• Sign up for the AAW Forum Pre-Holiday Swap by Monday, November 4th (click here for details)
  • Congratulations to Nino G. Cocchiarella for "Woven Seat Stool" being selected as Turning of the Week for October 28, 2024 (click here for details)
  • Welcome new registering member. Your username must be your real First and Last name (for example: John Doe). "Screen names" and "handles" are not allowed and your registration will be deleted if you don't use your real name. Also, do not use all caps nor all lower case.

Starting a big log for large dia hollow-form

Joined
Apr 11, 2014
Messages
456
Likes
451
Location
Dallas, TX
Almost 25-years ago I got mesmerized on Moulthrop's work and redirected without looking back. If you check out Ed's, Philip's, and Chris' work, you'll note that all are "big" - they have "presence". I think all will agree that a 5" diameter and a 20-" diameter, with the same design, out of the same log, and with the same finish, are very different: one is cute and the other commands attention. The problem is, big turnings come from big (and heavy) logs, take a big lathe and can hurt real bad if you screw-up.
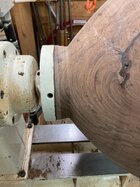
  • All logs start between centers with 1.5" four-prong spur and live-center. After determining the axis, I drill a shallow 1.5" hole, with a forstner, about 1/4' deep for the drive, and a shallow 9/16" forstner hole for the live-center, assuming Oneway live-center. Keep both shallow - you may have to adjust the axis
  • Raise up with your chain-hoist - a one-ton from Harbor Frt costs around $60 - a barn-door track and car from Grainger are about $40 - I ran out of neighbors willing to help mount a 200-lb+++ log a long time ago. Adjusting the axis becomes no big deal and reversing on the lathe is easy
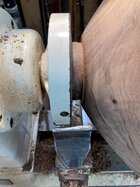
  • Snug it up and go. The live-center end will be the tenon for faceplate
  • Turn the outside to final design - no returning to fix it later
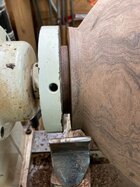
  • Cut the tenon same dia as your faceplate - my faceplates are 6" Oneway. Make the tenon surface "aero-space flat" or a teeny bit concave. Next step is to precision drill: I use #14 SS oval-head sheet metal, 1.25" for inside holes, 1" for outside holes (tips ground off). I found marking with "hinge-drills" to be invaluable when drilling 18-holes. Then drill holes with 11/64" bit with a depth stop set to the screw extension. The #14 screws and hole count assume the 6" Oneway faceplate
  • Mount on the head-stock and secure with live-center for final rounding/balancing. Then remove tail-stock and start hollowing. You shouldn't need a steady-rest - with screws properly hand-torqued, it ain't going anywhere.
  • After hollowing to maybe 1" thick (to allow for warpage) you're ready to dry. Boiling in a large pot for about 2-hours minimizes cracking and speeds final drying - allow 8-mos to a year for drying
After reading the above I have to wonder: Is there anybody out there stupid enough to do all this? Am I that stupid to do all that? Jury is out.
 
Joined
Feb 18, 2023
Messages
948
Likes
2,389
Location
Orange, CA
I own a Moulthrop piece from all three generations—who is Chris? Did you mean Matt?

You say the exterior cannot be refined after turning it around on the tenon/faceplate. Why?

Last, why use such short screws in the faceplate? Longer makes more sense, no? Do you use the faceplate instead of just a tenon?
 

Randy Anderson

Beta Tester
Beta Tester
Joined
May 25, 2019
Messages
908
Likes
1,392
Location
Eads, TN
Website
www.etsy.com
I've got a 150lb+ piece of walnut out back that I'm getting ready to hoist up onto my new "big boy" lathe as you call it. I wouldn't call it stupid - it's doing things many won't. As the principal at my kids school used to say all the time - strive to do hard things others won't do.

I'll be doing a session/demo at the local woodworking shop this coming Saturday on the unique steps for deep hollowing. Maybe there will be one in the audience that's willing to take a shot at it.
 
Joined
Apr 11, 2014
Messages
456
Likes
451
Location
Dallas, TX
Did mean Matt - guess I'm getting old

I've found that taking the wet log to final shape makes the envisioned shape more attainable when re-rounding after the inevitable warpage. Especially with walnut, assuming the end-grain runs from 3 to 9 and the side grain is noon to 6, the difference in thickness can be almost an inch on a 20" piece. Just re-rounding to the original shape can leave you with potential thin spots - changing the design can be a problem. I love walnut root-ball and that stuff is really whacky .

Regarding the screw length, I've gotten very comfortable with six long screws, 1.25". in the six center holes and 1" (tips ground) in the twelve outer screws. Reason is: no way do I want a 6" base on one of my hollow- even the ones >20" dia.
When the piece is rounded, shaped, and sanded to maybe 220 and, to my thinking, perfect, I then remove the outer screws on the faceplate and "dive under" - the side is curved to intersect the bottom annular ring and the tenon is 3.5". At that time the piece is removed from the lathe, removed from the faceplate, and a 1/2" galvanized floor flange / 10" nipple is attached to the tenon for the finishing process.
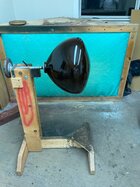
I go through the barrier/sealer applications until the piece is perfect. Then it goes on the Kelton mandrel for tenon removal / concave bottom cutting. Then, when the sealer is sanded to 220 and perfect, do I put it on the "umbrella fixture" and shoot a very high-end auto clearcoat. A couple of day later I knock off the orange peel with paper-backed 800. hand-sand to 3000 and then buff with wool and foam buffs.
After that, to the gallery it goes.
 
Joined
Feb 18, 2023
Messages
948
Likes
2,389
Location
Orange, CA
Did mean Matt - guess I'm getting old

I've found that taking the wet log to final shape makes the envisioned shape more attainable when re-rounding after the inevitable warpage. Especially with walnut, assuming the end-grain runs from 3 to 9 and the side grain is noon to 6, the difference in thickness can be almost an inch on a 20" piece. Just re-rounding to the original shape can leave you with potential thin spots - changing the design can be a problem. I love walnut root-ball and that stuff is really whacky .

Regarding the screw length, I've gotten very comfortable with six long screws, 1.25". in the six center holes and 1" (tips ground) in the twelve outer screws. Reason is: no way do I want a 6" base on one of my hollow- even the ones >20" dia.
When the piece is rounded, shaped, and sanded to maybe 220 and, to my thinking, perfect, I then remove the outer screws on the faceplate and "dive under" - the side is curved to intersect the bottom annular ring and the tenon is 3.5". At that time the piece is removed from the lathe, removed from the faceplate, and a 1/2" galvanized floor flange / 10" nipple is attached to the tenon for the finishing process.
I go through the barrier/sealer applications until the piece is perfect. Then it goes on the Kelton mandrel for tenon removal / concave bottom cutting. Then, when the sealer is sanded to 220 and perfect, do I put it on the "umbrella fixture" and shoot a very high-end auto clearcoat. A couple of day later I knock off the orange peel with paper-backed 800. hand-sand to 3000 and then buff with wool and foam buffs.
After that, to the gallery it goes.
I understood none of that since I’m new at this. Would have to see a video or in person though you explained it well.
 
Joined
Jan 8, 2021
Messages
332
Likes
449
Location
Wrentham, MA
Quite impressive description of the process, John. I'd love to see the operation done, as the scale dwarfs anything I've yet worked, and I'm sure there is a lot to learn and apply towards smaller vessels. LOL @ 'run out of neighbors'
 
Joined
Oct 15, 2015
Messages
204
Likes
469
Location
Smithville, MO
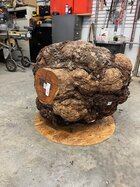
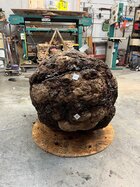
I'm glad John posted. This could be a good discussion platform for turners contemplating turning a big hollow form. John is a master of big beautiful hollow forms and the steps he goes thru to achieve a beautiful finish are second to none. He was nice enough to have a long discussion with me about a big cherry burl I have (640lbs) that I'm considering doing a single hollow form out of. It's been on the back burner since we talked but last week I brought it inside and began mapping it to see what would work. John puts his turnings between centers as he mentioned above. That is a tried and true method for hollow forms because it gives you the option of changing the axis slightly so you balance your cuts and don't remove a bunch of wood on one side while you are trying to reach the other. His methods with his face plates are done so that he sacrifices very little of the burl to finish the bottom. The shortest screws possible and the outside ones even shorter so that he can undercut them in the final shaping.
In my case I will be attaching directly to a faceplate without using a tail stock for support. The orientation of the plate will be difficult to get right because 5% difference on one end changes the other side dramatically. My burl is not going to make a perfect sphere because there would be too many big open voids or I'd have to remove way too much of the beautiful burl figure. So, I'm trying to determine what shape I needs to be and map out how the voids would be so that I can determine that there is enough wood to hold the thing together.
For starters, I identified different places on the burl so that I'd have some reference points I could plot on paper. I took a 36" square piece of plywood and cut a 31.5" hole out of the center. I use that outside rim to slide over the form to be able to see what protrusion would have to be removed and get an idea of where the plate would mount. If I had a hula hoop the right size I would have used that. I'm just beginning to fool with it now.
Its a big beautiful burl and the smartest thing would be to cut it up and get lots of smaller projects out of it. But, the idea of one large hollow form is appealing and it's an itch I'm gonna scratch it until I figure out what to do. John was doing a good sales job to encourage me to keep it as one turning.ab.jpgabb.jpg
Anyway it is a fun mental process and once again I'm glad John started this thread so we can have an open discussion.
 
Joined
Nov 15, 2020
Messages
568
Likes
442
Location
Huntington, VT
John, what is the maximum size where you feel comfortable w/o a steady rest? Also, do you incorporate the deeper central faceplate screw holes in the base of the piece and plug or otherwise obscure them? And does the boiling reduce warpage or just cracking?

Thanks for sharing your experience with these large pieces. You certainly are a master at that sort of work, Large scale does lend a certain presence to a given form.

Don, that is an imposing and likely looking burl! How will you orient the pith in your finished piece, and how do you plan to deal with the associated checking? And what sort of lathe are you going to spin that monster on? Does it weigh more than the burl?

The largest hollow forms I have done are about 13" d. x 9"h. and 9"d. x 16"h. I have found my two-wheel Oneway steady to be helpful in reducing chatter on pieces that size, though not absolutely necessary with a good faceplate mount and sensible hollowing technique.. The next time I turn a largish piece with voids I will probably add a temporary plywood belt for the steady wheels to ride on. The greater the overhang the more stress on the whole system, so anyone contemplating really large work should probably work up to it gradually.
 
Last edited:

Randy Anderson

Beta Tester
Beta Tester
Joined
May 25, 2019
Messages
908
Likes
1,392
Location
Eads, TN
Website
www.etsy.com
Don, that is certainly an impressive piece and one worth taking the time and effort to keep as a single piece. Keep us updated on your progress. I have a monster walnut root ball out back I'd like to tackle as a whole vs cutting it up so you'll help motivate me. I've done quite a few very large log blanks but not a burl or root ball that size - a different animal for sure.

I've spent a lot of time with John over the past couple of years learning the process for deep/big hollowing. He's willing to share all he knows, checks up on progress from time to time and provide encouragement along the way. Almost all of my steps, equipment and routines I got from John. There isn't much online or in video form on how and I would have likely given up or hurt myself without his help. Hundreds of YouTube videos on how to make a bowl or a small vase but almost none on deep hollowing that provide helpful info through the entire process.
 
Joined
Sep 19, 2023
Messages
830
Likes
1,536
Location
Columbia, TN
I'm glad John posted. This could be a good discussion platform for turners contemplating turning a big hollow form. John is a master of big beautiful hollow forms and the steps he goes thru to achieve a beautiful finish are second to none. He was nice enough to have a long discussion with me about a big cherry burl I have (640lbs) that I'm considering doing a single hollow form out of. It's been on the back burner since we talked but last week I brought it inside and began mapping it to see what would work. John puts his turnings between centers as he mentioned above. That is a tried and true method for hollow forms because it gives you the option of changing the axis slightly so you balance your cuts and don't remove a bunch of wood on one side while you are trying to reach the other. His methods with his face plates are done so that he sacrifices very little of the burl to finish the bottom. The shortest screws possible and the outside ones even shorter so that he can undercut them in the final shaping.
In my case I will be attaching directly to a faceplate without using a tail stock for support. The orientation of the plate will be difficult to get right because 5% difference on one end changes the other side dramatically. My burl is not going to make a perfect sphere because there would be too many big open voids or I'd have to remove way too much of the beautiful burl figure. So, I'm trying to determine what shape I needs to be and map out how the voids would be so that I can determine that there is enough wood to hold the thing together.
For starters, I identified different places on the burl so that I'd have some reference points I could plot on paper. I took a 36" square piece of plywood and cut a 31.5" hole out of the center. I use that outside rim to slide over the form to be able to see what protrusion would have to be removed and get an idea of where the plate would mount. If I had a hula hoop the right size I would have used that. I'm just beginning to fool with it now.
Its a big beautiful burl and the smartest thing would be to cut it up and get lots of smaller projects out of it. But, the idea of one large hollow form is appealing and it's an itch I'm gonna scratch it until I figure out what to do. John was doing a good sales job to encourage me to keep it as one turning.View attachment 68300View attachment 68301
Anyway it is a fun mental process and once again I'm glad John started this thread so we can have an open discussion.

Please consider giving us a ride-along in the Projects forum.
 
Joined
Jan 24, 2022
Messages
259
Likes
350
Location
Bainbridge Island, WA
Great thread. Keep it going. I roughed out a 200lb piece of elm burl last week. Put it between centers to start with and formed a 5" tenon on the bottom. Roughed out the form is about 14" diameter and about 20" deep. I usually use the tenon in a chuck with a steady rest. Maybe I should try the faceplate technique next time. Larger pieces seem to captivate my interest, at least for the present.
 
Joined
Apr 11, 2014
Messages
456
Likes
451
Location
Dallas, TX
faceplate without using a tail stock for support
That scares me - best to start between centers - seems like you mentioned having a VB36, right?
The plywood/hole is a great approach - it will help you to avoid "peninsulas"
Guessing that you intend for the axis to be in the main limb running along the center, the faceplate screws will be in end-grain - not optimum. It may be a chuck would be best "as long as" the log is supported at the other end - cantilevering a 600-lb+ log ain't happening. On Planet Mesquite I had to cut a little ledge and glue a collar for the wheels on the steady rest - instead of the normal bottom arm on the steady, I used threaded rods from 1.25" stock with harder wheels on the bottom arms - with big nuts, I was able to position the log to be precisely on center.

Judging from your pics, you've got a well lit shop that's ideal for a step-by-step

The attached PDF has several images - hopefully you can access

Call when convenient to you.
John
 

Attachments

  • PLANET MESQUITE - PPT compressed 2.pdf
    502.4 KB · Views: 3
Joined
Apr 11, 2014
Messages
456
Likes
451
Location
Dallas, TX
Great thread. Keep it going. I roughed out a 200lb piece of elm burl last week. Put it between centers to start with and formed a 5" tenon on the bottom. Roughed out the form is about 14" diameter and about 20" deep. I usually use the tenon in a chuck with a steady rest. Maybe I should try the faceplate technique next time. Larger pieces seem to captivate my interest, at least for the present.
Darryn,
  • I use a faceplate on face-grain (radial) pieces - the diameter is always greater than the depth
  • I use chuck and steady-rest on a tall piece like you did - looking forward to seeing a pic
John
 
Back
Top