This is pretty long, but here's how I sharpen my band saw blades.
I tried a lot of different methods before settling on my current method. I started with sharpening the blade on the saw with my old Craftsman 12-inch saw back in 1994. I've also tried touching the top of each tooth to a grinding wheel as described by Richard Raffan in his book Turned-Bowl Design. The problem that I had with grinding the top of each tooth, either on the saw or off, was getting a consistent amount of metal removal. Practice would have improved my results but...
I sharpen my own hand saws and one thing I learned is that uniform teeth are essential to good saw performance. So hand sharpening the band saw blade was a logical step for me. I "lost" a few blades in the learning process, but what the heck, they were on the way to the trash can anyway.
One thing that is very important is a consistent and light touch, especially when grinding the gullets. My current re-saw blade (in the pictures below) has been sharpened about 70 times and the teeth have been set three times. It still works "like new", but it's just about at the end of its useful life. I do have a new blade on the shelf, ready to step in when this one finally dies.
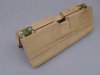
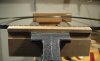
First, I remove the blade from the band saw to sharpen it. Sharpening the blade on the saw is too awkward for me and it's too hard to get a consistent angle and amount of metal removal. I use a 10-inch wide traditional-style saw sharpening vise for my bench vise. I'll provide a description and some pictures in the next message. The wide vise lets me work on a lot of teeth before I have to shift the blade - a real time-saver. A couple of blocks of wood at the back of the bench support the other side of the blade to keep it from twisting and getting bent. (Picture 1)
Basic sharpening:
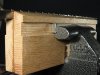
I put the blade in the vise with a little bit of the blade below the gullet exposed, maybe a 1/16". I start with the weld at the right end of the vise. The weld is an easy and convenient marker for when I've reached the end. I always sharpen the top of the teeth with a fine diamond hone, 3-5 light back and forth strokes, depending on how new the hone is and how dull the blade is. (Picture 2) The objective is to have the shiny area reach all the way to the tip of the tooth. Do the same number of strokes on each tooth. I like the EZE-Lap fine (red) hones because the entire surface is covered with diamond. They continue to work well even after the diamond abrasive has been knocked down. I probably get thirty or forty sharpenings from one hone.
I originally tried to match the original angles on the teeth, but was prone to mess up occasionally. I eventually changed to sharpening all the teeth flat across - quicker, no mess-ups and the blade seemed to cut just as good if not better. Maybe there's a reason rip blades are sharpened straight across.
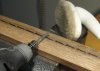
I sharpen the gullets only if I'm cutting a soft and/or stringy wood - aspen, butternut, American elm, etc. The harder woods (cherry and above) don't seem to need it, but the soft woods clog the gullets and the debris doesn't clear if the gullet edges aren't sharp. I use a 5/32" chain saw stone in the Dremel to sharpen the gullets. Just one light back and forth stroke straight across the blade. (Picture 3) The real challenge here is to maintain a slight hook and not deepen it. Grinding too deep makes the blade too aggressive and it may pull itself forward into the wood. The gullets on the blade in the picture are ground a little too deep. It's OK in a soft wood like aspen, but it likes to grab in oak.
I tried using a diamond burr for sharpening the gullets, but the diamond seemed to wear/break off rather quickly and then created big burrs on either side of the gullet -- not exactly the desired result. I tried using a chain saw file once - ended up with a very dull file. I haven't tried using a tungsten carbide cutter. I've got one, but it's not cheap and the chain saw stones seem to work just fine. (And they are a lot cheaper!)
Finally, I brush the filings and sawdust off the blade with an old finger-nail brush "requisitioned" from the kitchen. (Background in Picture 3) Then I shift the blade to the right and do the next batch of teeth. (Since the teeth are facing left, rotating to the right minimizes the chance that the blade will snag something else on the bench.)
It takes a little practice, but I can normally do a blade in about 11 minutes. Then I pop the blade back into the saw, set the tension and saw. I check the blade guides just to be sure, but since the saw was already set up for that exact blade, I save a couple of more minutes there.
About every other time I twist the blade inside out to remove any angle biases I might be putting on the blade. It also lets me check on how square I'm holding the hone and Dremel tool.
Setting the teeth:
I'm still working on my technique for this. The big problem is the teeth are so hard that it is really easy to break them off. I didn't break any teeth the last two times, so maybe I've got a handle on it. I usually set the teeth when the kerf seems to be getting a little narrow - maybe every 20th time.
I use a standard saw set that I probably bought it from Garrett-Wade twenty years ago. Putting too much set on the teeth will break them, especially on the expensive blades with the high alloy teeth. The 8 tpi setting on the saw set seems to be the largest set I can do without breaking teeth. I can do a larger set (kerf) with plain carbon-steel blades, but they don't last long enough to be worth the cost savings.
I lay the blade on top of the table saw (only large clear surface in the shop) with a little hanging over the edge to work on and pull up a stool. I set all of the left (inside facing) teeth (every third tooth on my blades), then turn the blade inside out and set the right (now inside) teeth. Turn the blade back right-side out it's ready to be sharpened. Again, I find it convenient to work from the weld around to the weld.
My Re-Saw Blade:
I have a 14-inch Delta with riser blocks. For re-sawing I use a 5/8" - 3 tpi hook tooth blade (Olson from Woodcraft). I've tried other blades, but this is the one that works best for me. The blade has a three-tooth pattern, Left-Right-Center. The first thing I do is remove every other tooth using a mandrel-mounted grinding wheel (1" dia x 1/4" thick) on the Dremel. I start with the first tooth above the weld and work my way around the blade until I get back to the weld. If the blade has an odd number of teeth, the two-tooth gap spans the weld, which is convenient when I sharpen the blade. That makes it a 1.5 tpi blade with a L-C-R pattern. The blade cuts at least twice as fast because there is more room to clear the sawdust. It also seems to cut twice as long before it needs sharpening.
Hope this is helpful -- Brian
I tried a lot of different methods before settling on my current method. I started with sharpening the blade on the saw with my old Craftsman 12-inch saw back in 1994. I've also tried touching the top of each tooth to a grinding wheel as described by Richard Raffan in his book Turned-Bowl Design. The problem that I had with grinding the top of each tooth, either on the saw or off, was getting a consistent amount of metal removal. Practice would have improved my results but...
I sharpen my own hand saws and one thing I learned is that uniform teeth are essential to good saw performance. So hand sharpening the band saw blade was a logical step for me. I "lost" a few blades in the learning process, but what the heck, they were on the way to the trash can anyway.
One thing that is very important is a consistent and light touch, especially when grinding the gullets. My current re-saw blade (in the pictures below) has been sharpened about 70 times and the teeth have been set three times. It still works "like new", but it's just about at the end of its useful life. I do have a new blade on the shelf, ready to step in when this one finally dies.
First, I remove the blade from the band saw to sharpen it. Sharpening the blade on the saw is too awkward for me and it's too hard to get a consistent angle and amount of metal removal. I use a 10-inch wide traditional-style saw sharpening vise for my bench vise. I'll provide a description and some pictures in the next message. The wide vise lets me work on a lot of teeth before I have to shift the blade - a real time-saver. A couple of blocks of wood at the back of the bench support the other side of the blade to keep it from twisting and getting bent. (Picture 1)
Basic sharpening:
I put the blade in the vise with a little bit of the blade below the gullet exposed, maybe a 1/16". I start with the weld at the right end of the vise. The weld is an easy and convenient marker for when I've reached the end. I always sharpen the top of the teeth with a fine diamond hone, 3-5 light back and forth strokes, depending on how new the hone is and how dull the blade is. (Picture 2) The objective is to have the shiny area reach all the way to the tip of the tooth. Do the same number of strokes on each tooth. I like the EZE-Lap fine (red) hones because the entire surface is covered with diamond. They continue to work well even after the diamond abrasive has been knocked down. I probably get thirty or forty sharpenings from one hone.
I originally tried to match the original angles on the teeth, but was prone to mess up occasionally. I eventually changed to sharpening all the teeth flat across - quicker, no mess-ups and the blade seemed to cut just as good if not better. Maybe there's a reason rip blades are sharpened straight across.
I sharpen the gullets only if I'm cutting a soft and/or stringy wood - aspen, butternut, American elm, etc. The harder woods (cherry and above) don't seem to need it, but the soft woods clog the gullets and the debris doesn't clear if the gullet edges aren't sharp. I use a 5/32" chain saw stone in the Dremel to sharpen the gullets. Just one light back and forth stroke straight across the blade. (Picture 3) The real challenge here is to maintain a slight hook and not deepen it. Grinding too deep makes the blade too aggressive and it may pull itself forward into the wood. The gullets on the blade in the picture are ground a little too deep. It's OK in a soft wood like aspen, but it likes to grab in oak.
I tried using a diamond burr for sharpening the gullets, but the diamond seemed to wear/break off rather quickly and then created big burrs on either side of the gullet -- not exactly the desired result. I tried using a chain saw file once - ended up with a very dull file. I haven't tried using a tungsten carbide cutter. I've got one, but it's not cheap and the chain saw stones seem to work just fine. (And they are a lot cheaper!)
Finally, I brush the filings and sawdust off the blade with an old finger-nail brush "requisitioned" from the kitchen. (Background in Picture 3) Then I shift the blade to the right and do the next batch of teeth. (Since the teeth are facing left, rotating to the right minimizes the chance that the blade will snag something else on the bench.)
It takes a little practice, but I can normally do a blade in about 11 minutes. Then I pop the blade back into the saw, set the tension and saw. I check the blade guides just to be sure, but since the saw was already set up for that exact blade, I save a couple of more minutes there.
About every other time I twist the blade inside out to remove any angle biases I might be putting on the blade. It also lets me check on how square I'm holding the hone and Dremel tool.
Setting the teeth:
I'm still working on my technique for this. The big problem is the teeth are so hard that it is really easy to break them off. I didn't break any teeth the last two times, so maybe I've got a handle on it. I usually set the teeth when the kerf seems to be getting a little narrow - maybe every 20th time.
I use a standard saw set that I probably bought it from Garrett-Wade twenty years ago. Putting too much set on the teeth will break them, especially on the expensive blades with the high alloy teeth. The 8 tpi setting on the saw set seems to be the largest set I can do without breaking teeth. I can do a larger set (kerf) with plain carbon-steel blades, but they don't last long enough to be worth the cost savings.
I lay the blade on top of the table saw (only large clear surface in the shop) with a little hanging over the edge to work on and pull up a stool. I set all of the left (inside facing) teeth (every third tooth on my blades), then turn the blade inside out and set the right (now inside) teeth. Turn the blade back right-side out it's ready to be sharpened. Again, I find it convenient to work from the weld around to the weld.
My Re-Saw Blade:
I have a 14-inch Delta with riser blocks. For re-sawing I use a 5/8" - 3 tpi hook tooth blade (Olson from Woodcraft). I've tried other blades, but this is the one that works best for me. The blade has a three-tooth pattern, Left-Right-Center. The first thing I do is remove every other tooth using a mandrel-mounted grinding wheel (1" dia x 1/4" thick) on the Dremel. I start with the first tooth above the weld and work my way around the blade until I get back to the weld. If the blade has an odd number of teeth, the two-tooth gap spans the weld, which is convenient when I sharpen the blade. That makes it a 1.5 tpi blade with a L-C-R pattern. The blade cuts at least twice as fast because there is more room to clear the sawdust. It also seems to cut twice as long before it needs sharpening.
Hope this is helpful -- Brian
Attachments

Last edited: