I have recently been trying to get into sandblasting it have been confused about what to get. I was think about getting the central pneumatic 30 lb blast cabinet and was wondering if that would be a good purchase. I also was confused and what grit sand to buy. Lastly I was wondering if a 150 gallon 2.6 scum 6 gallon air compressor will be enough to power the sandblasting unit. Thank you very much, Sebastian Montagano.

-
April 2025 Turning Challenge: Turn an Egg! (click here for details) -
Congratulations to Kelly Shaw winner of the March 2025 Turning Challenge (click here for details) -
Congratulations to Ellen Starr for "Lotus Temple" being selected as Turning of the Week for 21 April, 2025 (click here for details) -
Welcome new registering member. Your username must be your real First and Last name (for example: John Doe). "Screen names" and "handles" are not allowed and your registration will be deleted if you don't use your real name. Also, do not use all caps nor all lower case.
You are using an out of date browser. It may not display this or other websites correctly.
You should upgrade or use an alternative browser.
You should upgrade or use an alternative browser.
Sandblasting
- Thread starter Sebastian Montagano
- Start date
My experience was with one of the abrasive blasters that looks like an oversized lp grill tank and I had a 60 gallon 220v Sanborn compressor that put out quite a bit of cfm but I still wasn't happy with the results.
One of the big problems I had was water. If I were to try sandblasting again I'd invest in a good air dryer system. Because the sand wouldn't flow well once water got into the system. I was using this for blasting rust off a car frame though so maybe a cabinet would be different.
I have since used just a small hand held reservoir sandblaster and had mixed results with it. Same problem. Water.
- Joined
- Apr 27, 2004
- Messages
- 9,156
- Likes
- 5,760
- Location
- Lakeland, Florida
- Website
- www.hockenberywoodturning.com
There was a thread on this recently I’ll try to find it.
In the interim
Most any cabinet will work for wood.
I use coarse ground glass
A small compressor will get you started. I use a 27 gallon in demos and used for my work until I was convinced I wanted to do more blasting and got a 60 gallon Quincy.
With the small compressor you blast for 1 or 2 minutes then you wait 1-3 minutes for the compressor to fill the tank then repeat.
Depending on duty cycle you may need to take a longer break after 3-5 refill.
With the 60 gallon in every have to stop. It refills while I’m blasting and is off more than on.
You will see water filters in the plumbing diagram in the notes.
I wrote an article for the December 2016 AAW journal on sandcarving. It has a lot of info on media etc.
These are slides I’ve used in symposium demos.
- Joined
- Apr 27, 2004
- Messages
- 9,156
- Likes
- 5,760
- Location
- Lakeland, Florida
- Website
- www.hockenberywoodturning.com
Please ask any questions you have
Two threads in the recent past had a lot of info
 www.aawforum.org
www.aawforum.org
www.aawforum.org
Two threads in the recent past had a lot of info
beginning sand blasting
I am interested in trying some sandblasting. I have a newish Husky 20 gal compressor, 4 cfm @90 psi, 165 max pressure. Can I use this for blasting? Recommended equipment? How long would it take to blast a basic cereal bowl, just for general reference? Thanks, all.
Sand blasting turnings?
What’s the best wood for sandblasting? I have access to mostly cherry, maple and some oak( red and white). Thanks
That is not nearly enough compressor. Size your compressor so that it can hold the pressure you want with the end of a hose kept wide open. That is what sandblasting is like. A 6 gallon compressor will last less than 5 minutes.
My compressor is powered by a 3hp motor setting on top of an 80 gal. tank. It will barely maintain 80 psi with a 3/8 diameter hose blowing wide open. I understand that most smaller blastered use a 3/8 or 1/4 gun or nozzle.
I have attempted to use the siphon feed system, but found it did not perform to my expectations.
I know of one commerical blaster that now uses playground sand purchased in 1000 lb. totes.
Be aware there is risk of silica exposure when using sand.
I have attempted to use the siphon feed system, but found it did not perform to my expectations.
I know of one commerical blaster that now uses playground sand purchased in 1000 lb. totes.
Be aware there is risk of silica exposure when using sand.
Thank you so much for your guys input it was very helpful but I was wondering if you could use two air compressors as I have tow slightly smaller ones. Is this possible so I can get a longer blast time thank you very much, Sebastian Montagano.
I'm currently trying to tune my sandblasting rig to get more blasting time before my new compressor (Quincy 2hp 27 gallon 7.5cfm) kicks on. The best I've gotten so far is a little over a minute of blasting with the smallest gun nozzle opening (3/32"), then 2 minutes while the compressor gets back to pressure. This is with an additional 30 gallon tank from my old compressor in line. I started with a used large HF 40 lb cabinet, did the recommended upgrades to convert it to gravity feed with a metering valve, still not there. Tried a better siphon type gun, gave up on that and bought a HF 20lb pressure pot, did some upgrades to it. It's better, but still aggravating. It's blasting really well, but my time before the compressor kicks on is about 30 seconds. I'm currently playing with different pressures, etc., but the compressor can't keep up. I've learned a lot about pneumatic systems, like, start with the highest capacity compressor you can afford, then choose a better one, cuz if you don't have enough cfm's, nothing is going to work as well as you'd hoped. People aren't kidding when they say that blasting is like having an open end on the hose. If the compressor can't maintain pressure while blowing hard as it can, your blasting time will be very limited. You can do it with less, but you'd better be really patient. Focus on compressor cfm capacity first. Get more than you think you'll need, then worry about the rest of the system.
I should add that based on my recent experience, don't bother with cheap media. I bought a 20lb box of course ground glass from Amazon, and while it was nice that it was made from recycled bottles, it was fairly inconsistent and tended to plug up the nozzle with chunks that were larger. As soon as I switched to the Potters Industries Ballotini G3 media the clogging problems went away. I bought it on ebay for $61 for 50 lbs, with free shipping.
Al, do you know of any sheet stock suppliers for the #T226 resist? All I have been able to find are 10 yard roles.There was a thread on this recently I’ll try to find it.
In the interim
Most any cabinet will work for wood.
I use coarse ground glass
A small compressor will get you started. I use a 27 gallon in demos and used for my work until I was convinced I wanted to do more blasting and got a 60 gallon Quincy.
With the small compressor you blast for 1 or 2 minutes then you wait 1-3 minutes for the compressor to fill the tank then repeat.
Depending on duty cycle you may need to take a longer break after 3-5 refill.
With the 60 gallon in every have to stop. It refills while I’m blasting and is off more than on.
You will see water filters in the plumbing diagram in the notes.
I wrote an article for the December 2016 AAW journal on sandcarving. It has a lot of info on media etc.
These are slides I’ve used in symposium demos.
- Joined
- Apr 27, 2004
- Messages
- 9,156
- Likes
- 5,760
- Location
- Lakeland, Florida
- Website
- www.hockenberywoodturning.com
Al, do you know of any sheet stock suppliers for the #T226 resist? All I have been able to find are 10 yard roles.
Trent Bosch sells 15” widths by the foot.
Sandblast Resist Material – Trent Bosch Tools
 trentboschtools.com
Uscutter has it in 10yd rolls too.
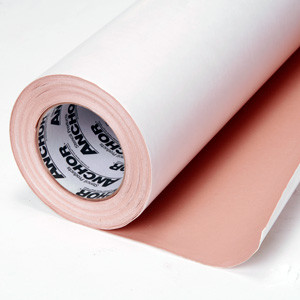
Anchor BlastLite Sandblast Stencil #T226, 22 mil, Wood & HDU, High Tack
Sandblast stencil material to be cut by vinyl cutter with high tack adhesive for use on raw wood, unprimed HDU, brick or unglazed tile.
 uscutter.com
Mr Hockenbery. I would like to color the parts under the blast but have the rest natural wood. How would you go about that? Try to color after the resist removed ?
- Joined
- Apr 27, 2004
- Messages
- 9,156
- Likes
- 5,760
- Location
- Lakeland, Florida
- Website
- www.hockenberywoodturning.com
I usually color, put the resist on, blast, color the background, remove the resist.Mr Hockenbery. I would like to color the parts under the blast but have the rest natural wood. How would you go about that? Try to color after the resist removed ?
This gives crisp edges to the color under the resist. Also lets you use dyes to color.
You can do some coloring after removing the resist. The prisma pens are good for this.
It’s generally harder and more tedious. Run the risk of coloring over the edge
What I do is color before blasting. Then color the background, the remove the resist.
This piece I used a little planing. Using masking tape I painted the red flower and hummingbird throat.
Put on the resist for those. More masking tape paint the humming bird put on the resist.
Put resist on the rim.
Paint the rest green put on the resist.
This makes the blasting easy when the green is gone stop blasting. Inspect and blast any green I miss
Paint with yellow and a bit of transparent red.
Remove the resist.

In the demo slides I have a picture sequence of the process for frogs on a hollowform
Last edited:
ThanksI usually color, put the resist on, blast, color the background, remove the resist.
This gives crisp edges to the color under the resist. Also lets you use dyes to color.
You can do some coloring after removing the resist. The prisma pens are good for this.
It’s generally harder and more tedious. Run the risk of coloring over the edge
What I do is color before blasting. Then color the background, the remove the resist.
This piece I used a little planing. Using masking tape I painted the red flower and hummingbird throat.
Put on the resist for those. More masking tape paint the humming bird put on the resist.
Put resist on the rim.
Paint the rest green put on the resist.
This makes the blasting easy when the green is gone stop blasting. Inspect and blast any green I miss
Paint with yellow and a bit of transparent red.
Remove the resist.
View attachment 56041
In the demo slides I have a picture sequence of the process for frogs on a hollowform