• It's time to cast your vote in the March 2025 Turning Challenge. (click here for details)
  • Congratulations to Steve Bonny for "Rhonda and Fisherman"being selected as Turning of the Week for March 31st, 202 (click here for details)
  • Welcome new registering member. Your username must be your real First and Last name (for example: John Doe). "Screen names" and "handles" are not allowed and your registration will be deleted if you don't use your real name. Also, do not use all caps nor all lower case.

Raffan's dust hood part 2, my version

Joined
Oct 25, 2020
Messages
740
Likes
666
Location
Minneapolis, MN
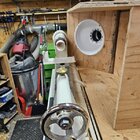
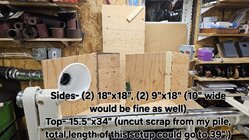
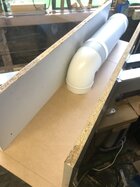
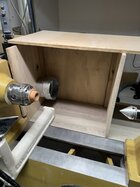
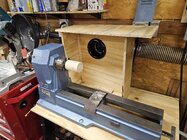
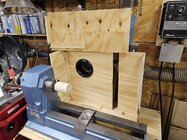
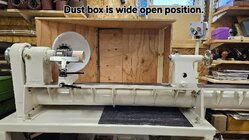
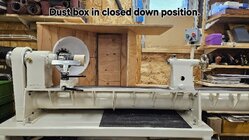
As I started in this thread (with 2 videos) https://www.aawforum.org/community/...dest-shop-with-dust-collection-details.23325/ which wandered and meandered with a lot of good information, here is the final result of my version of the Richard Raffan-inspired dust hood I built for my Oneway 1224.

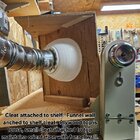
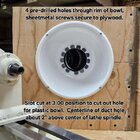
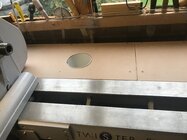
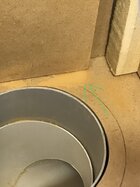
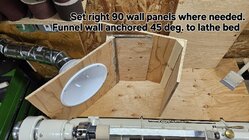
Raffan, nor Tomislav Tomasic in his video, had no plans to build it. It's easy to see that their setups are pretty casual in design, as is mine. Will my plastic bowl collect more effectively than Raffan's angle cut pipe? I don't know, but my bowl hood was my previous dust collector inlet, so I incorporated it. I built my dust box (or hood, or plenum) from dumpster salvaged 1/2" plywood, a $2 plastic kitchen bowl, and a few 4" duct fittings from the hardware store. Net cost, about $20. It's all just screwed together for easy future mods, if needed.

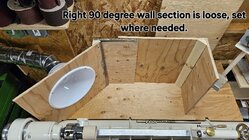
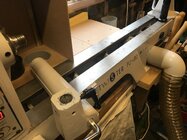
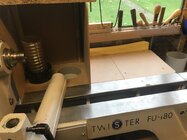
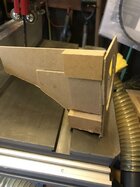
My shelf base is installed 3" below the lathe bed ways, and it comes to about 1/4" of the bed. The height of the dust box walls goes 3" above the top of the lathe swing (12" swing). So, the 4 dust box sides are 18" tall. Two 18"x18" panels, and two 9"x18" panels. That is what my scrap plywood gave me, otherwise I would have made 10" wide small panels rather than 9".

The 45 degree box panel pair (with the white bowl) is the only one attached to the bottom shelf. The 90 degree right panel pair is loose to be set wherever conditions require. My scrap plywood top could have been a few inches longer, but I think what I built will suffice for most of what I'll ever turn on this machine. I hope this inspires potentially better dust collection at your lathe, or at least a few minutes of entertainment.

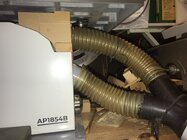
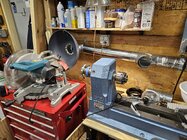
My dust collector in a 1hp 650cfm Jet 2-bag, with 2 upgraded (20 years ago) 5-micron felt bags which is downstream of a 30-gallon metal trash can with a "cyclone" separator lid to grab big stuff from going to the collector.

With my limited testing of the final product, I am very happy with the result. I'm convinced that containing the dust into the dust box as it comes off the sandpaper is more effective at controlling environmental dust than simply having a collector hose with some version of a hood right behind the spinning wood.
1000008009.jpg
1000008008.jpg
1000008006.jpg
1000008005.jpg

(To be continued...)
 
Last edited:
First look and I said the box is too open, then I saw how you can slide it closed. Good! I have thought, but not made a spindle hood that would be made from a long big cylinder/plumbing pipe, maybe 12 inch diameter with 2 hoses coming into the back. I did one where I used the sheet plastic stock (comes up to 12 foot long and 6 foot wide) and made cuts so it could go under the lathe bed and to help with chip containment, but it was far too open. Your version does condense my idea a bit. You may want some lighting inside this, and I would paint it white.

robo hippy
 
You may want some lighting inside this, and I would paint it white.

robo hippy

There is a 3' LED fixture on the ceiling directly overhead (for general lighting) that I needed to move toward me about 6" to get the light in a better position, and moving it made a difference. Then I have articulating lamps for task lighting that I need to re-install. But paint, yes, definitely needs paint on the interior of the enclosure walls.
 
I have been using Raffan's setup for about a month or so, made with the angled pipe, my pipe is 6" instead of 4", my base board is also about 3" below the ways, but is butted up tight to the lathe, it wil draw air from any gap you leave open, instead of from around what your sanding.
I found that covering the gap between the ways also helps to draw more air around what I am sanding, it seems to collect most if not all the dust.
It did take a little getting used to
 
I wonder if you could then just jam a 4" hose into the bowl and use that clean up on the bench and further down. If I build one of these I think I'll try that. Otherwise I see myself scooping hand fulls of shavings into the bowl.
 
I wonder if you could then just jam a 4" hose into the bowl and use that clean up on the bench and further down. If I build one of these I think I'll try that. Otherwise I see myself scooping hand fulls of shavings into the bowl.
My attitude toward my dust collection system is that I only want to collect stuff I can breathe, not use it for general shavings cleanup as well. My trash can separator is really for incidental non-dust that may get sucked in- flying shavings, sandpaper (come on! we've all sent a chunk of sandpaper down the collector hose once or twice, sounds terrible when it hit the impellor blades!), or whatever. My separator can is jammed in behind other stuff and not exactly convenient for easy emptying. If it can float in the air (dust), I want it captured by the dust collector (extractor for our friends on the east side of the Atlantic). If it's big and heavy, I'l sweep it up and get it into the trash bag.

But to answer your question, sure, another hose could be jammed into the bowl for general cleanup. For my system, I'd need to beef up the connection of the bowl walls to the bench for stability. And your accessory hose would need a crimped male fitting on the end to fit into the duct hole in the bowl, but it would work.
 
Last edited:
Inspired by this I revisited my system. Space is at a premium so up to now it’s been 2 1/2” with a posable hose and home made bell mouth. Mindful of the collective wisdom that 4” is better I set to based on the photos of others. Original design was to run the 4” pipe parallel and level with the lathe bed. However the tailstock handle and various other bits fouled it. So I fitted it below the “shelf” which is at the lathe bed height. Various bends and clips and the final outlet pipe fits under the bed extension by 1mm! The lathe is a midi size and sits on a workbench. The initial inlet is below the work -not ideal but the best available. Various height extensions in 4” and 2 1/2” slip into the inlet. No doubt other iterations will follow. I also modified the bandsaw extraction with various baffles to try to direct the (now) 2 x 2 1/2” suction. Before it was scaled back to 2 x 1 1/4”. Moving the main 4” flexi hose is a bit of a pain but a more built in system is not possible. 6D1D7001-5F37-40F2-A9EF-B709E2A78158.jpegD2E38DC3-73D0-4379-A9FB-6AB307F85C1F.jpeg31A04BCD-AA67-4481-92BE-92ECD740A42E.jpeg82D4DE62-2CE9-4A1F-804F-3CA309C1BBD8.jpeg
 
Michael, let us know how it works.
 
Early testing is very promising. As others have said it’s the enclosure that makes the difference. Previously anything that missed the bell mouth was in the atmosphere. The back “wall” of the enclosure catches this which falls downwards-most is sucked in -some forms a small pile. It helps that the enclosure is smooth MDF. Based on this I doubt if extensions to the inlet at the base will be necessary. I seldom do long spindle work. My simple interpretation is that the suction has to overcome the momentum of the dust particles which it mostly does: somewhat dependent on the angle of the dust “stream”. It’s the bits it misses that are the problem. Commercial “mouths” only collect what is pretty direct. The enclosure allows the scatterings to be collected. 46D3FFCB-44F5-460F-886D-2E542934F054.jpeg
 
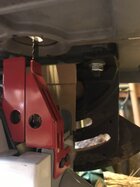
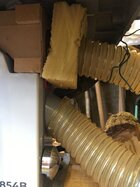
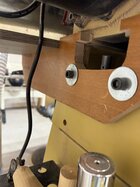
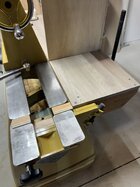
For anyone still interested!! The enclosure for the lathe is working very well. I can see the dust being collected and there’s far less in the air. The bandsaw is also a marked improvement though the “enclosure “ is pretty crude. The photo shows the “front” and the “outer side”. Made from scraps of 2mm MDF it is attached to the door edge with two small magnets. The inner side is in two pieces. One shaped to fit and a second panel on the outside of the tilting mechanism, again secured with magnets. Obviously no back or base. The sponge is a crude attempt to align the top flexible hose to the hole in the enclosure. Denser foam is on the way! As usual space is at a premium and the Y piece plus flexible hoses make secure attachment difficult. The Y piece is attached to the bench with bungee cord and the top flexible hose with wire to the bolt in the saw table. Not ideal but once “adjusted “ it works!9A829AAA-CC88-4C0D-B051-0A1DCEE9A75C.jpeg211CC3E7-7243-4583-8484-79ACCC6951AC.jpegB976A933-2030-43F4-8E11-822F8113EF7F.jpeg
 
This seems pretty obvious now it’s done, but took me a while to figure it out. My 3520 isn’t against a wall so I mounted a shelf to the lathe. The tail stock swing away still works, but I will need to make an extension handle for the headstock lock if I want to slide it.

Haven’t used it enough to decide if I like it or not. It does seem to get more dust, but also fills up with shavings that need to be swept out instead of just falling to the floor.

IMG_0391.jpegIMG_0389.jpegIMG_0390.jpeg
 
Hi Mike, yeah, shaving can collect there. My duct inlet is a bit higher than yours so shavings aren't getting sucked into the duct, but for shavings that pile up in the box, I just grab them by hand and toss them to the floor. I also have a small shop vac dedicated at the lathe for end-of-project/day cleanup, I'll use that for a final cleaning of me, the lathe area, and the dust box area. The fact that so much more airborne dust is being captured overcomes any side effects of my (our) efforts. Well done.
 
My box sits a couple inches lower than the bed ways, so I get a fighting chance at finishing the piece without banjo complication.
 
Okay, time to make a Raffan enclosure for my shortbed Vicmarc VL200 (16" x 16").

The lathe is from 2002, installed on a Craft Supplies in-house steel stand. Like I had previously to keep debris off the motor below, I've installed a sheet of 1/2" plywood between the lathe and stand, this time hanging it out behind about 12" to serve as a base for the dust hood system. The back wall is hole saw drilled for 4" steel duct and my previously unused 4" bell intake, and it also has the left side wall glued and screwed to it with the help of a piece of scrap wood in its corner. Same for the moveable right wall angle section which also lengthens and shortens the hood, keeping it as short as possible for the project at hand. Overall height, and the top clearance, are measured out to clear just a bit beyond the 8" swing of the lathe. Between this and the movable right wall, the opening into the dust enclosure can be chocked down (or expanded) to match the project. This keeps the greatest suction airflow coming right past the turning to draw the dust into the enclosure. And per my dark room and a pen light experiment, all the dust goes right down the duct and not outside of the enclosure. Success!

No blast gates on this end of the system. The ones I have lack proper male and female connections and I didn't want to fight them with steel duct. I'll turn some tapered wood plugs to fit in the holes when not in use.

Even my chop saw got a new hood. That's a 15" bowl shaped plastic bird feeder squirrel guard behind it, drilled out for the 4" duct. It needs fine tuning, and maybe some extra shroud cobbled in, but its working better than a shop vac stuck into its dust port.

20250310_195000.jpg

20250310_195048.jpg

20250310_194853.jpg
 
Last edited:
Back
Top