I could really use some help getting quality pictures because mine just aren't measuring up. I have been using a black background but I have trouble getting the lighting right and it's just not a quality job that shows off the piece to its fullest. I have noticed a lot of people using a gray gradient background. Does anyone have any suggestions on what to use without investing a ton of money?

-
March 2026 Turning Challenge: Olla! (click here for details) -
Congratulations to David Wyke, People's Choice in the February 2026 Turning Challenge (click here for details) -
Congratulations to Michael Nathal for "Eroded Wheel" being selected as Turning of the Week for March 23, 2026 (click here for details) -
Welcome new registering member. Your username must be your real First and Last name (for example: John Doe). "Screen names" and "handles" are not allowed and your registration will be deleted if you don't use your real name. Also, do not use all caps nor all lower case.
You are using an out of date browser. It may not display this or other websites correctly.
You should upgrade or use an alternative browser.
You should upgrade or use an alternative browser.
quality photos
- Thread starter Richard Avram
- Start date
john lucas
AAW Forum Expert
the background isn't the problem. It's usually exposure, focus and lighting color.. You'll have to post a photo so we can see what your doing and take better guesses as to what the problem is.
I photographed artwork professionally for 26 years and will be glad to try and help. Feel free to e-mail me if you don't want to post a photo here. johnclucas@charter.net
What I suggest is to shoot a picture. Then back up and take a photo of the whole set up so we can see what kind of lights your using and where they are placed and whatever else your using for your set up. Then give us a description of what all your doing as best you can. That will help us help you.
To answer your questions usually a black back ground makes it more difficult to get a good photo. In short your camera meter only knows gray which is sort of an average of all colors. When it sees black it tries to lighten the exposure to make the black gray. If you have a light colored bowl in the photo it often becomes too light. You didn't say what kind of lights your using but the type of lights have to match the white balance setting of your camera. If your using Auto White balance then the black is again a problem and gray might help.
- Joined
- Apr 27, 2004
- Messages
- 9,326
- Likes
- 6,140
- Location
- Lakeland, Florida
- Website
- www.hockenberywoodturning.com
Richard,
This is a problem that most of us, who don't have John's background, will have.
We are working on the PHOENIX Symposium.
There will be a panel presented - "let there be light" aimed how to light for photos and display.
Also there will be at least one photography demonstration.
Al
This is a problem that most of us, who don't have John's background, will have.
We are working on the PHOENIX Symposium.
There will be a panel presented - "let there be light" aimed how to light for photos and display.
Also there will be at least one photography demonstration.
Al
For my backgrounds, I went to the fabric store and purchased a piece of felt or fleece that is about 48 inches wide and I think I got it 2 yards long. The trick is to store it rolled up so it doesn't get too many wrinkles.
I use small LED lights for my illumination and I shoot in a dark garage (AKA - "the shop")
I use small LED lights for my illumination and I shoot in a dark garage (AKA - "the shop")
- Joined
- Jan 27, 2005
- Messages
- 13,219
- Likes
- 5,850
- Location
- Dalworthington Gardens, TX
- Website
- pbase.com
Richard, a graduated background isn't too costly -- the price ranges from about 20 to $40 depending on the size that you get. Also, a solid white background can be used with the light shaded from the upper part to give the effect of a dark background. That might be a little trickier for a beginner to set things up so a graduated background is the simpler route.
A sturdy tripod is also important. It doesn't need to be expensive as long as you can get a decent one that doesn't shake. This is important because long exposures are required.
Lighting is a very important part of making good photos and is often the one thing that gets neglected the most by beginners. One of the most important aspects of lighting is to make sure that your subject is being illuminated by only one type of lighting -- either natural, flash, incandescent, or fluorescent lighting, but definitely not a mixture.
The ability to control white balance is one of the best features of digital photography. Most people pay no attention to it when shooting pictures, but for product photography it makes a world of difference in the final results. Almost all digital cameras have the ability for the user to set various white balance options which would include auto, daylight, cloudy, overcast, flash, tungsten, fluorescent, and custom. Custom would be the best for this situation. It involves shooting a white target and you owner's manual should tell you how to set a custom white balance.
Most point and shoot cameras allow the user to control the exposure settings. This is important because using a stopped down aperture (i.e., the lens iris is closed down to a very small opening) is desireable to insure that the entire subject is in sharp focus. Stopping down the aperture also means that a longer exposure will be necessary to properly expose the image which is the reason for needing a tripod. The other component of exposure is the ISO speed which is the light sensitivity of the film or digital sensor. Use the lowest available ISO number for the best quality image. Using a low ISO number means that the exposure will be longer so this is another reason that a tripod is necessary.
Shooting distance is another important factor. Shooting the subject up close will result in depth-of-field distortion (AKA, fat nose syndrome). For the least distortion, back away from the subject several feet and then use the lens to zoom in tighter on the subject (most point & shoot digital cameras have lenses with optical zoom capability).
This is just a broad brush overview and does not really provide you with the details on how to do things, but you'll get there. In addition to our resident professional photographer, John Lucas, there is also a wealth of information in older threads on photographing your work.
Photography Guidelines
The editor of the "American Woodturner" journal has provided some guidelines about getting published in the journal, including a complete section about photography. It is always advisable to shoot as if images were destined for publication (quality, high resolution) ... it might not be the intent today, but you may change your mind later. Quality, high resolution images can be down-sampled for use on the web, but a less-than-optimum image seldom can be utilized successfully in print ... it doesn't go both ways. So taking quality, high resolution images provides you the greatest flexibility and keeps your options open. Read more.
Sharon Bierman
AAW Interim Webmaster
aaw.sharon@gmail.com
614-899-3755
john lucas
AAW Forum Expert
If your an AAW member go to the Journals and do a search for photography. There have been some good articles over the years including a few that I wrote. Ed Kelly just did a good one less than a year ago I believe. Those should get you started and then when we see images and can figure out what your doing it will be easier to help.
Thanks, I appreciate all of the input. What I am already picking up is that I want it to be to easy. The photography appears to be just as much an art as the turning and just putting a piece in front of a background and snapping a picture doesn't get it. I obviously have a lot of work and research to do in order to get up to speed, so I will get started and then I'll get back to you. Thanks for all the help.
- Joined
- Jan 27, 2005
- Messages
- 13,219
- Likes
- 5,850
- Location
- Dalworthington Gardens, TX
- Website
- pbase.com
... The photography appears to be just as much an art as the turning ....
That is a pretty good way of summarizing things. I am not sure which I have spent more money on. And, since there is some overlap, I am not sure if some of my expenditures count as photography or woodturning. -- not that it really matters since both are hobbies. Well, at least I have quit my really expensive hobby, flying.
")
john lucas
AAW Forum Expert
Many of the artists that I photographed for over the years learned to shoot their own work. Many didn't. The main reason was that it does require the same attention to detail and creating the work. that and it takes time away from actually creating the work. Full time artists who are successful often have a problem with keeping up with production, particularly if they have a couple of really good shows back to back.
the question they had to ask themselves was, do I spend the money on a photographer and stay home and make inventory, or do I spend a day shooting my own work and lose that time. That's a value only they could decide. It might take them a full day to shoot the work and it probably wouldn't be as good as I could do. It's a very competitive world getting into the higher quality shows so I got a lot of work because I was successful at helping them get in.
shooting your work for a forum is not as demanding of course and your time may not be as crucial. What your looking for is simply a well exposed, sharp image that shows the form and detail. It's not hard to help you get there but it will take time to read the camera manual (oh no not that) and you may have to purchase some lights of consistent color or at least find a good place to shoot in daylight.
Hopefully this link will work It is a brief photo tutorial I did for Woodcentral.
http://www.woodcentral.com/woodwork...c=455999;sbid=9000;md=read;id=455999#m_455999
Thanks John, I really appreciate the help.Many of the artists that I photographed for over the years learned to shoot their own work. Many didn't. The main reason was that it does require the same attention to detail and creating the work. that and it takes time away from actually creating the work. Full time artists who are successful often have a problem with keeping up with production, particularly if they have a couple of really good shows back to back.
the question they had to ask themselves was, do I spend the money on a photographer and stay home and make inventory, or do I spend a day shooting my own work and lose that time. That's a value only they could decide. It might take them a full day to shoot the work and it probably wouldn't be as good as I could do. It's a very competitive world getting into the higher quality shows so I got a lot of work because I was successful at helping them get in.
shooting your work for a forum is not as demanding of course and your time may not be as crucial. What your looking for is simply a well exposed, sharp image that shows the form and detail. It's not hard to help you get there but it will take time to read the camera manual (oh no not that) and you may have to purchase some lights of consistent color or at least find a good place to shoot in daylight.
Hopefully this link will work It is a brief photo tutorial I did for Woodcentral.
http://www.woodcentral.com/woodwork...c=455999;sbid=9000;md=read;id=455999#m_455999
john lucas
AAW Forum Expert
inexpensive photo background paper
I found some interesting background paper today. It is Banner paper from Staples. It comes in 30in by 52 feet and is white. It's kind of thin but seems to work. I cut it down to 28" to fit my photo stand. It's about $6. Using a seamless background paper such as this will really help your photos because it maker your eye go to the piece and not the wrinkled cloth so many people use. the downside is it will affect your exposure. your camera usually has +/- exposure compensation button. You might have to set it to +1/3 Or more to get a good exposure. The paper should look white not gray when you check the exposure.
I found some interesting background paper today. It is Banner paper from Staples. It comes in 30in by 52 feet and is white. It's kind of thin but seems to work. I cut it down to 28" to fit my photo stand. It's about $6. Using a seamless background paper such as this will really help your photos because it maker your eye go to the piece and not the wrinkled cloth so many people use. the downside is it will affect your exposure. your camera usually has +/- exposure compensation button. You might have to set it to +1/3 Or more to get a good exposure. The paper should look white not gray when you check the exposure.
Attachments
Thanks for the info and I'm really glad that you included that picture because it has given me an idea. I have a stand very similar that was originally for hanging clothes. I almost threw it out because it was just taking up space but now I think I will make a photo stand out of it. I think I'm going to be close to a Staples tomorrow and I'll look for the paper. It will at least get me started until I decide if I want to try something else.
Odie
Panning for Montana gold, with Betsy, the mule!
Hello Richard.......
I'm the least knowledgeable photographer to post on this thread, but I intend to do my own photography of my bowls. John and Bill, who posted to this thread, were both instrumental in helping me to improve my photography. I don't want to be a photographer......that isn't important to me, other than to find one set-up that works with my camera, and repeatable with the same settings.
One thing that helped me to eliminate, or significantly reduce "hot spots", and create better lighting, is to use a commercially made photography tent. I could probably have found other ways to get the results I wanted, but the tent made lighting very easy for me. It diffuses the light and creates a softer beam that is manageable, even with my little practical knowledge.
You may want to give one of these a try......I believe this one was $49.
ooc
Attachments
Last edited:
- Joined
- Jan 27, 2005
- Messages
- 13,219
- Likes
- 5,850
- Location
- Dalworthington Gardens, TX
- Website
- pbase.com
You should also check out Jamie Donaldson's web site for his tutorial on Phrugal Photo techniques for turnings tutorial Lighting set-up for creating a budget studio. He has a one-page PDF file that describes how to build the set-up. I think that there used to be more information. If you have any questions about it, let me know.
I attended his program on this subject several years ago at SWAT and it is excellent. He says that the whole lighting and tent set-up can be made for about $50.
Jamie is a retired professional photographer who specialized in photographing race horses -- being in Kentucky that should not be too surprising.
Last edited:
You should also check out Jamie Donaldson's web site for his tutorial on Phrugal Photo techniques for turnings tutorial Lighting set-up for creating a budget studio. He has a one-page PDF file that describes how to build the set-up. I think that there used to be more information. If you have any questions about it, let me know.
I attended his program on this subject several years ago at SWAT and it is excellent. He says that the whole lighting and tent set-up can be made for about $50.
Jamie is a retired professional photographer who specialized in photographing race horses -- being in Kentucky that should not be too surprising.
Thanks for the link Bill. I checked it out and it was very helpful. I'm trying to crunch all of these ideas together in my mind.
John, I'd really like your opinion of the set up that Bill had a link to in the previous thread. What do you like and what would you change? It is something that would work for me but if I should tweak it somewhere I'd like to know now. Thanks.I found some interesting background paper today. It is Banner paper from Staples. It comes in 30in by 52 feet and is white. It's kind of thin but seems to work. I cut it down to 28" to fit my photo stand. It's about $6. Using a seamless background paper such as this will really help your photos because it maker your eye go to the piece and not the wrinkled cloth so many people use. the downside is it will affect your exposure. your camera usually has +/- exposure compensation button. You might have to set it to +1/3 Or more to get a good exposure. The paper should look white not gray when you check the exposure.
- Joined
- Jan 27, 2005
- Messages
- 13,219
- Likes
- 5,850
- Location
- Dalworthington Gardens, TX
- Website
- pbase.com
I might still have Jamie's handout from SWAT if I knew where to look for it. Basically, it is 4 sheets of white non-glossy foam board, one 500 watt halogen work light, one white window shade and some half-inch PVC pipe and couplings. Additionally, a few light modifiers are needed -- that would include a couple pieces each of white foam board, black foam board, and aluminum foil glued to cardboard.
can you buy the 5000k daylight bulbs for a work light because I have one of those that I have been needing to change the bulbs in anyway.
- Joined
- Jan 27, 2005
- Messages
- 13,219
- Likes
- 5,850
- Location
- Dalworthington Gardens, TX
- Website
- pbase.com
Certainly. I've seen them at my local hardware store. Most work lights come with a spare bulb. If your's has a tubular handle, pull the plastic plug off the end and look inside for a spare bulb. No guarantee, but it won't hurt to look.
- Joined
- Feb 6, 2010
- Messages
- 3,516
- Likes
- 2,596
- Location
- Brandon, MS
- Website
- threeringswoodshop.square.site
One option which I believe I piced up from Bill and John several years ago on another forum. I use halogen work lights. Cut all shop lighting off and reflect the halogen off my white ceiling. The 2 small windows in the shop are behind the photographed object and throw very little extra light on subject. I did buy a gradient gray background.
Still not perfect ,but much better than previous efforts.
Still not perfect ,but much better than previous efforts.
Attachments
john lucas
AAW Forum Expert
I use the new curly CFL bulbs at home and when I teach. What I like about them is they are cool to the touch so you can build all sorts of light modifiers to go over them or in front of them and you don't have to worry about fires. Quartz lights are much brighter but they will burn up anything that gets close to them and your hands if you touch them without gloves on.
If your really interested in getting light bulbs that are correct or light fixtures of different types send me an e-mail to johnclucas@charter.net and I'll send you my handout on where I buy my lights and backgrounds, etc.
You can get CFL bulbs in 5500K daylight bulbs. All that I have tried so far are a tiny bit magenta in color but closer to daylight than any of the CFL's that say daylight but don't have 5500K written on them.
Quartz lights are tungsten balanced so you need to set your camera to that setting. Most are actually a little yellow and not accurate in color but close enough that most amatuer photographers will not see the difference. certainly good enough to just put photos on the web for critics and praise.
- Joined
- Jan 27, 2005
- Messages
- 13,219
- Likes
- 5,850
- Location
- Dalworthington Gardens, TX
- Website
- pbase.com
I may switch over to CFL's when my 500 watt photo floods all burn out. They are tungsten 4800K, but I suspect that they get nearly as hot as quartz lights. They are hot for sure -- in fact, I was surprised that the glass globe on one of them actually melted when I had it on for an extended period. I was wondering why the white balance kept changing so much while shooting with that bulb.
I'm getting there. The box is built and on a stand, I just have to add the foam board. My tripod is set up and I'm just waiting for the background paper to come in. I did buy the curly CFL 5000k bulbs so as soon as the paper gets here I'm ready to start learning.
AlanZ
Resident Techno Geek
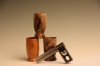
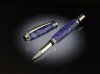
Keep in mind that using paper as a background isn't your only option.
For example, the setup I used for these images of small items is, how shall we say, a little different than one might expect.
I've posted this on other forums, so some of you may already be familiar with the setup.
I'll show a photo of the setup tomorrow, and after you stop laughing, I'll post the details.
Attachments
Last edited:
- Joined
- Jan 27, 2005
- Messages
- 13,219
- Likes
- 5,850
- Location
- Dalworthington Gardens, TX
- Website
- pbase.com
Ok, it looks like you are using glass -- a favorite technique in product photography.
Last edited:
AlanZ
Resident Techno Geek
- Joined
- Jan 27, 2005
- Messages
- 13,219
- Likes
- 5,850
- Location
- Dalworthington Gardens, TX
- Website
- pbase.com
Bill,
Yes, there's glass involved < vbg >
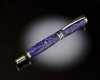
Here's a photo of the setup (one CFL on a stand, and a white reflector).
Cute, eh?
I'll give details shortly.
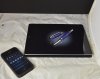
Very cute ... and a practical use of an iPad.
I got one for Christmas and now I have found something it is good for.
AlanZ
Resident Techno Geek
Bill,
I am using software on my iPad called Photo Soft Box Pro HD. It's generally used to configure an iPad as a photographic light source (by displaying various images or patterns, e.g., a divided window). I think it costs a massive $2.99
I decided to use it as a background, and display a bright spot under the pen. The software lets you change all the parameters of the underlying image... size, position, rotation, color, brightness, etc.
One cool thing is that there is a companion app for the iPhone (Photo Soft Box Pro Remote, another $0.99)... and via bluetooth, the iPhone controls the iPad app, so I could change color, intensity, etc without touching the iPad screen.
The iPad was placed in a photo tent. There was one fluorescent light shining through the left side of the tent. A white reflector on the right, next to the iPad. A black board was angled above the iPad so the screen reflected the black card.
So, this setup is really only suitable to small items, but it suits my style (I like using reflective backgrounds anyway, possibly coming from my years as an NYC advertising/commercial photographer).
Odie
Panning for Montana gold, with Betsy, the mule!
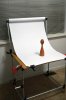
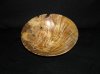
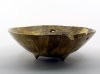
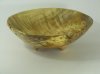
Ok, I'm starting to play with the setup. It's early but I have to start somewhere. The picture with the black background was what I had posted before and the other one I just took with the new setup.
Richard.......Looks like you need some light a little lower to see the bowl from rim to foot a little better. Of course, I'm not the expert with photography, so I'll leave this for further review from the more experienced......
What a wonderful piece of wood......lots of character and beauty!
ooc
- Joined
- Jan 27, 2005
- Messages
- 13,219
- Likes
- 5,850
- Location
- Dalworthington Gardens, TX
- Website
- pbase.com
The shooting perspective in the second shot is much better than in the first. A lot of woodturners shoot their work the way that you did in the first shot because they want to show off the wonderful figure of the wood. The problem is that shooting straight down tells the viewer nothing about the turning. For all that I know, the first image is just a flat disk of a pretty piece of wood, perhaps a round breadboard. As beautiful as the wood may be, we need to remember that we are photographing a turning and not documenting wood grain. Is is tough to fight the urge to show off the wood, but we want to see what you created.
Concerning the second image, the angle of the shot is good. It looks like there is sufficient depth of field so that everything is in focus. However,as Odie mentioned, the lighting has a problem. A picture of your set up would help diagnose the problem. It appears that the lights arethrowing most of the light behind the bowl. That is causing the front to be very dark. The left and right sides are very washed out because of light being reflected off the background paper. You may need to use some "gobos" to block some of the light on the background and adjust the positionof the lights to give the image a good three dimensional feel. Also, what is the color of the background paper?
Concerning the second image, the angle of the shot is good. It looks like there is sufficient depth of field so that everything is in focus. However,as Odie mentioned, the lighting has a problem. A picture of your set up would help diagnose the problem. It appears that the lights arethrowing most of the light behind the bowl. That is causing the front to be very dark. The left and right sides are very washed out because of light being reflected off the background paper. You may need to use some "gobos" to block some of the light on the background and adjust the positionof the lights to give the image a good three dimensional feel. Also, what is the color of the background paper?
john lucas
AAW Forum Expert
Gotta leave for the fitness center but I'll add my quick comments. On the platter photo you could have simply moved the light forward further. As you move the light you will see the reflection move. moving it forward would move the reflection up toward the rim until hopefully it falls off the rim.
What I usually do when shooting platters is to prop them up from behind with a brick or most of the time old quart paint can that I painted black. This makes it much easier to get the light in a position that does not cause a reflection and you don't have to move the camera up so it's easier to use the tripod.
The bottom bowl is easy. Just add a reflector to the front. It could be a mirror or it could be krinkled aluminum foil wrapped around cardboard or it could be a white piece of cardboard. You could also use a second light but I try to stay away from that because it just causes other problems like a secondary shadow.
If you back the camera up and show us the whole set up so we can see where the lights are and what type they are etc we can help more.
Odie
Panning for Montana gold, with Betsy, the mule!
One thing I've noticed, and especially with those on this forum who are posting to galleries, is many turners attempt to take one single photo that best shows off their work. This is fine, but if you go to places where there are turners attempting to sell their work, it's more likely that several photos will be used to represent the turning.
My opinion is that four photos are best to show a piece......view from side (profile), 3/4 view, view from above, and view of foot.
ooc
My opinion is that four photos are best to show a piece......view from side (profile), 3/4 view, view from above, and view of foot.
ooc
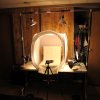
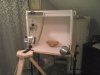
Etsy is good about letting you post several pictures of your work but the website that I use had only let me post one until just recently when they had an update, probably because they were getting complaints about just that. I'm posting another picture that I took after the comments. I adjusted the lighting a little and moved the piece farther back in the box to get a little more light in front of it. I'm showing the setup that I used to take the picture.
Attachments
- Joined
- Jan 27, 2005
- Messages
- 13,219
- Likes
- 5,850
- Location
- Dalworthington Gardens, TX
- Website
- pbase.com
Etsy is good about letting you post several pictures of your work but the website that I use had only let me post one until just recently when they had an update, probably because they were getting complaints about just that. I'm posting another picture that I took after the comments. I adjusted the lighting a little and moved the piece farther back in the box to get a little more light in front of it. I'm showing the setup that I used to take the picture.
You are shooting from too close to the subject. If your camera has optical zoom then zoom to maximum focal length and then back up to about five feet from the subject. If the turning looks too small and you can't zoom in closer then move the camera a bit closer to the turning.
Second, do as John said and move the lights forward (with respect to the turning) or in other words toward you. Moving the turning further back towards the background is the wrong way to solve that problem because it made the whole picture look somewhat flat and with the bowl so close to the background, there is no light fall off. I would set the bowl as closed to the front edge of the paper as you can and still have enough white space in front of the bowl. Also, I would have the background paper slope back more gently. If you are using a window shade as in the Jamie Donaldson set up then move the spool back about two feet. What you want is about a 30° slope to the background. The top of the window shade should be at least 18 inches behind the foam boards. This will allow the background to fade to dark gray at the top edge of the image.
After this, the next subject to tackle will be white balance. Your camera manual should have information on how to set that. It is possible to adjust it in software, but when shooting JPG images it is always better to do it in the camera. Below is an example of "fixing" in software, but it still is not as good as getting it right in the camera because I am just guessing at the background color.

A few other thoughts:
- The shooting angle is a bit too high. Lower the camera to get a view closer to the previous shot.
- There is too much white space at the bottom and not enough at the top.
- As mentioned the colors are off and white balance will help to correct that.
- The software on some web sites removes the EXIF data from the image and it appears that your photo hosting site is doing that unless you did it before uploading the image. You can "attach" the image (meaning that you can upload it so that it is hosted on the AAW forum rather than "linking" to the image on your own photo hosting site. The EXIF data is important because it tells us about your shooting conditions (aperture, shutter speed, ISO, focal length, white balance setting, and color profile).
- Play around with the lighting. At present, they are too close to the bowl, especially the one on the right. If you have a 500 watt halogen work light then place it in the enclosure as Jamie Donaldson does -- on the right side and pointing straight up. That prevents shining a light directly at the turning and makes the lighting a bit more uniform.
Thanks Bill for the help, I will try implementing later tonight. Right now I'm doing that dreaded chore of cleaning the shop.
AlanZ
Resident Techno Geek
Also try diffusing the lighting. Bare bulb in a silver reflector is less than flattering.
john lucas
AAW Forum Expert
The main problem now is it's simply underexposed. The white background makes your camera do that. You should have a +/- exposure button on your camera. set it to +1/3 or +1/2 to see if the background gets lighter and consequently the bowl as well.
I've never been a fan of solid panels. They limit what you can do with your lights. In other words the lights always have to be inside or aimed into the booth. With translucent white panels you have the option of putting the light outside the booth which will diffuse it more. Just one more option.
Alan is right a diffuser over the main light would help although the photo came out pretty good it's just the light is too even which makes the bowl look flat.
Bill gave good advice. Lower the camera, and set the zoom to more magnification so you can back the camera off a little. It will make the piece look more natural. How high the camera is has a lot to do with what's important about the piece. If shape is important a low angle is essential. If the wild grain that can only be seen inside is important then obviously a higher angle is necessary. That's something you have to decide.
Mark Hepburn
Artist & Chef
Many of the artists that I photographed for over the years learned to shoot their own work. Many didn't. The main reason was that it does require the same attention to detail and creating the work. that and it takes time away from actually creating the work. Full time artists who are successful often have a problem with keeping up with production, particularly if they have a couple of really good shows back to back.
the question they had to ask themselves was, do I spend the money on a photographer and stay home and make inventory, or do I spend a day shooting my own work and lose that time. That's a value only they could decide. It might take them a full day to shoot the work and it probably wouldn't be as good as I could do. It's a very competitive world getting into the higher quality shows so I got a lot of work because I was successful at helping them get in.
shooting your work for a forum is not as demanding of course and your time may not be as crucial. What your looking for is simply a well exposed, sharp image that shows the form and detail. It's not hard to help you get there but it will take time to read the camera manual (oh no not that) and you may have to purchase some lights of consistent color or at least find a good place to shoot in daylight.
Hopefully this link will work It is a brief photo tutorial I did for Woodcentral.
http://www.woodcentral.com/woodwork...c=455999;sbid=9000;md=read;id=455999#m_455999
John,
I read your wood central tutorial and had a few questions if you don't mind?
I've found some 5k CFLs But how many lumens? And where could I find a grey background or maybe a window shade? Also, I happen to have an old projector screen; would that work as a background?
Thanks!