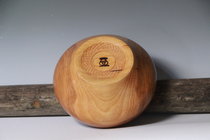
• April 2025 Turning Challenge: Turn an Egg! (click here for details)
  • Congratulations to Kelly Shaw winner of the March 2025 Turning Challenge (click here for details)
  • Congratulations to Ellen Starr for "Lotus Temple" being selected as Turning of the Week for 21 April, 2025 (click here for details)
  • Welcome new registering member. Your username must be your real First and Last name (for example: John Doe). "Screen names" and "handles" are not allowed and your registration will be deleted if you don't use your real name. Also, do not use all caps nor all lower case.

PowerMatic 3520C Initial Review: My Mustard Monster aka "The Beast"

Joined
Jan 3, 2021
Messages
566
Likes
844
Location
Spartanburg, SC
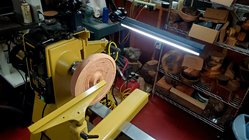
Happy Friday, all-Starting my 1st day of Christmas break exploring the PM 3520C I purchased through Woodcraft on their recent 10% off Black Friday sale for $5129, and added the light (which is both powerful, sturdy and infinitely adjustable with all the different planes of travel; it really seems like an integral part of the lathe instead of an accessory). The experience with both Woodcraft and the shipping company were textbook customer service; sometimes you get lucky, though in general I have never regretted a Woodcraft purchase (and I have spent thousands in them). If this reads like a fan-boy post, so be it, but this lathe is just a revelation to me after trading up from my good old Laguna 12/16. And it still sits perfectly level and stable on its leveling feet on the plywood base straddling the main beam of my crowded shop. It took two strapping young tradesmen (my lineman son and a burly neighbor) to help me get it moved in and set up, leveled and wired-up last weekend. At nearly 6 feet, I also added the risers, which on top of the plywood made it a little high for me, but two or three shop mats get me just right and feel better under my feet (after teaching all day on concrete).

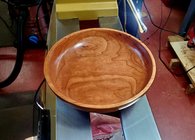
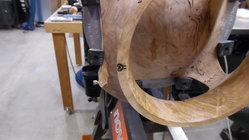
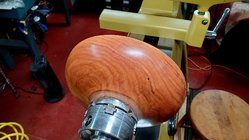
For its maiden voyage, I wanted to do something I thought would be relatively predictable, a kiln-dried 10"x3" cherry blank from turningblanks.net (fortunately, they are within driving distance, though they ship nationwide). It turned like a dream, and has a really nice figure after 400-grit, Yorkshire Grit and a couple of coats of TruOil. This thing is so powerful and precise, I feel like I almost immediately became a better turner on it because it is so smooth and stable, which really inspires more confidence on longer cuts and around the bend" on a bowl (which was often treacherous on the Laguna due to my slowly-developing skills and some vibration-induced chatter). I am excited knowing that I haven't even begun to explore all that this lathe is capable of. And the structural heft of it (9/16" silky-smooth cast-iron ways on a 260 lb. cast iron bed), the 160 lbs. headstock along with the precision of the hefty spindle all inspire confidence that was often frustrated by run-out and vibration on the Laguna). The 40 lb. banjo and tool-rest lock like a bank vault when I adjusted them to my liking. And I have to say the chromed locking handles all around are one of the sexiest things I have ever seen on a machine (though it takes some effort to lock the banjo all the way (perhaps a little more adjustment)).

It's just a joy to use, just making every operation more stable and precise. It just makes everything easier, and yet the possibilities seem almost endless.

And if you get one, get the light kit. It's totally worth it. I couldn't find specs, but plenty bright and easily movable and sturdy for inspecting for scratches. Trust me-get the light for about $150 if I recall (though I also got 10% off of it).

I know you're not supposed to get too attached to things, but my family is justified in their concern that I have almost made a shrine of this thing (I have an obsessive personality anyway, which can be both a blessing and a curse).

And yes, I know I need to get rid of that old power-strip, especially since my electrician wired up about 32 total outlets around the shop in addition to the 220 outlet (I've just been so focused on the lathe). Now out to add another coat of TruOil (which I also have a problem with). Happy Holidays/Merry Christmas early, fellow turners! Aaron


PowerMatic 3520 Cherry Rough-Turning.jpgThe Beast 1st Turn in Cherry.jpg
 

Attachments

  • Kiln-Dried Cherry Blank.jpg
    Kiln-Dried Cherry Blank.jpg
    268.6 KB · Views: 23
Enjoy your new friend! I transitioned to mine from a low-end Grizzly, reeves drive, minimum speed about 500 rpm. I thought I’d died and gone to heaven when I started turning on it. I still appreciate everything about it whenever I use it. Low speed, torque, indexing head, spindle lock, reversible, weight, etc., etc. If I haven’t got time to turn, sometimes I’ll go out to the shop just to wax the bed or check that I’ve unplugged it.
 
Enjoy your new friend! I transitioned to mine from a low-end Grizzly, reeves drive, minimum speed about 500 rpm. I thought I’d died and gone to heaven when I started turning on it. I still appreciate everything about it whenever I use it. Low speed, torque, indexing head, spindle lock, reversible, weight, etc., etc. If I haven’t got time to turn, sometimes I’ll go out to the shop just to wax the bed or check that I’ve unplugged it.
Yes, Lou, I admit to doing this too. A fresh coat of wax and sliding the banjo around like it's on ice skates can be a nice quick substitute for a turning session when time is tight.
 
That’s a beauty Aaron. On a side note, I just got an American Beauty. A woodturning instructor at our local college asked if he could come over and take a test spin. Long story short, he took the headstock and slid it down to the tailstock end of the lathe and turned a 12” bowl. I just watched the pro work. In my 15yrs of owning the PM3520B, I never moved the headstock once. It is way easier turning towards the end of the lathe…..duh, lol!!
 
That’s a beauty Aaron. On a side note, I just got an American Beauty. A woodturning instructor at our local college asked if he could come over and take a test spin. Long story short, he took the headstock and slid it down to the tailstock end of the lathe and turned a 12” bowl. I just watched the pro work. In my 15yrs of owning the PM3520B, I never moved the headstock once. It is way easier turning towards the end of the lathe…..duh, lol!!
Yeah, Russ-That bed extension is probably in my future for that very reason. I think a lot of us more "seasoned" turners have back issues. And that AB is an amazing lathe as you know. I tried one out at Tim Tucker's shop recently. Enjoy it!
 
I’m a bit jealous. I have the 12/16 for about a year now. Getting itchy for something bigger. When I bought it, I figured I’d never turn anything bigger than 12”. Now I realize that just because I can fit a 12” blank does not mean it’s ideal to make a 10”-12” bowl.

I’m a little (lot) intimidated by the size of the 3520. Not shure how I’d get it into the basement and set up. Can’t decide between that and something smaller.
 
About 12-13 years ago I upgraded from an old Delta beater to a 3520B and it changed my life. Like you, I fell in love with my new lathe and it was such a joy to work on. We've been through a whole lot of wood together and the years are taking their toll on both of us. Even so, I still love it more than I've ever loved any tool in my shop.
 
I’m a bit jealous. I have the 12/16 for about a year now. Getting itchy for something bigger. When I bought it, I figured I’d never turn anything bigger than 12”. Now I realize that just because I can fit a 12” blank does not mean it’s ideal to make a 10”-12” bowl.

I’m a little (lot) intimidated by the size of the 3520. Not shure how I’d get it into the basement and set up. Can’t decide between that and something smaller.
Mike-I too was intimidated by its size and weight, until I got it set up and turning, and confirmed that that is one of the main reasons I bought it; that rock-solid stability is a total game changer from the 12/16! Everyone's situation is different, though. I have seen videos and read about guys setting it up on their own using various loaders, winches, etc. I don't have either of those, but I do have access to strapping young men who like to borrow my truck for pulling their boat on duck hunts lol.

Only you can decide on your upgrade from the Laguna. I looked at others including the Jet 16/40, the Rikon 70-3040 (a very beefy and intriguing lathe with the sliding bed), and the bigger Nova with the pivoting headstock. Ultimately, my gut kept steering me back to the PM, which was absolutely the right call for me. I can't see me ever needing or wanting another lathe. Let us know what you end up with.
 
Aaron - you don't need the extension to turn off the end of the lathe - simply move the headstock down the ways to the point where there is enough room for the bowl blank and the banjo. This allows you to stand at the end of the lathe when you turn the inside, and is easier on the back than leaning over the lathe. The extension on your C can be added at a lower level to provide additional clearance over the 20" swing you already have.

I've only turned on a couple of lathes - a modern midi, my old Delta heavy 46-450 reeves drive 12" lathe and the powermatic 3520. I was first exposed to the B version at my turning club, and was a bit intimidated by it. After about 16 minutes, it became much friendlier. So much so, that an A version is in my garage these days.

Ironically - at this point, I've spent far more time turning ornaments and bottle stoppers than I have anything over 12". Yesterday, I tried a McNaughton coring system with it for the first time which is something my old lathe would never have supported.

Anyway - you have what is effectively the de-facto standard for modern lathes - enjoy it - not much out there that would be an upgrade.
 
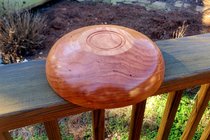
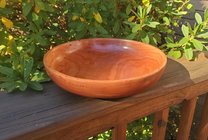
Well, I finished my 1st turn on the new lathe that I call The Beast: a cherry fruit bowl sanded to 600, with Yorkshire Grit friction polish and about a dozen coats of TruOil to highlight that beautiful color and figure. Sorry for the lousy phone pics. I'm still working on wall thickness and that elusive perfect curve both inside and out, but I could already feel all of that coming together easier on the 1st turn on this lathe just due to increased stability and lack of resulting tool chatter going "around the bend." This leads to increased confidence that I can go thinner and be more accurate without leaving extra thickness to sand out tool marks. I'm trying to develop a style for my bottoms too. I welcome constructive criticism from you more experienced turners.

Also, a quick question: If I want to design and buy a hot brand for my bottoms, what is a good one? I hear some of the electric ones are cheap junk. I think I want one I can heat with a torch. I tried a marking pen, and a wood-Finished Cherry 1st Turn Deck View.jpgburner, and both looked amateurish. Thanks-Aaron
Finished Cherry 1st Turn Top View.jpgFinished Cherry 1st Turn Deck View Bottom.jpg
 
I have a brand (heated with a torch) that I used for a while and then hung on the wall. The problem with it is that you only get one shot to get a good impression. If you’re a bit off perpendicular, you don’t leave it on the wood long enough, or the spot you’re branding isn’t dead flat, you get a lousy image and no second chance. I’ve tried mounting it in the drill press which gives a bit more latitude. I’m now using an archival pen and I like the result. A woodburning pen freehand is also an option.
 
Looks like a nice inaugural piece! Cherry never disappoints.

I'm trying to develop a style for my bottoms too. I welcome constructive criticism from you more experienced turners.

My two cents. Unless you’re trying to create a production line/series, I wouldn’t worry about developing a particular style. Let the form (or functional purpose) dictate the style. That said, the bottom of this bowl looks great.
 
Thanks, Reed! Funny how we always want what we don't have. We do have lots of nice hardwoods here in the East, but sometimes I wish I could get my hands on some madrone, myrtlewood or claro walnut like you guys have on the West coast.
 
Beautiful work!
Thanks, David-I don't remember if it was Al or someone else who advised beginners something to the effect that, if you want to turn a beautiful bowl, turn a hundred ugly ones, or something like that. I have certainly done that (though I haven't kept proper count). I strive to learn something new, or refine a technique I already know, with every project in my shop. I'm feeling a slowly-evolving aesthetic with every new turn. My goal is to make custom, one of a kind pieces along with some more utilitarian stuff. Now that I have the tool(s) to do that, and am slowly refining my technique and skills to live up to and "earn" that expenditure, I have no excuse not to (other than the huge suburban high school English department that swallows me whole every school year, but that's another story-there's a reason I post so much on school breaks!:rolleyes:).
 
Also, a quick question: If I want to design and buy a hot brand for my bottoms, what is a good one? I hear some of the electric ones are cheap junk. I think I want one I can heat with a torch. I tried a marking pen, and a wood-
Try Branding Irons Unlimited. I have bought two from them and use them on every piece. They have excellent customer service, and can help with your design process. They sell a simple brass headed branding iron you heat with a torch and an electrically heated model. Both are robust irons made from a substantial brass billet. If you are going to mark up 3 or 4 pieces at a go, then I suggest looking at the electric model. I only do one piece at a time, so it wasn't worth the increased expense to me.

I can give you a couple of tips, should you choose to go this route.
You do have to get the hang of how much to heat the brand, and how long to apply it to the wood, so it's advisable to practice on scrap wood when you first get the tool.
When I go to make a brand for real, I always test the brand on scrap wood to access the heat before applying it to the piece.
Certainly you can free hand, but the branding head has flat square sides, so it is possible to apply the brand in a precise location and orientation, but it takes a little planning. The attached picture might clarify.
SAM_3862.JPG
The U-Heat-It iron is a simple threaded rod, so I can remove the handle and mount it to the TS via a drill chuck to get a dead center brand.
Note, the brass head and steel rod expand at different rates so the head will turn a few degrees as it heats, so don't screw it on tightly, and be prepared to use a tool to re-orient the hot head if needed.
After branding you can sand off the adjacent scorching for a cleaner look.
SAM_3865.JPG
SAM_3866.JPG
If you aren't happy with the results it is possible to sand the brand off and try again. But honestly I would have to take a few moments for some thoroughly good swearing, first.
 
Another point for brands is it will be more forgiving to use if you use thin lines in your artwork. Like Mark has. Mine has some thick lines and letters reversed out of a big dark block. Makes it very difficult to get a crisp image, and sanding does not help. If the spot I’m marking isn’t perfectly flat, I get light and dark spots.

I have the electric handle, but don’t use it. I screwed the brand onto a rod, and chuck it into my tailstock. That way I can hit it again in exactly the same spot if needed.
 
Thanks, Mike and Mark-I am in consultation with Branding Irons Unlimited on the issue. Looking at their smallest circular brand, a 2.5" model that will fit the center of my bottoms perfectly. I assume they will need to be close to dead flat for a good brand, especially if I put it in a fixed rod as you guys do (no way to "rock it in" like with a handheld).
 
Mike is right, keep your logo simple.
Actually, most of the time I handhold the branding iron, but I use the Robust box rest/mini-table as a guide.
Not sure about the 2 1/2" limit, my small brand is 3/8"?
 
In other news, I took some time today to add a few upgrades. First, I installed the hardened 3/16" steel rod from Jimmy at D-Way Tools using JB Weld, following the instructions in his video. It was a pretty straightforward process after I used my belt grinder to strip the paint off and flatten the top for a better surface for the bar: https://www.youtube.com/watch?v=pMTody-4daQ

I knew from experience that that soft cast-iron rest would drive me crazy filing dings out of it. Maybe a lot of you more experienced turners can overcome the dings that lead to tool marks. Personally, I like super-smooth, hard tool rests like on my Robust versions. I plan to sand the JB Weld and polish the top once it cures for a day.

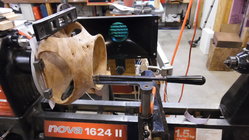
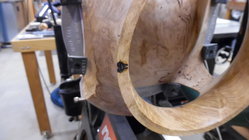
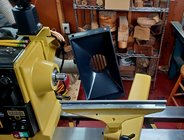
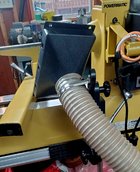
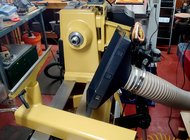
Second, I installed the Black Hole system for dust collection, and ran the hose to my 1hp Rikon dust collector. Not having an extensive shop background like some of you obviously do, I figured this would be better than any system I could jury-rig together. And yes, the instructions are lousy, though the video from Craft Supplies helped some for visualization purposes. Today's test let me know that it definitely sucks in the dust. I suppose it's adequately sturdy, though the hose hanging clamp and some of the plastic parts could be better for what they charge for it (isn't that the way with everything nowadays?). I plan to turn a big walnut bowl once that weld cures to test it all out.
Black Hole system Installed.jpgBlack Hole system Installed Rear View.jpgBlack Hole system Installed Side View.jpg
 
I got two of my brands on Etsy. I think it is from India or China but there are also some USA. I ordered a 1 inch but came in as 1.25 and is a bit too large for some items. Then ordered a .75 and it is just perfect. It also works well on convex surfaces. I think these were less than 27 each and arrive in almost exactly 30 days. This is the large one. One heating usually brands twice.
IMG_6765.JPG
 
Also, a quick question: If I want to design and buy a hot brand for my bottoms, what is a good one? I hear some of the electric ones are cheap junk. I think I want one I can heat with a torch. I tried a marking pen, and a wood-burner, and both looked amateurish. Thanks-Aar

I had Buckeye Engraving make a 5/8" square stamp for an electric branding handle. I wouldn't want anything larger. I mortised a piece of hardwood to fit the tool shank and just hold it in place by hand over the upturned vessel bottom to guide the tool for a second try if the brand is light or uneven.
 
I've had my 3520C for about 2 1/2 years now and I still feel warm & fuzzy about it. Feels a little odd to have affection for a big chunk of metal, but it's provided a lot of nice time spent turning. Haven't had a single problem with it and any failed turnings have been my fault. I'm generally left handed and have found that hollowing at the end of the bed is much nicer. I have the tailstock swing-away and found that a loop of rope around the quill handle and hooked to a nearby 2x4 pulls the tailstock further around the pivot and more out of the way.
Enjoy "the Beast" and keep it well fed with blanks and you'll be friends for years to come!
 
In other news, I took some time today to add a few upgrades. First, I installed the hardened 3/16" steel rod from Jimmy at D-Way Tools using JB Weld, following the instructions in his video. It was a pretty straightforward process after I used my belt grinder to strip the paint off and flatten the top for a better surface for the bar: https://www.youtube.com/watch?v=pMTody-4daQ

I knew from experience that that soft cast-iron rest would drive me crazy filing dings out of it. Maybe a lot of you more experienced turners can overcome the dings that lead to tool marks. Personally, I like super-smooth, hard tool rests like on my Robust versions. I plan to sand the JB Weld and polish the top once it cures for a day.

Second, I installed the Black Hole system for dust collection, and ran the hose to my 1hp Rikon dust collector. Not having an extensive shop background like some of you obviously do, I figured this would be better than any system I could jury-rig together. And yes, the instructions are lousy, though the video from Craft Supplies helped some for visualization purposes. Today's test let me know that it definitely sucks in the dust. I suppose it's adequately sturdy, though the hose hanging clamp and some of the plastic parts could be better for what they charge for it (isn't that the way with everything nowadays?). I plan to turn a big walnut bowl once that weld cures to test it all out.
View attachment 48720View attachment 48721View attachment 48724
Aaron how is the aluminum track attached to the lathe? Is it PM or other?
Thanks
Dennis.
 
Second, I installed the Black Hole system for dust collection
I have been looking into this system. Did you get it from craft-supply? This system is kinda pricey but I like the concept. I understand the swivel for the dust shoot does not come with it and has to be purchased separately?
 
Back
Top