
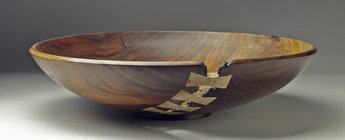
I have done some that go all the way through. My first attempt was on a 17” black acacia bowl that had a large fissure from a bark inclusion. The pewas were meant as more functional to keep contents from falling through the crack.Are these ever installed such that they go all the way through the bowl wall? I've done some and end up with an interesting patch on the outside and still just an ugly crack on the inside. I suppose I could just try it and see what problems emerge, no shortage of cracked bowl blanks! I suspect the issue might be routing that deep a recess with a small bit and keeping the sides straight for a tight joint line on both sides.
I used an inlay template and kit, but found the bit too short to clear the inside wall and the full thickness of the template. I completed the outside first, then needed to locate a 1/8” bit that would give me about 3/4” of depth to clear the inside wall. Planned for 1/2” wall thickness to expose the pewa and then finish thickness of 3/8” - 5/16”. Used the template kit to cut the pewa and the recess.
It does work just fine. The glue bond is not anywhere as strong as the standard pewa because of the difference in strength between the mostly face glued standard and the mostly end grain glued through pewa. I found this out when the bowl was dropped by a relative onto a concrete floor and two of the pewa popped out - no harm, they glued back in nicely.
Working a 1/8” bit to a total depth of 3/4” is an excercise in going slowly and working to several steps in depth, unless you buy several bits upfront, you’ll be waiting on the mail. These small diameter bits aren’t capable of withstanding a lot of lateral stress.
One other observation that applies to surface or through pewas - when routing the recess, take care to keep the router angle consistent as you rotate around the template. If your bit is even very slightly off center, changing the angle as you rout will make the recess either slightly smaller (a pain to fix) or slightly larger (easier to fix, but ugly unless your filler matches perfectly).
Here’s the result of my first attempt…standard surface pewas are way, way easier.
Attachments

Last edited: