Been wanting to try my hand at live edge goblets for a year or so after seeing work by @Don Wattenhofer posted here. Don was kind enough to give me a gentle push last spring with some .pdf presentations.
Fast forward to present. I've now turned two of them, and between them would have something worth keeping!

Top

First effort ended up thicker than desired, but otherwise things worked out fine. The rim is about 5/32" thick and was cut perpendicular to the lathe. The rest of it ended up fine.
My goals for the second one were to ensure that the cup and edge were thinner than 1/8" and had a more gentle curve to the profile. Pleased to see the rim is already bending and undulating. Here is what ended up:

The rim ended up where I wanted it from a thinness perspective, but unfortunately half the bark came unglued. I did notice that the bark on this piece was much thicker than the first one, which probably played into that. Is it normal for the bark to feel spongy when cutting into it at something other than a 90* angle? Or is that a function of it being thick.

The outside ended up getting some vibration waves in it, which I'll have to work on, but have ideas on what to do differently - mainly be more aggressive with the second bevel on the gouges.
Part of that may be due to hidden cracking along the pith, which nearly caused complete disaster on the stem as a chunk sheared off. This crack also was in the transition from cup to stem, and caused a bit of instability.
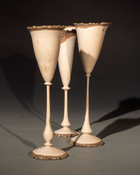
Comparison of both. In a perfect world, I'd take the rim and stem of left one, combined with thinness of right one, and it would be stellar. As is, it just gives me more incentive to get back to the lathe and take another spin.

TLDR questions:
What is best angle to approach cutting into the rim, and assuming it is ok to do this at something other than 90, is there any suggestion on technique to follow?
Hollowing - using a 3/8" spindle gouge, was getting a lot of vibration, in two scenarios. On the wider, flatter part along the rim, and deeper at the bottom of the cup, as the tool was 2" or more off the rest. Could a bowl gouge be used for the hollowing, and if so what is preferred grind, I have both fingernail and 40-40 gouges.
Turning the stem. Always nerve wracking, partially due to having relatively long overhang, due to not getting tool rest close due to the differences in diameter between cup and stem- my shortest rest is 6", not opposed to getting a 4" if this would help. But if it is technique, that is fine too.
Open to any other critiques of form and process.
Fast forward to present. I've now turned two of them, and between them would have something worth keeping!
Top
First effort ended up thicker than desired, but otherwise things worked out fine. The rim is about 5/32" thick and was cut perpendicular to the lathe. The rest of it ended up fine.
My goals for the second one were to ensure that the cup and edge were thinner than 1/8" and had a more gentle curve to the profile. Pleased to see the rim is already bending and undulating. Here is what ended up:
The rim ended up where I wanted it from a thinness perspective, but unfortunately half the bark came unglued. I did notice that the bark on this piece was much thicker than the first one, which probably played into that. Is it normal for the bark to feel spongy when cutting into it at something other than a 90* angle? Or is that a function of it being thick.
The outside ended up getting some vibration waves in it, which I'll have to work on, but have ideas on what to do differently - mainly be more aggressive with the second bevel on the gouges.
Part of that may be due to hidden cracking along the pith, which nearly caused complete disaster on the stem as a chunk sheared off. This crack also was in the transition from cup to stem, and caused a bit of instability.
Comparison of both. In a perfect world, I'd take the rim and stem of left one, combined with thinness of right one, and it would be stellar. As is, it just gives me more incentive to get back to the lathe and take another spin.
TLDR questions:
What is best angle to approach cutting into the rim, and assuming it is ok to do this at something other than 90, is there any suggestion on technique to follow?
Hollowing - using a 3/8" spindle gouge, was getting a lot of vibration, in two scenarios. On the wider, flatter part along the rim, and deeper at the bottom of the cup, as the tool was 2" or more off the rest. Could a bowl gouge be used for the hollowing, and if so what is preferred grind, I have both fingernail and 40-40 gouges.
Turning the stem. Always nerve wracking, partially due to having relatively long overhang, due to not getting tool rest close due to the differences in diameter between cup and stem- my shortest rest is 6", not opposed to getting a 4" if this would help. But if it is technique, that is fine too.
Open to any other critiques of form and process.