Otis, not always on smaller pieces. Sometimes not on ones that are 6" to maybe even 9" and I feel I have a good tenon with solid wood. If the tenon is iffy say due to a soft pith, a knot or a crack then I'll opt for the steady rest. There have been times when I started without the steady and the vibrations were a bit more than normal so I'll stop and mount it up. No set rule for when to use a steady rest but if in doubt better to use one than wish you had when you have a snag and it sails across the shop or breaks off the tenon, or both. On larger pieces always. Even the slightest rough cut or snag on a 24" piece will knock it out of balance or likely much worse.

-
March 2026 Turning Challenge: Olla! (click here for details) -
Congratulations to David Wyke, People's Choice in the February 2026 Turning Challenge (click here for details) -
Congratulations to Michael Nathal for "Eroded Wheel" being selected as Turning of the Week for March 23, 2026 (click here for details) -
Welcome new registering member. Your username must be your real First and Last name (for example: John Doe). "Screen names" and "handles" are not allowed and your registration will be deleted if you don't use your real name. Also, do not use all caps nor all lower case.
You are using an out of date browser. It may not display this or other websites correctly.
You should upgrade or use an alternative browser.
You should upgrade or use an alternative browser.
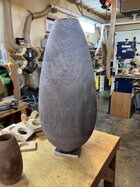
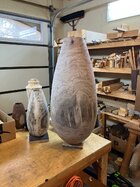
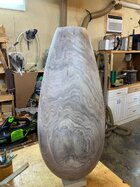
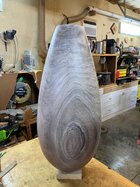
Large (32") Walnut Vase
- Thread starter Randy Anderson
- Start date
Side topic update - I mentioned that saving the water from a previous boil of black cherry or walnut can help add some color to the next piece. I boiled a good sized walnut piece a few days ago and yesterday boiled this 26" ash in the water I saved. I took it out this morning. It picked up quite a bit of color. It's wet of course and will get a second turning at some point but I'm hoping that some of the walnut color soaked into the grain lines and end grain a bit to add some color contrasts. It was typical blonde, not much color ash when I put it in.
Attachments
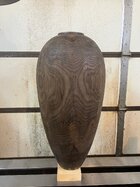
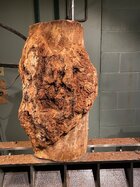
I have a huge stockpile of large walnut that my nephew brought to me a few months ago. It was cut from a tree that blew over in the hurricane they had last summer along the gulf coast. I ended up getting most all of the tree, including the massive root ball. I started yesterday on the first of quite a few large pieces and decided I would try to keep up with a project thread on the process. Here are some pics of getting it into the shop with my tractor, rolled in place and then lifted up with my ceiling hoist I ..
Randy, don't know how I missed this last month when you started this project, but read the whole thread this morning. WOW! really good work and thank you so much for the detailed description of the process. Largest thing I've turned was also walnut but just a simple 18" bowl.
Thanks Dave, hope you're doing well. I hope to start the next phase in a day or so.
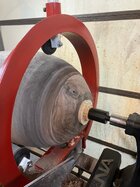
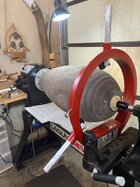
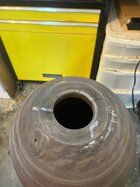
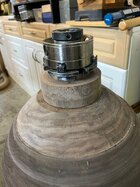
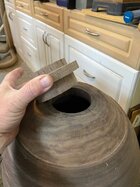
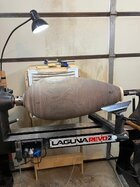
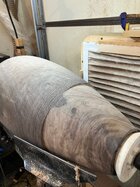
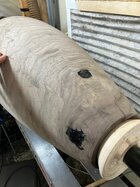
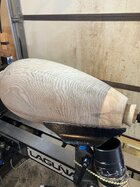
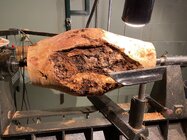
Truing up the base and adding a tenon insert today. First step is to mount it between centers, clean up an area for the steady rest to ride on, flatten the base and true up the hole. Having to take this step is one of the downsides of hollowing from both ends. There's no set way to mount it up but I typically use a cone on the head stock end for the neck opening and bring up the tail stock center to the tenon on the base.
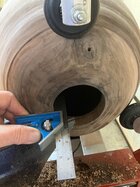
You will likely have to make multiple adjustments to where you place your center on the tenon. You look for a spot that minimizes the amount of material you have to remove to true up the surface. The warping can vary all along the length of the piece so turn it slowly and watch the surface, adjust a bit, turn and look again. Keep an eye on what your final tenon size will end up being. If you get too far off the original center to balance out the warping in the piece you can end up with a tenon that won't fit in your jaws. Been there. I can then true up the tenon and base, flip it around, mount it in the chuck, put the cone in the tail stock end and start the second turn. Be sure and flatten the base and get a good clean mount ready for your chuck.
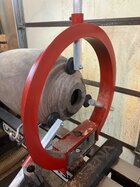
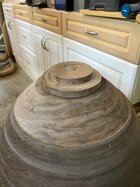
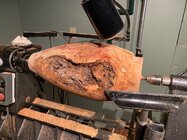
On this piece the neck was too large for my standard jaws so I used my jumbo jaws with rubber feet. It's important to make sure there is a shoulder for it to push against since the tail stock with cone and then the steady rest need to keep it tight against the head stock. If there's no shoulder then it will slip over the chuck from the pressure. I flatten up the base then clean up an area for the steady rest. Very light cuts taking only what's needed to get to a smooth surface. I ended up taking about 1/8 or less to true up the surface. Not bad re warping but I can see other areas further toward the top that will take a bit more. I believe I have plenty of material to work with since I turned this one a fat 3/4" thick. I left the base opening a bit thick to give me plenty of purchase area for the insert to glue to. Make sure the base and insert for the hole are perpendicular to get a good glue joint.
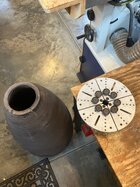
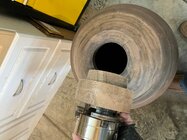
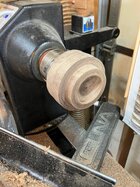
With this done I can turn an insert to glue into the base that will then give me a tenon to use for the second turning. Be sure and use dry, stable solid wood for the insert. I found a piece of walnut in my wood stash to use. It's a different tone but should work fine. A piece this size is not going to get picked up, turned over and examined up close like a small bowl or vase. Very likely no one will ever even look at the base of it.
You will likely have to make multiple adjustments to where you place your center on the tenon. You look for a spot that minimizes the amount of material you have to remove to true up the surface. The warping can vary all along the length of the piece so turn it slowly and watch the surface, adjust a bit, turn and look again. Keep an eye on what your final tenon size will end up being. If you get too far off the original center to balance out the warping in the piece you can end up with a tenon that won't fit in your jaws. Been there. I can then true up the tenon and base, flip it around, mount it in the chuck, put the cone in the tail stock end and start the second turn. Be sure and flatten the base and get a good clean mount ready for your chuck.
On this piece the neck was too large for my standard jaws so I used my jumbo jaws with rubber feet. It's important to make sure there is a shoulder for it to push against since the tail stock with cone and then the steady rest need to keep it tight against the head stock. If there's no shoulder then it will slip over the chuck from the pressure. I flatten up the base then clean up an area for the steady rest. Very light cuts taking only what's needed to get to a smooth surface. I ended up taking about 1/8 or less to true up the surface. Not bad re warping but I can see other areas further toward the top that will take a bit more. I believe I have plenty of material to work with since I turned this one a fat 3/4" thick. I left the base opening a bit thick to give me plenty of purchase area for the insert to glue to. Make sure the base and insert for the hole are perpendicular to get a good glue joint.
With this done I can turn an insert to glue into the base that will then give me a tenon to use for the second turning. Be sure and use dry, stable solid wood for the insert. I found a piece of walnut in my wood stash to use. It's a different tone but should work fine. A piece this size is not going to get picked up, turned over and examined up close like a small bowl or vase. Very likely no one will ever even look at the base of it.
Attachments
Side topic update - I mentioned that saving the water from a previous boil of black cherry or walnut can help add some color to the next piece. I boiled a good sized walnut piece a few days ago and yesterday boiled this 26" ash in the water I saved. I took it out this morning. It picked up quite a bit of color. It's wet of course and will get a second turning at some point but I'm hoping that some of the walnut color soaked into the grain lines and end grain a bit to add some color contrasts. It was typical blonde, not much color ash when I put it in.
I am very interested in how this turns out, having cut down an ash tree in December.
Ever use 2 Steadyrests for a big piece like this?clean up an area for the steady rest to ride on
Alan, never used or thought of using two. Not seen anyone set up that way before. As long as I've got good support out some distance from the head stock I feel I've got it secured and steady. They're a necessary help but also another big piece of HW that sometimes is in the way. Not sure I'd want to maneuver and wrangle around two of them.
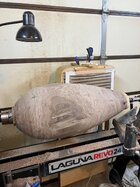
Today I was able to get the bottom plug made and glued in. I made it from a piece of walnut I had that was dry, stable and from the center of a smaller piece. This will at least give some consistency to the grain orientation on the bottom however, I seriously doubt it will ever be seen by anyone other than me. I turned the plug end first. I turned it very close to size and then did several test fits to find just the right size. Taking a little bit off between each test fit. I want it snug but not tight. I leave the chuck mounted as I do the test fits just to make sure everything stays centered and consistent. Once I got to the dia I wanted, including the depth of 1", I created another larger tenon just behind the plug. I left a ring of wood larger than the plug dia and the new tenon dia to give me a stronger glue joint for when I start the second turning. All of this will get turned away in the final stages as I true up the bottom. The only thing that will remain is the actual plug itself. There won't be a lot of stress on this joint but it does need to hold through the next turning, the sanding and the finishing.
Attachments
Last edited:
I used Titebond II to glue it in place. I'll let this dry overnight and then start next steps tomorrow. I decided to stand it on end while the glue sets. I thought about pressing it between centers on the lathe but with the piece being 20lbs I felt it would be enough weight on the glue joint and would be easier to manage. I use wooden blocks (stacked up on the table) with different dia holes in them to stand pieces up on my workbench. Very handy for being able to stand pieces up with a tenon on them in between steps or to evaluate the profile and shape. In image 9794 you can see where I did a bit of second turning for where the steady rest needed to ride while I trued up the bottom. You can easily see the difference in the wood where I turned vs the rest of the piece. After boiling pieces will look awful and you might think they're ruined. The discoloration is shallow and just a slight bit of turning brings them back to life.
Attachments
Last edited:
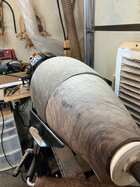
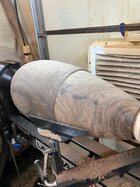
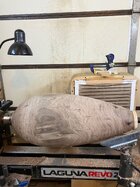
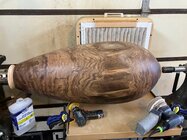
Working on the second turning this morning. I mounted it in the chuck using the tenon plug I glued in yesterday and a cone center on the tail stock. I start at the top neck opening and work my way back about 2 to 3 inches at a time. I have three 1/2" spindle gouges that I use. I rotate them regularly to keep a sharp clean edge. I take multiple light cuts to get down to a flat surface and sneak up slowly on where I can get a clean cut all the way around. I then move up and work the next 2 -3 inches. The warpage in a piece, especially one this size, can vary a lot as you move along so you have to move slowly, watching your curve profile as you go and making sure you only take off as much as needed. Don't assume that the same depth of cut will work all the way along. I typically taper off my cut just a little as I move along the small section I'm working to be sure that the warp profile hasn't changed. It's easy to get too aggressive early on and end up with your curve profile changing such that you run out of material later on. As you move along you can come back and blend the profile as needed, then start another 2-3 inch section. You can see in several of the pics where there's a dark patch that I left. That's a low spot where the tool hasn't quite cut yet. That tells me that I'm very close and some steep angle sheer cuts or a few passes with my NR scraper will finish it off.
I had to cut deeper than I typically do for the first third or so. There was a low area (dark spots) that was consistent almost halfway down the piece. You can't leave it and hope to sand it out so you just keep sneaking up on it, checking your curve profile, very very light cuts, etc until you get there.
Working a second turning requires paying close attention to tool control. Anchor it on the hip, control with the hand on the handle and light touch on the tool at the tool rest. You can feel when you've got a clean cut all the way around but, it's very easy to have the tool bounce when first starting on a section. It's easy to have this bounce begin to self propagate around the piece and can be tough to get rid of. Light cuts, if the bounce doesn't feel right back up and try to get slightly under it to start again. And, if you think your tool is dull is almost certainly is.
Attachments
Last edited:
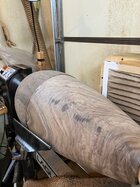
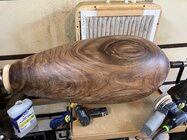
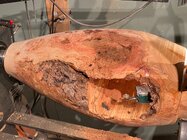
Finishing up on the second turning. Fortunately the low area tapered off as I moved toward the wide part of the piece and I didn't have to remove as much material to get a flat surface. I'll take a break and then go back over it numerous times with my NR scraper to eliminate as many of the undulations in the surface as I can. They can be very hard to detect by sight so watching the shavings and cutting edge on the NR scraper helps locate them. I leave it mounted until I'm sure I'm done with tools on the outside. There's really no way (at least not for me) to remount and come back to a perfect mount that doesn't create a very slight difference. Touching it again with a tool is asking for trouble.
Finishing this stage is a big sigh of relief. The next steps don't carry the potential for disaster or total failure that the ones up until now do. The only real risk now is dropping it or knocking it off my workbench and having it crash to the floor and split apart - which I've done.
Finishing this stage is a big sigh of relief. The next steps don't carry the potential for disaster or total failure that the ones up until now do. The only real risk now is dropping it or knocking it off my workbench and having it crash to the floor and split apart - which I've done.
Attachments
Last edited:
Really appreciate you schooling us on your process, Randy.
For filling knot holes and non structural cracks I use black (Ebony) timbermate wood filler. It's water based, easy to use, dries quick and sands easily. It dries more grey than black so I add black water based india ink to it to keep it moist and darken it up. It can be reconstituted with water, or india ink, if it dries out over time. If I have a crack that is deep or I think could compromise the long term structural integrity of the piece I use West Systems GFlex two part epoxy. It has a really long working time and will flow deep into a crack. I'm amazed sometimes at how much will keep flowing deep into a crack so I always make sure I have painters tape on the inside if I see any indication of the crack. I've forgotten before and once it drips into the piece and onto the opposite side it's very difficult to get it off. I'll sometimes also use West Systems G5 two part 5 minute epoxy on larger voids where I think they're too big for using Timbermate. I use System Three black epoxy pigment to dye it black whenever I use GFlex or G5. I've also sometimes used black mica powder with epoxy. It can add a bit of shimmer to the epoxy that, depending on the piece and size of the crack, can look nice.
I only had three small knots on this piece and they weren't that much to fill so I used Timbermate.
I only had three small knots on this piece and they weren't that much to fill so I used Timbermate.
Attachments
Last edited:
Sanding, sanding and more sanding. I use a 5" ROS for sanding med to large pieces. I've found I can get a much flatter surface, better finish and address very very small undulations in the surface without creating more from a smaller 3" drill motor type sander. It makes it easy to spot very slight variations in the surface that I can't see or even feel. A dust line will form in a valley. You can see one in the pic above the sander. I can't feel it but it's there. This piece will get a multi coat automotive clear finish so I need a dead flat smooth surface. Undulations will be noticeable and even exaggerated in the finish. Once I get to 180 grit on the ROS I may use 240 and up on my 3" sander to address small areas as needed. One of the other considerations for pieces this size - lots of real estate to sand.
Attachments

Finished sanding to 320 this morning. I did have a problem that took me a while to address without impacting my shape profile. I first thought it was a compression ring where the steady rest touched early in the second turning step. Looking back at my photos I saw that the steady rest was not positioned where the problem was. I assume now it was likely a chatter mark/bounce that I left with my gouge and then missed with my NR scraper. With this much surface area to cover it's easy to miss things. I do try not to use the surface of the vase for my steady rest mount area and typically either leave a 1" neck on the end or glue in a ring.
The two pics while on the lathe are just after wiping down with mineral spirits. A good estimation of how it will look when done.
I'll set it aside for now and wait for when the weather improves here to start the finishing process. I'll probably start a new project page for that part. The finishing process is a lot of work as well and I need a string of days when the weather cooperates. I use an outdoor blow up inflatable spray booth (like a kids bounce house sort of thing) but I still need reasonable weather to be able to use it. I likely wont get that many here in Memphis until spring so I keep pieces sanded and waiting to be finished. One of these days I plan to set up a climate controlled finishing shed.
Attachments
Last edited:
Looks nice Randy, this has been an interesting tutorial.
Thanks Vincent. I hope others have followed and maybe a few decide to tackle a big one.
Randy, Looks great and it does indeed tempt me to scale up.
Thanks Stan. It's been quite a learning process scaling up to do much larger pieces. It's also been very rewarding facing each challenge then figuring out how to solve it in my shop environment. It's an evolving process and I still tweak how I go about it. Mine started a couple of years ago working with John Tisdale. Much of how I go about it I learned from him. There's very little info available on the "how to" for doing very large pieces. What is available is limited on most of the needed details and varies a lot from person to person. Let me know if you decide to give it a try. Happy to offer whatever help I can.
Kent, started the second turn on the ash today. No real impact on the underlying color that I can tell. Disappointed but, worth a shot. I've had better luck with black cherry colored water on some porous white oak before so hoped I would get some transfer here. Oh well, press on.I am very interested in how this turns out, having cut down an ash tree in December.
Attachments
Randy:I have a huge stockpile of large walnut that my nephew brought to me a few months ago. It was cut from a tree that blew over in the hurricane they had last summer along the gulf coast. I ended up getting most all of the tree, including the massive root ball. I started yesterday on the first of quite a few large pieces and decided I would try to keep up with a project thread on the process. Here are some pics of getting it into the shop with my tractor, rolled in place and then lifted up with my ceiling hoist I have over the lathe. I forgot to take a pic of the hoist process. Per the online log weight charts it weighs approx. 300lbs. I was able to peel off the bark with a pry bar in about 45 minutes rather than try and deal with it on the lathe. Worth the time vs the absolute mess and fight it can be with a rouging gouge.
I currently have the Clark 1 1/4" hollowing bar setup but have ordered his 1 3/4" bar setup for this one and others to come. I've hollowed to 32" before with what I have but even with an 1 1/4" bar it's a tough slog and battle for the last 12-15", depending on the wood. I debated hollowing from both ends, a viable option I've done before, but would prefer not to. The goal for the next couple of days is to decide on which end will be top and bottom and begin shaping. It's 33" x 16".
Thanks for sharing your experience. I just completed a cherry burl vase with similar challenges and learned a lot. Started with something like 28” x 14”. Final dimensions are 23.5” tall and 10” at the widest point.
Slow and steady wins the race!
Looking forward to seeing your progress.
Thanks again,
Rob
Attachments

I just completed a cherry burl vase
Wow, that's incredible - looks like it might have been a big challenge! Any more photos? Any "in-progress" photos?
A friend of mine has turned a number of large bowls with a lot of voids. Afraid of something coming apart, he would turn the the outside then wrap it with reinforced "strapping" tape before working on the inside.
JKJ
Rob, nice piece and yep, the voids make it an interesting ride for sure. It is kind of neat to be able to see your cutter through the sides as you go but the chips just go everywhere. No need to clean them out at least. I've done a few large black Cherry pieces with voids. That one should turn out very nice.
It is kind of neat to be able to see your cutter through the sides as you
I've seen some teach hollowing by cutting large holes in the sides. Lets the student see the tool, the wall thickness, and better understand the process.
JKJ
Thanks, JohnWow, that's incredible - looks like it might have been a big challenge! Any more photos? Any "in-progress" photos?
A friend of mine has turned a number of large bowls with a lot of voids. Afraid of something coming apart, he would turn the the outside then wrap it with reinforced "strapping" tape before working on the inside.
JKJ
In my experience, bark enclosures and burl features can and do often fly apart from these large hollow forms. This occurs as the hollowing is underway. The outside is basically done and sometimes even sanded and finished before hollowing. A steady rest helps but requires a complete running surface; something to plan into your project beforehand. I want the weaker material to be expelled and the stronger and stabile material to remain, so I don’t tape it down. I’ve attached a couple pics of the process. Thanks again, Rob
Attachments
Thanks, John
In my experience, bark enclosures and burl features can and do often fly apart from these large hollow forms. This occurs as the hollowing is underway. ... I want the weaker material to be expelled and the stronger and stabile material to remain, so I don’t tape it down. ...
Fair enough. I think my friend didn't want the pieces to fly out due to safety concerns so the tape kept the piece together. When the inside of the bowls were done, he removed the tape and likely removed any loose pieces by hand. From looking at the bowls, while there were many voids, it looked like the matrix had integrity and the overall structure was stable. Knowing him well, I suspect he chose wood with that in mind.
You piece certainly looks unique and inspiring, the figure is fantastic, and the wall is expertly thin! - it would be fun to see it in person.
I see burls all over my property, mostly cherry, mostly small. I generally just let them grow or give them to people who really want to turn one. Maybe I should try turning one whole. (When harvesting, I generally cut them up into little pieces. People LOVE burled ornament and pen blanks!) . A great source of figured, burl-like wood is from the underground root ball of large trees - some of the most wood stable I've experienced. I usually dig up the entire root system, trim off the small roots, and pressure wash the dirt off the rest to evaluate.
I guess I should turn what I have before getting started on anything else. Maybe I'll finally do something with this chunk (on the bigger lathe!)

There was a huge cherry burl across the fence in a neighbor's woods - I watched it grow for 15 years. I should have asked him for it but didn't - the tree eventually died and fell over and the last I checked the burl was rotting on the ground.
JKJ
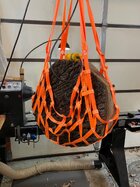
Different project but relates to this one. I decided to get a better rigging setup for lifting heavy blanks. My original DIY one wasn't ideal and made me a bit nervous sometimes. My knots were not always the best and it would creak and moan sometimes. Picked this up online for about $20. It's a 3.25ft square with long corner straps for the hoist. It has a 1,100lb rating so even if it's overstated re the specs I'm still well under the stated limit so should be fine.
This is a 23" dia walnut blank destined to be a live edge bowl.
This is a 23" dia walnut blank destined to be a live edge bowl.
Attachments
Last edited:
Randy - Just read the complete thread (just found it) and that is an amazing piece. I’ve been considering some larger pieces - my largest to date is 18” long and 9” at widest, which presented enough challenges I imagine at the size you turned they only get greater (including the fact my largest bar is 1.25” diameter). Very much appreciate all the information you include as it has answered a number of my lingering questions. I have a number of logs in the back yard waiting and will have to cut off a piece and practice with some. Thanks again for taking the time and to share your experience and posting all the pictures. John
John, thanks and let me know if you decide to tackle a bigger one or have other questions. Happy to share and learn.
Whoa, Randy what a process, thank you for documenting and sharing!