• We just finished a fairly major forum upgrade. If you are having problems using the forums, please clear your browser cache and that should clear up any issues. Otherwise post in the Help Thread or email us at forum_moderator@aawforum.org. Happy Holidays!
  • Congratulations to Alex Bradley winner of the December 2024 Turning Challenge (click here for details)
  • Congratulations to Kris DeVault for "Tri-Corner Trifecta Bowl" being selected as Turning of the Week for December 30, 2024 (click here for details)
  • Conversations are now Direct Messages (click here for details)
  • Welcome new registering member. Your username must be your real First and Last name (for example: John Doe). "Screen names" and "handles" are not allowed and your registration will be deleted if you don't use your real name. Also, do not use all caps nor all lower case.

How to make crisp finely cut detail grooves.......it's not what you think.

Odie

Panning for Montana gold, with Betsy, the mule!
TOTW Team
Joined
Dec 22, 2006
Messages
7,261
Likes
11,338
Location
Misssoula, MT
This is a question I'm often asked, and I'm initiating this post to relay the following message I sent to someone who sent a PM asking for this information.....

Thanks, XXXXXX 🙂

You know, I could write a book on this subject, but the bottom line is the grooves are done with a plain ol' spear point scraper ground to a very acute angle at the tip of the point. The real trick is to prepare the surface in such a way that eliminates all, or nearly all out-of-roundness to the geometrical shape of the bowl. Detail grooves done on a bowl that has significant out-of-round issues.....just never look very good, specifically because of the uneven appearance of the grooves.....caused by that out-of-roundness. This means mastering your tools for the purpose of eliminating the need for any aggressive sanding.....none, zip, zero, nada! (If you need to power sand the surface, you've already failed to provide a tooled surface that will be able to accept multiple details without issues. The goal should be to start sanding with fine grits, using nothing but hand held sandpaper no coarser than 180gt, but preferably 240gt.) You will always have to deal with naturally occurring warp of a bowl, but aggressive sanding is that which also contributes to destroying the perfect geometrical shape......and, that one aspect of the total equation is what you can deal with.

There will always be some amount of out-of-roundness to deal with, but if that is kept to an absolute bare minimum, the detail grooves have a crisper cleaner look to them. If the point of the spear point scraper is at a very acute angle, it can go deeper into the wood without destroying the aesthetic appeal that a wider groove will do. Going deeper will also greatly help to overcome very minor issues with out-of-roundness.

Hope that gives you a starting point for contemplating cutting good looking detail grooves.....however, my strongly held belief is.....there are no silver bullets in woodturning. For me, it took time and experimentation to find what works best.....and, that is something I can't help you with, because it's completely up to you to make these discoveries using your own initiative.

-----odie-----

-----odie-----

(Note: Edited for conceptual clarification.)
 
Last edited:
Odie, can you post a pick of your spear point scraper?

Paul

OK.....I'll try to do that tomorrow. I meant to measure the actual angle, but forgot to do that this evening....I'm just now coming in from the shop.....past midnight!. The actual angle isn't that important, as long as it is very acute. I'll get back with you tomorrow.....unless I forget again. I'm getting very forgetful lately! I hope that's not an indication of senility! 🙂

The dual sides of the spear point scraper are fashioned on an 80gt (original version of seeded gel, now discontinued) Norton SG wheel.....but, the very tip of the spear is honed with a 600gt diamond hone. There really isn't anything special about it.....just a standard everyday spear point scraper. In all practicality, it's good for only about 5 grooves, at the most......and that number could vary, depending on the species of wood. The point enters the wood at as close to center of spindle height, as possible....

-----odie-----
 
Getting a turning 'perfectly' round is a major challenge. With bowl grain/side grain orientation, for 1/4 turn you go against the grain, and for 1/4 turn you go with the grain, and repeat. To me, this means there is always two bumps per revolution, or maybe 4.... My finish cut is a shear scrape. With the shear scrape, since you are not rubbing the bevel, you are nibbling off the high spots till you get close to round. I did a pencil test for a while. Hold a lead pencil up to the spinning wood till it just touches the wood. Turn the lathe off and see how complete or incomplete your bowl is. This can vary a bit depending on there being more or less run out in your spindle, headstock bearings, and chuck. Some of my bowls will have 3/4 of the pencil equator line. Never been able to make the full circle.

robo hippy

Yes....you are absolutely correct, robo. Getting "absolute perfection" in geometry is nearly impossible. Getting as close to it as possible is the object. Aggressive sanding.....especially with power sanding.....can quickly move a bowl further away from that unattainable perfect geometry. There is a point where "very close" to perfect geometry becomes a great advantage in cutting detail grooves that have a great aesthetic appeal.

The only thing a turner can do to influence the acquisition of this aesthetic appeal.....is to master his tools for the purpose of providing a tool finish that requires a bare minimum of sanding. It's not only a matter of a gentle touch to the tool, as you describe.....it's also a matter of preventing any tearout that would require aggressive sanding.

-----odie-----
 
Odie, can you post a pick of your spear point scraper?

Paul

OK.....here you go, Paul. 🙂

These two spear point scrapers are aprox 32° angle. (An exact angle is not important.) As I mentioned previously, the sides are ground on an 80gt Norton SG wheel, and the very tip is honed with a 600gt diamond hone. Nothing extraordinary about them, but as I said, the surface preparation is the most important element of getting great looking detail grooves.....

-----odie-----

IMG_1697.JPG
 
Last edited:
@odie I know you’ve posted this before but I forget - do you hone the wheel burr off the top, then hone the hollow grind to raise a burr?

Doug.....I do remove the ground bur on scrapers that have a manually raised bur, and these are typically used for shear scraping.....but in this case with the spear point scrapers intended for detail grooves, I do not. When I hone the very tip of the spear, the ground bur is removed by the honing operation.....I think. I've never microscopically inspected the tip after honing, so I can't say for sure if the ground bur is completely removed. The actual answer to that question is moot, because performance in a clean cut when penetrating wood is the object......it does that.

-----odie-----
 
Me being a neophyte...... I used a wire to darken some of my character lines on the rim. How would I go about doing a darkening process on grooves cut on the flat surface of the bottom? Or is it even possible?
 
Me being a neophyte...... I used a wire to darken some of my character lines on the rim. How would I go about doing a darkening process on grooves cut on the flat surface of the bottom? Or is it even possible?
Countertop sheet material, the ubiquitous name being Formica. Get a few of the small samples from your local building supplies store. Press the corner edge into the groove, similar precess to using wire.

I dont use it much anymore, it makes a wider line than I like. Otherwise it works very well. Others may have a way of making thinner lines, for which I’m “all ears”.
 
I just watched a guy use some ebony to color a wooden hat band. Would some really old black piano keys be ebony and are they too dry to work for coloring?
 
Countertop sheet material, the ubiquitous name being Formica. Get a few of the small samples from your local building supplies store. Press the corner edge into the groove, similar precess to using wire.
Also - I suggest using off-brand (not Fomica) as the off-brands tend to be thinner and make better lines. You can also sand down the square to get a thinner edge (but the thin bit won't last long)
 
I’ve used various woods to color with. make a sharp edge and rub it against the wood to transfer the color of the wood.
pink ivory, padauk, ebony…. To me they are a bit like a wooden crayon. They don’t lay down ink. It more like wood adhearing to the other wood.

we did this in Michelson class to color hat band areas.

Sharpened Blackwood should work too. With a really hard wood you can burn a line too.

another coloring technique is to put a sealer over the surface, cut your design, apply paint, wipe it off, let dry. Lightly sand the surface remove any traces of paint not in the carved recesses.
I believe it was a video with Michelson in it that I just watched.
 
I don't see any advice concerning what stage of turning a bowl or platter is best for cutting detail grooves. One way to achieve even grooving is to cut the grooves before hollowing the project, during which time the wood is more likely to warp as stress in the wood is relieved as the wall becomes thinner.
 
Also - I suggest using off-brand (not Fomica) as the off-brands tend to be thinner and make better lines. You can also sand down the square to get a thinner edge (but the thin bit won't last long)
Wilsonart. That's some toxic smelling fumes and you're right they don't last long or maybe I was pushing too hard!
 
I don't see any advice concerning what stage of turning a bowl or platter is best for cutting detail grooves. One way to achieve even grooving is to cut the grooves before hollowing the project, during which time the wood is more likely to warp as stress in the wood is relieved as the wall becomes thinner.
I learned that pretty early because I tried to go back and decorate the outside after I had turned the inside and I tried but you never can get it to mount in the exact position as before.
 
I don't see any advice concerning what stage of turning a bowl or platter is best for cutting detail grooves. One way to achieve even grooving is to cut the grooves before hollowing the project, during which time the wood is more likely to warp as stress in the wood is relieved as the wall becomes thinner.

If I want fine detail then it will be a 2 turn item, including hf’s. Wet wood doesnt take fine detail as well, then sometimes sanding will obfuscate the details.

Let ‘em dry, return for thickness and roundness. Then add details.
 
I agree with you, Doug...do not cut enhancements into a wet turning blank. However, I should have made it clear that I work mostly with dry wood. Often, When I want to cut detail grooves into the project rim, I will finish turn the exterior, sand, cut the grooves , and then do the hollowing. Even dry wood will move a little, but hardly ever enough to be perceptible to the eye.
 
Countertop sheet material, the ubiquitous name being Formica. Get a few of the small samples from your local building supplies store. Press the corner edge into the groove, similar precess to using wire.

I dont use it much anymore, it makes a wider line than I like. Otherwise it works very well. Others may have a way of making thinner lines, for which I’m “all ears”.
Forgive me but the obvious is to just use thinner wire. I use any number of wire thicknesses to get the burning I like...from a super heavy duty wire coat hanger to extremely thin braided steel wire. The nice thing about braided wire is that it heats up very fast due to greater friction.
 
Forgive me but the obvious is to just use thinner wire. I use any number of wire thicknesses to get the burning I like...from a super heavy duty wire coat hanger to extremely thin braided steel wire. The nice thing about braided wire is that it heats up very fast due to greater friction.
Little tough to use wire on the bottom of a bowl if you put grooves on it
 
I've enjoyed reading this "old" revived thread - there is so much wisdom buried on this forum.

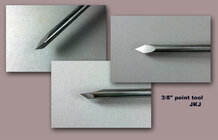
As for the tool (Odie: "the grooves are done with a plain ol' spear point scraper ground to a very acute angle at the tip"), I feel inspired to add my 2 cents. Some years ago I ground a 3/8" round 10V rod from Doug Thompson into a "point" tool. It's been so useful I later made a second one from 1/4" rod. The point is very cute, er, acute.

I use these to make narrow grooves on anything - spindles, side grain, end grain, plastics, metals, trespassers - unless I want deep v-grooves made with the skew. Works incredibly well, cuts clean. Easy to make a consistent set of grooves.

I call it my Wicked Point Tool:
point_tool_comp.jpg

If I want to darken lines that can't easily be burned, I apply an appropriate finish first then rub a bit of thick dark grain filler into the grooves.

JKJ
 
Back
Top