• We just finished moving the forums to a new hosting server. It looks like everything is functioning correctly but if you find a problem please report it in the Forum Technical Support Forum (click here) or email us at forum_moderator AT aawforum.org. Thanks!
  • Beware of Counterfeit Woodturning Tools (click here for details)
  • Johnathan Silwones is starting a new AAW chapter, Southern Alleghenies Woodturners, in Johnstown, PA. (click here for details)
  • Congratulations to Dave Roberts for "2 Hats" being selected as Turning of the Week for April 22, 2024 (click here for details)
  • Welcome new registering member. Your username must be your real First and Last name (for example: John Doe). "Screen names" and "handles" are not allowed and your registration will be deleted if you don't use your real name. Also, do not use all caps nor all lower case.

Homemade Klin

Joined
Mar 19, 2016
Messages
1,187
Likes
1,282
Location
Haubstadt, Indiana
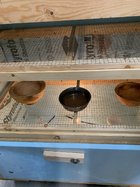
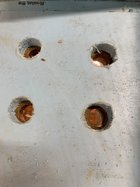
I appreciate the suggestions. It will be a learning curve. I will need to develop a schedule for drying. In addition to using a timer, I have options to slow the rate of temperature rise. I have four 1” holes in the top for my secondary use. I could start leaving all four uncovered and cover one each day slowing the temperature rise. I could also turn it off at night simulating a solar kiln. Adding the pan of water seems like a good idea. Another option is getting some lower watt light bulbs from the Restore. All in all I am satisfied with my design and build. There may be a few failures, but I believe I will be successful using this kiln.

holes in top
50AB6D69-1AB0-44F0-997D-6D8659E2BE4D_1_201_a.jpeg

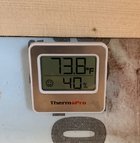
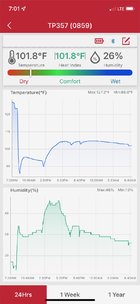
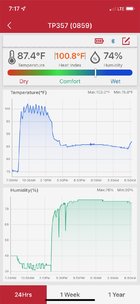
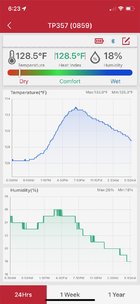
This is the temperature showing the drop overnight as the outside temperature went down. Humidity also dropped to the lowest reading g so far. I’ll take a look at the piece today and check the weight.
BA6501D2-6411-4B95-BFD4-00A265E3B72F_1_201_a.jpeg
 
Joined
Jun 1, 2006
Messages
326
Likes
154
Location
Freelton, ON
My approach is always the tortoise route. Low temperature and high humidity to start. Otherwise cracking will happen with most woods. Start out just above ambient and get up to 95F for a while finishing off higher after initial water loss. Have a chart but do not have it on my iPad. You start out closely monitoring and after a few tries load it and forget it. Temperature rises on its own as less energy is used to vaporize water.
 
Joined
Jul 18, 2018
Messages
1,073
Likes
1,761
Location
Baltimore, MD
William, I’m curious about your chart. Is this something you entered data to create (Excel?) or is this tracked for you by the temp/hygrometer instrument?
 
Joined
Mar 19, 2016
Messages
1,187
Likes
1,282
Location
Haubstadt, Indiana
My approach is always the tortoise route. Low temperature and high humidity to start. Otherwise cracking will happen with most woods. Start out just above ambient and get up to 95F for a while finishing off higher after initial water loss. Have a chart but do not have it on my iPad. You start out closely monitoring and after a few tries load it and forget it. Temperature rises on its own as less energy is used to vaporize water.

Mike, You, Gerald, and Richard are so right about low temperature. Right now I’m in the testing mode and just have a few small pieces to test. The first test was a learning curve as I thought I needed high temperature. The little walnut bowl cracked. I now have two smaller cherry bowls in as test. I turned them and coated one with sealer and white glue on the other. Both have branch piths. Left them out several hours in 90F+ shop before putting in kiln. I add a pan of water and changed the light bulb to 40 watt. My goal was to stay under 105F preferably around 100F. I have 4 1” vent holes in the top open and the doors open to create a 3/16” gap the length of the door. Current kiln temperature this morning is 102.0F and outside temperature is 72F. It is going to get to 90’sF again today and need to watch kiln temperature. I think I could bake a cake in this kiln with a 60 watt bulb. So far after 1 day the cherry bowls are doing fine. I was initially going to put in a metal 6” blast gate for venting, but thought that was overkill with the 4 1” vent holes. Now thinking of adding it to control the temperature. I got an initial humidity rise at first, but now the humidity is going down. I just have two small pieces in the kiln. I may add the cutoff’s from the blank to increase the humidity. Plan is to stay at current temperature for 3 days then close door completely for a day looking for 110F and finally cover vents for a day looking for 115F. Since these are small I think they will be dry by then. It’s a learning curve.

8AE32117-04A3-4831-AB49-455F307F233B_1_201_a.jpeg

William, I’m curious about your chart. Is this something you entered data to create (Excel?) or is this tracked for you by the temp/hygrometer instrument?
Lou, when I went to buy the sensor from Amazon, there was a pop up that a newer version was available. It was about $2 more ($10 total) and that is the one I bought. Not sure what one you bought and if it has the same feature.. I’m glad you posted it as it is ideal for anyone who wants to build a kiln

This is what mine looks like
C5B01592-2A7B-4691-9A30-E7D0F4BD55DB_1_201_a.jpeg

When I open the app this screen shows up

300FE099-A6CD-4A61-9DE3-8AA661DA17B5_1_201_a.jpeg
I tap the temperature bar area and the graph appears. It takes a few seconds to upload the data. Evidently the sensor stores the data and downs loads when the bluetooth is active. I take a screen shot and save to photos.
79668EFD-B371-497B-9DC6-84DF6E5F52D7_1_201_a.jpeg
 
Joined
Jul 18, 2018
Messages
1,073
Likes
1,761
Location
Baltimore, MD
William, I’m not sure mine has that capability to upload data to an app. I’ll have to check. But honestly, not sure I need it. I really only bought it because it had a wireless sensor and a range of 200’ so I could monitor it in the house (shop is in a detached garage).
 
Joined
Mar 19, 2016
Messages
1,187
Likes
1,282
Location
Haubstadt, Indiana
William, I’m not sure mine has that capability to upload data to an app. I’ll have to check. But honestly, not sure I need it. I really only bought it because it had a wireless sensor and a range of 200’ so I could monitor it in the house (shop is in a detached garage).
I find it a nice feature for setting up the kiln. I think mine said 260 feet unobstructed. My shop is a metal pole barn about 100 feet from the house. I don’t connect in the house, but just outside the door I do.
 
Joined
Aug 14, 2009
Messages
2,054
Likes
1,145
Location
Peoria, Illinois
I'm surprised to see a bowl with a finish on it in a kiln. I think you'll find that some of them blush from getting moisture trapped under the finish.
 
Joined
Mar 19, 2016
Messages
1,187
Likes
1,282
Location
Haubstadt, Indiana
I'm surprised to see a bowl with a finish on it in a kiln. I think you'll find that some of them blush from getting moisture trapped under the finish.
Richard, no finish. One has wood sealer and the other has white glue.
 
Joined
Jul 19, 2018
Messages
1,713
Likes
2,246
Location
Ponsford, MN
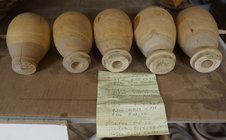
Here is an example of why a kiln is not necessary!
The 5 hollow forms were turned from the same small black cherry and they all were initially put into a brown paper grocery bag until the moisture loss tapered off. The 5 were all rough turned on the pith. The one on the left was turned first and developed the 3 checks in the tenon that extended into the bottom of the form. The next 4 marked A, B, C & D were turned after the first one had cracked so I drilled into the tenon to reduce the mass and that seams to have prevented the cracking. The paper is a record of the drying of A -D and it is plain to see that it only took a little over a month for them to reach equilibrium. Also notice that as the humidity increased the weight increased.

DSC01366.JPG
 
Joined
Feb 6, 2010
Messages
2,980
Likes
1,955
Location
Brandon, MS
Correct me if I am wrong but for my kiln I set an upper and lower temp. Then the thermostat turns the bulb on or off to keep the temp between the two parameters. The one that was put on this kiln is calibrated in either C or F. I checked on Amazon and these cost in the mid $20 range. I weight my pieces daily and that or to add water is the only reason to open the door. For a bowl takes 3 to 5 days. By the way I had trouble with walnut also.
 
Joined
Mar 19, 2016
Messages
1,187
Likes
1,282
Location
Haubstadt, Indiana
Here is an example of why a kiln is not necessary!
The 5 hollow forms were turned from the same small black cherry and they all were initially put into a brown paper grocery bag until the moisture loss tapered off. The 5 were all rough turned on the pith. The one on the left was turned first and developed the 3 checks in the tenon that extended into the bottom of the form. The next 4 marked A, B, C & D were turned after the first one had cracked so I drilled into the tenon to reduce the mass and that seams to have prevented the cracking. The paper is a record of the drying of A -D and it is plain to see that it only took a little over a month for them to reach equilibrium. Also notice that as the humidity increased the weight increased.

View attachment 45360
Don, there are a lot of things that are not “necessary”. There are also a lot of ways to do things differently. I have about 10 -12 bags sitting around in my shop right now. And as far as drying in an attic, that is also a good and different way to dry wood. However I’m 74 and my days of going up and down a ladder/stairs carrying wood are over. I have a secondary use for this kiln. I don’t need both of my Thompson 5/8” bowl gouges or 3 of my 3/8” Thompson gouges, one of each would work. But I like having them. I will definitely like having a bowl ready to turn in 10 days verses one to eight months, but don’t need it.
 
Last edited:
Joined
Mar 19, 2016
Messages
1,187
Likes
1,282
Location
Haubstadt, Indiana
Correct me if I am wrong but for my kiln I set an upper and lower temp. Then the thermostat turns the bulb on or off to keep the temp between the two parameters. The one that was put on this kiln is calibrated in either C or F. I checked on Amazon and these cost in the mid $20 range. I weight my pieces daily and that or to add water is the only reason to open the door. For a bowl takes 3 to 5 days. By the way I had trouble with walnut also.
Gerald, I do have the water heater thermostat that will cycle. It is a pain to get a set point as the scale to set is not real precise and the lowest temperature I can set is 106F per the scale. Why 106F I don’t know. I’ll set it down to the lowest setting for my next test to see what exactly the real low point is. I’ll look for a better thermostat that is easier to set and can set to around 100F. Right now I have it set for my secondary use at 136F off and 135F on. I’d like to set it at 140F off and 139 on, but the setting scale is too coarse. I’ve got a CFL bulb I’ll try to see what little heat it generates. Building this I thought I would be fighting to keep heat in, so I built it tight and insulated it well. However it is the opposite. I have named it my “Yeti”.

Edit: I ordered a digital thermostat.
 
Last edited:
Joined
Feb 6, 2010
Messages
2,980
Likes
1,955
Location
Brandon, MS
Gerald, I do have the water heater thermostat that will cycle. It is a pain to get a set point as the scale to set is not real precise and the lowest temperature I can set is 106F per the scale. Why 106F I don’t know. I’ll set it down to the lowest setting for my next test to see what exactly the real low point is. I’ll look for a better thermostat that is easier to set and can set to around 100F. Right now I have it set for my secondary use at 136F off and 135F on. I’d like to set it at 140F off and 139 on, but the setting scale is too coarse. I’ve got a CFL bulb I’ll try to see what little heat it generates. Building this I thought I would be fighting to keep heat in, so I built it tight and insulated it well. However it is the opposite. I have named it my “Yeti”.

Edit: I ordered a digital thermostat.
I use incandescent bulb , I think 60 W. The ramp up time is not critical as you will be looking at several hours to get it even. I would allow a 6 to 10 degree spread between bulb on and off because the temp does not seem to need a precise and consistent temp. Think you will like the digital thermostat.
 
Joined
Feb 3, 2010
Messages
384
Likes
439
Location
Adelaide Hills, Australia
I have no experience with kiln drying of wood myself, but pass on secondhand the experience of a colleague who professionally turned woodwind music instruments out of expensive boxwood (buxus), which is one of the most expensive woods when correctly seasoned.

On one occasion his kiln caught 'on fire' and charred its very expensive load of boxwood.

Few of us are going to working with such valuable woods, but passed on as something to avoid, especially if the kiln is inside your workshop.

Theoretically light bulbs of the wattage discussed shouldn't reach the ignition (flash) point of wood, but charring can as was the experience of my mate.
 
Joined
Mar 19, 2016
Messages
1,187
Likes
1,282
Location
Haubstadt, Indiana
Why not try to start with spending a day or two to read read up on the basics of wood drying? Then you can start thinking of applying this to a small scale kiln. There are many good books, e.g. from USDA https://www.fpl.fs.fed.us/documnts/fplgtr/fplgtr118.pdf
I have spent more than a day or two reading information on kilns. However most all of the information. is for commercial kilns. It actually led me down the wrong path regarding temperature. Most of what I read said to use 120F-140F for drying. While this may be applicable for a commercial kiln, it does not relate to a kiln used for drying turnings. Commercially it is acceptable for minor cracks to happen, where we turners don’t want any cracks. I have gotten much better information from those who have posted here regarding temperature and schedule. IMO for a homemade kiln for drying turnings you will need to develop a schedule for time at temperature and temperature to use for drying that will be different from any commercial schedule. In addition you need to accurately control the temperature. I have learned that you cannot accurately control the temperate with bulb wattage and venting. To control the temperature you need an accurate thermostat. My first attempt was using a water heater thermostat. This is a mechanical disc type where you can set the off, but cannot set the on. The setting scale is coarse and repeatability is not real good. I have on order a digital thermostat where I can set both off and on temperature. I’ll keep the water heater thermostat set high as a secondary cutoff should the digital thermostat ever fail. My hope this thread will help others who want to build a kiln.
 
Joined
May 1, 2022
Messages
22
Likes
24
Location
Arazede, Portugal
Hi. There are programable devices for temperature control. The PDI controllers like that. There are many brands and information on how to use and program them…
 

Attachments

  • EZ PMExp Rev E PID.pdf
    2.5 MB · Views: 9
Joined
Mar 12, 2017
Messages
85
Likes
152
Location
Sweden
I have spent more than a day or two reading information on kilns.
You are not the only amateur to believe that the established wood drying technology does not apply to your kiln. The fundamental technology that governs wood drying is the same whether you have one board or a thousand boards in your kiln. The important part is to have a good kiln schedule for the wood you attempt to dry. Briefly the kiln schedule rules how you adjust the humidity in the kiln after the humidity of the wood, in order to get a reasonably cautious drying of the wood. The kiln humidity is easy to measure as dry/ wet bulb temperature. The temperature itself is not important. All this is explained in textbooks on drying. Please, make another effort to read up.

A very simple rule is that if you start with raw wood, set the temperature with a thermostat, absolutely necessary, adjust the exhaust airflow to get a dry/wet bulb difference of 2 degrees C and leave the exhaust vent constant. The dry/wet bulb difference will then gradually increase and when it has reached 30 degrees C, the wood will be furniture dry, about 6% MC.
 
Joined
Mar 19, 2016
Messages
1,187
Likes
1,282
Location
Haubstadt, Indiana
You are not the only amateur to believe that the established wood drying technology does not apply to your kiln. The fundamental technology that governs wood drying is the same whether you have one board or a thousand boards in your kiln. The important part is to have a good kiln schedule for the wood you attempt to dry. Briefly the kiln schedule rules how you adjust the humidity in the kiln after the humidity of the wood, in order to get a reasonably cautious drying of the wood. The kiln humidity is easy to measure as dry/ wet bulb temperature. The temperature itself is not important. All this is explained in textbooks on drying. Please, make another effort to read up.

A very simple rule is that if you start with raw wood, set the temperature with a thermostat, absolutely necessary, adjust the exhaust airflow to get a dry/wet bulb difference of 2 degrees C and leave the exhaust vent constant. The dry/wet bulb difference will then gradually increase and when it has reached 30 degrees C, the wood will be furniture dry, about 6% MC.
Lennart, you are far more knowledgeable on this than I am. I do appreciate your input. I looked at wet/dry bulb measurement but I don’t have a wet bulb measurement for my kiln. I haven’t run across where anyone who has installed this measurement for a homemade kiln. Ideal yes, but this is just well insulated box with a light bulb for a heat source and a fan to move the air. Letting the temperature rise slowly and checking weight loss as a method to determine if the wood is dry. Not that scientific, but from what I have determined it is the method most have used. The two cherry pieces I have in the kiln have now lost 30% of their initial weight and no cracks are present other than at the pith of a branch.
 
Joined
May 30, 2022
Messages
242
Likes
249
Location
Belchertown, MA
You can’t really do a commercial kiln schedule with a box and light bulb. Commercial kilns have a huge volume of wet wood with a relative small volume of air and controlled venting to regulate humidity. That’s hard to duplicate with a box and a light bulb.

I have been trying to think of way to get high humidity into the box for the initial stages without resorting to something really complicated.
 
Joined
Mar 12, 2017
Messages
85
Likes
152
Location
Sweden
Lennart, you are far more knowledgeable on this than I am. I do appreciate your input. I looked at wet/dry bulb measurement but I don’t have a wet bulb measurement for my kiln. I haven’t run across where anyone who has installed this measurement for a homemade kiln. Ideal yes, but this is just well insulated box with a light bulb for a heat source and a fan to move the air. Letting the temperature rise slowly and checking weight loss as a method to determine if the wood is dry. Not that scientific, but from what I have determined it is the method most have used. The two cherry pieces I have in the kiln have now lost 30% of their initial weight and no cracks are present other than at the pith of a branch.
It is very easy to make a wet bulb. Just wrap some tissue paper or cloth around the thermometer, or sensor, and soak in water. Another tip is to start the drying by steaming the bowls. This equalizes moisture content and relieves tensions. A wall paper remover or similar works well. Close exhaust on kiln and let steam in till the temperature rises to about 80 dgr C (180 F). Stop the steam and set the thermostat to what you want, maybe 50 dgr C (120 F ) open the exhaust valve very little. When you have reached a difference of 2 dgr C (4 F) you leave the exhaust valve at that setting. When you have reached a dry/wet difference of 25 dgr C (45 F), which will take a couple of weeks, the bowls will be dry. A prerequisite for all drying is that you have a good air circulation in the kiln. However, I still urge you to read more of how drying works.
 
Joined
Aug 14, 2007
Messages
5,491
Likes
2,840
Location
Eugene, OR
I am trying to remember, but don't standard kilns use steam? I did concrete work around the lumber mills here, and I don't think all the steam came from just the moisture in the wood. I never cared for steaming or boiling since it tends to muddle the colors together.

robo hippy
 
Joined
Apr 12, 2022
Messages
73
Likes
23
Location
Papamoa Beach, New Zealand
I am thinking of building a homemade kiln. I didn’t see anything in the search. I want to dry long spindle stock. I thinking of using a insulated OSB box and maybe three halogen light bulbs. I would wire a snap disc thermostat ~145 degrees F. An old refrigerator won’t work because of the length of the spindles. Suggestions are welcome.
DO NOT use halogen lights unless you want a fire. I spent most of my working life in timber preservation and as others have said the key is air movement. what ever you decide to do I would suggest a drain in the lowest part of your kiln as there will be a suprising amount of moisture that needs to be got rid of along with the wood tannins that will leach out. My suggestion is to use steam to heat the kiln through a radiator of some type. Take your time drying and do NOT dry below the average air moisture other wise you will not have wood stability. Good luck building your kiln.
 
Joined
Mar 19, 2016
Messages
1,187
Likes
1,282
Location
Haubstadt, Indiana
Update: I changed my thermostat control to a digital control. Much better. Thanks for suggesting @Gerald Lawrence. @robo hippy from what I have read they use to use steam running through pipes as a heat source in those kilns. It was not cost effective and steam is no longer used per the information I found.

Testing the on/off setting the digital thermostat worked well. The zig zag in the chart is the testing with a 65 watt flood. The 65 watt the temperature cycles between the thermostat set points. With a 40 watt the cycle is much longer.

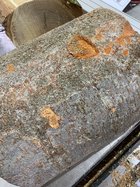
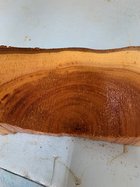
I had a piece of wood that I believe might be Flowering Japanese Cherry (see pictures) for my next drying test. MC was 30%. I roughed out two 8-9” bowls. I always cut my blanks round on my bandsaw and I took the cutoffs, sprayed them with water and put them in the kiln along with the bowls, no heat. After 1 day the humidity increased to 75% in the kiln. A slower approach I turned on one 40 watt bulb and have the thermostat set to 95F on and 100F off. I’ll just use the 40 watt bulb for at least the first week. Eventually I will increase the temperature points to 100-105 and start weighing the bowls.

F0199F6F-235F-4C74-9E1C-C274BD572101_1_201_a.jpeg

I think this is Flowering Japanese Cherry. Other possibilities??

DB746D95-EB38-45D1-B705-1000FCC4CD63_1_201_a.jpeg 9AC3A292-7A03-4C39-B153-F6DED0283FE5_1_201_a.jpeg
 
Joined
Jan 13, 2022
Messages
177
Likes
123
Location
Middletown, PA
Website
www.timsworkshop.com
Could you expand on this point? Why is fire more of a risk than with incandescent bulbs? Are you talking about the halogen replacements for standard incandescent bulbs?
Probably because Halogen lights tend to burn as hotter temperatures than regular incandescent bulbs. Back when the Halogen Torchier (not sure if I spelled that right) were just becoming popular, there were also fire issues - people would put them where things like curtains and other flammables would be able to get in and lay on the bulb. Fire being the result, because of the high temperatures.

I am going to use a 100W reptile heater for mine, when I get back to working on it. I have the kind that looks sort of like a flood light bulb, but very skinny with a flat round disc on the end. Screws into a standard light socket. I drew up plans to make a metal shield over it to keep drippings off it. The shield also incorporates a fan to move the heat and air around inside the freezer turned kiln.
 
Joined
Aug 14, 2007
Messages
5,491
Likes
2,840
Location
Eugene, OR
I had a halogen spot light or two in my shop. I could smell smoke a few times, and got rid of them. They do burn pretty hot. The LED lights don't quite have the good spectrums that some of the Ott or Blue Max lamps do. These are the ones that the needle point and quilters use. If you have one of those type of people in the house, stealing their light is as bad as using their fabric scissors to cut paper.....

robo hippy
 
Joined
Jun 6, 2018
Messages
1,958
Likes
1,004
Location
La Grange, IL
Halogen replacements for ordinary incandescent bulbs (i.e. to be used in residential lamps) have the small Halogen bulb contained within the glass envelope of a standard (A 19) light bulb. I suspect this reduces the risk somewhat, although it still gets hot. They are dimmable, which adds another temperature adjustment. Certainly any heat source you use should be installed with due respect for nearby combustibles.
 
Joined
Jan 13, 2022
Messages
177
Likes
123
Location
Middletown, PA
Website
www.timsworkshop.com
I had a halogen spot light or two in my shop. I could smell smoke a few times, and got rid of them. They do burn pretty hot. The LED lights don't quite have the good spectrums that some of the Ott or Blue Max lamps do. These are the ones that the needle point and quilters use. If you have one of those type of people in the house, stealing their light is as bad as using their fabric scissors to cut paper.....

robo hippy
Grew upwith one of 'those' types - my mother was (and still is) very much into quilting. Thou shalt not touch the fabric scissors unless you are cutting fabric. Any other use an ye shall be subject to...well, we just wont think of that :)

My youngest (turns 20 in a couple of weeks! Man am I getting old) is the same way. She is not into the quilting, but is very much into 'cosplay' and makes her own costumes.

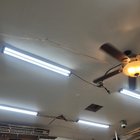
I used to have fluorescent 'shop lights' (the 2 tube, 48" lights) mounted to the ceiling in my shop, outfitted with tubes that had a color temperature of, I believe, 6500 degrees Kelvin. I found (on Amazon) some led shop lights the same size and similar color temperature. Replaced all but one of the old fluorescents - the LED came in a box of 8, I needed 9 and they did not have singles available. Most of the bulbs on tools are also daylight LED bulbs, not that it matters a lot there, but I like the color consistency.

These are the lights I mounted to the ceiling in my shop: https://www.amazon.com/gp/product/B081QVPB31/
 

Attachments

  • 20220702_124847.jpg
    20220702_124847.jpg
    258.3 KB · Views: 3
Joined
Feb 6, 2010
Messages
2,980
Likes
1,955
Location
Brandon, MS
. Fire being the result, because of the high temperatures.

. I drew up plans to make a metal shield over it to keep drippings off it.
Not sure where all this fire and water talk comes from. I use my kiln for turnings (after first turn) and have never had water drip from them . As to fire just use smaller bulbs and keep the heat between 90 and 120. My bulb does have a aluminum shield over it as a heat sink.
 
Joined
Jul 18, 2018
Messages
1,073
Likes
1,761
Location
Baltimore, MD
Gerald (or anyone else who uses a kiln after rough turning), do you use Anchorseal or similar sealer on the turnings that go in the kiln? If so, end grain only?
 
Joined
Feb 6, 2010
Messages
2,980
Likes
1,955
Location
Brandon, MS
Gerald (or anyone else who uses a kiln after rough turning), do you use Anchorseal or similar sealer on the turnings that go in the kiln? If so, end grain only?
Have done it both ways and sealing the endgrain with parafin does seem to help end grain cracks
 
Joined
Jan 13, 2022
Messages
177
Likes
123
Location
Middletown, PA
Website
www.timsworkshop.com
Not sure where all this fire and water talk comes from. I use my kiln for turnings (after first turn) and have never had water drip from them . As to fire just use smaller bulbs and keep the heat between 90 and 120. My bulb does have a aluminum shield over it as a heat sink.
The dripping is not necessarily water, anything that may ooze out. The shield is also to give me a bit more control and to protect the bulb should someone (me) drop something :) Having a box over the bulb will mitigate the chance that a falling hunk of wood won't take it out. Don't have it built yet and I already chipped the ceramic on one of the 100W heater bulbs I have. Only putting one in, they came in a pack of 2. Since it is an inaccessible area, I am not concerned about the little bit of coil that is visible.

The fire talk was specific to halogen bulbs because they burn at a significantly higher temperature than incandescent for the same power. Should there be pieces of wood shavings or bark, etc., fall onto the bulb there is a very real chance of fire. Regular bulbs should be fine - it is the halogen bulbs that are the main concern from a fire perspective.
 
Joined
Jul 18, 2018
Messages
1,073
Likes
1,761
Location
Baltimore, MD
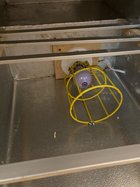
I’ve got one of these light bulb cages to protect the bulb from mishaps. Just loaded my drying box for the first time. I rough turned 18 bowls yesterday and today. 10 red maple and 8 ash. Coated end grain on all, and put half in the box and half on the shelf as usual. Weighed all, and then created an Excel spreadsheet to chart weight loss and percentage loss. Looking forward to seeing how this all works for me.
 

Attachments

  • 08395194-A58A-41A7-8D9D-18C3565587DA.jpeg
    08395194-A58A-41A7-8D9D-18C3565587DA.jpeg
    413.3 KB · Views: 6
Joined
Mar 19, 2016
Messages
1,187
Likes
1,282
Location
Haubstadt, Indiana
It is a fact halogen bulbs reach a much higher temperature than incandescent bulbs. However if you compare a 100w incandescent bulb to a 40w halogen bulb the temperatures are similar. You should take precautions regardless of the type of bulb. As far as moisture or anything else I have not seen anything. My shelves are covered with 1/2” wire hardware cloth, so no danger of anything falling on the bulbs.
@Tim Starliper I looked up ceramic reptile bulbs and the information I saw was they produce about 106F temperature. Is that the highest temperature you want with one bulb or are your ceramic bulbs different?
 
Back
Top