• April 2025 Turning Challenge: Turn an Egg! (click here for details)
  • Congratulations to Kelly Shaw winner of the March 2025 Turning Challenge (click here for details)
  • Congratulations to Ellen Starr for "Lotus Temple" being selected as Turning of the Week for 21 April, 2025 (click here for details)
  • Welcome new registering member. Your username must be your real First and Last name (for example: John Doe). "Screen names" and "handles" are not allowed and your registration will be deleted if you don't use your real name. Also, do not use all caps nor all lower case.

Finishing maple with least color change, while still bringing out chatoyance in ripple figure?

Joined
Jul 30, 2021
Messages
352
Likes
100
Location
Aurora, CO
I just turned my first "Jimmey Clewes" style platter, from a 14" AAA ripple figured maple platter blank. The ripple figure is incredible. The natural color of the wood is INCREDIBLE! I love the natural color of maple in general.

I am now at the point of finishing it...and I'm honestly not sure what finish to use. I really don't want to change the color of the wood, however I know anything based on linseed will yellow it significantly. Shellac (even the bleached blond stuff, in my experience) will yellow it. I have used Acks finishing polish in the past, which generally needs to be used with a sanding sealer, which are usually shellac based (or perhaps mylands which is cellulose based), and that also yellows the wood, although less than linseed oil finishes...so I am wary of trying the Acks approach in this piece. I know that polyurethane will yellow it, and yellow more over time (not to mention, that wouldn't necessarily be "food safe" (I know the definition of that term has changed a lot over time, and that for many finishes with solvents, after they evaporate, what remains is food safe, so I don't really want to get into that debate here...not sure if urethane falls into that class at all though)).

I am wondering what finishes are out there that will really bring out the chatoyance of the ripple figure in this wood, without changing the color beyond the normal darkening that most finishes introduce (I'm fine with the darkening). I mostly just don't want this beautiful piece to become yellow. I have done some work with Lacquer, and that is a heck of a LOT of work, and in the end I don't think I'll be able to keep the surface as smooth and neat as it is right now.

I've played around with polycrylic, but man, that stuff is really thick and does not really seem to bring out the chatoyance at all in my experience with it so far...but, maybe someone can convince me it can?

I've also looked into water-based urethanes. When I find comparisons between oil-based an water-based finishes, they almost universally say that the oil-based is better for bringing out the shimmer of chatoyance than water-based. Water-based generally contain more solids as well, and I am not sure if they would penetrate into the wood as well? I haven't tried a water-based urethane yet though, so I'm happy to hear what you more experienced woodworkers think.

Are there any other options out there for really bringing out the qualities of the wood grain, without coloring the wood?
 
Last edited:
I might start with a coat or two of (home made) super blonde shellac to bring out the chatoyance then go from there.

Water based poly, lacquer, or walnut oil (not the dark one everyone knows) could be a second step, depending on how food safe you want to go. Saturation of oil will definitely darken the wood but not yellow it like BLO.

Alternatively, Osmo polyx oil/wax finish is considered food safe and very well regarded as a top quality product, but haven't used it myself and can't speak to any yellowing effect it may or may not impart.

I suspect a lot will ride on what you consider food safe. I'd also ask why food safe is important on what is likely decorative, not utilitarian piece?
I actually have some Osmo Polyx....I forgot all about it, as I guess it got misplaced somewhere (not sure where the can is right now). That might work...

I've got a super blond shellac blend, but it definitely yellows the wood, and even very very thinned out, its been rather hard to apply and get a nice finish. I don't know what it is about shellac, but I seem to have a tough time using it. Maybe it is the ultra arid air here in Colorado, drying it out too fast, or something...not sure. But, I have a lot of trouble with shellac. Just dissolved in DNA, in sanding sealers, in friction polishes (with the exception of Pens Plus, but that is some very expensive stuff!)

As for food safe, I have a bunch of maple things to make, and some will be utilitarian, some will be decorative, but I'd like them all to have the same finish. I am not super-strict when it comes to food safety. I think there is a bit of extremism there these days. I'd be happy with General Finishes Salad Bowl Finish, which I know they had to rename because of the cancel-culture war against anything with any kind of solvent in it with regards too food safety. I know many people wouldn't touch Salad Bowl Finish or Wood Bowl Finish with a 50 foot pole... The science is pretty clear on it, IMO, but thats a whole different can of worms. :P

Anyway. Bunch of maple stuff, I'd like to get a consistent looking finish for all of it, and if I need it to be food safe (or if the buyer decides to use something for utility rather than decoration)...

I forgot about walnut oil. I have some Doctors Woodshop walnut oil. Its pretty clear... I wonder if it would do any yellowing...
 
Got to McFeeley's website and look at their water based finishes. They have one used for stringed instruments and another that is for gymnasium floors. I used the gym floor finish on cedar stair treads and the stuff has held up really well. It does not yellow the wood at all. I used the instrument finish for several years on some wood carvings I made. I have not tried either on woodturning but they should work good.
 
A lot of good suggestions above. Sounds like you need to sand and prep a few maple cutoffs to experiment (and then report back).
I can tell you from my personal experience that Osmo Polyx-Oil (satin) does not yellow maple as much as the polyurethane I use, but there is still some darkening/yellowing. Even straight mineral spirits will darken/yellow wood, so I don't know if any applied liquid is truly "clear". It's really going to come down to whether you like the final result.

According to Osmo's customer service the only difference between their Polyx-Oil and Top Oil products is that Top Oil contains a higher proportion of solvents. As to food safety it turns out that each SKU number has to be tested individually to get certified (and I'm assuming he meant certified in Europe). Top Oil isn't sold in as many sizes as Polyx so Top Oil is what has been tested and certified. IMO they are both food safe, and I'd use the Polyx-Oil you have.
 
Thanks for the suggestions, all! I appreciate the info.

I'll definitely try finishing a few pieces of sanded maple. I have this rather tall maple round blank that I could face, sand, and finish, get some photos, then turn down a few millimeters and repeat the process. I'll have to give some of these finishes a try. I do have the Poly-X, and I've used it in the past. Its been hit or miss from a streaking standpoint, IIRC, and I haven't used it since early spring... I am wondering what the best application for Poly-X is. The first application on the first piece was AMAZING, and I fell in love with it. But then I had some pieces where I had a heck of a time avoiding streaking. The durability of that finish in the end, though, I remember was phenomenal. Loved it. IIRC, I think it did yellow the woods a bit, so I'll do some experimentation with it first. If I can figure out how to apply it without any streaking, that would be great. I do remember applying very, very thin coats, as per recommendations I'd had at the time, but for some reason I still seemed to end up with streaks.

One of those pieces I finished in streaky poly-x, I ended up sanding back and then applied Watco spray lacquer. The lacquer took some time to get used to, and the finish is nice and shiny, but with that I either had some of that...orange skinning I think is the term, and also had a real hard time keeping little dust flecks out of it. Only takes a handful of little dust specs to basically ruin the lacquer finish, and once they are in there, its practically impossible to get them out. Sanding back the lacquer was rather tough and resulted in a very, very long, drawn out finishing process...and I guess I don't have the patience for that on smaller turned items. ;)

I think I am also going to give the Doctor's Woodshop Walnut Oil a try. That stuff is amazingly clear (clearer than any other walnut oil I've used or found). I suspect it may yellow the wood just slightly, but I'll test it on something else first to see.

Does anyone have any experience or info on how water-based finishes compare to oil-based finishes when it comes to bringing out the chatoyance of the grain? That is another factor here, and I would really like to maximize the chatoyance of this ripple figuring, as its just amazing.
 
Spray lacquer is the fastest film finish to dry. If you got lots of nibs in your finish, either the air in the area you're using it is horribly laden with debris, or you applied too heavy an application and it took longer to dry than is intended. Because spray lacquer dissolves and blends with prior coats, ideally you spray a thin coat, allow to dry over 15-30 minutes, and repeat. It may take 4-6 thin coats to build up the level of finish you want. Also, the Watco spray cans historically had a poor spray nozzle and would not spray a uniform mist and tended to shoot a goober of finish onto the work piece unexpectedly. There are other brands that work better, for example the Masters Lacquer from CraftSupplies. Rattle can lacquers are not as effective as a proper spray set up, but they sure are fast and convenient.

In my hands, lacquer is the least color changing of the finishes, other than water based, which tend to impart a faintly bluish color to my eyes. (Maybe it's just the lack of any amber tint)
 
I have been doing the "Jimmy Clewes" style dyed rim maple platters for years. The only finish that I would ever consider is spraying lacquer. I use Deft gloss in rattle cans ... about six coats. Don't even think of using shellac. Because it is alcahol based it will muddy up the colors and even super blond shellac has quite a bit of amber tint. Any varnish also will yellow the colors. After the finish has dried, you aren't finished. You will need to level the finish to mirror flat to get the best effect. I use Micromesh with closed cell foam backer. I start with 1500 grit and progress through all nine grits to 12,000 grit.

It's too late if you have already dyed the wood because the color of maple will combine with the blue colors to turn them green. If you want your blue color to remain blue you will need to first bleach the wood. I have a recipe for bleaching wood HERE. Bleaching the wood before dyeing will make a huge difference in the vividness of the colors.

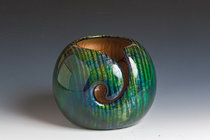
Here is one of my dyed pieces, a yarn bowl.

yarnbowl.jpg
 
I forgot about walnut oil. I have some Doctors Woodshop walnut oil. Its pretty clear... I wonder if it would do any yellowing...

The color of the wood matters a lot. Maple, even the lightest maple is very yellowish. Any oil, even light colored walnut oil will deepen the amber tint. Also, any oil applied to bare wood after it has been dyed will absolutely ruin the colors. Pure acrylic lacquer will never yellow, but it is hard to find and you can't alwsays compledetely trust the label because it could be a mixture of acrylic and nitrocellulose lacquer. However, even nitrocellulose lacquer is still very good and the amount of yellowing is very very small compared to other finishes. As I mentioned in the previous post, you should consider bleaching for the best colors. I think that some of the commercial wood bleaches have reappeared on the market. They are the same thing as the homebrew stuff, but the price is much higher. Don't be too put off by my dire warnings. I just didn't want people who are unfamiliar with proper handling of dangerous chemicals to be careless and have a serious accident.
 
Thanks for the info Bill. I have not applied any finish as of yet. I will let it dry by itself with no finish, just stored in a cool dry place (heated crawlspace). Will certainly look at the process you have suggested and try it on some smaller pieces. Perhaps a Xmas Ornament to start. Thanks again.
 
Does anyone have any experience or info on how water-based finishes compare to oil-based finishes when it comes to bringing out the chatoyance of the grain?
Yes, quite a bit, but not all products. I’ve used several Target Coatings, Minwax, and a couple other brands of wb finishes. NONE created chatoyance.

One might - Minwax oil modified poly - I tested it but forgot why I didnt want to use it. I will look for my sample and/or see if I still have the can and repeat the test. It needs to be sprayed so you need that capability (dont think its available in a rattle can). I think it does yellow as well, I will report back.

I will check yellowing on a solvent butcher block finish I tested as well - I think it was pretty water clear, but expensive.
 
I'll definitely try finishing a few pieces of sanded maple. I have this rather tall maple round blank that I could face, sand, and finish, get some photos, then turn down a few millimeters and repeat the process. I'll have to give some of these finishes a try. I do have the Poly-X, and I've used it in the past. Its been hit or miss from a streaking standpoint, IIRC, and I haven't used it since early spring... I am wondering what the best application for Poly-X is. The first application on the first piece was AMAZING, and I fell in love with it. But then I had some pieces where I had a heck of a time avoiding streaking. The durability of that finish in the end, though, I remember was phenomenal. Loved it. IIRC, I think it did yellow the woods a bit, so I'll do some experimentation with it first. If I can figure out how to apply it without any streaking, that would be great. I do remember applying very, very thin coats, as per recommendations I'd had at the time, but for some reason I still seemed to end up with streaks
I have never seen streaking with Osmo Polyx, so I'm not sure how to advise you. But you asked about the application process, I am attaching a PDF that I got off the internet. It is the transcript of a video demonstrating the application. For some reason the video has been taken down, but I still have the transcript so I'm sharing it. Caveat, the PDF author is talking about flatwork, so I think these directions need some interpretation for woodturners. For example I sand to a much smoother surface than 220, so I haven't found that I need to "scrub in" the Polyx as he describes. A couple of important points though are to use very little Polyx and apply with a white non-abrasive pad.
 

Attachments

Last edited:
I have been doing the "Jimmy Clewes" style dyed rim maple platters for years. The only finish that I would ever consider is spraying lacquer. I use Deft gloss in rattle cans ... about six coats. Don't even think of using shellac. Because it is alcahol based it will muddy up the colors and even super blond shellac has quite a bit of amber tint. Any varnish also will yellow the colors. After the finish has dried, you aren't finished. You will need to level the finish to mirror flat to get the best effect. I use Micromesh with closed cell foam backer. I start with 1500 grit and progress through all nine grits to 12,000 grit.

It's too late if you have already dyed the wood because the color of maple will combine with the blue colors to turn them green. If you want your blue color to remain blue you will need to first bleach the wood. I have a recipe for bleaching wood HERE. Bleaching the wood before dyeing will make a huge difference in the vividness of the colors.

Here is one of my dyed pieces, a yarn bowl.

View attachment 41122

Hi Bill,

Thanks for the info. So, to be clear, this was my FIRST platter. At the moment, I'm just trying to get the shape and design right. I know Jimmy's thing is the dying, but for this particular platter I'm not going to try dying the rim yet. There is more to that, and he talks about sealing the endgrains a specific way (with shellac) to prevent the dye from bleeding through to the back side of the platter and leaving spots in the pores there, etc. I'm just not ready to bump the complexity up to that level yet. I'm still trying to get the shape of the platter right...I didn't actually get the rim right. I ended up with a slight concave curve, where Clewes says that a slight convex curve is really the most appealing to most people (Even if they don't really realize it!) So I have some design aspects to work on.

To my eyes, there isn't any yellow really with these Maple blanks. They are a tan, for sure, which I guess some people might call "yellow"...but, the thing I'm really trying to avoid is the PEE yellow color that Linseed imparts. That bright, notable, yellow yellow. I'd like to keep the lighter tan color if I can.

I have definitely had some trouble with the Watco lacquers. I may give the Masters Lacquer a try that someone else mentioned. The Watco stuff, I could never get it to shine right with those real light coats. They always seemed to give me a "glittery" like finish, even with a ton of coats. If I put on a thicker coat, then after about 5 minutes it would smooth out and get more glassy, but then in the end it would have a slight ripple to the surface (orange skinning), and I never liked that, and so far have never really been able to properly level it all out even with extensive sanding. The Watco stuff is everywhere...easy to find. I'll have to see if I can find something else. I just upgraded my compressor from a small 4.5 gal to a 20 gal. I may be able to use a proper sprayer to apply lacquer now as well...but, I've never used a sprayer like that before, and am not sure I want to jump to that level just yet.

BTW...that yarn bowl. :jawdrop: Is that ultra glossy, mirror finish lacquer?? And that dye! Wonderful!
 
Yes, quite a bit, but not all products. I’ve used several Target Coatings, Minwax, and a couple other brands of wb finishes. NONE created chatoyance.

One might - Minwax oil modified poly - I tested it but forgot why I didnt want to use it. I will look for my sample and/or see if I still have the can and repeat the test. It needs to be sprayed so you need that capability (dont think its available in a rattle can). I think it does yellow as well, I will report back.

I will check yellowing on a solvent butcher block finish I tested as well - I think it was pretty water clear, but expensive.
Thanks for the info.

I recently upgraded my compressor from a 4.5 gal to a 20 gal, and I think I can use a proper sprayer now. I have never used one before...

I have found that oil (mostly linseed I guess) does seem to bring out the chatoyance of wood grain in general, and more so if its a ripple figure. I don't think its something you necessary create, but enhance...I mean, the ripple figuring of this platter, without any finish at all and even before sanding, exhibited that cats-eye like shimmer in the ripple figuring. I just want to maximize its depth and really make it shimmer as much as possible.
 
I have never seen streaking with Osmo Polyx, so I'm not sure how to advise you. But you asked about the application process, I am attaching a PDF that I got off the internet it is the transcript of a video demonstrating the application. For some reason the video has been taken down, but I still have the transcript so I'm sharing it. Caveat, the PDF author is talking about flatwork, so I think these directions need some interpretation for wood turners. For example I sand to a much smoother surface than 220, so I haven't found that I need to "scrub in" the Polyx as he describes. A couple of important points though are to use very little Polyx and apply with a white non-abrasive pad.
Thanks for the PDF. This is largely the procedure I have been following, although I got it from a video originally. I don't know that I've ever really "scrubbed" it in though... I have wondered if temperature and humidity might play a role in how well this works. I live in Colorado, where its quite arid, particularly in winter...and also wondered if the colder winter temps might have an impact (last time I generally used poly-x was early spring, but I tried again during summer, and remember it being really thick and sticky). I do like the final hard, durable result with Poly-x though...so I'll try it again here.
 
Spray lacquer is the fastest film finish to dry. If you got lots of nibs in your finish, either the air in the area you're using it is horribly laden with debris, or you applied too heavy an application and it took longer to dry than is intended. Because spray lacquer dissolves and blends with prior coats, ideally you spray a thin coat, allow to dry over 15-30 minutes, and repeat. It may take 4-6 thin coats to build up the level of finish you want. Also, the Watco spray cans historically had a poor spray nozzle and would not spray a uniform mist and tended to shoot a goober of finish onto the work piece unexpectedly. There are other brands that work better, for example the Masters Lacquer from CraftSupplies. Rattle can lacquers are not as effective as a proper spray set up, but they sure are fast and convenient.

In my hands, lacquer is the least color changing of the finishes, other than water based, which tend to impart a faintly bluish color to my eyes. (Maybe it's just the lack of any amber tint)
I was probably using too-thick of layers. The Watco stuff always gives me a "glittery" or sparkly finish with a fine bumpy texture if I use very thin layers. But, I agree, its the clearest and least color-changing of any finish I've used.

I need to try some other brands of lacquer. I'll see if I can find some of the Masters stuff, and give it a test try on a block of maple sanded down, and see how it goes. I have a compressor now that can handle a proper spray setup...I may give that a try down the road. I've never mixed a 2-part lacquer before, and never sprayed anything with a proper spray gun...any recommendations for a good 2-part lacquer? Does a spray lacquer help bring out the shimmer and chatoyance?
 
I wonder if your Polyx has gone bad? I would describe the viscosity of mine as similar to paint and no more sticky than a post-it note (probably less).

Also, could the streaking be due to the wood prep?
Its not even a year old yet...an the lid is always tightly closed...

I've been sanding to 400-600 grit, then I use some 3M pads to clean up any final remaining scratch marks and give me a nice clean surface.
 
For non color change with light woods—maple, ash—I’ve been using shellac followed by minwax finishing wax. The shellac is applied with a pad and after a few minutes drying, buffing it ALL off with 0000 steel wool. The trick to a smooth finish is making sure all of the shellac is off the surface. No film finish!. Then a quick application of wax.
I also love doctors walnut oil/microcrystal wax. But it will darken the maple more than shellac does.
 
Its not even a year old yet...an the lid is always tightly closed...

I've been sanding to 400-600 grit, then I use some 3M pads to clean up any final remaining scratch marks and give me a nice clean surface.
Don't know what to suggest. A pre-wipe with mineral spirits (and let it dry) ? But if you have some maple bits to work with, do some experiments. If you still get streaks post some photos.

At the end of the day Polyx may not be clear enough for your needs on this project, but it's a lovely finish for a lot of woods and you should be getting better results. And I know it wasn't cheap.
 
I don't think its something you necessary create, but enhance...I mean, the ripple figuring of this platter, without any finish at all and even before sanding, exhibited that cats-eye like shimmer in the ripple figuring. I just want to maximize its depth and really make it shimm
While some pieces will have a lot, such as your sample, many don’t, at least to my eye. The addition of a solvent finish shows it, and it may well be there before, just not visible. Either way, the finish soaking into the fibers and drying enables the light refraction to be seen. The amount of chatoyance visible is a function of surface gloss - as the surface gloss factor moves to matte, less chatoyance is visible, because the increasing surface roughness scatters the light.

I am not positive why wb finishes dont show the chatoyance (the wood you have probably will, but “average” wood does not), but I believe it is due to the different refractive index of the solids used to make wb vs solvent finishes. It may also be depth of penetration into the fibers, but I dont think so. Shellac and lacquer dry very quickly, limiting penetration, but show a great deal of chatoyance.

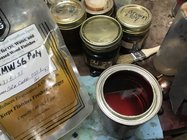
The mw oii modified finish wont work for you, it possibly more yellow than solvent poly. One that may be just what you need is Watco Butcher Block Oil. It is a solvent based tung oil alkyd resin that dries fairly water clear and will add to chatoyance. I dont use it much as the yellow in poly isnt an issue for me, and the product is comparatively expensive. Here is a picture of the oil in the can (has a slight reddish brown hue and the can is almost full, so it shouldnt impart much color) compared to mw poly in the stoploss bag.

1636664225242.jpeg
 
To my eyes, there isn't any yellow really with these Maple blanks. They are a tan, for sure, which I guess some people might call "yellow"

Hold a sheet of white printer paper next to the wood to see how far from white the color of the wood actually is. That color can't be ignored when you are dyeing wood because you are doing subtractive coloration. Of course, the color isn't pure yellow, but yellow is the major component of the tan color when using the CMYK color model (your inkjet printer uses CMYK ink colors for subtractive coloration while your computer display uses RGB lights for additive coloration.

This means that the blue dye that you apply to the wood will have a green tint initially and will progressively get more green as the wood darkens over a few month's time.

If you bleach the wood to make it whiter, you need to complete all of the sanding beforehand because the bleaching only penetrates about two-thousandths of an inch into sidegrain.
 
I am not positive why wb finishes dont show the chatoyance (the wood you have probably will, but “average” wood does not), but I believe it is due to the different refractive index of the solids used to make wb vs solvent finishes. It may also be depth of penetration into the fibers, but I dont think so. Shellac and lacquer dry very quickly, limiting penetration, but show a great deal of chatoyance.

Yeah, this is kind of what I suspect...that the solids in the WB stuff are different (and as I gather, wb stuff is generally higher in solids as well). I've experimented with water based finishes a bit, and they just don't seem to make wood in general pop like shellac or oil+solvent based finishes. It is interesting how shellac does bring out the best aspects of the wood, even though it doesn't seem to penetrate a lot and dries quickly...

Finish is one of those things...great breadth and depth of knowledge you need to learn with all of it. ;) I have the "bible" of finish..."Understanding Wood Finish" I think it is. I've barely scratched the surface, there is so much information in that book.

Well, this weekend I'll certainly be experimenting. Your point about how glossy the finish is is a good one... This particular platter may just become an experimental piece as well, I was out in the shop just a little while ago, and installed a new light. With this new light I was instantly able to see a lot of radial scratches on the bottom side of the platter that I couldn't see before with my previous lighting. I always sand with the grain every other grit, and make sure I sand with the grain with the final grit as well regardless...so I'm not sure how these didn't get sanded through. I may try to back up the grits a bit and re-sand it, at least as best I can now that the platter is flipped and in the chuck, but I'm not sure if I'll be able to clean it all up. I sanded it to a pretty smooth surface already, and its already a bit shiny, and I always have trouble when trying to re-sand something I've taken that far. So, I may just try a finish on this one, see how it goes, and keep it for myself in the end.

I'm still a beginner, and sometimes you just have to spend some money to learn! ;P (Still, this thing was a AAA ripple figured blank, and was about $50 or so...expensive little lesson!)
 
Hold a sheet of white printer paper next to the wood to see how far from white the color of the wood actually is. That color can't be ignored when you are dyeing wood because you are doing subtractive coloration. Of course, the color isn't pure yellow, but yellow is the major component of the tan color when using the CMYK color model (your inkjet printer uses CMYK ink colors for subtractive coloration while your computer display uses RGB lights for additive coloration.

This means that the blue dye that you apply to the wood will have a green tint initially and will progressively get more green as the wood darkens over a few month's time.

If you bleach the wood to make it whiter, you need to complete all of the sanding beforehand because the bleaching only penetrates about two-thousandths of an inch into sidegrain.

Remember that I'm not going to be dying this one. This is my first platter of this style, and I just wanted to get the hang of turning the shape. I have a few more I intend to just turn and finish, without dying. Getting into Clewes' multi-color dying stuff is something I plan to do, but its not something I'm going to be doing with this platter nor probably the next few.

I've got your 2-part wood bleach post bookmarked, though, and will certainly revisit it when the time comes!
 
I just turned my first "Jimmey Clewes" style platter, from a 14" AAA ripple figured maple platter blank. The ripple figure is incredible. The natural color of the wood is INCREDIBLE! I love the natural color of maple in general.

I am now at the point of finishing it...and I'm honestly not sure what finish to use. I really don't want to change the color of the wood, however I know anything based on linseed will yellow it significantly. Shellac (even the bleached blond stuff, in my experience) will yellow it. I have used Acks finishing polish in the past, which generally needs to be used with a sanding sealer, which are usually shellac based (or perhaps mylands which is cellulose based), and that also yellows the wood, although less than linseed oil finishes...so I am wary of trying the Acks approach in this piece. I know that polyurethane will yellow it, and yellow more over time (not to mention, that wouldn't necessarily be "food safe" (I know the definition of that term has changed a lot over time, and that for many finishes with solvents, after they evaporate, what remains is food safe, so I don't really want to get into that debate here...not sure if urethane falls into that class at all though)).

I am wondering what finishes are out there that will really bring out the chatoyance of the ripple figure in this wood, without changing the color beyond the normal darkening that most finishes introduce (I'm fine with the darkening). I mostly just don't want this beautiful piece to become yellow. I have done some work with Lacquer, and that is a heck of a LOT of work, and in the end I don't think I'll be able to keep the surface as smooth and neat as it is right now.

I've played around with polycrylic, but man, that stuff is really thick and does not really seem to bring out the chatoyance at all in my experience with it so far...but, maybe someone can convince me it can?

I've also looked into water-based urethanes. When I find comparisons between oil-based an water-based finishes, they almost universally say that the oil-based is better for bringing out the shimmer of chatoyance than water-based. Water-based generally contain more solids as well, and I am not sure if they would penetrate into the wood as well? I haven't tried a water-based urethane yet though, so I'm happy to hear what you more experienced woodworkers think.

Are there any other options out there for really bringing out the qualities of the wood grain, without coloring the wood?
Stick with old school finishes. The water base ones in my opinion donot bring out the incredible grain. they tend to plasticize the wood.
 
Oil, wax, and solvent-based finishes penetrate into the wood and thus increase the way that the light is reflected with changes in the grain orientation. Water-based finishes, on the other hand, basically sit on top of the wood so the chatoyance isn't enhanced as much.
 
Oil, wax, and solvent-based finishes penetrate into the wood and thus increase the way that the light is reflected with changes in the grain orientation. Water-based finishes, on the other hand, basically sit on top of the wood so the chatoyance isn't enhanced as much.
Yeah, my experience with polycrylic is definitely a finish that just sits on top of the wood. I think it may even dull the chatoyance some, as I finished some purpleheart for a little utilitarian project in polycrylic, and the shimmer I could see in the wood before I finished is simply lacking in the finished product. Such a bummer that drying oils and solvent based finishes are effectively being expunged through regulations...they do such a much better job.

I did some experimentation with the doctor's woodshop walnut oil on some walnut pen blanks. The finish is pretty much clear. There is darkening, and maybe the slightest amount of yellowing. Its good enough for what I want. Once I get this platter fully sanded, I'll give the walnut oil a try. This oil definitely brings out the chatoyance in pen blanks, its amazing stuff. So I think it will do the job.

I have a bunch of figured maple blanks to turn, though, and I'm going to be experimenting with a range of finishes (though, probably not water based...)
 
I use Deft gloss in rattle cans ... about six coats.

Here is one of my dyed pieces, a yarn bowl.

View attachment 41122

Bill, this finish is truly amazing, I must say! That shiny mirrored glass like finish is phenomenal.

Do you mind if I ask...how exactly do you apply the lacquer? You say you use the Deft gloss stuff. I've seen people apply lacquer in a couple different ways. Some use more continuous sprays as they move back and forth over the piece, others use more of a...I guess you would call it a "flick" where they just kind of sprits and flick the lacquer over the piece. I've tried both, and never really had luck with either.

What do you do to achieve this beautiful finish?

I don't think it is exactly like either of the two techniques that you described.
  • I spray from a distance of about a foot ... sometimes a bit closer.
  • I usually work left to right striving for a constant velocity
  • I start the spray just before crossing the workpiece and release the spray after I have cleared the workpiece.
  • No flicking, spritzing, erratic motions, nor continuous spraying waving the can around.
  • I try to stay within the temperature range stated on the can.
  • Staying within the humidity range is more problematic here. If blush develops then I stop spraying and let the piece sit until it clears. Sometimes I will use a blow dryer to speed up the clearing process.
  • I let the finish dry for a week or more.
  • The next step is finishing the finish. This is where the real work begins. If you have a demented friend who loves to sand that would be great, otherwise, you'll have to do it yourself. The 1500 and 1800 grits of Micromesh are for leveling the finish (there is always some orange peel that needs to be removed.) and all the other grits are for removing the scratches made by the previous grit. At 4000 grit a shine starts to develop.
 
The next step is finishing the finish. This is where the real work begins.

Rule #1 with hi gloss fully filled finishes - they dont look that way “off the can or gun”. You have to get them there. I dont know about Bill and others, but I keep the tenon on through the whole process so I can spin it on the lathe for all the sanding and polishing.

I usually end up with 8-12 coats, with sanding back between groups of coats. This is the big advantage of lacquer - it “ burns in”, each coat melts into the previous, becoming one. Finishes that do not, like solvent poly, leave “ghost lines” from sanding through layers. One of the differences between evaporative (lacquer, shellac) and reactive (poly, conversion varnish). WB can be a bit of both, entirely different animal regardless of what the mfr calls it - poly, lacquer, etc.

3 big advantages to a spray system vs rattle can:

1) spray atomization
2) adj viscosity
3) adj solvent evaporation.

All help smooth out the finish for sanding, and #3 broadens the conditions you can spray in.
 
The next step is finishing the finish. This is where the real work begins. If you have a demented friend who loves to sand that would be great, otherwise, you'll have to do it yourself. The 1500 and 1800 grits of Micromesh are for leveling the finish (there is always some orange peel that needs to be removed.) and all the other grits are for removing the scratches made by the previous grit. At 4000 grit a shine starts to develop.
Bill, I have been leveling the finish by wet sanding with 400 grit SiC paper. Then I go to Beall buffing. Seems to be pretty good. I wonder if you have tried something similar to that and how does it compare to the Micromesh method.
 
@Bill Boehme , thanks for the explanation. To clarify for me, Do you apply 6 coats and then let the piece dry for a week, or do you allow each coat a week to dry?
And do you use the micromesh sanding pads wet or dry (and if wet, with what)?
 
I have never seen streaking with Osmo Polyx,
In my experience streaking is due to too much Osmo applied to the surface. Try wiping the excess off with a cotton rag about 5 minutes after initial wiping on. Streaks can be removed easily. I wait about a week to let it cure, then light scrubbing with steel wool, followed by Beall buffing. I only use the white diamond wheel (or Vonax as a substitute) with Osmo since I find both the coarser tripoli wheel and the wax wheel are not necessary
 
@Bill Boehme , thanks for the explanation. To clarify for me, Do you apply 6 coats and then let the piece dry for a week, or do you allow each coat a week to dry?
And do you use the micromesh sanding pads wet or dry (and if wet, with what)?

I apply thin coats. If it runs then that is way too much. I try to get each coat just thick enough to wet the surface so that it will blend into the previous coat. I let each coat tack dry before applying the next coat. A club member once asked me how much lacquer I applied to a piece that I brought to the club for show and tell. I said, "three". He replied, "three coats"? I replied, "three cans". That was an exaggeration, but maybe not too far from the truth. :D

I do all of my spray finishing outdoors because I don't have a spray booth or respirator with organic vapor filters. I never finish on the lathe for much the same reason that I don't use the wife's dining table as a workbench. I have a DeVilbiss HVLP spray gun, but it isn't worth the set up and clean-up effort for the few pieces that I turn.

It depends on the number of coats and the weather, but it takes a few days for the finish to sufficiently harden for sanding. A finish might feel dry to the touch an hour after it has been applied, but it is still quite soft beneath the surface. This is one of those lessons where I learned the "right way" by doing it the "wrong way".

I usually dry sand when using Micromesh even though wet sanding with water gives the smoothest finish. When wet sanding I do it next to the laundry room sink so that I can frequently rinse the swarf from the pads. The risk of wet sanding is that even a microscopic crack or flaw in the finish will allow water to get beneath the finish and cause the wood to swell or wrinkle ... that's definitely not a good thing, especially if the wood has been dyed. I'm far more apt to wet sand a CA finish because super thin CA soaks into the wood making it essentially waterproof.

My intuition tells me that wet sanding using oil on Micromesh pads wouldn't work because the slurry would rather quickly load up the superfine grits. Plus, cleaning the oil slurry from the Micromesh pads would likely be a challenge.
Thank you for all of this info, Bill. This is excellent insight.

The point about it taking a few days to fully harden... So do you wait until then until you do any sanding at all? Or do you sand between every couple of coats? I was sanding between every 2 coats of lacquer on the items I've lacquered so far, but, I wonder if that is problematic if the finish hasn't fully dried yet.
 
I do much the same as @Bill Boehme, with a few differences. I spray 3-4 coats, let dry for a day or so, dry sand with 320. Shoot another 3-4 coats, let dry a couple of days, light dry sand with 600 looking for defects, which usually exist. Spray another 2-4 coats, let dry several days, light sand with 600 looking for defects.

During each spray session, larger defects get “drop filled”, remove gun cap and use the spray tip to drop finish into the defect, no air flow. Another big advantage of a spray gun. When dry enough I use a scraper to knock down the bulge.

After many coats and light dry sanding I have a sanded level coat that I then let cure out as long as possible. 30 day min. Finishes continue to shrink for a long time, the longer you wait the less a rubbed out finish will shrink. After the cure period, the item is remounted and wet sanded with usually 600 (all wet sanding done with si-carbide wet dry paper) up to ~ 1000-1200. Water with some dawn detergent. I then use auto paint liquid abrasives/polishes with foam pads that fit my sanding drill (Meguair’s brand). Any cracks etc are fully filled and sealed with finish and there is no danger of water getting in.
 
Back
Top