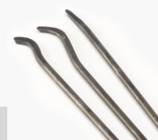
I'm rough turning a 12" green Honey Locust bowl. While attempting to attach a faceplate, I broke 1 drill bit and 2 screws; they are still in the blank. I have now cut out everything I can reach around the center. The photos show where I am, and the pencil indicates the bottom of the screw (at least I hope it's the bottom). Question now is, How do I get that center out so I can let the bowl dry well (it's at 22% moisture now)
 ? Thank you!
? Thank you!