• Beware of Counterfeit Woodturning Tools (click here for details)
  • Johnathan Silwones is starting a new AAW chapter, Southern Alleghenies Woodturners, in Johnstown, PA. (click here for details)
  • Congratulations to John Shannon for "Walnut Bowl" being selected as Turning of the Week for May 27, 2024 (click here for details)
  • Welcome new registering member. Your username must be your real First and Last name (for example: John Doe). "Screen names" and "handles" are not allowed and your registration will be deleted if you don't use your real name. Also, do not use all caps nor all lower case.

Drying Box / Kiln Build

Joined
Oct 6, 2022
Messages
352
Likes
937
Location
Brenham, Texas
I've been working on putting together a drying box for rough turned bowls. Here are some pictures of the build and other details.

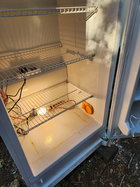
The non-working freezer was purchased via in online market forum. The cost was $100. There was no coolant present at the time of purchase. Due to space constraints, the kiln has to live outside. I made a brick platform for it to sit on for stability and to keep it off the ground to help prevent rust.

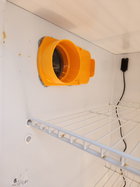
Box interior with shelving and rear baffle removed. Removed and discarded OEM low voltage fan. Installed 110v 210 CFM axial fan. Air flows to the rear of the box into a plenum. Air is diffused through the vent at the top
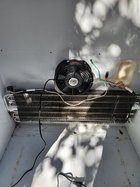
20230114_131408.jpg

Baffle re-installed. Air is drawn through the bottom and side openings.
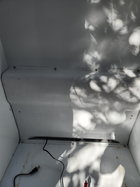
20230114_132916.jpg

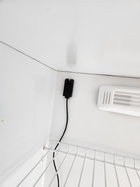
Hygrometer / Thermostat power distribution control. Fan is wired to the hygrometer, light bulb is wired to the thermostat. Set controls to run the fan until it drops below 10% RH. The light bulb runs until the temperature reaches 110. These are best guess initial settings. I would appreciate any thoughts on this based on your experiences.
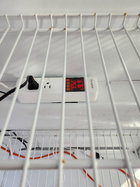
20230114_151631.jpg

Temp/RH sensor installed at the top.
20230114_151634.jpg

Continued in next post.
 
Joined
Oct 6, 2022
Messages
352
Likes
937
Location
Brenham, Texas
I used a 4 1/2" hole saw to make two ventilation holes in bottom right and left top sides. I installed a 4" louvered vent with bug screen on the outside and a dust collection blast gate on the inside of each hole. The blast gate provides air flow adjustment.
20230114_163434.jpg20230114_163446.jpg

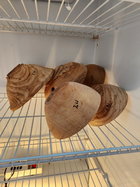
Added some rough turned bowls. Using a moisture meter, each was marked with today's reading
20230114_163457.jpg20230114_165107.jpg
 
Joined
Nov 15, 2020
Messages
459
Likes
313
Location
Huntington, VT
I would expect a lot of cracks and checks if drying from green at 10% rh unless the pieces are quite thin. (If the fan runs intermittently the rh may average higher, but that still poses a challenge). You need to keep the rh relatively high in the initial stages of drying so that the moisture gradient between core and surface is not too drastic. Your personal experience over time will be a good guide to operating your box, but the basic principles of kiln drying are applicable and inescapable. There are tables for maximum daily percentage moisture loss of different species for drying lumber which are worth looking at, though perhaps not directly relevant to drying turnings with their relatively large end grain component.

I find weighing turnings periodically is better for monitoring moisture loss. Pin meters need to be inserted halfway between center and surface to get an approximate average, which may result in holes in the finished piece. Scanning meters require a flat surface as big as the meter base for an accurate reading.

Although I have a solar kiln for drying lumber I have never felt the need to accelerate drying of vessels. I have a pretty good backlog of roughouts which airdry just fine with some attention to keeping the initial drying slow (sealer, paper bags or slightly vented cardboard boxes, cool woodshed and well insulated attic space) and am not in a hurry. Once-turned pieces dry out quickly without any encouragement.
 
Joined
Jul 18, 2018
Messages
1,079
Likes
1,800
Location
Baltimore, MD
Just my experience, but I’d try to pack the box as full as possible. I think that will help slow the moisture loss and prevent cracking. I’ve also found that, depending upon species, 100° might be a bit high. I’ve brought mine down to 80-90 and am having more success (less cracking), but I realize a lot may depend on other variables
 
Joined
Jun 1, 2006
Messages
327
Likes
154
Location
Freelton, ON
Based on over ten years of use of a kiln I built I would reduce the air flow dramatically. I had three 1/2” holes top and bottom in mine. Initially, you want very high humidity and moderate temperature at the beginning until the free water is released, about first ten days. If you do not have a full load, you can use some wet shavings to increase the humidity. It is easier to weigh with a small digital kitchen scale in grams and write on the rough outs with the date. Have attached a chart I put together for a load. The temperatures are in °C but just above ambient at the beginning and well over 35°C or high 90s F or over 100 at the end. Often 95°F is mentioned.
 

Attachments

  • FB25D307-16A4-427E-8B07-765A8039A042.jpeg
    FB25D307-16A4-427E-8B07-765A8039A042.jpeg
    225.7 KB · Views: 28
Joined
Oct 6, 2022
Messages
352
Likes
937
Location
Brenham, Texas
Thanks to all for the responses. Will be adding a Govee sensor in the near future. Having this data is the right next step.
 
Joined
Mar 19, 2016
Messages
1,206
Likes
1,299
Location
Haubstadt, Indiana
Monty, I believe there are many different cycles that will work. Several things that have been mentioned are important IMO. Weight is the best indicator of drying instead of a pin meter. The amount of weight loss is somewhat a variable as it depends on the initial MC of the wood. I look for 3 days maintaining the same weight. I put a pan of water in as Gerald suggested durning my first cycle. I do run a fan, but not tied to RH, it runs continuously. I don’t think I have ever seen the RH go below 10%, however it may be location dependent or that is the lowest my sensor reads. Have four 1” holes in my top. My kiln has three light bulbs that are independently controlled. For my first two cycles I just need one 40W bulb and the last cycle just one 65W flood.

I just successfully dried two 12” cherry bowls for a friend. Here is the cycle I use:

1. 2 days with kiln closed an d a pan of water. Fan is on and runs for all cycles.
2. 7 days, 95F on and 100F off.
3. 7 days, 100F on and 107F off
4. 7 days 107F on and 115F off
I begin checking weight after 4 days and look for 3 consecutive days with no weigh loss, so the cycle may be more than 7 days.

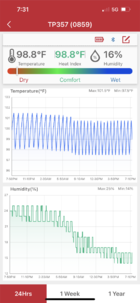
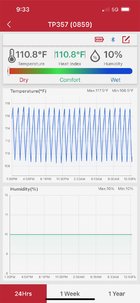
The first chart shows when the pan of water evaporates. The second photo is the last cycle. Temperature show about 118F high. Controller is set to 115F, difference may be location of meter thermocouple. RH at this cycle shows 10% for the day. I have seen spikes to 14% RH in previous cycles.


IMG_0828.PNG IMG_0886.jpeg
 
Joined
Nov 15, 2020
Messages
459
Likes
313
Location
Huntington, VT
Monty, I believe there are many different cycles that will work. Several things that have been mentioned are important IMO. Weight is the best indicator of drying instead of a pin meter. The amount of weight loss is somewhat a variable as it depends on the initial MC of the wood. I look for 3 days maintaining the same weight. I put a pan of water in as Gerald suggested durning my first cycle. I do run a fan, but not tied to RH, it runs continuously. I don’t think I have ever seen the RH go below 10%, however it may be location dependent or that is the lowest my sensor reads. Have four 1” holes in my top. My kiln has three light bulbs that are independently controlled. For my first two cycles I just need one 40W bulb and the last cycle just one 65W flood.

I just successfully dried two 12” cherry bowls for a friend. Here is the cycle I use:

1. 2 days with kiln closed an d a pan of water. Fan is on and runs for all cycles.
2. 7 days, 95F on and 100F off.
3. 7 days, 100F on and 107F off
4. 7 days 107F on and 115F off
I begin checking weight after 4 days and look for 3 consecutive days with no weigh loss, so the cycle may be more than 7 days.

The first chart shows when the pan of water evaporates. The second photo is the last cycle. Temperature show about 118F high. Controller is set to 115F, difference may be location of meter thermocouple. RH at this cycle shows 10% for the day. I have seen spikes to 14% RH in previous cycles.


View attachment 49514 View attachment 49515
I won't try to argue with success but the low humidity levels in your kiln surprise me. At 10% rh and 110*F the equilibrium moisture content should be under 3%, much lower than normal household conditions except in desert areas. Are you drying green bowls at maximum 25% rh with no checking?
 
Joined
Mar 19, 2016
Messages
1,206
Likes
1,299
Location
Haubstadt, Indiana
I won't try to argue with success but the low humidity levels in your kiln surprise me. At 10% rh and 110*F the equilibrium moisture content should be under 3%, much lower than normal household conditions except in desert areas. Are you drying green bowls at maximum 25% rh with no checking?
Kevin,
Not sure what you mean by “maximum 25% rh”. If you meant 25% MC, then yes I’m drying bowls that are in the 22 -28% MC range.
I am successful. I have dried bowls several time using this cycle. Both of the charts are only one day snapshots. The one showing the 10% was on the last day. There is no way the bowls ever reached any kind of equilibrium in that time frame. Also I let them sit for about a week before turning. Measuring moisture at turning time ranges 6-12%. Humidity inside the kiln is much different winter vs summer. In the summer with the water in the kiln humidity will reach 70-80%, whereas in the winter it will be between 45-55%. From memory the RH at the end of the cycle in summer was about 25% My shop is not air-conditioned in the summer, but heated to 60F in the winter. I have dried bowls in both seasons without checking. Mostly cherry and maple. Haven’t had any walnut to try, IMO the real test.

The only way for to keep the humidity up would be add water on a daily basis. It has not been necessary for me to that.

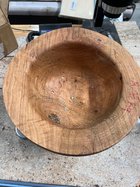
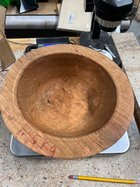
These are the last two bowls dried without checking.

IMG_0867.jpegIMG_0870.jpeg
yet
 
Last edited:
Joined
Feb 28, 2021
Messages
1,251
Likes
1,104
Location
Roulette, PA
Website
www.reallyruralwoodworks.com
Kevin,
Not sure what you mean by “maximum 25% rh”.
RH = Relative Humidity -
Defined: the amount of water vapor present in air expressed as a percentage of the amount needed for saturation at the same temperature.

In other words, 25% moisture in the air at a given temperature (The number % goes down as temperature rises , since warmer air can hold more moisture - So, (unscientific explanation here) if your blank is at 25% MC or some such and RH is 25% , chances are good, your wood is at equilibrium or around there - But raise temperature, RH goes down, so wood dries faster..)


Edit: I should have finished reading your entire post first, but figured it may be worth leaving the above up in case others find it useful?)
 
Joined
Nov 15, 2020
Messages
459
Likes
313
Location
Huntington, VT
Kevin,
Not sure what you mean by “maximum 25% rh”. If you meant 25% MC, then yes I’m drying bowls that are in the 22 -28% MC range.
I am successful. I have dried bowls several time using this cycle. Both of the charts are only one day snapshots. The one showing the 10% was on the last day. There is no way the bowls ever reached any kind of equilibrium in that time frame. Also I let them sit for about a week before turning. Measuring moisture at turning time ranges 6-12%. Humidity inside the kiln is much different winter vs summer. In the summer with the water in the kiln humidity will reach 70-80%, whereas in the winter it will be between 45-55%. From memory the RH at the end of the cycle in summer was about 25% My shop is not air-conditioned in the summer, but heated to 60F in the winter. I have dried bowls in both seasons without checking. Mostly cherry and maple. Haven’t had any walnut to try, IMO the real test.

The only way for to keep the humidity up would be add water on a daily basis. It has not been necessary for me to that.

These are them last two bowls dried without checking.

View attachment 49544View attachment 49545
yet
I misunderstood your post, sorry. Your first chart showed RH ranging from a high of 25% to a low of 14% for one day, no doubt at the end of the kiln cycle. I mistook that chart for a range over the whole cycle. Your last post explains your process more thoroughly and agrees with my experience drying lumber in a solar kiln, with high humidity early in the cycle and low RH at the end. Thanks for straightening me out.
 
Back
Top