Just turned my first 4 bowls on my new laguna 1836! Have two bowls with 16 inch diameter 1.5" thick walls stored in bag with shavings. One is red oak (smelly) and one is hackberry. How long should I keep them in bag with shavings? I have anchor sealed entire bowl. The red oak bowl has been turned roughly a week and is starting too mold. I am storing them in the basement where it is cool and air conditioned. In my garage workshop very humid today! 85 degrees F. I have read that some take shavings out at end of first week then place them back in new bag and leave for a month then weigh monthly for a year or so. No rush to turn just looking for no mold and good bowls to turn later on.

-
April 2025 Turning Challenge: Turn an Egg! (click here for details) -
Congratulations to Kelly Shaw winner of the March 2025 Turning Challenge (click here for details) -
Congratulations to Ellen Starr for "Lotus Temple" being selected as Turning of the Week for 21 April, 2025 (click here for details) -
Welcome new registering member. Your username must be your real First and Last name (for example: John Doe). "Screen names" and "handles" are not allowed and your registration will be deleted if you don't use your real name. Also, do not use all caps nor all lower case.
You are using an out of date browser. It may not display this or other websites correctly.
You should upgrade or use an alternative browser.
You should upgrade or use an alternative browser.
Drying Bowls
- Thread starter Norm Marentette
- Start date
- Joined
- Apr 27, 2004
- Messages
- 9,161
- Likes
- 5,768
- Location
- Lakeland, Florida
- Website
- www.hockenberywoodturning.com
I avoid using shavings - for me they make an ideal mold habitat.
mold is less of a problem in some areas.
my methods is to put the fresh turned bowl in a paper bag with a second bag slid over the top
keep the bags out of an air current. Every day a swap the damp bags for dry bags and inspect for mold.
if I see any mold I wipe with Clorox. I set the damp bags aside to sue the next day unless there was mold in which case I discard the bags.
When the bags are dry (after 5-7 days) I put the bagged Bowls on a shelf standing with the rim vertical.
in 4-6 months I take bowls out of the bag Store on a shelf rim down.
my drying room has a dehumidifier and average temperature 75. usually 8-10 months the bowl will be 9-10% MC.
THAT IS AS DRY AS IT WILL GET IN MY DRYING ROOM.
I haven’t used bag of shavings technique. Just Anchorseal and shelf in the basement and for the smaller bowls I’ve done this works fine.
The method that I have used for many years is to anchor seal the end grain areas only and leave the mostly side grain areas without any anchor seal then store them in an open area. The individual bowls should not be stacked together but rather need air contact all around. The piece can be weighed initially and then at regular intervals you will see the weight loss as an indication of the progress such that when the weight stops decreasing it will be ready for finish turning. Note: moisture meters only read the surface dryness. The high humidity is not a problem but rather just another way to slow the drying process.
The idea is to dry the end grain slowly to prevent the rapid drying that typically occurs and causes the surface checking so the drying will be more uniform. The method you describe sounds like a combination of 3 methods as in 1 = anchor seal, 2 = paper bag and 3 = paper bag with shavings and that = almost no drying that will guarantee mold / rot.
The idea is to dry the end grain slowly to prevent the rapid drying that typically occurs and causes the surface checking so the drying will be more uniform. The method you describe sounds like a combination of 3 methods as in 1 = anchor seal, 2 = paper bag and 3 = paper bag with shavings and that = almost no drying that will guarantee mold / rot.
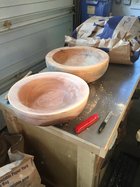
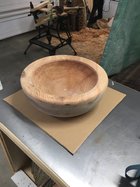
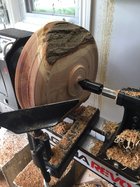
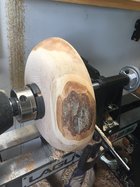
Thanks for the advice! Here is a pic of my largest bowls. No cracks yet! I have been following Ashley Harwood and she seems to just Anchorseal and place on a shelf? Jim Sprague see his bowls on a shelf upside down in shop but I know he uses a kiln drying process which I hope to bypass at the moment. Again not in any hurry for them to dry. Just build a good inventory for the year.
Attachments
Makes a lot of sense, thanks! I think I will take them out of bags and air dry in garage or should I make shelf in my heated crawlspace in the house for storing? Thanks again.The method that I have used for many years is to anchor seal the end grain areas only and leave the mostly side grain areas without any anchor seal then store them in an open area. The individual bowls should not be stacked together but rather need air contact all around. The piece can be weighed initially and then at regular intervals you will see the weight loss as an indication of the progress such that when the weight stops decreasing it will be ready for finish turning. Note: moisture meters only read the surface dryness. The high humidity is not a problem but rather just another way to slow the drying process.
The idea is to dry the end grain slowly to prevent the rapid drying that typically occurs and causes the surface checking so the drying will be more uniform. The method you describe sounds like a combination of 3 methods as in 1 = anchor seal, 2 = paper bag and 3 = paper bag with shavings and that = almost no drying that will guarantee mold / rot.
- Joined
- Apr 27, 2004
- Messages
- 9,161
- Likes
- 5,768
- Location
- Lakeland, Florida
- Website
- www.hockenberywoodturning.com
Anchor seal works great! If you turn a lot of bowls it is a lot less work that changing bags.
I do maybe 10 double turned bowls a year. mostly I do once turned hollow forms or NE bowls.
i used to use anchor seal. The bags are less mess and the bowls dry 2-3 month faster.
I do maybe 10 double turned bowls a year. mostly I do once turned hollow forms or NE bowls.
i used to use anchor seal. The bags are less mess and the bowls dry 2-3 month faster.
Sorry I am confused. So you suggest I just use AnchorSeal, and store on shelf? No bags?Anchor seal works great! If you turn a lot of bowls it is a lot less work that changing bags.
I do maybe 10 double turned bowls a year. mostly I do once turned hollow forms or NE bowls.
i used to use anchor seal. The bags are less mess and the bowls dry 2-3 month faster.
Attachments
I would leave them in the garage even if it freezes in the winter time. When you stack them put small sticks under them so that no part of the piece is blocked from free airflow.Makes a lot of sense, thanks! I think I will take them out of bags and air dry in garage or should I make shelf in my heated crawlspace in the house for storing? Thanks again.
If you use the anchor seal then most likely the bag is not Necessary, especially if you are keeping them in a cool basement. Just keep them out of the breeze and heat and they will likely be fine.
Interesting how one says keep in Garage then others say cool basement? Wondering what if I put them in Garage out of sun. High humidity today, temp about 80 in garage and leave them for a couple of weeks then move them to basement?
Wet shavings will generate mold, which means the piece is drying too slow. Dry shavings can work as a humidor maybe, keeping a barrier around the wood as it dries which keeps it from drying too fast. Most of the time, just putting them on the shop concrete floor works fine. Me, I green turn to final thickness, and I like my bowls to warp.
robo hippy
robo hippy
Two questions.Wet shavings will generate mold, which means the piece is drying too slow. Dry shavings can work as a humidor maybe, keeping a barrier around the wood as it dries which keeps it from drying too fast. Most of the time, just putting them on the shop concrete floor works fine. Me, I green turn to final thickness, and I like my bowls to warp.
robo hippy
1. How thick would you leave the walls on a red oak 16 inch diameter bowl?
2. I am new to lathe turning and don't mind the warping effect, I currently have a 5/8 bowl gouge and wondering if should purchase a 1/2 inch for finishing? Would like to learn beading for a little detail. Maybe I should just go back and finish turn the bowls I turned last week.
Thanks again for the info.
- Joined
- Apr 27, 2004
- Messages
- 9,161
- Likes
- 5,768
- Location
- Lakeland, Florida
- Website
- www.hockenberywoodturning.com
its a choice. Both bags and anchor seal are equally effective at drying bowlsSorry I am confused. So you suggest I just use AnchorSeal, and store on shelf? No bags?
if you are just doing a few bowls and you have the time to switch to dry bags every day for a week - I suggest using bags like I described above.
Advantages for bags over anchor seal are - bowls dry a few months quicker, bags are free from the grocery store, less messy.
advantages for anchor seal and shelf- it’s coat and done.
As you can see, a variety of ways to go about drying traditional bowls. I think after trial and error folks find a method that tends to work in their environment, space, timeframe, etc. May take a few times to find one that works with minimal failures and reasonable time for your plans. For me I turn traditional 10% or so of the bowl diameter, anchor seal the entire bowl and put on a shelf in my garage that is open most of the time during the day. Be sure and write the date, wood, notes, etc on the bottom before you put on anchor seal. Hard to write on once the sealer is on. I don't weigh my bowls. In Memphis, the stable MC for wood is around 13% so when I get that reading on the inside bottom and outside on the tenon area I go ahead and finish turning it. Not much predictability on timeframe. I have same log, same day turned sometimes vary by several weeks in drying time. Lots of variables - when cut down, how long did it sit before being first turned, MC in the air, winter, summer, etc. For natural edge I use bags only, no shavings and no anchor seal. Check every few days and same process - when it gets to 13% I take it out of the bag and set aside to sand and finish. For me the key was to build up an inventory of green bowls in the drying process that I can pull from as needed. Some drying, some dry ready to sand. Too easy to get impatient if you're waiting on it to dry.
IMO drying bowls in a consistent environment is best, one with hvac that operates 24/7. The moisture barrier (sealer, paper bags, etc) can then be altered as one finds a method that works for them. Storing in an area exposed to high flux of temp and humidity introduces uncontrolled variables that greatly complicate process development.
I bag mine, place on wire shelving in the house. Record weight as bagged, and check occasionally. I never change the bag. Mold has not been an issue. Loose one here and there from cracking, but rare. I see much longer drying times quoted here vs what I experience. A 1” thick bowl usually dries in 6 mo.
Wall thickness question - 10% of dia.
I use yard waste bags, no chips. The lawn bags are two layers thick and plenty of room for big bowls. Otherwise, hockenberry has good advice.
Randy made some good points as to time of year wood is harvested and how log the log was down before turning. I rarely turn in less than 3 to 4 weeks so wood is usually dot dripping. I use bag and chips but only for about 2 weeks and open the bag and weigh every 1-2 days. after chips come out weigh 3 times a week. The only wood I have had a real problem of mold is pecan, not sure why as that tree had been down 6 months before I got it. When the weight change drops to 5 GM or less a day it comes out of the bag. I do not seal my bowls unless they are too large to fit in a grocery bag.
I'm very new to this, as well. I sealed end grain and rims, bagged (or boxed) w/ shavings for a couple days closed, then a couple days open, then out of bag/box entirely. I stickered them (3 plywood strips ea) to stack & save space. Now they are on my garage floor toward the door area (warmer there), away from the HVAC vent area.
I normally cool my shop but on 110+° days like yesterday and today I close it off to help the house keep up. The door is insulated.
I'm sure my process may change as I learn and gain more experience but for now it looks something like this (below). I'd like to have a dedicated shelf, wire, probably. I did pick up a freezer to build a kiln with.
I was told not to leave them up high like in the pic so now they are all stacked on the floor. At least 1~2" space for airflow all around between each bowl with the small stickers. I wondered if maybe I should cover them with a tarp but haven't so far.
Allen, I considered stacking with stickers to let the air in but decided not to since I check them regularly for cracks and would then have to unstack and restack. I've seen a fair number of shop pics with stacks like yours in the background so I know it's a popular method. I just lean them up against each other along a shelf and can (sorta, they can be tricky to manage) pull one out to check for cracks. Getting some CA into a small crack on the tenon, foot or rim early in the drying process can prevent a bigger crack from developing. That said, wire racks would help. My experience with tarps for log storage or drying is not good. Traps moisture and encourages mold.
That's good advice to stay on top of cracks early, which I hadn't made a game plan for until...now. Thanks
Thanks for the info! Really appreciate it.
As you can see, a variety of ways to go about drying traditional bowls. I think after trial and error folks find a method that tends to work in their environment, space, timeframe, etc. May take a few times to find one that works with minimal failures and reasonable time for your plans. For me I turn traditional 10% or so of the bowl diameter, anchor seal the entire bowl and put on a shelf in my garage that is open most of the time during the day. Be sure and write the date, wood, notes, etc on the bottom before you put on anchor seal. Hard to write on once the sealer is on. I don't weigh my bowls. In Memphis, the stable MC for wood is around 13% so when I get that reading on the inside bottom and outside on the tenon area I go ahead and finish turning it. Not much predictability on timeframe. I have same log, same day turned sometimes vary by several weeks in drying time. Lots of variables - when cut down, how long did it sit before being first turned, MC in the air, winter, summer, etc. For natural edge I use bags only, no shavings and no anchor seal. Check every few days and same process - when it gets to 13% I take it out of the bag and set aside to sand and finish. For me the key was to build up an inventory of green bowls in the drying process that I can pull from as needed. Some drying, some dry ready to sand. Too easy to get impatient if you're waiting on it to dry.
Norm - there's as many drying routines as there are turners - and some actually work. My advice is to look to some local turners and see how they handle drying, and whether its successful. You appear to live in Canada - advice from Florida, Tennessee, Missouri, etc. may not work as well for you...
Just my two cents worth.
Just my two cents worth.
Norm, you've been given a lot of good but varying advice. There's a reason for that. There are no constants in the experiment of bowl drying. I'd suggest you try doing a few in each of the ways suggested and see what works best for you. You'll lose some bowls but hey, the stuff grows on trees. Where you live and where your wood comes from creates huge variables. What time of year the wood you're was harvested, the type of wood it is, even what part of the tree it came from, all are huge variables. You'll probably never get a one size fits all answer for any of the many questions that pop up as a new turner. Take your own advice...."the process is the passion."
Well, for sure, drying is another art to learn in woodturning, furniture making as well. It changes a lot depending on the wood, and on where you live. So, you have to experiment... I would play with smaller pieces at first, then move to bigger pieces. I have found it interesting that some people will seal the whole bowl, and some seal just the end grain. I know that you should round over all edges as a sharp edge will not only cut you, it is also more prone to cracking, so round over bowl rim and the edge of a tenon.
Side note, the 10% rule works on most woods. My favorite wood to turn is Pacific Madrone. If you leave a bowl at that 10% thickness, you can pretty much 100% guarantee that it will crack. If it didn't crack, it will warp way beyond that 10% range. Sycamore is another wood that moves a lot. Mesquite doesn't move much at all.
robo hippy
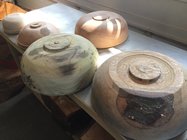
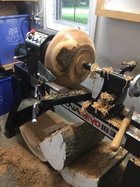
Thanks for the advice gentlemen. I currently have a ton of cut red oak, hackberry and maple to practice on.
Been using the 10% rule, but next time I am trying the once turn rule. Here are some pics of today's practice session.Well, for sure, drying is another art to learn in woodturning, furniture making as well. It changes a lot depending on the wood, and on where you live. So, you have to experiment... I would play with smaller pieces at first, then move to bigger pieces. I have found it interesting that some people will seal the whole bowl, and some seal just the end grain. I know that you should round over all edges as a sharp edge will not only cut you, it is also more prone to cracking, so round over bowl rim and the edge of a tenon.
Side note, the 10% rule works on most woods. My favorite wood to turn is Pacific Madrone. If you leave a bowl at that 10% thickness, you can pretty much 100% guarantee that it will crack. If it didn't crack, it will warp way beyond that 10% range. Sycamore is another wood that moves a lot. Mesquite doesn't move much at all.
robo hippy
Attachments

I was recently introduced to a drying method that I had not heard about - tho some you are likely aware of it: Alumina based desiccant beads. NOT Silica. These are made by BASF and adsorb 40% of their weight in moisture which is much better than Silica @ 25% - can be regenerated over and over after saturation via heating them in an oven and unknown lifespan. Seems they will last a very long time. Have been testing them out. Very promising in that a rough turned bowl that is 1"to 1-1/4" which and 25% -30% moisture content, soft to medium density wood ( soft maple, poplar, Monkey Pod, even Cherry) usually is approx.10% in 3-5 days. ( No, I am not no drugs.... ") ). Added benefit is that the bowls have MUCH less warp and cracking. I placed a 12-1/2" Monkey Pod rough turned bowl @ 1" thickness in the beads on Sunday - and checked it yesterday. When I put it in the beads, the moisture content measured 27% at the bottom outside - the tenon. When I pulled it out yesterday the same testing location showed 10.5%. No warp or cracks.
). Added benefit is that the bowls have MUCH less warp and cracking. I placed a 12-1/2" Monkey Pod rough turned bowl @ 1" thickness in the beads on Sunday - and checked it yesterday. When I put it in the beads, the moisture content measured 27% at the bottom outside - the tenon. When I pulled it out yesterday the same testing location showed 10.5%. No warp or cracks.
Since this is so new to me, I hesitated to talk about it, but I have dried 3 bowls this way thus far, and ( holding my breath...) see no negative other than initial cost of the media, and the inconvenience of re-generating them. I don't think it is going to become the "standard" for drying wood rough turns - but I do see the potential of - for many - saving a lot of space in a limited sized shop, and the ability to answer the bell, when someone unfamiliar with the amount of time involved in taking a piece of green wood to a finished bowl calls and asks if you can"whip out a bowl for them" as they need a gift for someone. We have all probably had those interesting conversations. And - if you have big collection of rough turns waiting for you to pick one and finish it...Bravo! Some of us don't for a multiple of reasons. This may be a tool for those situations.......As I dry a few more, I will take some date and time stamped pictures and log the weights before and after, etc.
). Added benefit is that the bowls have MUCH less warp and cracking. I placed a 12-1/2" Monkey Pod rough turned bowl @ 1" thickness in the beads on Sunday - and checked it yesterday. When I put it in the beads, the moisture content measured 27% at the bottom outside - the tenon. When I pulled it out yesterday the same testing location showed 10.5%. No warp or cracks.Since this is so new to me, I hesitated to talk about it, but I have dried 3 bowls this way thus far, and ( holding my breath...) see no negative other than initial cost of the media, and the inconvenience of re-generating them. I don't think it is going to become the "standard" for drying wood rough turns - but I do see the potential of - for many - saving a lot of space in a limited sized shop, and the ability to answer the bell, when someone unfamiliar with the amount of time involved in taking a piece of green wood to a finished bowl calls and asks if you can"whip out a bowl for them" as they need a gift for someone. We have all probably had those interesting conversations.
And - if you have big collection of rough turns waiting for you to pick one and finish it...Bravo! Some of us don't for a multiple of reasons. This may be a tool for those situations.......As I dry a few more, I will take some date and time stamped pictures and log the weights before and after, etc.@Tim Tucker , there was a recent discussion of using silica based dessicants, but unfortunately I don't remember the thread title (perhaps someone else does).
The question I have for you and other dessicant users is how uniform the drying process is. Moisture is absorbed at the wood surface and it takes time for water deep in the wood to migrate. Are your moisture meter readings pretty stable if you let the wood sit? One would expect the deeper fibers to have higher moisture, when you turn away the surface are you finding the wood significantly wetter?
The question I have for you and other dessicant users is how uniform the drying process is. Moisture is absorbed at the wood surface and it takes time for water deep in the wood to migrate. Are your moisture meter readings pretty stable if you let the wood sit? One would expect the deeper fibers to have higher moisture, when you turn away the surface are you finding the wood significantly wetter?
@Tim Tucker, weighing the piece is the only way to know a piece is dry. As Mark says, below the surface the wood can still be wet, and a moisture meter wont tell you. IMO continue what you are doing but add in weighing the piece, when it stops losing weight its done. I would like to see the data for a few bowls, with time, % moisture, and weight, as the columns. It would give use a good picture of how long it takes to fully dry in the beads.
I dont know a lot about the beads. Do you know if the equilibrium point changes as the beads become more saturated, ie once a piece stops losing weight with the same beads it started with, would it loose more moisture if put into fresh beads? Any data from the mfr?
I dont know a lot about the beads. Do you know if the equilibrium point changes as the beads become more saturated, ie once a piece stops losing weight with the same beads it started with, would it loose more moisture if put into fresh beads? Any data from the mfr?
These are not Silica. Not sure how much that matters, other than they can adsorb more moisture than silica.@Tim Tucker , there was a recent discussion of using silica based dessicants, but unfortunately I don't remember the thread title (perhaps someone else does).
The question I have for you and other dessicant users is how uniform the drying process is. Moisture is absorbed at the wood surface and it takes time for water deep in the wood to migrate. Are your moisture meter readings pretty stable if you let the wood sit? One would expect the deeper fibers to have higher moisture, when you turn away the surface are you finding the wood significantly wetter?
I have 2 moisture meters. One is a probe type, and the other is a probe-lees that has a flat plate on the back of the meter. 8 ranges for differing density materials. When it is set to measure moisture as deep as 2 inches from the surface, it shows 19% currently - in the tenon which is the thickest part of the rough turn bowl @ approx. 1-3/4" . As the flat plate pole-less meters are better suited for dimensional lumber and flat surfaces - that is the only place on a turned piece to get a good reading. The plate must have good contact with a flat surface. In probing the piece with eh other meter elsewhere on the bowl- it is at 10-10.5% SO - if I am interpreting what I have experienced with 3 bowls ( which is a small amount to "trust" completely...but promising ) as long as the bowls are turned at 1"-1-1/4" thickness - they dry uniformly. Again, very little warping or cracking as opposed to other methods I have tried . As my shop is heated/cooled/ dehumidified, I will allow this piece to sit a while and monitor it.
I agree with you on the weight being the "final word" in dryness. But there are several kinds of moisture detection meters. I have a couple. Some that can detect moisture deeper than probes. Please see above response to Mark on that.@Tim Tucker, weighing the piece is the only way to know a piece is dry. As Mark says, below the surface the wood can still be wet, and a moisture meter wont tell you. IMO continue what you are doing but add in weighing the piece, when it stops losing weight its done. I would like to see the data for a few bowls, with time, % moisture, and weight, as the columns. It would give use a good picture of how long it takes to fully dry in the beads.
I dont know a lot about the beads. Do you know if the equilibrium point changes as the beads become more saturated, ie once a piece stops losing weight with the same beads it started with, would it loose more moisture if put into fresh beads? Any data from the mfr?
I would contact BASF about these Doug, as I am not far enough along in experience with these to speak with any authority other than what I am finding.
But, as for the saturation slowing the adsorption or not allowing for complete drying - *BUT* what I am doing to know when the beads are exhausted and in need of a re-charge - is that I have a small quantity of the beads which have a small amount of cobalt chloride applied to them. They are in a small - baby food jar, with 2 layers of cheese cloth over the mouth of the jar, which is held soon by rubber bands.. The jar is buried in the bead bed next the bowl. I use the beads in a jar as a monitor . When they turn pink - I figure the rest of the bead bed will need to be re-charged.
But - back to weight...We know these beads adsorb 40% of their weight as far a given volume. SO...if they are weighed before, and occasionally...one should be able to determine when the need to be re-charged. Hope that helps.
If you are interested in trying this- as long as the supply lasts, you can buy this from a surplus chemical supplier suburban Greenville SC at a VERY discounted price. $30 for 25 pounds, which is a 5 gal. bucket full. That is about the price for ONE pound if you buy this from a industrial supply house which serves the industries which normally use this ( as an air dryer )
Sorbead Air WS is made by BASF if you would like to look at this in ore detail, MSDS, etc....
Sorbead Air WS is made by BASF if you would like to look at this in ore detail, MSDS, etc....
Attachments
I have ZERO financial connection to the supplier of this product, but he approved of me posting his contact info:
MAG-IT LLC
Dwayne M. Grassie
e-mail: sales@mag-it-usa.com
ph# 864-616-0891
MAG-IT LLC
Dwayne M. Grassie
e-mail: sales@mag-it-usa.com
ph# 864-616-0891