• April 2025 Turning Challenge: Turn an Egg! (click here for details)
  • Congratulations to Kelly Shaw winner of the March 2025 Turning Challenge (click here for details)
  • Congratulations to Guillaume Fontaine for "Nebules" being selected as Turning of the Week for April 6, 2025 (click here for details)
  • Welcome new registering member. Your username must be your real First and Last name (for example: John Doe). "Screen names" and "handles" are not allowed and your registration will be deleted if you don't use your real name. Also, do not use all caps nor all lower case.

Correct way to cut up small logs for bowls and hollow forms

Joined
Jul 19, 2017
Messages
479
Likes
450
Location
Roscoe, Illinois
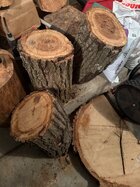
I've viewed videos online and done a little research on cutting up logs. Although I generally don't have access to even small logs, I recently acquired some partially dried small oak logs 10"- 12" in diameter and a couple of feet long. I have sealed the ends to at least temporarily prevent checking. I've attached a picture. Three of the logs are, more or less, centered in the picture.

One of the videos I watched indicated that, after cutting the log into sections of the size you want, you should find the part of the log where the pith is equidistant from 2 sides of the log and saw it down through that line.

I've seeen other methods on other videos and online resources.

Any suggestions on the best way to do this? I don't have a large chainsaw, but I think mine would be OK for these logs. Or, I have a way to resaw them safely on my bandsaw.
 

Attachments

  • unnamed.jpg
    unnamed.jpg
    538.7 KB · Views: 38
If the length of the sections is within the capacity of your chainsaw and skill set, saw them lengthwise down the pith. If not, get someone to do it for you, or cut them in half. Cutting into shorter blanks before splitting, you will end up losing more wood to end checking. At that diameter, a length of twice the diameter plus some inches for loss due to checking (2-6" extra length) is a good rule of thumb.

They will keep a fair while as half logs, especially if you coat the ends. When you're ready to make something, there will be at least a little checking on the ends and you will need need to lop off 1/2-4" from the exposed ends to eliminate the checking. Then, cut a piece of the desired length, and get to turning.

It's hard to describe with words how to cut through the pith to produce balanced bowl blanks, but your description sounds like it might be correct. There are diagrams somewhere on line, and Al will be along shortly with his image marker to show you how to do it. (won't you, Al?)
 
One of the videos I watched indicated that, after cutting the log into sections of the size you want, you should find the part of the log where the pith is equidistant from 2 sides of the log and saw it down through that line.
I’ve been doing this for over 20 years. I use the chainsaw if needed but primarily use the shop bandsaw with a sharp 1/2” 3tpi blade. I might resharpen several times before changing blades. With large logs and log sections I do the initial sectioning on my Woodmizer sawmill behind the barn.

If practical, I like to make my 1st cut down the pith. I did some that way today on the shop bandsaw. I located the pith on each end, put a mark and a circle around it to make it easy to see, then rolled the log until I found a stable side if one exists. (If not, I might make a flat spot with the chain saw.) May be able to get more out of the log if the pith is approximately parallel to one side of the log. If wanting to maximize the block, it’s also important to note any limbs splits, and other potential defects and plan around them. If there are any major splits on the end I might adjust things to make the first cut down the largest split. I’m not concerned with drying “checks” since they usually are shallow.

Then, with the log sitting on the stable side, I use a square against the table to draw a vertical line through the pith. Repeat for the other side. Mark the line position on both ends where it can be seen from the top and draw a straight line from end to end to follow with the bandsaw. (Richard Raffan said he doesn’t bother with the straight cutting line, just eyeballs the cut.)

Cut down the line to rip the log into two parts. What I do next depends on the diameter of the log, the amount of good wood on both halves, and the kinds of blanks I can get. Generally, I process for the largest blanks possible since they can but cut down as needed.

I like to make one edge straight enough to sit nicely against the bandsaw fence, then cut a straight line on the other edge. The figure out what sizes of blanks I can get and make further cuts with the new straight edge. If cutting squares for boxes, vases, etc, I will try to make the first cut on each half down the pith - that will leave pith and juvenile wood on the corners of the squares where it will be cut away on the lathe. Same thing with leaving a bit of bark on the opposite corner.

If I have a fairly long log section and the edges and/or pith are skewed in the log half, I might crosscut that half first if shorter sections would allow making larger squares. There are always measurements and decisions to make. I use a square as show in my video to help decide the largest squares I can get from a log half.

If cutting for bowl blanks, I do much the same thing - first lay out the largest rectangle I can make from that half, again, crosscutting a longer log if needed. The goal is to end up with a blank that is rectangular with the length along the grain a little longer than the width. Then make cuts at the ends of that rectangle so that section of the log half can be turned up on it side to keep it well supported to make the tall cut. I may cut more of the ripped surface away if it contains significant juvenile wood or pith since thats where a crack will form first.

Much of this depends on whether I want to turn it green (almost never) or dry first (almost always). Some also depends on the species and the T/R ratio and position of transverse rings in the blank, another likely place to crack in some species. Much of this comes with the experience of making 100s of these.

If the goal is to make a natural edge bowl, I simply cut the sides and cut away pith if needed, then leave the bark side of the log section untouched.

Cutting crotches and burl for bowls or platters is entirely different.

Depending on the wood, the time of year, how long it’s been laying on the ground, and the health of the original tree, all of these cuts might be different depending on what kind of living things I find under the bark or in the middle. Signs of powder post beetles are most concerning since some types can infect other wood in the shop.

(oops, out of time - sorry, didn’t have time to proofread this)

JKJ
 
I'll bet if you talked to a tree crew (like at Busy Beaver Tree Service) and show them what you're doing with them, you could have all kinds of logs to work with.
 
I'll bet if you talked to a tree crew (like at Busy Beaver Tree Service) and show them what you're doing with them, you could have all kinds of logs to work with.

I did that when I was sawing a lot of logs.

But I made a mistake when I told the county road crew boss I could use some logs and I had a place to dump them. In a very short time I had way more logs than I could saw and had to tell them to stop!

The tree service companies around here are quite cooperative - they would call me when they were cutting a tree they thought I might like and I’d bring a big trailer. (It’s easy to load even a large log or two on a trailer once you know how.)

JKJ
 
Here is how I get started, I made this drawing a few years ago. All logs will have the pith off-center, with the wider hemisphere growing on the side of the log that needs the strength to support itself (on a non-vertical limb, the wide part of the growth is on the bottom side), or it may represent the sunny side of the log (for a trunk). I also tend to rip the log parallel to the bark surface. This makes ribbon shavings rather than chips (will likely need to unclog the chip discharge chute on the bottom of the saw quite often, keep an eye on that chute), but it is easier on a general purpose chain than cutting down perpendicular to the end grain. These cuts, and the next cuts you make in similar fashions, will also give you more uniform grain patterns in your pieces, along with grain stress stabilization. I hope this helps.
1744109293036.jpeg
 
Last edited:
Any suggestions on the best way to do this? I don't have a large chainsaw, but I think mine would be OK for these logs. Or, I have a way to resaw them safely on my bandsaw.
The blank prep for me starts with cutting log sections that have features centered for openings.
The blank prep for endgrain hollowed forms is quite different from blank prep for facegrain HFs.

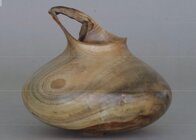
My sequence to do a pitcher lip face grain hollow form like thisIMG_2939.jpeg

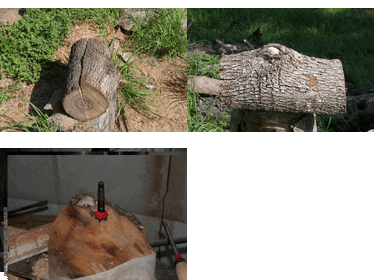
The form above came from the log section shown below with a limb scar
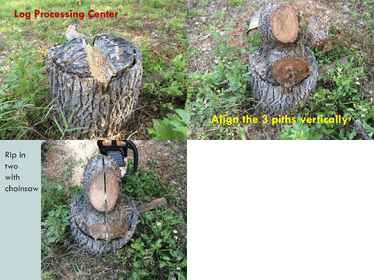
I first rip it with a chain saw so that the limb scar is centered
Then I find the center of the opening so that I get I high side around the opening for the pitcher rim
Then a drill a shallow hole for the sur drive
I use this hole to cut the blank round on the bandsa
HollowformdemoSWAT.gif

This is part of the prep sequence for a crotch bowl it show ripping.
I can rip a log section longer than my bat by aanling the bar downward while ripping
FWS%20Natural%20edge%20crotch%20bowl.gif
 
Last edited:
Two things I check before I cut up a log. One is the pith, and two is the cracks coming off of the pith. There are almost always cracks coming off of the pith, and "usually" they will be fairly close to lining up with each other. I do not worry about making the grain perfectly centered in the bowl, and will opt for making the center cut to line up with the cracks. Some times the pith is close to the middle of the log, some times not. I got one log that was a branch that was growing horizontal. Pith was about 3 inches from the top of the branch, and bottom of the branch was another 12 inches down. Some times the pith can be in the center on one end, and way off center on the other end of the branch/log. I now have a big bandsaw to cut my blanks to near perfect parallel sections/slabs. When I used to use the chainsaw, I had a bunch of strips of plywood in 1/2 inch increments, up to 8 inches deep. I would use a marker to line up my cuts, and consider a 1/2 inch wide kerf. For sure, cut off the bark edge on the outside of the bowl blank, unless you are going for a natural edge bowl. It just saves a lot of extra work.

robo hippy
 
Reed makes a good point. If the log has been on the ground long enough to make significant cracks, you either have to lose a lot of wood from the ends, or cut along Mother Nature's guidelines. Since our arid climate causes speedy cracking, we try to get to trees the same day as they are felled or the next day, and process as soon as we can. Randy, in your part of 'Downstate', you'll have more time and better wood choices. Fruit woods of all kinds have the reputation of cracking before they hit the ground, so get those processed immediately.
 
Fruit woods of all kinds have the reputation of cracking before they hit the ground, so get those processed immediately.

I've seen that, cherry all cracked before I got it out of the woods.

However, I think much depends on the specific tree, how the tree grew, where in the tree the piece was cut, and the temperature/humidity of course.

I had to take out one big cherry tree to put in my hay storage building. For some unknown reason it was among the most stable wood I've had. I cut a bunch of large rounds. I didn't have time to do my normal anchorseal. People came to get some over the next week and NONE of it was cracked or checked!! l left one 14" dia limb section on the ground out in the sun and several years later still had no cracks. Amazing. I still have a few pieces in a storage building, unsealed, uncracked after maybe 15 years.

I wish I knew what that tree had been drinking. I'd give it to some other trees.
It grew in the shade - maybe the slow growth helped.

JKJ
 
The wood I have is oak. Although the tree had been dead for a year or two, it was freshly cut down when I got the small logs I have. They seem to be of the size that I can probably cut them on the bandsaw rather than my small chainsaw. I have Little Ripper sort of permanently borrowed from a friend which might be of use, If they won't fit on the bandsaw, I'll just do what I can with the small chainsaw. There really is only minimal cracking from the pith outward and almost no others. I sealed the ends within 24 hours so that should stop some checking. Even though the tree is still a little "wet", it isn't bad since it was standing dead for at least a year or more. Thanks for the input. I picked up some useful information for the future.
 
it was standing dead for at least a year or more.

Standing dead can make great wood, if the boring critters don't find it. Some advice I got when I got my sawmill was stand logs on end for a few days to let the water drain out. Sometimes it's a steady stream! Less water in the wood, possibly fewer drying defects. Obviously works better for wood with more open grain like red oak.
 
My experience with standing dead trees is that if you cut it down, you have to turn it into bowls IINS (immediately if not sooner). As soon as it is cut, then that seems to open it up for tension relief/cracking.

robo hippy
 
My experience with standing dead trees is that if you cut it down, you have to turn it into bowls IINS (immediately if not sooner). As soon as it is cut, then that seems to open it up for tension relief/cracking.

robo hippy

I’ve had varying experience. Maybe it depends on some other factors such as the type of wood, how long it’s been dead, the growing conditions, the amount of sun/shade it had since it died, etc.

JKJ
 
Maybe it doesn’t really matter. I had access to this wood. Almost no checking. I already sealed the ends and no additional checking so far. I use the wood I have access to and whatever happens happens.
 
Thanks hockenbery. This triggered a couple lightbulbs 💡. I can’t wait to try this.
It’s great fun!


Remember the limbs grow at an angle towards the roots 30 degrees is a good guess usually.
Sometimes I try to turn the form so the limb mostly goes into the form. Other times I let it poke through the rim.

Most limb scars are hollow. Sometimes it can be a structural issue.

This pitcher form shows the limb poking through the rim and coming back into the base - big knot feature
IMG_2946.jpeg

This is a similarly shaped form turned from a 1/4 log to get an angle for the rim - cherry with lots of bird pecks in the sapwood
IMG_2948.jpeg
 
Last edited:
Of note some spoke of logs developing cracks in time. Almost every tree I have ever cut had a crack in the pith when it hit the ground or within 2 hours of that. I have wondered if hitting the ground causes some of this. I noted while watching a logging show they create a bed of smaller trees when dropping a large conifer . Stated when not cut this way the log broke into pieces and was worthless, and they showed one in the video.
 
Almost every tree I have ever cut had a crack in the pith when it hit the ground or within 2 hours of that. I have wondered if hitting the ground causes some of this.

I think damage from hitting a hard ground depends on the species.
As for pith cracks, I see the same pith cracks in trees that were felled and hit hard and in log sections my tree guy would cut and gently lower in sections with a rope. Less cracking and checking, of course, if the ends are sealed immediately after cutting, especially with some hardwood species.

I only save and seal hardwoods and eastern red cedar so I don’t have much experience with pines except for cutting some into boards on my sawmill. However, I have felled a number of pines of various diameters and have not once had a log break when it hit the ground, unless standing dead. Maybe those in the logging show were a different type of pines. Around here, eastern white pine and vrginia (scrub) pine are the most common connifers.
 
Damaged trees can have several causes. They didn't harvest the Giant Sequoias because when they hit the ground, the insides would shatter, but no other tree gets that huge. For storm damaged trees, if they blow over and have the root ball attached, generally that is good wood. If the tree has shattered due to high winds, it might be good for pen blanks. I don't really remember trees/logs getting cracks off of the pith shortly after they are cut down. Most have been on the ground for a while by the time I get them.

robo hippy
 
Back
Top