• November Turning Challenge: Puahala Calabash! (click here for details)
  • Congratulations to Ted Pelfrey for "Forest Floor" being selected as Turning of the Week for November 4, 2024 (click here for details)
  • Welcome new registering member. Your username must be your real First and Last name (for example: John Doe). "Screen names" and "handles" are not allowed and your registration will be deleted if you don't use your real name. Also, do not use all caps nor all lower case.

Cherry log bowl

Joined
Aug 20, 2024
Messages
12
Likes
21
Location
Mathews, VA
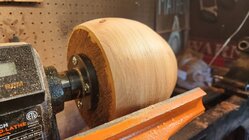
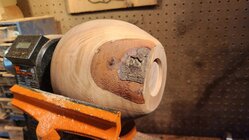
I picked up a seasoned quartered cherry log at a coop in Fredericksburg last month. Looked at it every couple of days trying to figure out what to do with it. While I love turning live wood, I've never tackled anything this big before. It is (was) 7" x 8" x 13.5" long. I cut it down to 7.5" wide. Took me close to 30 minutes to get it cut, trimmed and on the lathe. Plus another 10 minutes to make sure I was starting with sharp tools...
20241013_102528.jpg20241013_102537.jpg
20241013_103600.jpg
20241013_104640.jpg
 
Joined
Aug 20, 2024
Messages
12
Likes
21
Location
Mathews, VA
This log was so out of balance it made the whole workbench shudder every rotation. I had to make a couple of deeper cuts on the corner just so it would turn over the rest block.

It took me 2 hours just to get to the point where everything wasn't shaking, and my right arm and elbow felt like they were going to fall off. By the end, I was cutting for 2 minutes and resting for 5 - 10.

I finally got it down to where it was starting to take shape. I'll need to shave a bit more off the bottom just to have a solid space for the chuck, but I'd like to leave a little live edge. Still not sure how the shaping will turn out. It's sitting on my breakfast bar until I can see the final lines of how I think it should look.

I work full time and only get to lathe on weekends when nothing else is going on. I'll be lucky to have this done by Thanksgiving (i have at least 3 other projects to finish as well)
20241013_121110.jpg20241013_114614.jpg20241013_133824.jpg20241013_114604.jpg
 
Joined
Feb 2, 2016
Messages
359
Likes
308
Location
Clinton, TN
Interesting! Love to see the finished piece.

But... what kind of cherry is that? The bark is unlike any of the "wild black cherry" I've harvested over the years. All those have distinctive, unforgettable bark. The wood is lighter than the wild cherry too. Maybe it's the lighting.

Here's a black/wild cherry bowl from a downed tree, with an oil finish. (Almost of the cherry around here looks much like this when finished with oil)

cherry_bowl.jpg

A student made this from cherry, also with an oil finish.

penta_platter_Kristina_finished_comp3.jpg
JKJ
 
Joined
Jan 20, 2011
Messages
517
Likes
637
Location
Traverse City, MI
Wood often looks different in photos, than in real life, and I'm not good with wood ID, but your log looks more like beech to me than cherry.
 
Joined
Feb 28, 2021
Messages
1,363
Likes
1,204
Location
Roulette, PA
Website
www.reallyruralwoodworks.com
Re: Wood ID- I'm pretty sure it is cherry - For one thing, got to remember dimensions he mentions , so whole log might have been 14 inch diameter, if that, and I have done lots of cherry (whole trees) and the bark is consistent with less mature cherry branches and younger trees.

Also his second pic in the original post I'll say 100% that it is cherry - I recognize it instantly - so much so that I can just about smell that distinctive cherry odor , so I'd say it is his lathe lighting that is throwing y'all off on the wood's color.
 
Joined
Sep 19, 2023
Messages
840
Likes
1,553
Location
Columbia, TN
But... what kind of cherry is that? The bark is unlike any of the "wild black cherry" I've harvested over the years. All those have distinctive, unforgettable bark. The wood is lighter than the wild cherry too. Maybe it's the lighting.

If it's cherry, it's an ornamental/fruit cherry. Definitely not black cherry.
 
Joined
Feb 2, 2016
Messages
359
Likes
308
Location
Clinton, TN
The magic of wood ID is mostly in the end grain. Most everything else is a guess. Having the bark (and if possible the leaves) help tremendously - there are lots of resources on the internet to identify trees.

I got started on the hobby of wood identification when looking at a bowl passed around at a club meeting. The turner had labeled it "cherry" when it was obviously ring porous, even to the naked eye. Cherry is not.

One easy thing to do is take a small piece of the wood, maybe at least 3/4"x1/2" and big enough to hold, and shave the end grain with a single edged razor blade to remove all saw and tool marks that hide the pores.

Use a 10x hand lens and examine the pores. R. Bruce Hoadley's book "Identifying wood" is an incredible resource, but the online Wood Database web site includes end grain photos of all the common species. Their article on identifying wood shows the basic technique, read section 7 here:
https://www.wood-database.com/wood-articles/wood-identification-guide/

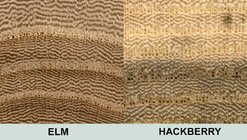
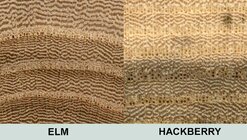
(Also note that you can also get free professional wood ID from the USDA wood products laboratory. They used to accept up to 5 sample per year per US citizen but later changed to 3 per year. We did that once - someone mailed me a small sample and she also mailed one the the gov lab - fortunately we both agreed on the species - it was an easy on: elm)

This page is also useful in that it shows how wrong we can be by simply looking at the wood surface and grain:
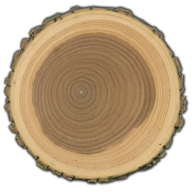
If you REALLY want to see the wide extent of variability in wood appearance, look at hobbithouseinc. (I know, it's an odd name for a wood website but well worth bookmarking!) Select a species from the wood pics list and be amazed at the differences. There are even some turned examples at the bottom of each species page. Here is the entry on american black cherry:
The Hobbithouseinc pages also include closeup pictures of end grain.

I have used a 10x magnifier but since I have a low power stereo microscope I prefer to use that - easier to see.

You basically examine the pore size and distribution, rings, and rays. Some are tricky but some are trivial. For an example, look at the the difference between red and white oak: both are strongly ring porous with large earlywood pores and tiny "tornados" of latewood pores. However, the earlywood pores of white oak are filled with tyloses (making white oak good for outdoor furniture and whisky barrels!) The large pores of red oak are open and more like soda straws.

red_white_oak.jpg

This is black/wild cherry, classified as semi-diffuse porous or semi ring porous. (All these pics are at the same magnification)

blackcherry.jpg

You can find end grain pics of different species at the wood database web site. Cherry is here:

For anyone interested in this I can recommend R. Bruce Hoadley's book Identifying Wood. And I think his book Understanding Wood is a must have for anyone who works with wood and wants to understand how it grows, dries, shrinks, and warps - necessary for a high rate of success when cutting up logs into wood blanks for drying. I buy extra used copies of the second book to loan to people who express an interest. (Hoadley is both a wood technologist and a craftsman - he understands the technical aspects of wood as well as how they apply to those of us who like to play with wood!)

Since it's often impossible to identify wood correctly by looking at the side grain or even the various surfaces of a turning, when people hand me a piece of wood and ask what it is I usually examine it closely for a moment then pronounce "It's definitely "tree wood".

JKJ
 

Attachments

  • 1728998950552.jpeg
    1728998950552.jpeg
    99.4 KB · Views: 2
  • Elm_Hackberry.jpg
    Elm_Hackberry.jpg
    99.4 KB · Views: 2
Joined
Feb 2, 2016
Messages
359
Likes
308
Location
Clinton, TN
If it's cherry, it's an ornamental/fruit cherry. Definitely not black cherry.

Cherry does have various bark appearance but around here, at least, the type of bark shown looks like what I seen on smaller branches. The mature tree bark always looks more like this.

1729001397660.jpeg

Bark, leaves, smell, endgrain - all good clues. A few times I've even gone back to the site where a tree was removed or came down and looked around on the ground for fallen leaves!


Oops, for anyone interested in wood ID I should mention fluorescence. I use 365nm UV flashlights to look at wood and some other things. Some species that otherwise look similar are dynamically different under black light, for example locust fluoresces bright green while others with similar end grain (e.g. mulberry and osage orange) do not. Red heart also has strong fluorescence. Take a peek:

UV_3_redheart_locust.jpg

In some species, fluorescence is only revealed when the wood is dampened with water.

Another huge indicator is density. I sometimes cut a measured sample and weigh it with a sensitive gram scale to calculate the density, then compare that to the charts. With this method, dryness is important. But still, there is so much varability within the species and even in different parts of the same tree that any one test is seldom definitive.

JKJ
 
Last edited:
Joined
Nov 15, 2020
Messages
578
Likes
450
Location
Huntington, VT
This log was so out of balance it made the whole workbench shudder every rotation. I had to make a couple of deeper cuts on the corner just so it would turn over the rest block.

It took me 2 hours just to get to the point where everything wasn't shaking, and my right arm and elbow felt like they were going to fall off. By the end, I was cutting for 2 minutes and resting for 5 - 10.

I finally got it down to where it was starting to take shape. I'll need to shave a bit more off the bottom just to have a solid space for the chuck, but I'd like to leave a little live edge. Still not sure how the shaping will turn out. It's sitting on my breakfast bar until I can see the final lines of how I think it should look.

I work full time and only get to lathe on weekends when nothing else is going on. I'll be lucky to have this done by Thanksgiving (i have at least 3 other projects to finish as well)
If you can't get it roughed out in one session it's best to minimize moisture loss by storing in a plastic bag or possibly freezing, otherwise it's likely to check badly. In fact I think I see a check in your next to last photo, just above center. That's always a risk with partially air dried blanks.

You may want to tackle smaller projects on that lathe, or at least better balanced blanks. Serious shaking is a warning sign best not ignored. Were you roughing at the lowest possible speed?
 
Joined
Sep 19, 2023
Messages
840
Likes
1,553
Location
Columbia, TN
The magic of wood ID is mostly in the end grain. Most everything else is a guess. Having the bark (and if possible the leaves) help tremendously - there are lots of resources on the internet to identify trees.

I got started on the hobby of wood identification when looking at a bowl passed around at a club meeting. The turner had labeled it "cherry" when it was obviously ring porous, even to the naked eye. Cherry is not.

One easy thing to do is take a small piece of the wood, maybe at least 3/4"x1/2" and big enough to hold, and shave the end grain with a single edged razor blade to remove all saw and tool marks that hide the pores.

Use a 10x hand lens and examine the pores. R. Bruce Hoadley's book "Identifying wood" is an incredible resource, but the online Wood Database web site includes end grain photos of all the common species. Their article on identifying wood shows the basic technique, read section 7 here:
https://www.wood-database.com/wood-articles/wood-identification-guide/

(Also note that you can also get free professional wood ID from the USDA wood products laboratory. They used to accept up to 5 sample per year per US citizen but later changed to 3 per year. We did that once - someone mailed me a small sample and she also mailed one the the gov lab - fortunately we both agreed on the species - it was an easy on: elm)

This page is also useful in that it shows how wrong we can be by simply looking at the wood surface and grain:

If you REALLY want to see the wide extent of variability in wood appearance, look at hobbithouseinc. (I know, it's an odd name for a wood website but well worth bookmarking!) Select a species from the wood pics list and be amazed at the differences. There are even some turned examples at the bottom of each species page. Here is the entry on american black cherry:
The Hobbithouseinc pages also include closeup pictures of end grain.

I have used a 10x magnifier but since I have a low power stereo microscope I prefer to use that - easier to see.

You basically examine the pore size and distribution, rings, and rays. Some are tricky but some are trivial. For an example, look at the the difference between red and white oak: both are strongly ring porous with large earlywood pores and tiny "tornados" of latewood pores. However, the earlywood pores of white oak are filled with tyloses (making white oak good for outdoor furniture and whisky barrels!) The large pores of red oak are open and more like soda straws.

View attachment 67687

This is black/wild cherry, classified as semi-diffuse porous or semi ring porous. (All these pics are at the same magnification)

View attachment 67691

You can find end grain pics of different species at the wood database web site. Cherry is here:

For anyone interested in this I can recommend R. Bruce Hoadley's book Identifying Wood. And I think his book Understanding Wood is a must have for anyone who works with wood and wants to understand how it grows, dries, shrinks, and warps - necessary for a high rate of success when cutting up logs into wood blanks for drying. I buy extra used copies of the second book to loan to people who express an interest. (Hoadley is both a wood technologist and a craftsman - he understands the technical aspects of wood as well as how they apply to those of us who like to play with wood!)

Since it's often impossible to identify wood correctly by looking at the side grain or even the various surfaces of a turning, when people hand me a piece of wood and ask what it is I usually examine it closely for a moment then pronounce "It's definitely "tree wood".

JKJ

I use the Wood DB all the time. It's a great resource. The hackberry/elm end grain is one of the few I know on sight.
 
Joined
Sep 19, 2023
Messages
840
Likes
1,553
Location
Columbia, TN
Cherry does have various bark appearance but around here, at least, the type of bark shown looks like what I seen on smaller branches. The mature tree bark always looks more like this.

View attachment 67692

Bark, leaves, smell, endgrain - all good clues. A few times I've even gone back to the site where a tree was removed or came down and looked around on the ground for fallen leaves!


Oops, for anyone interested in wood ID I should mention fluorescence. I use 365nm UV flashlights to look at wood and some other things. Some species that otherwise look similar are dynamically different under black light, for example locust fluoresces bright green while others with similar end grain (e.g. mulberry and osage orange) do not. Red heart also has strong fluorescence. Take a peek:

View attachment 67693

In some species, fluorescence is only revealed when the wood is dampened with water.

Another huge indicator is density. I sometimes cut a measured sample and weigh it with a sensitive gram scale to calculate the density, then compare that to the charts. With this method, dryness is important. But still, there is so much varability within the species and even in different parts of the same tree that any one test is seldom definitive.

JKJ

I probably haven't seen enough young cherries with that smoother bark. On hardness, I have been tempted to buy a Janka gauge but I have yet to find one (I haven't looked real hard).

Fluorescence is cool. According to the Wood DB, the wych elm fluoresces. However, I cut down a small elm that I believe is American elm, and it fluoresces as well. Here's an incense burner I made for my wife.

image000000.heic.jpg

And a black locust bowl.

IMG_20240229_071816.jpg
 
Joined
Jul 18, 2018
Messages
1,164
Likes
2,323
Location
Baltimore, MD
(Also note that you can also get free professional wood ID from the USDA wood products laboratory. They used to accept up to 5 sample per year per US citizen but later changed to 3 per year. We did that once - someone mailed me a small sample and she also mailed one the the gov lab - fortunately we both agreed on the species - it was an easy on: elm)
I’ve used the Forest Products Lab service a few times and it may be important to know that they only identify to the genus level, not species. This is often specific enough, but if you’ve got a need to know precisely which species within the genus (I.e. red pine vs. scotch pine) you may be disappointed.
 
Joined
Aug 20, 2024
Messages
12
Likes
21
Location
Mathews, VA
Thanks all for the information. Much appreciated, and I'm grateful to belong to a group that shares so much. Given the color and the smell, I'm about 80% sure it's cherry, but if not, I get to add another type of wood (TBD) to what I've turned so far.

I was hoping for more sympathy from my wife that I need a full size floor standing lathe that won't vibrate so much but she's not buying it yet. I should have had her watch me for the first 30 minutes...

Here's a few more pictures. At this point, I'm considering using the smaller half to make a top and have this be a really big box. Also, the lighting in my shed sucks, and my phone camera doesn't do great with the coloring. At this point, it's 6.75" in diameter and 5 3/4" tall.

Out of all the things i struggle with, finding the center of an odd-shaped piece of wood is one of the most frustrating. It works okay for cedar where being asymmetrical gives it more appeal, but no matter how i measure and cut, things always end up smaller than planned.
20241013_135119.jpg20241013_141259.jpg20241013_135111.jpg20241013_141252.jpg
 
Joined
Jan 20, 2011
Messages
517
Likes
637
Location
Traverse City, MI
I was hoping for more sympathy from my wife that I need a full size floor standing lathe that won't vibrate so much but she's not buying it yet. I should have had her watch me for the first 30 minutes...

Out of all the things i struggle with, finding the center of an odd-shaped piece of wood is one of the most frustrating. It works okay for cedar where being asymmetrical gives it more appeal, but no matter how i measure and cut, things always end up smaller than planned.

You mention a couple struggles (both balance and finding center) and your photo from your first post shows exactly why. When you pick a spot and screw a faceplate onto a rough log, you have instantly given away your choices of where the axis of rotation will be. If it's off-balance or off-center, you're sort of stuck with it and you've locked it in somewhat permanently. (to the extent that any change means starting over)

If you were to start between centers instead of a faceplate, you open up lots of choices for that center axis placement. If it's off somehow, you can move it sideways to balance or center. You can even change the angle to balance grain or features. You can even take a few cuts, and adjust again. You're in total control. Then once YOU (rather than your faceplate) decide the axis, you can make an even/true surface for your faceplate, a glue block, or a tenon for a chuck.
 
Joined
Nov 15, 2020
Messages
578
Likes
450
Location
Huntington, VT
I completely agree with Darryl. It's the rare piece that I don't start between centers. I try to find a static balance point where the workpiece can rotate between the center points without rolling down to the heavy side. With it roughly balanced I can turn at a reasonable speed and there's less material to remove to get the piece rounded. At that point I can better see my options, adjust the center points if necessary and face off the tailstock end.
 
Joined
Feb 2, 2016
Messages
359
Likes
308
Location
Clinton, TN
I was hoping for more sympathy from my wife that I need a full size floor standing lathe that won't vibrate so much but she's not buying it yet.

Dave,

What a dilemma! Maybe you could approach it from a different angle. Perhaps think of the some things you could make that she might personally appreciate. Make some of these to catch her attention then describe other things she might like. Think small and useful, perhaps utility turnings, things not as often done by many turners today. If she's anything like my Lovely Bride, she will soon have some requests! Yes, turning good-sized bowls and forms can be fun (and quite easy with green wood), but smaller, often "utility" turnings, can have a big impact. As an aside, numerous turners, some well known, point out that turning detailed things first, especially spindles, can help teach fine tool control.

Here's my experience. When I started turning almost 25 years ago, I started with the hands-down worst lathe in the world. I bought it only to make something useful intended help our son starting architect school. (He's now a successful architect!) I then made a few small, useful things household on that stupid little lathe.

It soon became obvious that "we" needed a better lathe so "we" agreed to get a Jet 1642. I started turning many, many things that My Lovely Bride found useful, most for the kitchen. (She is an incredible chef.) Our extended family found these useful too. I started a Christmas tradition of having a box full of things others in the family could choose from. This was a HUGE hit and helped solidify the idea that yes, the lathe could be more than just a hobby for my own enjoyment.


The composite images below show a small sampling of things I've made that she, friends, and even strangers found useful. (A long story for another time: through woodturning we even developed a life-long friendship with a family in Italy who now host us when we visit and take us to fascinating places not even known to travel agents.)

I made some of these for the kitchen and are still being used today. She uses ring keepers both in the kitchen and bedroom - I've made lots of these (easy to turn!) and many people are using them. I'm about to make some for someone we met in Costa Rica. At bottom left are "profile" mugs I made as presents with the profiles of one son and his bride.

At bottom right are tiny vases - I made these each year for the kindergartners in our SS class for them to "fix up" by shining up with wax and making tiny artificial flower arrangement to take home for mother's day (years later some mothers told me how they still treasure these!) Other things, like the little needle case boxes, we gave to friends. Believe me, we shared the joy in giving things to others AND in using things around the house. All this made it easy to see how useful the lathe and hobby could be!
utility_turnings.jpg

When later I wanted to make things larger than the Jet could easily handle, she was supportive of me getting an even larger lathe, so I found a used PM 3520b at a good price and took a multi-day road trip with a U-haul trailer to bring it home.

I continue to make things she finds useful, some large, others small. Some of these are recent, like the Olivewood mortar and pestle and the Olivewood rolling pin made to her specs (this helped yesterday with making a custard pie I'm enjoying today!) Some are much bigger things like serving platter and a few larger bowls not shown (the largest of the two platters just below center is just under 20" in diameter. Some things were gifts: a drop spindle for a friend interested in spinning fiber into yarn, the ebony lidded box, hair sticks we took to a friend in Italy, and even the non-turned, carved coffee scoops - we gave the Cocobolo one away, we use the one carved from Pink Flamewood every day.
utility_more.jpg


Also: in case you haven't thought of it, I want to pass along an idea for your immediate problem of balance and vibration. Many years ago a good friend turned large bowls on a lathe that was far too small. He turned outboard with a free-standing tool rest he build. To solve the problem of vibration, he clamped the lathe to the wall in his mother's garage using long pipe clamps. I think he used at least four, maybe more. The next time I get over to visit I'll try to snap photos of some of his large pieces. I was impressed.

Another thing - when I have a heavy, irregular chunk of wood which will likely have some balance problems, I first use a chainsaw and/or bandsaw to make it closer to round. I keep an electric chain saw for this. I can even use it inside the shop.

JKJ
 
Joined
Sep 19, 2023
Messages
840
Likes
1,553
Location
Columbia, TN
You mention a couple struggles (both balance and finding center) and your photo from your first post shows exactly why. When you pick a spot and screw a faceplate onto a rough log, you have instantly given away your choices of where the axis of rotation will be. If it's off-balance or off-center, you're sort of stuck with it and you've locked it in somewhat permanently. (to the extent that any change means starting over)

If you were to start between centers instead of a faceplate, you open up lots of choices for that center axis placement. If it's off somehow, you can move it sideways to balance or center. You can even change the angle to balance grain or features. You can even take a few cuts, and adjust again. You're in total control. Then once YOU (rather than your faceplate) decide the axis, you can make an even/true surface for your faceplate, a glue block, or a tenon for a chuck.

Great point, DF. Kent Weakley talks about this a lot in any of his natural edge videos. I turn everything between centers with a spur drive. @David Skidmore, check it out at www.turnawoodbowl.com or on YouTube.
 
Joined
Aug 20, 2024
Messages
12
Likes
21
Location
Mathews, VA
You mention a couple struggles (both balance and finding center) and your photo from your first post shows exactly why. When you pick a spot and screw a faceplate onto a rough log, you have instantly given away your choices of where the axis of rotation will be. If it's off-balance or off-center, you're sort of stuck with it and you've locked it in somewhat permanently. (to the extent that any change means starting over)

If you were to start between centers instead of a faceplate, you open up lots of choices for that center axis placement. If it's off somehow, you can move it sideways to balance or center. You can even change the angle to balance grain or features. You can even take a few cuts, and adjust again. You're in total control. Then once YOU (rather than your faceplate) decide the axis, you can make an even/true surface for your faceplate, a glue block, or a tenon for a chuck.

I just gave myself a triple face-palm. DUH!!!. It never occurred to me - mostly because it's less of a problem with the smaller things. I will try it with the top piece (after trimming down with the chainsaw) and report back. It also doesn't help that my center spur stays in the holder that is hidden on the back side of the motor. I will start keeping it next to the chuck keys (that I keep in my first ruined bowl) so I don't have to re-learn this again...
 
Joined
Aug 16, 2022
Messages
354
Likes
807
Location
Butler, PA
I just gave myself a triple face-palm. DUH!!!. It never occurred to me - mostly because it's less of a problem with the smaller things. I will try it with the top piece (after trimming down with the chainsaw) and report back. It also doesn't help that my center spur stays in the holder that is hidden on the back side of the motor. I will start keeping it next to the chuck keys (that I keep in my first ruined bowl) so I don't have to re-learn this again...
Lyle Jamieson also has a good video on youtube about starting between centers and balancing the weight and grain. I started out just as @John K Jordan above did with a cheap lathe and made small useful items to learn on : paper towel holder, pepper mills, salt shakers, bottle stoppers, small bowls, etc.
 

Michael Anderson

Super Moderator
Staff member
TOTW Team
Joined
Aug 22, 2022
Messages
1,667
Likes
5,146
Location
Chattanooga, TN
Thanks for posting the follow-along, David. I'm enjoying the journey and the nice discussions here! One thing I'll add is that having the grain running diagonal to the ways (as opposed to parallel/spindle or perpendicular/"typical bowl" can make getting a clean surface all around slightly challenging. I'm looking forward to seeing your final piece. Cherry is one of my favorite woods to work.
 
Joined
Aug 20, 2024
Messages
12
Likes
21
Location
Mathews, VA
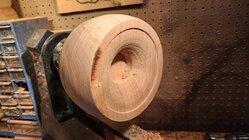
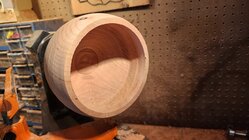
Haven't had any time to work on this until yesterday. Good thing, since it gave me a little time to think and plan the next steps. I am definitely going to turn this into a box, using the other (smaller) log piece for the lid. Since it's a bit smaller, I had to narrow the top of the bowl. I was very pleased that it didn't warp very much in the 3 weeks it's been sitting. Even more pleased that the mortise I cut for the chuck spun it exactly the same as with the face plate.

I'll finish roughing it out today to get it the thickness I want and will set it aside while I start on the lid. I want to be able to finish them at roughly the same time (same weekend), so I expect to spend several hours with my N95 mask and sandpaper. The lid will be a bit more challenging, since the grain is going to run a bit differently than the bowl. I'm going to take my time to plan and prepare better than I did for the bowl.
 

Attachments

  • Cherry Starting Hollowing.jpg
    Cherry Starting Hollowing.jpg
    252.2 KB · Views: 4
  • Cherry Rough Shape2.jpg
    Cherry Rough Shape2.jpg
    228.6 KB · Views: 5
  • Cherry Rough Shape.jpg
    Cherry Rough Shape.jpg
    285 KB · Views: 4
  • Cherry with Tenon.jpg
    Cherry with Tenon.jpg
    267.6 KB · Views: 5
Joined
Aug 20, 2024
Messages
12
Likes
21
Location
Mathews, VA
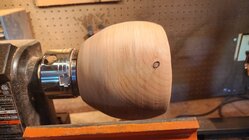
Here are a few more pictures of where I ended up with roughing it out yesterday. Ideally, I'd like to get the walls thinner, so that's probably going to be my focus for today.

The only thing I'm not happy with at the moment is that I lost a bit more of the live edge getting it back in round. But I knew it would be an issue with the way the bark was at the bottom. But I was able to get the mortise 100% on the hardwood and not spanning over to the bark.
Cherry Mostly Roughed2.jpgCherry Current Look.jpg
 

Attachments

  • Cherry Mostly Roughed.jpg
    Cherry Mostly Roughed.jpg
    215.1 KB · Views: 2
Joined
Aug 20, 2024
Messages
12
Likes
21
Location
Mathews, VA
Michael - I've run into the cross-grain issue on other live edge pieces. It was less of an issue with the Bartlett Pear, and no issue with Cedar or Olive given how soft they are. But I did a pass with 150 grit on the inside, and it's going to take quite a bit of work to get it sanded to my liking. I've got most of the inside nice and smooth, but I'm still working on getting the walls a bit thinner. Have another Christmas project that's taking a bit of my time, but this one is the one that I'm most focused on...
 
Back
Top