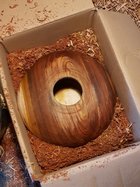
I've been having a significant problem with checking and cracking while twice turning bowls of late. I dry rough turned bowls in my furnace room which now in the Northeast is warm and very dry. I've been placing the wet bowls in paper bags (thanks Leo) and drying them on wire shelves. This seems to have worked well as the bowls warp but largely haven't checked or cracked while drying. They dry very quickly, sometimes even in just five weeks. The problem arises when I jam chuck the dry bowl (against a four jaw chuck) and begin turning the outside. After my first or second pass checks or cracks begin to appear seemingly out of nowhere. Generally they only get bigger as I take subsequent passes. This has occurred mainly with black cherry and walnut which I've read are prone to cracking. Today it happened with a sugar maple bowl (Anchorsealed) that's been drying for six months. This wasn't happening in the summer when the furnace was off. I haven't heard of anyone else drying bowls in their furnace room which is a warning flag. My thought has been it's a kiln like environment so in theory should work well. The dry bowls I've been turning are 12 to 15 inches in diameter and I'm jam chucking against five inch jaws. My best guess is I'm drying too quickly and/or it's too much stress removing them from that dry environment to immediately turn in my cooler and more humid shop. Any ideas, thoughts or suggestions are greatly appreciated!
-
Beware of Counterfeit Woodturning Tools (click here for details) -
Johnathan Silwones is starting a new AAW chapter, Southern Alleghenies Woodturners, in Johnstown, PA. (click here for details) -
Congratulations to Peter Jacobson for "Red Winged Burl Bowl" being selected as Turning of the Week for April 29, 2024 (click here for details) -
Welcome new registering member. Your username must be your real First and Last name (for example: John Doe). "Screen names" and "handles" are not allowed and your registration will be deleted if you don't use your real name. Also, do not use all caps nor all lower case.
You are using an out of date browser. It may not display this or other websites correctly.
You should upgrade or use an alternative browser.
You should upgrade or use an alternative browser.
Checking/cracking while twice turning bowls
- Thread starter Rip Littig
- Start date
How thick are the walls and how consistently thick are they? Is the pith included in your bowls?
- Joined
- Feb 28, 2021
- Messages
- 1,231
- Likes
- 1,091
- Location
- Roulette, PA
- Website
- www.reallyruralwoodworks.com
I'd suspect they are drying too quickly - In lumber-speak, it might be called case hardening. You want them to dry slowly, so I'd avoid putting them in a furnace room - probably the temperature on the outside of the wood gets too high too fast before temperatures on the inside wood have a chance to equalize (which affects how well the moisture will move through the wood) 5 weeks , I think is way too fast of a drying time unless you're microwaving the item (microwave heats inside out, so it works to speed drying without having the precise temperature & humidity controls kiln drying needs)
Just my opinion, not like I know all that much about it, but I'm pretty sure your bowls are drying too fast, from being stored in a furnace room. Even with flatwork, the typical recommendation for any lumber you plan to work with is have it sit inside your shop (where the wood will be worked/processed) in order to acclimatize to the environment , for several weeks at least, before using the lumber.
Just my opinion, not like I know all that much about it, but I'm pretty sure your bowls are drying too fast, from being stored in a furnace room. Even with flatwork, the typical recommendation for any lumber you plan to work with is have it sit inside your shop (where the wood will be worked/processed) in order to acclimatize to the environment , for several weeks at least, before using the lumber.
I suspect that there’s lots of airflow in the furnace room, as whenever the furnace kicks on the draft/blower draws air in to feed the fire. I believe that generally you want to dry with relatively still air.
I think that's a pretty good guess.My best guess is I'm drying too quickly
Lawrence your conditions in the furnace room are all wrong for drying the wood.

The kilns use higher temperatures (much higher) and very high humidity, this keeps the tension under control while moving the woods inner moisture out of the wood, and then often the wood is left to rest and relax for a few weeks.
Because of the dry conditions in your furnace room while drying the wood, you bring a lot of tension into the wood.
See that's why I use the brown paper bag to dry the wood at a cool place, the bag keeps the moisture high while the wood is still wet and lets it evaporate into the paper bag, drying in a slow and steady manner.
As for the bowls you have dried already, you can try to rescue them by placing them in a cool place, like your garage and leave them till spring-summer, by then the tension might be gone and you will still have some bowls you can finish turn without them splitting, good luck .
.

The kilns use higher temperatures (much higher) and very high humidity, this keeps the tension under control while moving the woods inner moisture out of the wood, and then often the wood is left to rest and relax for a few weeks.
Because of the dry conditions in your furnace room while drying the wood, you bring a lot of tension into the wood.
See that's why I use the brown paper bag to dry the wood at a cool place, the bag keeps the moisture high while the wood is still wet and lets it evaporate into the paper bag, drying in a slow and steady manner.
As for the bowls you have dried already, you can try to rescue them by placing them in a cool place, like your garage and leave them till spring-summer, by then the tension might be gone and you will still have some bowls you can finish turn without them splitting, good luck
The walls are approx 12.5% of the side grain to side grain width. I've tried hard to keep thickness consistent while making the bottom more thin. The pith has been removed. Thanks for mentioning it as I thought perhaps I was leaving the walls too thick.How thick are the walls and how consistently thick are they? Is the pith included in your bowls?
agree with others that the conditions in the furnace room are not what you are looking for. I'm also in the NE and dry my bowls in the garage - unheated and uninsulated, they just go in paper bags until I can get around to the second turning. The only ones I've had any cracking issues with have been cherry. Try a different location for drying your bowls and see if you find any changes.
Thanks all. I appreciate it. What's frustrating is I carefully checked on the rough bowls as they dried making sure they weren't cracking. That's when I thought I was in the clear. It didn't occur to me internal stress was building. Obviously that became apparent when twice turning. As they say, live and learn...and burn. It's all tuition anyway.
As they say, live and learn...and burn. It's all tuition anyway.
Lawrence, what purpose does the checking serve? If you check and find cracks, the blank is toast and there's really nothing you can do at that point. What you need is to find a system that works for you in your environment.Thanks all. I appreciate it. What's frustrating is I carefully checked on the rough bowls as they dried making sure they weren't cracking. That's when I thought I was in the clear. It didn't occur to me internal stress was building. Obviously that became apparent when twice turning. As they say, live and learn...and burn. It's all tuition anyway.
Everyone of us got a lot of cracked bowls during the process of finding a drying method that works for us. You've gotten useful feedback and some suggestions to try in the future to improve your results. But what works for me, is not what is going to work for you. The basic answer is to slow the drying process down. 5 weeks is nowhere near long enough.
If you want to use a kiln to dry your wood, maybe to get faster results than the standard 1 year per inch of thickness, you will need to do some serious research, as this tightly controlled process is much more complicated than just heat and air circulation.
Last edited:
Sounds to me like the wood is drying on the outside, but the inside is still very wet. Any attempts to speed up drying usually result in more cracking. I only turn green to final thickness/once turn my bowls. I like the warped shapes...
robo hippy
robo hippy
I start drying Anchorsealed rough turns outside for a few months (Western Kentucky is pretty humid), then move them inside for a few months. If they’re still a little heavy they go into the kiln for awhile. This process seems to work for me.
At 12.5% t that would be 1-1/2” to 1-7/8” wall t, drying as quick as 5 weeks. Much too fast. Do you use a humidifier in your house in winter? Whats the furnace room temp vs the rest of the house?
I keep my double bagged bowls in the house on on wire shelving, and house humidity 40-45% pretty much year round, with house temp 68 to 72F year round. No issues with cracking unless I cut bad blanks or leave sharp edges.
I keep my double bagged bowls in the house on on wire shelving, and house humidity 40-45% pretty much year round, with house temp 68 to 72F year round. No issues with cracking unless I cut bad blanks or leave sharp edges.
john lucas
AAW Forum Expert
Dityo what Doug said. My bowls dry in less than 5 months. Sometimes as quick as 3. That's here in Tennessee. I sometimes stack several together in paper sacks or a box.
Thanks Doug. I don't use a humidifier in the house (we have steam heaters). The furnance room is probably 85 degrees or so while the rest of the house is approx 69 or 70. The basement clearly is more humid that anywhere else so it's likely quite a shock coming out of the furnace room immediately into the shop.At 12.5% t that would be 1-1/2” to 1-7/8” wall t, drying as quick as 5 weeks. Much too fast. Do you use a humidifier in your house in winter? Whats the furnace room temp vs the rest of the house?
I keep my double bagged bowls in the house on on wire shelving, and house humidity 40-45% pretty much year round, with house temp 68 to 72F year round. No issues with cracking unless I cut bad blanks or leave sharp edges.
Its not the temp shock when you remove the piece. The evaporation rate at 85F vs ~70F, at the same absolute humidity (much different RH%) is very different. You need to slow down the evaporation by using more moisture barrier ( thats why a double bag mine), or move them to a 70F part of the house. Your furnace room is probably cool in the summer, which means you would need to change moisture barrier by the season to get consistent results - a consistent process provides consistent results (40 yrs in mfg).
When I turn wet wood, I coat all end grain with paste wax to slow down the moisture loss and let it dry in my unheated garage for at least 6 months, but usually more like a year. Then it’s off to a professional kiln at a local sawmill. Walnut and maple tend not to crack as much as cherry. If you are turning wet wood to an inch thick, then it’s certainly not dry after 5 weeks, even in a furnace room. Try a longer, slower drying time. Weight the bowls every month. You’ll know then when the moisture loss has stopped.
The woods I use vary considerably on how the first turned pieces survive the dying process.
I've found that drying from the inside first reduces splitting.
Drying from from the outside first is like wearing a shirt that is too small for you.... the buttons will inevitably pop off.
Applying waxes and other sealants to the outside is one way of allowing the inside to dry first.
My primary method is to just pack the wet pieces as they come off the lathe into cardboard boxes nested in the wet shavings with the inside surface exposed to allow that to dry first. I close the lid for a few days then progressively open up over the following weeks. It mostly works...
I periodically take moisture readings and write those on the box to help decide how much to open the boxes and when to remove and stack on shelves. I rarely get back to turning them for a year or two and some can be waiting for a decade or so before 2nd turning...
Your woods, climate and needs may vary considerably from mine and this method may not work for you.
It sure make sense that during the winter months with the furnace running, its more apt to crack; however would like to hear thoughts on storing wood in a furnace room during the summer months?
Try packing your bowls in bags with shavings (inside and out) from it's turning. This should slow down the drying and help resolve cracking issues. I have the opposite problem here. Wet winters and high humidity. The shavings seem to act like a buffer for moisture transfer in either direction.
I was unable to determine from the original post what type of jam chuck you are using. Are you forcing the wood to expand outward? I use this type to begin the 2nd turning. The groove in the center allows the typical raised areas that form during drying to sit below the surface. 4 1" hot glue "welds" are enough to get the mortise/tenon area running true again. Separate the glue with a bench chisel afterwards.
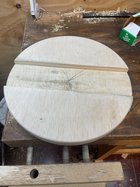
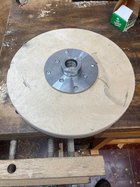
I was unable to determine from the original post what type of jam chuck you are using. Are you forcing the wood to expand outward? I use this type to begin the 2nd turning. The groove in the center allows the typical raised areas that form during drying to sit below the surface. 4 1" hot glue "welds" are enough to get the mortise/tenon area running true again. Separate the glue with a bench chisel afterwards.


I had good success this past spring/summer with sugar maple, black cherry and shagbark hickory cut and roughed out in April/May, then twice turned in September. During the summer the furnance room is still slightly warmer than the rest of the house as there's a water heater and no a/c vents. As others have said, drying rough bowls in the basement and/or garage would be better. Not having a surplus of dry bowls ready for final turning is testing my patience and obviously I'm paying for that now. Hopefully I can catch up by roughing out a lot this coming year then drying more slowly moving forward.It sure make sense that during the winter months with the furnace running, its more apt to crack; however would like to hear thoughts on storing wood in a furnace room during the summer months?
- Joined
- Apr 27, 2004
- Messages
- 8,655
- Likes
- 5,017
- Location
- Lakeland, Florida
- Website
- www.hockenberywoodturning.com
Depends on the temperature and humidity. See chart belowIt sure make sense that during the winter months with the furnace running, its more apt to crack; however would like to hear thoughts on storing wood in a furnace room during the summer months?
What you want to do is control (slow the drying). Cold temps and high humidity will prevent drying.
The short grain on the endgrain sides of the bowl loose moisture quickly. The long grain on the side grain sides of the bowl loose moisture slowly.
What paper bags do is create a humidity chamber. Thie humidity slows the release of moisture from the endgrain so that the side grain can catch up in moisture loss.
The paper bags need to be in an area with minimal airflow - you don’t want the bags to dry and wick moisture rapidly.
I dried a lot of bowls in a basement shop that had a furnace in it.
Paper bags out of air flow or coating with anchor seal will slow the drying in a low humidity environment.
Drying is directly related to the temperature and humidity of the drying environment. This chart shows how dry wood will get in your environment if you know the humidity and temperature. my drying area is 50 % humidity and 70 degrees. My wood will dry to 9% MC.
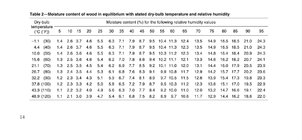
This states what is necessary for success.What you want to do is control (slow the drying). Cold temps and high humidity will prevent drying.
The short grain on the endgrain sides of the bowl loose moisture quickly. The long grain on the side grain sides of the bowl loose moisture slowly.
What paper bags do is create a humidity chamber. Thie humidity slows the release of moisture from the endgrain so that the side grain can catch up in moisture loss.
The one thing relative to this thread is that if the end grain moisture loss is not properly controlled you will get checking and after a period of time those checks may close up but that does not mean that those fibers will reattach to each other.
You've hit on another few factors contributing to your results. Which means you're getting closer to figuring out what will work for you.I had good success this past spring/summer with sugar maple, black cherry and shagbark hickory cut and roughed out in April/May, then twice turned in September. During the summer the furnance room is still slightly warmer than the rest of the house as there's a water heater and no a/c vents. As others have said, drying rough bowls in the basement and/or garage would be better. Not having a surplus of dry bowls ready for final turning is testing my patience and obviously I'm paying for that now. Hopefully I can catch up by roughing out a lot this coming year then drying more slowly moving forward.
- Wood cut in winter is dormant and drier than wood cut in summer. And will dry with less chance of cracking. (April/May will depend on where you live, but should be wetter than middle of winter wood)
- Drying in your furnace room in summer, you have a fairly stable temp and humidity, especially compared with the 85 degree dried out environment of the room in winter. Also, the air conditioned air in the rest of the house will be drier than your furnace room.
- You've observed that taking the 'dried' blanks from your warm furnace room into the drier shop seems to promote cracking. (probably they're not fully dry)
Once again, all of us also confronted that terrible conundrum when the itch to get going is strong but we didn't have any dried blanks on which to work. Maybe some folks in your local club will remember that phase of turning, take pity on you, and give you a few dried bowl blanks to work on. It wouldn't hurt to ask. (nutmegwoodturnersleague.org)
Last edited:
I have been calling for using the brown paper bag for years and years, against the Dishwashing dunking and later the buckets with alcohol as the way to dry quick and without distortion and cracking, yup, don't hear much about that anymore.
As for where you live has not to do much with it either, humans do pretty much live in houses where they control the indoor temps. and humidity.
The idea of a wet or dry house is just degrees in difference, I say that if a wet towel is hung up to dry, and dries within hours, not days or weeks, your wet bowls are drying too fast.
The Brown paper bag used without any shavings (they just cause mildew and prevent evenly drying) does what commercial kilns do with high temps and very high humidity, so that all parts of the wood do dry at the same rate, end grain and side grain and have controlled fast drying.
The brown paper bag does this without the high temperature and so it takes longer, but does have the end grain and side grain dry evenly, so that we do not get the tensions buildup while drying.
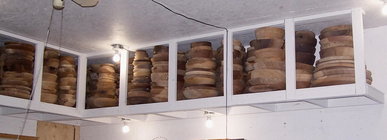
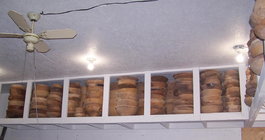
I do know what I'm talking about and have used this method for years, always have turned green wood and most of them twice turned, splits are way less than 1%, just look at these pictures, see any splits ??
Yes in those over 1000 turnings there are some pieces that did split, probably 6 or 7 of them.
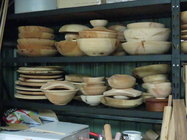
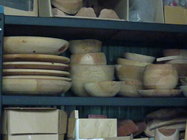
First picture is Dry Applewood bowls, wood that most seem to have problems drying without splitting.
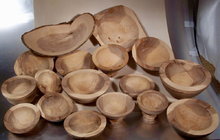
Most smaller turnings are in my storage shed, some are 20 years old and older.
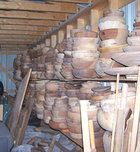
These are larger bowls and platters in my heated shop stored up high.
As for where you live has not to do much with it either, humans do pretty much live in houses where they control the indoor temps. and humidity.
The idea of a wet or dry house is just degrees in difference, I say that if a wet towel is hung up to dry, and dries within hours, not days or weeks, your wet bowls are drying too fast.
The Brown paper bag used without any shavings (they just cause mildew and prevent evenly drying) does what commercial kilns do with high temps and very high humidity, so that all parts of the wood do dry at the same rate, end grain and side grain and have controlled fast drying.
The brown paper bag does this without the high temperature and so it takes longer, but does have the end grain and side grain dry evenly, so that we do not get the tensions buildup while drying.
I do know what I'm talking about and have used this method for years, always have turned green wood and most of them twice turned, splits are way less than 1%, just look at these pictures, see any splits ??
Yes in those over 1000 turnings there are some pieces that did split, probably 6 or 7 of them.
First picture is Dry Applewood bowls, wood that most seem to have problems drying without splitting.

Most smaller turnings are in my storage shed, some are 20 years old and older.

These are larger bowls and platters in my heated shop stored up high.


all of us also confronted that terrible conundrum when the itch to get going is strong but we didn't have any dried blanks on which to work. Maybe some folks in your local club will remember that phase of turning, take pity on you, and give you a few dried bowl blanks to work on. It wouldn't hurt to ask. (nutmegwoodturnersleague.org)
Or, work on 1-turn skills while waiting for the 2 turn stuff to dry. I turn a lot more 1 turn vs 2 turn after developing the knowledge/ skills. Warping adds a lot of character to pieces.
1 turn still benefits from a moisture barrier while drying, but only needs one for a a few days, depending on thickness.
I have been doing one turn for several years now and have never used anything to slow the drying I just set them in the open air of the loft in my shop and weigh each day on a gram scale. The temp in the loft varies between 45Degrees F and 70 degrees at this time of year due to the floor electric heat is set to 40 F. Summer or winter only effects the drying time and checking is rare but distortion is not rare, which is good in my opinion.1 turn still benefits from a moisture barrier while drying, but only needs one for a a few days, depending on thickness.
Leo, that's one of the most amazing collections of rough turned pieces I've seen. I'm impressed!
Pacific Madrone is one of the 'difficult' trees to get bowls from that don't crack. One choice is to boil them, or steam them, which pretty much does the same thing, it ruptures the cell walls so the 'bound' water can escape more easily. I don't like that method because the colors do muddle a bit, and I just prefer the 'warped' shapes. Over the years, I have found that if I get trees when the spring sap is running full speed, I get a lot less cracking than I do if I get mid to late summer trees, which is our dry season. Why? No clue, other than 'because'....
robo hippy
robo hippy
Thanks Monty. I've been using a five inch (with jaws expanded) four jaw chuck to jam against when twice turning. Your system, which looks very similar to that used by Glenn Lucas, seems superior to using a four jaw chuck. I'd image it puts far less stress on the walls when twice turning even if just in the beginning. I've thought of creating something similar, I just wonder how stable it would be for say a fifteen inch bowl. Regardless, I do want a better jam chuck than I'm using now.Try packing your bowls in bags with shavings (inside and out) from it's turning. This should slow down the drying and help resolve cracking issues. I have the opposite problem here. Wet winters and high humidity. The shavings seem to act like a buffer for moisture transfer in either direction.
I was unable to determine from the original post what type of jam chuck you are using. Are you forcing the wood to expand outward? I use this type to begin the 2nd turning. The groove in the center allows the typical raised areas that form during drying to sit below the surface. 4 1" hot glue "welds" are enough to get the mortise/tenon area running true again. Separate the glue with a bench chisel afterwards.
View attachment 48752 View attachment 48753
Agree with Leo about the brown paper bags. If the bowls are still drying too fast double or triple bag them. I also do single bags then put several bowls into a large box which slows it down further.
Christian Burshard, who does a lot of strange things with madrone, will put the bowl/form inside a paper bag, then put that inside a plastic bag. Change out the paper bag daily till dry. I haven't tried that one. With the quantity of bowls I do, it is not practical...
robo hippy
robo hippy
I’ve been using Richard Raffin’s method, or close to it, for remounting for finish turning. That is jamming against a four jaw chuck, about halfway open works best. Lock the spindle, push the bowl with tailstock and rotate the bowl to find where the chuck sets best. True the tenon and reverse the bowl. Then turn a recess in the interior, and reverse again. Large jaws are needed.Thanks Monty. I've been using a five inch (with jaws expanded) four jaw chuck to jam against when twice turning. Your system, which looks very similar to that used by Glenn Lucas, seems superior to using a four jaw chuck. I'd image it puts far less stress on the walls when twice turning even if just in the beginning. I've thought of creating something similar, I just wonder how stable it would be for say a fifteen inch bowl. Regardless, I do want a better jam chuck than I'm using now.
At this point, I do pretty much all of the outside work, up to and including sanding to about 180.
Check and true up the bottom tenon. Size it to near your intended foot size (optional), and reverse the bowl for inside turning.
The outside may have become slightly untrue, but no biggie, as you only need to do finish sanding. Your fingers or soft disk will ride with the wobble (usually less than 1/16”).
The set-up (turning outside tenon and inside recess) takes a bit of time, but afterward things are strong and true. Especially nice when working on large bowls. I only use tailstock for the first step, establishing the outside tenon.
My process when twice turning is nearly identical to Marc's - lthough I seldom bother to true the tenon before turning the inside recess. The warped tenon can usually positioned in the jaws to balance out the warp for the most part. I usually mount using the warped tenon, true the face/rim and turn the recess inside - both are very quick cuts. Then turn and mount to the recess to true the tenon and turn the outside of the form.
If the blanks are cut with the grain balanced, warpage is usually pretty symetrical and less pronounced near the center. Even an oval tenon can be gripped by most jaws securely to get the recess established inside. I use this process with all our local woods - Big Leaf Maple, Madrone, Allder, Walnut without problems. If a roughed blank. does not seem secure I'll resort to a jam chuck, but I can't remember the last time I needed to. Haven't had any fly through the shop yet, but then I do turn at pretty low rpm until the piece is well balanced.
If the blanks are cut with the grain balanced, warpage is usually pretty symetrical and less pronounced near the center. Even an oval tenon can be gripped by most jaws securely to get the recess established inside. I use this process with all our local woods - Big Leaf Maple, Madrone, Allder, Walnut without problems. If a roughed blank. does not seem secure I'll resort to a jam chuck, but I can't remember the last time I needed to. Haven't had any fly through the shop yet, but then I do turn at pretty low rpm until the piece is well balanced.
Last edited:
- Joined
- Apr 27, 2004
- Messages
- 8,655
- Likes
- 5,017
- Location
- Lakeland, Florida
- Website
- www.hockenberywoodturning.com
I learned a similar technique from Al Stirt. I turn the whole outside jammed over the chuck jaws. Works fine.I’ve been using Richard Raffin’s method, or close to it, for remounting for finish turning. That is jamming against a four jaw chuck, about halfway open works best. Lock the spindle, push the bowl with tailstock and rotate the bowl to find where the chuck sets best. True the tenon and reverse the bowl. Then turn a recess in the interior, and reverse again. Large jaws are needed.
I don’t do bowls bigger than 16”
I do adjust the bowl over the chuck so that the rim’s high and low low spots are equi-distant from the lathe axis.
The tailstock doesn’t get in my way turning the outside. If it did using the recess would solve that.
For me the recess doesn’t add any value.
Bowl 2nd turn process - cant give credit to any specific turner, more a pieced together process from many and my own experience.
I use 4 or 5 friction/jam chucks that direct thread on the spindle, and range in size from ~ 2” up to ~6”, and sometimes I just use chuck jaws. Locate in the ID, and TS center located in the original center hole (you left one there, right?). Tenon is trued, along with a lower part of the OD.
The bowl is then reversed in the chuck, some of the upper ID is removed (not fully round, but close), then the OD is turned. I’ve had finished OD’s go out of round after cutting the ID round - I want 2 turn bowls near perfect round, with rims the same t all the way around.
At this point the cutting is done and usually the bowl is set aside for sanding. My chucks are marked and I mark tenons so they can be realigned to the chuck jaws, giving perfect alignment when remounted for sanding/finishing. I tend to batch things through various stages vs 1 bowl through the entire process.
A question for Leo. The brown paper bag technique you advocate and others also is simple and works well in your environment. Would a tightly closed cardboard box accomplish the same ends, slow down the drying just like a paper bag?
Bernie, using a cardboard box is not the same or works the same, but it can slow down the drying as there is only a limited amount of air in the box and with enough bowls or smaller box, the air in it will get saturated and so slows the drying, but that is where the similarities stopA question for Leo. The brown paper bag technique you advocate and others also is simple and works well in your environment. Would a tightly closed cardboard box accomplish the same ends, slow down the drying just like a paper bag?
With the brown paper bag the initial part is the same, the air gets saturated, a paper bag can also be closer to the turnings size, so less air, now the bag will absorb some moisture, and the turning can loose some more moisture, than the paper bag will have the air surrounding the bag take some of the moisture from the bag, and the bags inside air will give again moisture to the bag, the turning will then be able to loose some moisture again and this all keeps repeating till the moisture levels are the same all around.
The cardboard is not able to do the same as the brown paper bag, but it could maybe loose some moist air if the flaps are not fully closed, though it would be much harder to have a consistent process, as with the brown paper bags use.
- Joined
- Apr 27, 2004
- Messages
- 8,655
- Likes
- 5,017
- Location
- Lakeland, Florida
- Website
- www.hockenberywoodturning.com
Like @Leo Van Der Loo I don’t use a box for twice turned bowls…A question for Leo. The brown paper bag technique you advocate and others also is simple and works well in your environment. Would a tightly closed cardboard box accomplish the same ends, slow down the drying just like a paper bag?
I use a box to slow the drying of once turned Hollow forms and Large NE bowls.
The box increases the success rate to close to 100% if I have even thickness walls and a curves that let the wood move.
Day 1 - I rinse the turned piece as soon as it comes off the lathe in the sink, towel dry put it in the Box and close the flaps on the top.
Day 2 - I open some flaps so the box is half closed
Day 3 - open the box
Day 4 - set the piece on a shelf
Day 5 - sand the piece and apply the first coat of finish

