• April 2025 Turning Challenge: Turn an Egg! (click here for details)
  • Congratulations to Kelly Shaw winner of the March 2025 Turning Challenge (click here for details)
  • Congratulations to Ellen Starr for "Lotus Temple" being selected as Turning of the Week for 21 April, 2025 (click here for details)
  • Welcome new registering member. Your username must be your real First and Last name (for example: John Doe). "Screen names" and "handles" are not allowed and your registration will be deleted if you don't use your real name. Also, do not use all caps nor all lower case.

Bowl interior technique

Joined
Dec 10, 2021
Messages
6
Likes
6
Location
New Paltz, NY
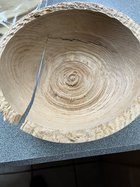
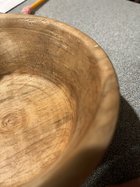
01031F30-5E25-4055-B52B-B1D54A54646C.jpeg0B2451EC-179D-4912-8E8F-286BC1AA5051.jpegCF246719-8BE9-490F-8DAE-D9F56224D481.jpegNewbie question: I’m learning bowl turning and keep having issues with the consistency of the interior surface of the bowl. In the best cases, my interior walls are a bit wavy and have some tool marks. In the worst case, I totally misjudged the thickness of a bowl wall and split the bowl. I imagine this is a common part of the learning curve, but I’m wondering if there is any advice about keeping the interior wall smoother. I suspect it has something to do with bevel contact as I make the curve. Thanks!
 
The second bowl is not too bad for a beginner on their own. It can be sanded.


If you can take a quality class or get one on one with a mentor it will reward you with skills that make Turing the inside easy.

The keys are properly sharpened bowl gouge, bevel riding cuts, hold the tool loosely so it can work.
Try hemispherical shapes to start - easy to hollow.

For consistent wall thickness use calipers.
I can see from the photos you are not riding the bevel across the bottom.
Grinding the heel off the bevel can help.

Instruction is best. Here are links to some demo videos of how I do it. The 4.5 minute one covers the basics.

This post in the techniques has slides. A demo of rough turning a bowl to dry, and a demo of returning a very warped dry bowl.

A short 4.5 min clip from a demo - rough hollowing a bowl -
View: https://www.youtube.com/watch?v=flw8LwQqGQU
 
Last edited:
Mr H said this much more succinctly, but from one newbie to another…

What has helped me judge bowl thickness is not judging it at all, but actually measuring as I go along, with a double-ended caliper. Cut, measure, cut, measure. For the bottom, I measure using a depth gauge. Another technique I sometime use is to drill a depth hole. When there’s no longer a hole, you are deep enough. The AWW journal has a couple of articles on making a depth gauge.

I struggle with getting a smooth interior as well. Sometimes if I get ridges with the 1/2” gouge, I’ll switch to the 3/8” and take lighter cuts. When that fails, I resort to a heavy round-nose scraper with a good burr, followed by 80-grit sandpaper. A light touch with the scraper in a shearing orientation will usually get it smooth enough without appreciable tear-out. Not ideal, but once it’s done, no one really cares how I got the bowl done (except me, or other woodturners).

I have a decent collection of DVDs and books, and there’s YouTube and all the resources AWW has to offer, especially the live demos. They have all been helpful, but nothing beats a hands-on class for learning this craft. I’ve only taken one half-day class so far, but that half-day was worth 10 times the amount spent watching demos. If there’s a local club nearby, join up. You might meet someone willing to be a mentor.

As you’ve discovered, a lot of things have to come together at once for a smooth interior: tool selection, tool geometry, tool sharpness, tool control through the entire cut, stance, body position, and more. Stuart Batty is only one of many, many pro woodturners that do a great bowl turning demo, but he sticks out in my mind as among the best. His videos are on Vimeo, as I recall. Richard Raffan, Glenn Lucas and Mike Mahoney also come to mind.

Good luck.

George

PS: I am a hobbyist woodturner, turning merely for my own enjoyment, and for friends and family.
 
Sharp tools and practice, practice, practice. If you cannot wait for that find an instructor and get a lesson. Better yet find a club and join it (even if you have to drive a while it will be worth it). Find a member of that club to show you how to sharpen then how to use the tool. Then sharpen and practice, practice, practice. You do that and some day you will be the one someone comes looking for for help.
 
Agree with finding a club - its a great thing. Classes can help a great deal but can be significant $’s

A few things that might help:

> tool control with the body, not hands
> float, not ride, the bevel - doesnt take much pressure to be too much
> make a continuous arc bowl, no transition. Can always make dog bowls later.
>once the OD is rounded, or the ID has an 1” or so of depth, work on making small controlled cuts vs hogging wood out. Teaches tool control.
> When hollowing the ID (OD complete), wall t down to 1-1/2” or so, see the OD as the tool is guided in the ID.
> the fingers are pretty good calipers but might need training. Use some calipers to help train them.
> it takes time and practice, even with instruction. There are many new skills for the body and mind to learn. You will probably screw up quite a few pieces, and that’s perfectly fine - if you learned something from the mistakes it was not wasted time, its practice reps.
 
If you join a club they most likely have mentors. That's been the best for me. To be able to go and have a one on one session and have the mentor watch and make corrections or support what you're doing is invaluable. When choosing a mentor look at their work and pick the one that has the work you most admire. One thing I have to constantly tell myself is slow down, light cuts, easy does it. Like fly fishing a big river, break it down into small seams and runs, inch by inch and easy does it.
 
Lots of good info so I'll only add: light cuts, don't push the tool into the wood. As Al and Doug said you want to let that tool ride or float the bevel. Let the tool do the work, you're just holding it.
Also, you may have to sharpen your chisel after every 3rd or 4th pass (or first or not) depending on the wood. Hard wood like pecan you will be sharpening your tools more often than other woods. If you even wonder if your chisel is sharp or not sharpen it. For me knowing when to sharpen and how to sharpen correctly was one of the hardest things to learn. I took a great online demo/class during the covid lockout and it really helped. At that time I had already been turning for 5 or 6 years.
Keep practicing and don't let a catch or rough cut get you down! :)
 
A club is a huge help. When our started, I learned more in the first year than I did by teaching myself. You Tube wasn't a thing back then. I have a bunch of videos up, mostly about bowl turning. If we had Star Trek transporters, I would invite you for a play date. You can't beat hands on instruction.

There are 3 areas of the bowl on the inside. One is the wall, two is the transition, and three is the bottom. I use 2 different gouges for the insides of bowls, one is the 40/40 grind, which goes down to the transition area. The other is any one of several BOB (bottom of bowl) gouges. They are ground to 70 degrees and have a slight arc to the nose. They are the ones for making it through the transition and across the bottom of the bowl. For going down the wall, you use very little body rotation. For going through the transition, you use a pretty fair amount of rotation. For going across the bottom, you use pretty much no rotation, and keep the gouge shaft and handle angle constant, no loose steering wheel when doing that. You can practice this a lot when hollowing out the inside of a bowl.

Like my martial arts instructors would say, "10,000 more times!" But teacher, that is what you said last time.... "Well then, 10,000 more times!"

robo hippy
 
Another thing to help you learn would be to try a few small bowls with a flatter curve, more of a deep platter shape. The inside of a deep, U shaped bowl can be a challenge to some of the best turners. Especially the transition from the side to the bottom. But a shallow bowl doesn't make that sharp curve at the transition. And you won't be cutting directly across the endgrain as abruptly (which is the main reason sandpaper was invented). As you get more comfortable and start getting a better feel for things, start working towards that deep bowl shape if that's what you like. And as always, remember that most difficult cuts are made significantly easier with a freshly sharpened tool.
 
Turning open-form bowls (wide diameter relative to the depth) is important for developing good gouge technique when learning to turn. The gouge must have bevel some bevel contact in order to yield a smooth cut, and this is easiest to achieve in an open form. I explain this to students, while noting that they probably prefer turning to sanding. ;) Any interior curve that's abrupt makes a clean surface difficult also. Taking the time to really improve gouge technique pays off. Note, too, that some interior shapes can completely block bevel contact with a gouge that's ground at 40 or even 45 degree. Hence going to 55 degrees or other grind.
 
One caution for beginners is to focus on one technique and set of tools at the start.
Having a class or mentor provides this grounding.

If you are watching videos.
Jamieson, Bosch, Stirt, Ellsworth, Clewes. Lopez, Geiger, all use similar tools and techniques for bowls this is my style.
Probably easier for a beginner because of fewer tools.

Batty, hardwood, use similar tools and techniques.

Robo has another set of techniques and tools


All of these work extremely well. But can be confusing to a beginner mixing and matching
 
It looks like you are using a carbide tipped scraper? My best advice is to loosen your grip and slow down. Most new turners put a death grip on their tools and nothing good comes from being tense. Second is to slow down your arm movements especially when you get near the center of the bowl, and third, switch to a bowl gouge that you can nearly shave with. Shearing cuts are always better than scraping. With a bowl gouge you can shoot a better curve with the bevel skating on the wood. Smooth cuts with a carbide scraper is totally dependent on your arm movements and you'd better be damned smooth!
 
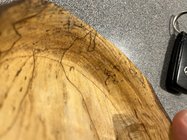
for the first and last pictures, I seem to notice, for lack of better term, gouges in spots in the bowl - in my experience (limited as it is and still self-teaching) those happen when the bowl flexes, warps, or otherwise deviates from perfectly round (vibration of the bowl- perhaps not securely or properly chucked? in my case, my lathe has a bit of runout that I have to compensate for by very light cuts.. and Ive also gotten those when I got catches - the bowl walls flex a bit as the gouge catches... and for green wood (I.E. natural edge or once-turned) it happens when you don't get your inside form turned quickly enough - as the bowl loses moisture it starts to warp out of round) Those gouges can also happen from just trying to force a dull gouge into your wood (don't push the gouge into the wood, let the wood come to the gouge) as for the raggedy one in the middle, that looks like a few of mine that I first turned before I figured out what all those youtubers referred to as riding the bevel, and learned how to apply my pressure to the tool down into the tool rest instead of into the wood (lock elbows to sides and use your body to move the tool..) and lastly, I don't think your bowl split is from mis-judging wall thickness - looks to me more like there was already a crack in the wood (checks or ring shake?) that you caught with the tool, which at least for me almost always results in the bowl disintegrating into pieces unless I notice the cracking and do something to stabilize it first...
 
for the first and last pictures, I seem to notice, for lack of better term, gouges in spots in the bowl - in my experience (limited as it is and still self-teaching) those happen when the bowl flexes, warps, or otherwise deviates from perfectly round (vibration of the bowl- perhaps not securely or properly chucked? in my case, my lathe has a bit of runout that I have to compensate for by very light cuts.. and Ive also gotten those when I got catches - the bowl walls flex a bit as the gouge catches... and for green wood (I.E. natural edge or once-turned) it happens when you don't get your inside form turned quickly enough - as the bowl loses moisture it starts to warp out of round) Those gouges can also happen from just trying to force a dull gouge into your wood (don't push the gouge into the wood, let the wood come to the gouge) as for the raggedy one in the middle, that looks like a few of mine that I first turned before I figured out what all those youtubers referred to as riding the bevel, and learned how to apply my pressure to the tool down into the tool rest instead of into the wood (lock elbows to sides and use your body to move the tool..) and lastly, I don't think your bowl split is from mis-judging wall thickness - looks to me more like there was already a crack in the wood (checks or ring shake?) that you caught with the tool, which at least for me almost always results in the bowl disintegrating into pieces unless I notice the cracking and do something to stabilize it first...
Lock your elbows to your body? You must turn all your bowls by standing at the end of the lathe. That lock your elbow advice dates back to the 50s when people were turning on crappy lathes with scrapers. The better advice is to dance with the work and move smoothly along. So far we have no idea what kind of tools his is using.
 
Lock your elbows to your body? You must turn all your bowls by standing at the end of the lathe. That lock your elbow advice dates back to the 50s when people were turning on crappy lathes with scrapers. The better advice is to dance with the work and move smoothly along. So far we have no idea what kind of tools his is using.
Yup, its what I do and no I dont turn at the end of the lathe - Granted your right elbow is further out, usually, when starting the cut down into the bowl, but your left elbow (and thus hand applying pressure down onto tool rest) can be locked down to your ribs , preventing you from trying to push your gouge into the cut - and still allows you to use your body movement (the turner's dance) to sway into the curves smoothly - You mention the dance - that is what it is - You do not use your arms, elbows, hands to move the tool - You use them to hold the tool in a position you want it and then your body movement (sway) does the moving - your body mass gives you far greater control. It took me quite a while to figure it out and then just really paying attention to how I was making the "good" cuts I find that it is because I am not moving my arms/hands (because elbows and tucked in to my ribs) and just using whole body (flexed knees and hips - sorta like learning your "sea legs" I guess) to control movement of the tool. (and BTW, what tool you are using should not matter - same principle applies - your hands just hold the tool in position, let the tool do the cutting, let your body control the movement)
 
Thank you everyone. Some great tips that I've been trying to work on. I had contacted my local AAW chapter, and they were very responsive. However, the standard meetings are mid-week during the day, so it has been hard to attend.

To answer some of the questions above, I am using HSS bowl gouges. The primary one is ground to about 50 degrees. I tried more like a 55 degree grind, but found that my 6-inch grinding wheel was too small to safely grind that angle with the bowl gouge length I have, using a Wolverine jig. More proof that I should upgrade my sharpening station :).

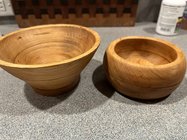
I laminated some scrap cherry 4x4 wood and had some fun practicing some of the tips you mentioned. The results were an improvement but still a work in progress. The hardness of the cherry definitely forced me to lighten up my cuts and focus on sharpening, which will be good practice in the future. I appreciate the feedback and tips!
IMG_0328.jpg
 
Last edited:
I've only been turning for about 3 years. At first, I didn't lose any bowls but that was mainly because I didn't attempt to get the walls too thin. I was just happy when they were smooth with no waves or tear out. Now that I've moved to attempting thinner walls, I've ruined a few bowls, but practice, constant checking of walls by feel in open bowls, and just being patient has made the losses less and less. The same is true with bowl bottoms. I don't like to just practice, preferring to create a finished product, but then the result is I lose some nice pieces. So I have started to practice on some junk, especially practicing getting the bowl walls to match the outside shape and be consistent in thickness; not too thin but thinner than I was doing. I am getting better slowly.
 
I've only been turning for about 3 years. At first, I didn't lose any bowls but that was mainly because I didn't attempt to get the walls too thin. I was just happy when they were smooth with no waves or tear out. Now that I've moved to attempting thinner walls, I've ruined a few bowls, but practice, constant checking of walls by feel in open bowls, and just being patient has made the losses less and less. The same is true with bowl bottoms. I don't like to just practice, preferring to create a finished product, but then the result is I lose some nice pieces. So I have started to practice on some junk, especially practicing getting the bowl walls to match the outside shape and be consistent in thickness; not too thin but thinner than I was doing. I am getting better slowly.
How thin are you going for?

I use calipers - lets me now the wall thickness rim to the Chuck which gives a close measure of the bottom thickness.
Been at it over 30 years and never go through the wall or bottom.

On all bowls I set the rim thickness first bye eye and use that for the rest of the wall thickness
I set the calipers with a little gap. Hold one side on the inside wall and run them down the wall.
I often put my finger tip under the tip of the caliper as I run it down the wall this lets me see where it needs to be cut when I feel a pinch on my finger tip.

On traditional bowls I let the wall thickness decrease slightly from the rim to the bottom.

On NE bowls 12-16” I do a wall thickness 3/16” to 5/16 keeping it even rim to bottom
On smaller NE bowls I go for a wall thickness 1/8” to 3/16”
On the NE bowls every once in a while the calipers will tell me I have cut too thin so I pick up the cut at the proper thickness which leaves a tiny ridge that I blend in sanding. Continuing to cut on the too thin cut line just makes the wall thinner.
 
So I have started to practice on some junk, especially practicing getting the bowl walls to match the outside shape and be consistent in thickness; not too thin but thinner than I was doing. I am getting better slowly.
I do "practice" while roughing out a bowl, or taking a bowl towards the final thickness. Making every cut a good, clean cut gets you some practice - plus it gives you time to discover how that particular piece of wood is behaving, and what tools/techniques work and which don't.

Also, I aim for a consistent wall thickness starting at maybe 3x or more of my final wall thickness I'm going for. Get the wall consistent/even all the way down while it's still thick, matching the outside shape. Then, on those cuts getting down to your final thickness you just take off an even amount with each pass (watching the depth of the ridge you are making). You'll end up with a consistent wall after each consistent pass. So you can stop worrying so much about wall thickness, breaking through, etc, and just concentrate on good cuts.
 
How thin are you going for?

I use calipers - lets me now the wall thickness rim to the Chuck which gives a close measure of the bottom thickness.
Been at it over 30 years and never go through the wall or bottom.

On all bowls I set the rim thickness first bye eye and use that for the rest of the wall thickness
I set the calipers with a little gap. Hold one side on the inside wall and run them down the wall.
I often put my finger tip under the tip of the caliper as I run it down the wall this lets me see where it needs to be cut when I feel a pinch on my finger tip.

On traditional bowls I let the wall thickness decrease slightly from the rim to the bottom.

On NE bowls 12-16” I do a wall thickness 3/16” to 5/16 keeping it even rim to bottom
On smaller NE bowls I go for a wall thickness 1/8” to 3/16”
On the NE bowls every once in a while the calipers will tell me I have cut too thin so I pick up the cut at the proper thickness whinch leaves a tiny ridge that I blend in sanding. Continuing to cut on the too thin cut line just makes the wall thinner.
I just bought calipers after ruining a bowl. When I was doing smaller bowls there was no need for anything but visual inspection and touch. The larger bowls, I’ve realized are a bit more difficult. The inside is smooth but, on a couple of bowls recently I got just one area to thin because it didn’t follow the outside shape. Just a matter of learning what I should check more often. I would be happy if the walls were around a 1/4” unless the design indicates a more substantial or thinner wall. My technique with the gouge has improved a lot, especially after a class with Trent Bosch last fall. i have another this spring unless COVID interferes. There‘s nothing that improves your skills and technique more then doing nothing but turning for 3 or 4 days (although it is exhausting too).
 
I do "practice" while roughing out a bowl, or taking a bowl towards the final thickness. Making every cut a good, clean cut gets you some practice - plus it gives you time to discover how that particular piece of wood is behaving, and what tools/techniques work and which don't.

Also, I aim for a consistent wall thickness starting at maybe 3x or more of my final wall thickness I'm going for. Get the wall consistent/even all the way down while it's still thick, matching the outside shape. Then, on those cuts getting down to your final thickness you just take off an even amount with each pass (watching the depth of the ridge you are making). You'll end up with a consistent wall after each consistent pass. So you can stop worrying so much about wall thickness, breaking through, etc, and just concentrate on good cuts.
Roughing a bowl does improve skills with a gouge but there’s nothing like just taking a piece of wood that is nothing special and repetitively doing what you are having problems with. I have no interest in practicing on a special piece of wood.
 
I just bought calipers after ruining a bowl. When I was doing smaller bowls there was no need for anything but visual inspection and touch. The larger bowls, I’ve realized are a bit more difficult. The inside is smooth but, on a couple of bowls recently I got just one area to thin because it didn’t follow the outside shape. Just a matter of learning what I should check more often. I would be happy if the walls were around a 1/4” unless the design indicates a more substantial or thinner wall. My technique with the gouge has improved a lot, especially after a class with Trent Bosch last fall. i have another this spring unless COVID interferes. There‘s nothing that improves your skills and technique more then doing nothing but turning for 3 or 4 days (although it is exhausting too).
Trent is a terrific instructor. Our techniques are are quite similar but we do some things differently.
 
Back
Top