• Beware of Counterfeit Woodturning Tools (click here for details)
  • Johnathan Silwones is starting a new AAW chapter, Southern Alleghenies Woodturners, in Johnstown, PA. (click here for details)
  • Congratulations to Jim Hills for "Journey II" being selected as Turning of the Week for May 6th, 2024 (click here for details)
  • Welcome new registering member. Your username must be your real First and Last name (for example: John Doe). "Screen names" and "handles" are not allowed and your registration will be deleted if you don't use your real name. Also, do not use all caps nor all lower case.

Bowl From a Board

Joined
Aug 16, 2022
Messages
281
Likes
638
Location
Butler, PA
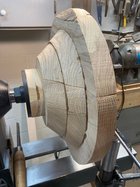
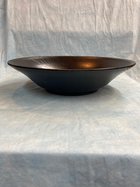
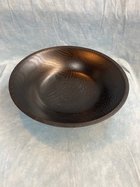
Next project is going to be a bowl from a board. This is made from scraps leftover from the tables I made. I took some pictures as I went but didn't post this until now because it was a Christmas gift to my wife. I didn't take enough pictures but will do my best to describe the series of events. As before I made a full scale drawing of what I wanted to make before starting any cutting of wood. I will post it tomorrow because I forgot to take a picture of it.
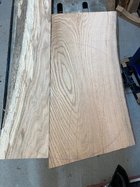
First picture is wood chosen for bowl. It's 2" thick both pieces planed to same thickness With 19" circle drawn on it which will be cut on bandsaw before boards are glued together
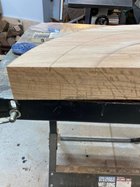
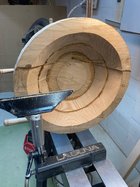
Second picture is the lines for cutting the layers. I moved in same thickness as boards for each ring (2").
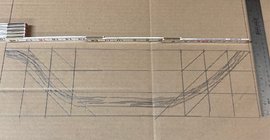
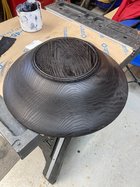
Third picture is marking the sides of the boards so I don't get confused and cut them upside down.
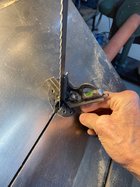
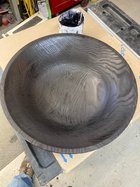
Fourth picture is setting the bandsaw table to a 45 degree angle.
 

Attachments

  • Wood for Bowl.jpg
    Wood for Bowl.jpg
    651.7 KB · Views: 33
  • Laying out Bowl.jpg
    Laying out Bowl.jpg
    676.9 KB · Views: 33
  • Marking Sides of Boards.jpg
    Marking Sides of Boards.jpg
    348.3 KB · Views: 34
  • Setting up Bandsaw.jpg
    Setting up Bandsaw.jpg
    506.1 KB · Views: 35
Joined
Aug 16, 2022
Messages
281
Likes
638
Location
Butler, PA
Here's my full scale drawing that I made before starting the project. I drew two plans, one on right and one on left side of the drawing. I decided to go with the left side plan since the top ring was square on the outside and had more wood to work with. I call this my CAD drawing (cardboard aided drawing). I stated above that thickness was 2", it was actually 1 3/4" and this gave a wall thickness of about 1 1/4" so that was a pretty good wall to work with. This was easier than using 3/4" thick boards. You can also use angles other than 45 degrees to change the shape of the bowl. Russ or one of the other segmenters may have some advice on this.
 

Attachments

  • Bowl Plan.jpg
    Bowl Plan.jpg
    336.6 KB · Views: 39
Joined
Aug 16, 2022
Messages
281
Likes
638
Location
Butler, PA
After cutting out the pieces on the bandsaw I first mounted the base to a glue block. I centered it by using a divot in the center of the base and the glueblock has a hole in the center of it. then put a pin through the glue block and glue it to the base of the bowl. After mounting the faceplate to the glueblock I put this piece on the lathe and flattened the top of first piece of the bowl. In the mean time I glued the two upper ring parts together to make two rings. After the rings dried I glued the second ring to the base of the bowl and used the lathe as a clamp overnight. Then flatten second ring. To glue the top ring on I had to clamp it with four clamps and a board across the bottom section of the bowl since my lathe isn't big enough to use as a clamp for the top ring. It turned out as the pictures show. All turning is done off the end of the lathe with the bed extension in the lower position since the lathe is only 15" swing and the bowl is about 19' od. Sorry I didn't take pictures of these steps. As you can see in pictures be very careful when cutting the rings with bandsaw because every error causes problems. Also be careful to align the grain the best you can when stacking the rings. As you will see later the growth rings actually align pretty good. If you look carefully at the first picture you can see a vertical line on the top layer, this is an index line to help align grain when gluing up.
 

Attachments

  • Back Side.jpg
    Back Side.jpg
    486.6 KB · Views: 25
  • Glued Up.jpg
    Glued Up.jpg
    438.3 KB · Views: 25
Last edited:
Joined
Aug 16, 2022
Messages
281
Likes
638
Location
Butler, PA
Here's the result after turning ready to sand. I forgot to mention this is some type of red oak. As you can see since these are two different pieces of wood to make the large bowl the grain and color of the wood doesn't match which didn't matter because of the finish used. If you're using a transparent finish this would be something to consider when choosing your wood.
 

Attachments

  • IMG_219Back Side.jpg
    IMG_219Back Side.jpg
    572 KB · Views: 22
  • IMG_2196 Top Side.jpg
    IMG_2196 Top Side.jpg
    631.3 KB · Views: 23
Joined
Aug 16, 2022
Messages
281
Likes
638
Location
Butler, PA
Here's the bowl after removing the glueblock. I removed it with the hammer and wood chisel method to break the glue joint. As you can see I added some beads to the bottom to raise it from the table and to sit even and some decorative lines on the rim. I used a Dway 1/16" beading tool to make and space the lines. These pictures are with two coats of usmc black leather dye which I will let dry for a couple days before applying the finish.
 

Attachments

  • IMG_2200 Black  Bottom.jpg
    IMG_2200 Black Bottom.jpg
    559.9 KB · Views: 29
  • IMG_2201 Black Top.jpg
    IMG_2201 Black Top.jpg
    508.5 KB · Views: 27
Joined
Aug 16, 2022
Messages
281
Likes
638
Location
Butler, PA
Here's the bowl finished with the conversion varnish, Same finish I used on the table project. I actually sprayed them at the same time. These type of bowls are pretty easy to make and if you want a large bowl and don't have a log big enough to make it this does the job. It finished out at 18" diameter and 4" deep. It is for holding decorations at different seasons things like pine cones and other things my wife does.
 

Attachments

  • Black Oak Side.jpg
    Black Oak Side.jpg
    332.9 KB · Views: 42
  • Black Oak.jpg
    Black Oak.jpg
    476.5 KB · Views: 42
Joined
Dec 11, 2023
Messages
10
Likes
9
Location
Westford, MA
Here's the bowl finished with the conversion varnish, Same finish I used on the table project. I actually sprayed them at the same time. These type of bowls are pretty easy to make and if you want a large bowl and don't have a log big enough to make it this does the job. It finished out at 18" diameter and 4" deep. It is for holding decorations at different seasons things like pine cones and other things my wife does.
Vincent, Excellent work. I have zero experience with conversion varnish and am just learning to use air spray for painting. Is it difficult to spray and apply? Could one use a brush?
 
Joined
Aug 16, 2022
Messages
281
Likes
638
Location
Butler, PA
Vincent, Excellent work. I have zero experience with conversion varnish and am just learning to use air spray for painting. Is it difficult to spray and apply? Could one use a brush?
Michael, Thank you for the compliment. Conversion varnish isn't hard to spray, just follow directions on the sheet for whatever product you are using. I don't think using a brush would work very well, this is a lacquer based product and it dries fairly quickly so it wouldn't have time for the brush marks to flow out. If you did brush it I would guess you could wet sand it between coats, but I would recommend spraying for best results. I used Sherwin Williams brand, you can look on their website to see the instructions.
 
Back
Top