• March 2025 Turning Challenge: Identical Bowls or Plates! (click here for details)
  • Congratulations to Joseph Bernard for "Working Spider" being selected as Turning of the Week for March 3 2025 (click here for details)
  • Welcome new registering member. Your username must be your real First and Last name (for example: John Doe). "Screen names" and "handles" are not allowed and your registration will be deleted if you don't use your real name. Also, do not use all caps nor all lower case.

Blade Kerf and getting the needed kerf in the wood?

Joined
Jul 30, 2021
Messages
303
Likes
93
Location
Aurora, CO
Well, I haven't been here in a few months. Had some life stuff crop up. I had a project working on boxes last time I was here, which I did start exploring, but I've had to table that for now as I am lacking some tools and machines that I think are necessary to actually succeed at it. So, I've moved onto other things...

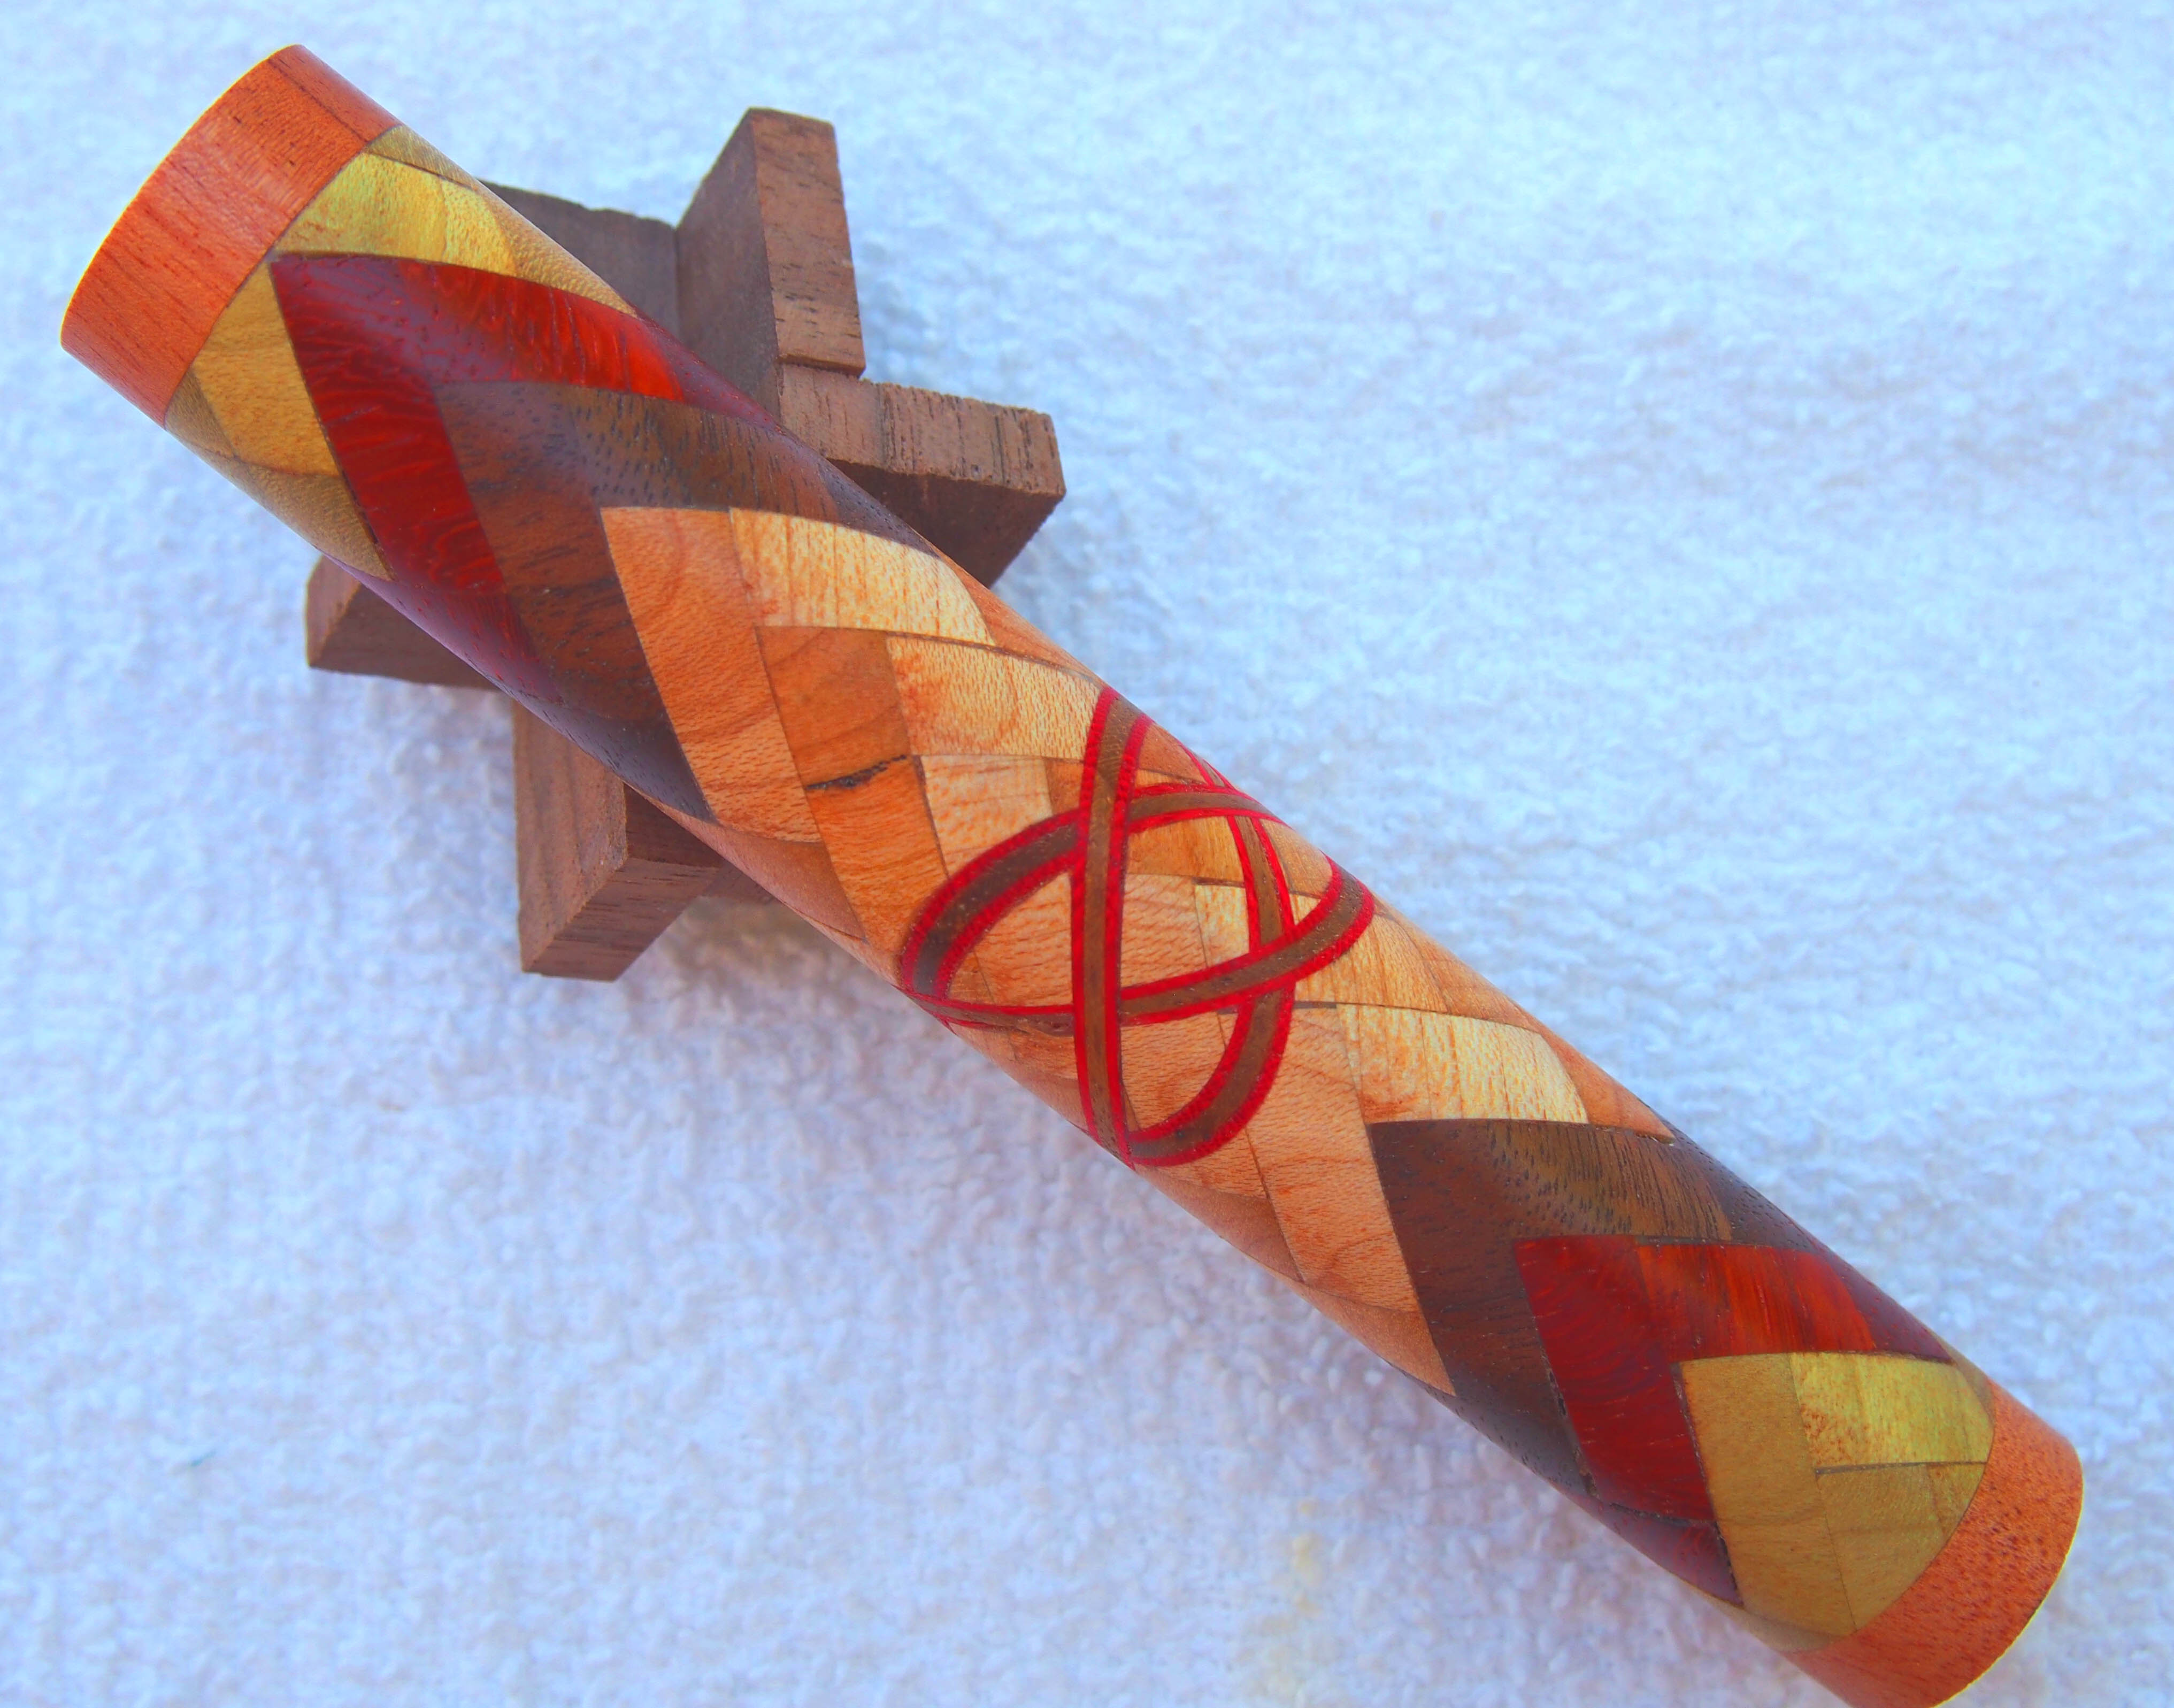
The last week or so, I've been delving into making Celtic Knot designs in various things, including pens, turned easter eggs, and rolling pins. I have only just started, but I have run into some issues gluing things up after the cuts. My original approach was to cut all the way through, add my insert layering materials and then glue everything together again. That approach has many problems, which I'm sure many of you know. So I am now trying to take the approach of making a cut with the table saw (vs. bandsaw, originally) most, but not all, of the way through my main pieces of wood. This leaves the kerf, which I then fill with exactly-matching insert material of the same width as the kerf (i.e. 5/64th). Well, that is the goal, anyway....

KERF!! My current blades, and apparently all of the available table saw (or miter saw) blades that I can find locally, are mostly Diablo (a not terribly great brand), and they don't actually explicitly state what their kerf is. My personal measurements, indicate it is somewhere a bit less than 1/8" for my miter saw blade (it measures exactly 13/128ths, just shy of 7/64ths, which is shy enough of an actual 1/8" that...it doesn't work for the 1/8" thick microlumber boards I am trying to use as the insert material. For my table saw blade, it is officially a 3/32" kerf, although some of the teeth seem to measure 13/128ths. I have wondered if it may be a bit of pitch buildup on the table saw blade (or maybe even both), so I intend to clean them. In any case, 3/32" or 6/64", is neither wide enough for some of the larger projects, nor narrow enough for the pen projects (which are definitely my smallest projects.)

The original goal was to use 1/16" thick insert material for the pen Celtic Knots, while using 1/8" thick insert material for the larger items. The pens, in fact, the intent was to glue several different layers of 1/64" thick veneers together to make a more interesting insert material, mainly three layers plus a slight bit of room for the glue line between each layer and between the insert material and the kerf in the pen blank (that final 1/64th would end up being divided up among four different layers of glue, all of which I think would end up less than 1/128" thick.)

Ok, so now for the trouble. First a 1/16" (or 4/64") 10" table saw blade does not seem to exist (well, I did find one...but it was $230!!!! I suspect there are some very specific challenges in making a blade that thin at that diameter to keep it from ripping itself apart when spinning...), although I have found a 5/64" thick blade. I would prefer to stick with the original plan of gluing together three layers of veneer, but technically I could glue together 5 layers, which would give me something slightly larger than a 5/64" thick insert...

The other challenge I've found is, full kerf (1/8" thick) blades. I seem to be finding them at two price points...about $40, and around $200! This makes me wonder a lot about the nature of a full kerf table saw blade. Should I be worried about a $40 blade? I cannot afford a $200 blade right now, or even one of the $189 Freud or CMT ones. I am curious, however, why there is such a large gap between the low end and the higher end? (Is there even a middle ground...I seem to find them pretty much at the ends of this spectrum but not really in the middle so much.)

I can probably only afford one additional blade as it is, and that will likely be the 5/64" one. So, given that...I am further curious: Is there a simple method to using a blade with a narrower kerf than you need, to cut a slot in a piece of wood, that is at an angle (60, 45, 30 or 22.5)? I have been pondering this for a bit here, and I am not sure what the best approach is. My original and naive thought was, just slide it down the fence a little bit and run the cut again... But I am not certain that is the best approach. Further, I am wondering if there is a way to do this, and maybe it is still just sliding it down the fence, that would GUARANTEE I get EXACTLY the right cut, every time. So, if I make a 3/32" cut the first pass, then I need to shave off exactly another 1/32" to get a 1/8" kerf in the wood. Does anyone know of a reliable way to do that? I could probably solve the problem if I turned on the math centers of my brain and brought out my trig again, but I am hoping there is maybe a simpler way. My second thought was, just stick a 1/32" thick thing between the stop on the fence and the wood for the first cut, then remove it for the second cut...but if the wood is at an angle, that won't really be correct. Again, I could work out the math, and I'd need to do it for at least four angles, but I'm hoping that some of you out there have solved this problem before, and there is a simpler and very ingenious way of adjusting the blank to get exactly the right kerf cut from a too-thin kerf blade. ;)

Well, thank you for taking the time to read! I hope you are a woodworking genius!! ;D
 
Router bit using a sled?
Continue...I'm not quite sure I understand...

I do have a router, but its rather big and unwieldy. I bought a Skill on sale, it was a darn good deal but now I kind of regret it as its not really useful for anything but being inside a router table, I think. It might have been fine for, say, construction projects, but its not really good for fine woodworking. At some point I intend to add a smaller router that is more manageable....
 
So this is just spitballing, I have never done something like this (cutting with a router) Router table with a miter slot, thin sled with miter bar so that the cutting length of the router bit is more than the thickness of the sled plus material, sled has a fence and two clamps to hold both sides of the blank, set the fence angle, clamp the blank on to the sled/fence, cut the blank
 
So this is just spitballing, I have never done something like this (cutting with a router) Router table with a miter slot, thin sled with miter bar so that the cutting length of the router bit is more than the thickness of the sled plus material, sled has a fence and two clamps to hold both sides of the blank, set the fence angle, clamp the blank on to the sled/fence, cut the blank
Gocha. If I had a router table, I'd try it! :P Some day... (and a thickness planer, and an oscillating drum sander, and....)

I do suspect it could work though. Could also be even more versatile, as you can get router bits in a pretty wide range of diameters...
 
I wonder if a saw sharpener person (or equipment) wouldn't be able to make a narrower kerf blade. It doesn't sound like the cuts are that deep, so I'm picturing a normal thickness blade (for stability) ground to a thinner profile just at the teeth. 🤔
 
I wonder if a saw sharpener person (or equipment) wouldn't be able to make a narrower kerf blade. It doesn't sound like the cuts are that deep, so I'm picturing a normal thickness blade (for stability) ground to a thinner profile just at the teeth. 🤔

Interesting thought... I just measured the blades...looks like they are 9/128ths thick. So just shy of 5/64ths. I can buy a 5/64ths blade, not too expensive, and it would probably be a lot of work to file each and every tooth down...assuming I could do it without causing any damage. If the blade itself, vs. the teeth, was closer to 1/16th, it might be worth it. The price of the only 10" 1/16th blade I've found was so high, I suspect that there must be some magic to making the blade itself that thin. Seems like 5/64ths is about as thin as they get otherwise.

So the remaining problem is, how do I get a FATTER kerf cut into the wood, from a blade that is narrower than the kerf I need, when the wood is at an angle...
 
I didn't understand exactly what you're trying to do.

There are 3 and 4" diameter metal slitting saws that can be mounted on inexpensive arbors for use in your router or drill press. The saws come in a variety of common thicknesses like 1/16" on up and are very accurate as to thickness. Imports shouldn't be more than 20 bucks or so.

I've used the saws quite a bit to inlay thin veneer embellishing.
 
The approach that I have used is to first make a partial cut into a scrap block then setting up a stop at the angle chosen and cut the insert material to the thickness required for the saw kerf. In the photo below birch insert material is glued onto the end of a piece of walnut so that it can be held in place for cutting. The angled stop is clamped to the fence then a sample is cut and tested for fit in the scrap block. The exact thickness can be set using a fine adjusting tool like a "hammer" to move it a small amount in whichever direction is necessary to fine tune the thickness. The one key to success is when making the cut hold the blade in the workpiece, shut down the saw and when the blade stops turning lift it out and pick the insert out. The next step is to cut the primary wood to a uniform length then set a stop on the right hand fence so the angle is approximately in the middle, then make the first cut all the way through and stare gluing together.
DSC01427.JPG
To glue the pieces together I make an angle jig which is nothing more then two pieces of hard wood attached together to form a 90 degree angle.
The clamps needed are 5 small bar clamps and a piece of poly sheeting to prevent the glue squeeze out from bonding the wood to the clamping jig.
The process is to spread glue on the 2 ends of the primary block then clamp the first end to the jig such that it is forced into the 90 degree angle. The next is to place the insert in place and the other half of the primary blank, the clamp the 2nd half to the jig and finally the fifth clamp against the ends of the blank to close up the joint.
The next step when the glue is set is to clean up any glue squeeze out or or trim any of the insert that extends out from the bock. When the block is trimmed back to original dimensions place it on the saw against the stop that you didn't move and bring the stopped blade down it make sure that it lines up the raze up the blade, rotate the blank and make the second cut. Repeat 2 more times and you should have an accurate keltic note blank.
The smaller saw kerf would be nice for smaller diameter pieces if someone can find a thinner blade but until that happens there is no way to do it with a thicker kerf.
 
Would it be easier to remove a small amount of material from the inlay material?

I don't really have any means of doing that. If I had a thickness planer, then probably. But my tools are lathes, a bandsaw, a tablesaw and a drill press. For the pen materials, its layers of 1/64" thick veneer glued together. I was planning on three layers, but I may have to bump it up to 5 layers if I get a 5/64" blade. In any case, removing material, would basically mean removing a layer of veneer.

For the larger stuff, its 1/8" thick pre-planed to exact thickness (I've checked, its pretty darn exact for all but 1 board which is ever so slightly thinner by about 1/128th), and I was going to be using random materials. Its actually not really celtic knots for some of the larger stuff. Its more just random loops of various inlay woods to add some interest to the pieces. In any case, the wood is exactly 1/8" thick. So I need a kerf just ever so slightly larger than 1/8" (seems like most table saw blades are about 1/128" maybe 1/64" larger than their nominal size, if my latest caliper measurements are telling me anything.)

In any case, I don't think whittling down the thickness is an option for me. Certainly not with the layered veneer. And lacking a thickness planer, I don't think I could hand-plane anything that good yet (I only picked up my first hand plane in december and I'm a super novice with it.) I doubt I could evenly reduce 1/32" off of any of these boards.

I guess, maybe I'm overcomplicating things. I should probably just pick up a $40-50 full kerf table saw blade and just be done with it. I've probably read too many things from professionals worried about nuances far beyond my skill level right now, and a basic $50 full kerf blade will probably do exactly what I need it to just fine,
 
I didn't understand exactly what you're trying to do.

There are 3 and 4" diameter metal slitting saws that can be mounted on inexpensive arbors for use in your router or drill press. The saws come in a variety of common thicknesses like 1/16" on up and are very accurate as to thickness. Imports shouldn't be more than 20 bucks or so.

I've used the saws quite a bit to inlay thin veneer embellishing.

I'm cutting slots in larger blocks of wood, say a 2x2x4" piece of walnut. One slot per side. For a Celtic Knot, the cuts are all the same on each side, and when turned it produces an overlapping "knot" of the inlay material. Sometimes I cut at different angles, and insert different woods into the main block, which just produces an interesting and maybe chaotic series of varying overlapping loops. Well, that's the plan, haven't quite gotten the kerfs right yet, hence the thread. I've done this with pen blanks before, albeit with some glueup problems, and the results are quite interesting.

In any case. I don't know how I would use a router or drill press with a blade attachment to achieve the goal?

Just take a Celtic Knot. Here is an example from someone far more skilled than I. To avoid the kinds of glueup problems I am having, when you cut the main blank so you can insert the material for the knot, you don't cut all the way through. You cut most of the way through, but leave a small amount, say 1/16th for a pen blank. You then insert the material in the slot you just cut, glue it in and let it dry. Then you flip the blank (its usually still square at this point), and make another cut and glue in another insert, etc. etc. for all four sides. When you turn it, you end up with this nice set of overlapping loops, a "Celtic Knot" as its called. (Yes, not quite, but, its the best we can do, with turned blanks!)

Well, the trick with cutting most-but-not-all-the-way through, is the kerf has to be the same thickness as the insert. If its not, well, you either can't insert it (too thin kerf), or you can't really glue it in (too thick kerf). For insert material made from three layers of 1/64" thick veneer, you have a little over 3/64" of veneer and glue. A 1/16" kerf, should, generally, work for that. I sadly have never used a 1/16" blade, although I know some people (including the person who made the below blank) do (they may actually be smaller than the standard 10" table saw blade, maybe 6-7" with a 1/16" kerf...something I'm not sure I'm interested in trying at this point.) I have found a 5/64" blade, which would allow me to stack 5 layers of veneer and, maybe, perhaps with a little bit of force, fit them into a 5/64" slot with glue.

For the 1/8" thick microlumber I have, which was originally bought with a different idea in mind, but that idea is kaput at this point, I would need a 1/8" kerf (or very slightly larger, seems most "full kerf" blades are 0.126" thick which just might do it.) I have a 3/32" kerf blade right now. So its 1/32" too thin, and I cannot fit my 1/8" thick board into the kerf cut by my current table saw blade. HOWEVER...and this was where the thread came about:

I suspect I should be able to figure out a way, to insert some additional material at the end of the piece of wood I am cutting, between the blank and the stop, to shift the wood a little bit for the FIRST cut. That would cut a 3/32" kerf. Then, if I remove that additional material from between the blank and the stop, the blank would shift just a little, allowing me to cut the additional 1/32" (or slightly more) required to get a full 1/8" kerf in my blank. The question I originally posed was...does anyone know if a very simple, method, mnemonic, something, to help figure out how thick of a piece of material to place between the blank and the stop, for this to work? Now, I know the thickness of this material is going to be dependent on the angle of slot I am cutting in my blank. If it is 60 degrees, then the thickness of this "shifter" material would be different, than if the angle was 45, 30, or 22.5 degrees. I can solve the problem...with some math, trigonometry specifically. I have been trying to avoid that...my brain has been in "low power" mode for nearly a month now, as I get about 1 hour of sleep a night, and some nights I get no sleep....so, trying to drag out my old trigonometry skills here....is not going to be fun, and may not be productive, if my brain can't...brain. You know?

Anyway....that was the idea. I was hoping someone had a neat trick to figure this out very easily, or maybe "mechanically" or something like that. But I guess, tomorrow, I'll have to "go full trig" on the problem.

full
 
I can’t help thinking that you’re overthinking it. You don’t always have to rush out and buy new gear for every project, sometimes the stuff you already have is fine. Most saw blades range from 2.8 to 3.5mm (much simpler than fractions!!) so there really isn’t much difference. Make one with the blade you have and see how it goes… it will be fine!!

You are also correct that you should cut almost all the way through but definitely not all the way! Remember to cut the insert piece to match your saw kerf at the same angle as the cut in the wood, this will maintain grain direction and give a better glue joint. I’m

Good luck

Richard
 
Gocha. If I had a router table, I'd try it! :P Some day... (and a thickness planer, and an oscillating drum sander, and....)

I do suspect it could work though. Could also be even more versatile, as you can get router bits in a pretty wide range of diameters...

A very serviceable router table can be made with a small piece of 3/4" plywood on legs to elevate it over the router. Drill a small hole for the bit and you are in business. No need to buy a fancy one with all the bells and whistles. Easy to clamp (or screw) a fence to it as needed.
 
The more I think about the celtic knot turning I wonder if it isn't more the kind of thing that makes other turners puzzle over how it was done. But does it generally really have any artistic merit?

Same feeling I get when I see a largish hollow form with major voids. Quite a high level of craftsmanship to accomplish the piece, but little appeal to me as art.

Woodturners are constantly whining about the lack of acceptance in the world of art. Is it a confusion between craftsmanship and the artistic statement a piece might or might not make?
This. I agree. I have done a couple Celtic Knots (pens, rolling pins, etc) but the interest I saw from it in the real market (in my area at least) was not as much as might be expected. I got more interest out of plain wood turned into interesting forms, shapes, and uses (unique boxes, bowls, great shapes and forms like Odie's work, Calabash forms, etc) So I ended up just writing off celtic knots as just a challenge on how to achieve it, but as far as art and appeal, to each their own....
 
Having a 10" table saw doesn't mean you have to only use 10" diameter blades. Assuming a 5/8" arbor, blades can be found down to 6 1/4" diameter. Smaller diameter allows for thinner blade stock (and thinner kerf), but you'll lose some depth of cut. When i use a 7 1/4" blade on my PM 66 saw, i still have more than a 1 1/4" depth of cut, and an 8" blade gets me over 2" cut depth. I can also buy higher quality blades at lower cost in smaller diameters. It all depends on how deep your cut needs to be...
 
Having a 10" table saw doesn't mean you have to only use 10" diameter blades. Assuming a 5/8" arbor, blades can be found down to 6 1/4" diameter. Smaller diameter allows for thinner blade stock (and thinner kerf), but you'll lose some depth of cut. When i use a 7 1/4" blade on my PM 66 saw, i still have more than a 1 1/4" depth of cut, and an 8" blade gets me over 2" cut depth. I can also buy higher quality blades at lower cost in smaller diameters. It all depends on how deep your cut needs to be...
+1
 
When making something, always err to the side that is easiest to repair.
1. Pull your thinner blade that has the least amount of flutter when in use.
2. Cut a kerf in soft and hard wood. Note if there is a difference.
3. With good dense paper, add shims on opposite sides and 180 degrees apart. These need to be placed at the outer edge of the saw arbor flange. This will cause the blade to act exactly like a wobble blade dado. It will cut kerfs with perfectly parallel walls.
4. Test and shim until the kerf width is exact.
Antique furniture repair shops in this area have been using this method for over 35 years, because it works.
5. After some use or setting for a while, make new test cuts.
6. Earl McLain's advice is simple, inexpensive and completely valid. Our main blade is 7 1/4" diameter.
 
Back
Top