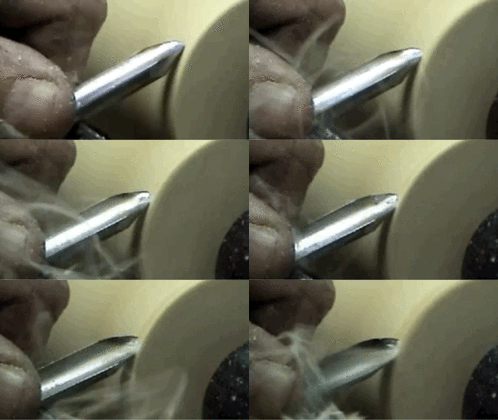
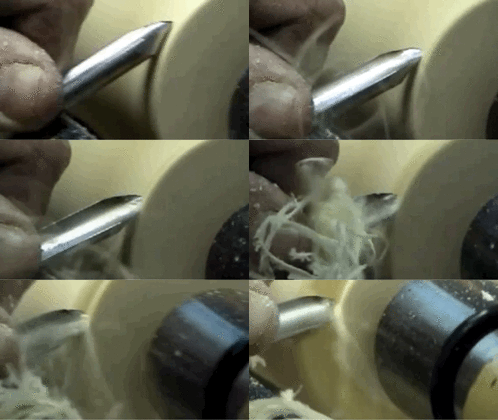
That’s very succinct and easy to understand. Perfect in my opinion.Bevel support is cutting with zero clearance angle behind the cutting edge.
Tim
-
December 2025 Turning Challenge: Single Tree! (click here for details) -
Congratulations to Bob Henrickson, People's Choice in the November 2025 Turning Challenge (click here for details) -
Congratulations to John Dillon for "Chinquapin Oak" being selected as Turning of the Week for December 22, 2025 (click here for details) -
Welcome new registering member. Your username must be your real First and Last name (for example: John Doe). "Screen names" and "handles" are not allowed and your registration will be deleted if you don't use your real name. Also, do not use all caps nor all lower case.
You are using an out of date browser. It may not display this or other websites correctly.
You should upgrade or use an alternative browser.
You should upgrade or use an alternative browser.
Bevel Support
- Thread starter Jamie Straw
- Start date
Dave Landers
Beta Tester
Yeah, I had a feeling that I wasn't explaining that very well. What I meant was, with a planing cut, the direction the bevel cuts is parallel to the wood (i.e. the lathe axis). That is, you're moving the skew down the cylinder (making a smaller cylinder) and the bevel is rubbing/floating/gliding/hovering/whatever-ing on the wood, but it offers no support to resist any forces of the cut (the wood pushing back against the edge).One quick question. I don't quite understand "planing a cylinder with a skew - the bevel is parallel to the wood."
...What I meant was, with a planing cut, the direction the bevel cuts is parallel to the wood (i.e. the lathe axis). That is, you're moving the skew down the cylinder (making a smaller cylinder) and the bevel is rubbing/floating/gliding/hovering/whatever-ing on the wood, but it offers no support to resist any forces of the cut (the wood pushing back against the edge).
I'll have to think on this more, perhaps pay more attention, especially when I turn thin spindles. With fairly thick spindles I can hold the tool by the handle and slide it down the tool rest and easily make smooth planing cuts, but I haven't paid much attention to what part the bevel plays - I just make the cut using "what feels right" from experience.
However, I use different techniques as the spindle gets thinner and thinner - only "whisper" thin shavings are removed on each pass and there is extremely little force pushing back. (Cutting edges have to be shaving sharp.) It can get impossible to turn thin successfully without good support with the fingers of both hands and the "whatever-ing" of the bevel - flexing and vibration can otherwise destroy the piece in a heartbeat.
My gut feeling says it's primarily my fingers providing the controlled support: on the tool at the rest, at the cutting edge, and behind the spindle to control flexing. I press the tool handle tight against the underside of my right forearm, the arm held firmly against my side - this is not the time for loosely held freehand flexibility! I press the tool firmly into the tool rest during the cut. My left elbow/arm is always firmly supported by the top of the lathe headstock.
But after 100s of these, I work by feel and never pay attention to the details!
This picture shows three cases, the first, thinning with a large skew while the spindle is fairly thick, and two with the 1/2" skew cutting in one direction then the other.
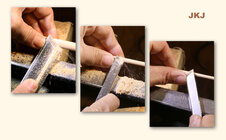
Perhaps the part the bevel plays would be easier to analyze with a thin spindle than a thicker one. I think I'll try to turn a 6" long section very thin (16" dia?) and see if it's possible to figure out what part the bevel plays.- maybe have someone turn off the lathe in the middle of the cut, try to hold the tool still, and examine the back side of the cutting edge with a bright light? Or maybe paint the entire bevel with a Sharpie marker, start the cut at one spot on the cutting edge then slide so it's cutting at another spot - take the tool off the edge and see how much of the marker is worn away at the second spot? I've never tried that (or even had a reason to think of trying it!)
BTW, these are old, old pictures - I don't use this type of rest anymore, I now only use the Robust rests with the hardened steel rod on the top.
JKJ
- Joined
- Apr 27, 2004
- Messages
- 9,307
- Likes
- 6,079
- Location
- Lakeland, Florida
- Website
- www.hockenberywoodturning.com
Dave Landers
Beta Tester
Agree, it's basically the same. The bevel and cutting edge of the gouge where it contacts the wood is about the same as you'd get from a skew. Can also do it with a SRG etc.I think a pull cut with a BG is a plaining cut too
So if you look at hockenbery's 1st clip, you can see that the gouge is cutting left-to-right.I'll have to think on this more, perhaps pay more attention, especially when I turn thin spindles. With fairly thick spindles I can hold the tool by the handle and slide it down the tool rest and easily make smooth planing cuts, but I haven't paid much attention to what part the bevel plays - I just make the cut using "what feels right" from experience.
There's a little bit of force from the cut trying to push the gouge back to the left (it's not much due to the shear angle of the cut). But the bevel isn't helping with that. The force is small enough that it's easy to control - in your pics with the skew, your thumb is doing that.
Now in hockenbery's last 2 clips, he starts to roll the gouge over - at that point there is some wood behind the bevel and it is helping with the run-back control.
It's not a real big deal. But we do sometimes get caught up in "ride the bevel!" and sometimes it's important (especially when teaching or demoing) to understand why. It's often run-back control. But sometimes it's simply direction of cut. And sometimes you can even get away with basically ignoring the bevel altogether (a scrape for example).
This picture shows three cases, the first, thinning with a large skew while the spindle is fairly thick, and two with the 1/2" skew cutting in one direction then the other.
View attachment 69611
Perhaps the part the bevel plays would be easier to analyze with a thin spindle than a thicker one. I think I'll try to turn a 6" long section very thin (16" dia?) and see if it's possible to figure out what part the bevel plays.
JKJ
I expect that you will find out more with a very long thin spindle.
I found that I had to concentrate on my technique when out of interest I turned some spindles down to 3mm diam (a bit under 1/8") over about a 10" section; not as thin as the 1/16" over 6" length that you will be shooting for! Perhaps I could have gone down finer with a finer grained wood over that length, but I didn't have any that I wanted to sacrifice for just an exercise out if interest.
The spindle on the left in the following photo is 3mm diam and the 30mm wide (just under1-1/4") P&N skew that I used is next to it. More a case of caressing the bevel over the wood than any other descriptor I can think of...
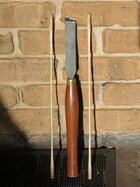
caressing the bevel
That's my new favorite description. Brilliant! I'm stealing it.
When I do demos on thin spindles I take these to pass around. (The ruler is 12")
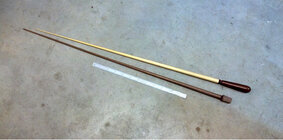
These are tapered from about 1/2" down to about 1/16" inch, turned with the "left hand steady rest" technique. It would have been easy to make them thinner but there's a point of diminishing returns as the diameter gets closer to the size of the grain, rings, and pores. I've run into that making toothpicks. (Not a commercially viable product for turning by hand!)
The top one is from shelving pine from HomeDepot. Fairly soft and weak wood but fine grain.
The bottom from walnut. I hold nearly all thin spindles with a short 2MT on the drive end and a steb live center on the other.
On the one from walnut, I lost the pressure from the tailstock when I was almost done turning due to a weak spot in the wood. To finish up, I drilled a hole in the drive end an pulled it tightly in the headstock with a 1/4" drawbar screwed into the wood, with the thin end resting in a small, shallow hole in a wooden piece held in the live center. I intended to put a handle on it too but it's too useful as is to show the drawbar method. I should make more of these for whiteboard pointers for teachers. (Not many would want a blackboard pointer these days!)
My favorite wood species for thin spindles are fine-grained and hard, strong, straight-grained wood. Dogwood is a good one, ebony another. Holly is good but not very strong. Basswood is horrible! I've used it for light-weight conductors batons where the balance point is critical, but don't like to.
Have you tried making conductors batons? A custom baton is highly prized in certain circles. Most use mass-produced batons - can be ordered from Walmart!
These are cocobolo/holly, ebony/holly, ebony/holly, kingwood/holly, olive/basswood, and one-piece dogwood. The last one has terrible balance.
There is an advantage in not making the shaft too thin since that can affect the visibility in a darkened orchestra pit. It's also hard to find pure white holly but I might try bleaching the next time. White maple might be good.
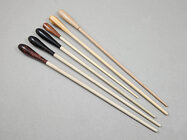
The horizontal one in this picture is a "tap" baton, made for a jr high school band director to tap loudly on his music stand to help the kids stay in time! It has a heavy lignum vitae handle to help balance the strong, heavy dogwood shaft with a tough tip!

JKJ
Interesting thread and interesting question. Here's my take:
"Riding the bevel means keeping the bevel of the tool against the wood to ensure the tool is cutting at its best, that the cutting angle is correct, and that the cut is as smooth as possible."
"Riding the bevel means keeping the bevel of the tool against the wood to ensure the tool is cutting at its best, that the cutting angle is correct, and that the cut is as smooth as possible."
I think my mother may have been right when she told us learning to play music was as important to education as reading, writing, and math!
JKJ
My mother didn't say that, but she believed it. We all (7 of us) had to take piano for two years minimum, then HS band. I played bass guitar off and on for 20 years after HS. It came naturally to me. The 6-string? Not so much.
My mother didn't say that, but she believed it. We all (7 of us) had to take piano for two years minimum, then HS band. I played bass guitar off and on for 20 years after HS. It came naturally to me. The 6-string? Not so much.
Do you need a spare electric bass? Hurts my left shoulder even a year after surgery. I give up.
6-string (classical), piano, etc, no problem.
JKJ
Do you need a spare electric bass? Hurts my left shoulder even a year after surgery. I give up.
6-string (classical), piano, etc, no problem.
JKJ
I don't currently have a bass, so yes.
Neighbor, cool guy, is Elton John’s bass player, or was, as Elton is retiring. So he appreciated this bass joke about how easy playing bass is: kid takes his first bass guitar lesson, tells dad it went well. Same with the second lesson. Dad asked when the third lesson is and kid says he canceled it because he’s got a gig.I played bass guitar
this bass joke about how easy playing bass is
Good joke! But I think easy depends on the type of bass and how you play it! When I played an upright string bass in college it was easy - since I was so bad. I was basically playing bass rhythm for the group (fingers, no bow), I could manage that.
But just listen to Edgar Meyer - I once heard him play a violin concerto on his upright bass! (he has extended 1st and 4th string fingerboard to play higher and lower notes).. His dad started the strings program in the elementary school where my middle son started cello in 4th grade - the reason he plays the cello today!
Eric Lofstrom has some wonderful teaching props along the same lines: a really large skew and gouge, both made from wood. Eric has also painted the bevel and edge regions different colors to highlight them. Both the highlighting and the sheer size make it much easier to understand tool geometry vs. the mechanics of a particular cut during demonstrations.With our high school students, I borrow an idea from Alan Lacer and use a skew made from a 2X4, and a gouge made from a closet rod, to show them first the flute, the edge, and the bevel. When showing them A-B-then C, or bevel support, it's much easier for them to see and understand when it's a giant tool.
Eric has also painted the bevel and edge regions different colors to highlight them. Both the highlighting and the sheer size make it much easier to understand tool geometry
That's a great idea! On mine I found the huge size a huge help; coloring the edges will make visual/physical aid even hugher! (Is that a word?)
JKJ
- Joined
- Apr 27, 2004
- Messages
- 9,307
- Likes
- 6,079
- Location
- Lakeland, Florida
- Website
- www.hockenberywoodturning.com
I think we all learned that technique from Bonnie Klein who was using the wooden tool replicas in the 90sEric Lofstrom has some wonderful teaching props along the same lines: a really large skew and gouge, both made from wood.
Along with introducing us to the ABC description of starting the cut
I think we all learned that technique from Bonnie Klein who was using the wooden tool replicas in the 90
Maybe not all of us. i didn't start turning until around 2000 and didn't know about Bonnie Klein until much later.
I, and perhaps many others, "reinvented" the wheel, er, the big wooded tool teaching aids.
JKJ

