• We just finished moving the forums to a new hosting server. It looks like everything is functioning correctly but if you find a problem please report it in the Forum Technical Support Forum (click here) or email us at forum_moderator AT aawforum.org. Thanks!
  • Beware of Counterfeit Woodturning Tools (click here for details)
  • Johnathan Silwones is starting a new AAW chapter, Southern Alleghenies Woodturners, in Johnstown, PA. (click here for details)
  • Congratulations to Dave Roberts for "2 Hats" being selected as Turning of the Week for April 22, 2024 (click here for details)
  • Welcome new registering member. Your username must be your real First and Last name (for example: John Doe). "Screen names" and "handles" are not allowed and your registration will be deleted if you don't use your real name. Also, do not use all caps nor all lower case.

Basket Illusion

Joined
Jul 27, 2005
Messages
279
Likes
1,842
Location
North Ogden, Utah
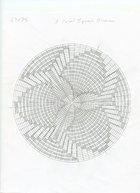
I've thought about documenting the steps of my style of basket illusion for a while and thought this would be a good a place to give it a try. Keep in mind that there are probably as many different ways to do this as there are people doing it and mine is only one of them. And I also need to give credit and thanks to those who taught me most of this. I was first inspired by Jim Adkins several years before I ever tried this myself. And to this day I still think his baskets are the most realistic I've seen. Steve Mawson has also been a huge inspiration to me and also become a good friend. Harvey Meyer, although he does mostly a different style of basket illusion, is the one that made the light come on in my head and finally understand how to get the design on the wood. His YouTube videos on basket illusion are well worth watching. So this is all mostly information I'm passing along to anyone else that may take an interest in this type of woodturning embellishment and not anything that I have "invented". So anyway, here we go.

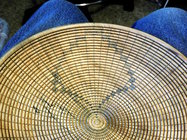
This is going to be a smaller basket, about 9" diameter and 2" deep made from a piece of kiln dried hard maple that has just a little bit of spalting. When making a basket I'm trying to create something that looks old, maybe well used, and usually in the style of a desert southwest Native American made basket. So I don't mind a little bit of figure or color variation or the spalting in the wood I use. In fact for me personally I think it makes a more realistic basket. But in reality, if you were to hold one of these basket illusions up next to an authentic Native American basket they're not really even close to looking real. I like making them though and as tedious as they can be I find working on them to be very relaxing.

In this first photo, I have the blank mounted using the big screw that comes with most chucks. I'm using the tailstock with a revolving cup center just to make it a little more stable.DSCN9872.JPG

From here I just turn the outer shape and make a tenon as I would on any other bowl. There's no point in sanding this because the beading process will remove the surface anyway.DSCN9873.JPG

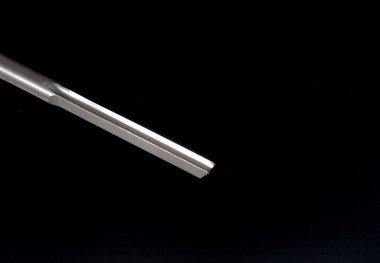
Because this bowl will have a braided rim design I now turn the outer part of the rim using a 3/8" beading tool that I made from a worn out 3/8" spindle gouge. D-Way makes beading tools in many sizes and I'm sure their 3/8" tool would work great here but I'm kind of frugal and made my own from a worn out spindle gouge. I don't know the angles of the grind other than to say they are similar to the D-way tool as it comes new. These beading tools are used with the flute down, as a scraping tool and work best with light cuts that just make those angel hair shavings.DSCN9876.JPGDSCN9878.JPG
 
Last edited:
Joined
Jul 27, 2005
Messages
279
Likes
1,842
Location
North Ogden, Utah
This is what the rim bead looks like, this is the only part of the basket that I sand but I wait until the rim is complete before sanding it. As you can hopefully see, only the outside half of the rim is turned.DSCN9879.JPG

Now this is the only turning tool that is critical and required for this basket illusion work. It's a D-way 1/8" beading tool. The reason it's critical is because several years ago Harvey Meyer, one of the best basket illusion makers out there, convinced Pat at PJL Enterprises to start making a wood burning pen that matches the bead created by the D-way tool exactly. So the combination of the D-Ways beading tool and the PJL's burning pen make this possible. I can just about guarantee that if you try this any other way you'll suffer from much frustration. I say "just about guarantee" because there are always some amazing people out there that can find their own way to make it work.DSCN9881.JPG

So now we just begin creating the beads, working from the rim to the bottom of the basket. There are several ways to do this and keep them consistent that I won't go into. I suggest you just turn a practice piece and experiment with what works best for you. The tool itself works best if you use a very light touch and give it a little wiggle from the handle end as you cut the bead. In this next photo, take a look at the last bead and notice how the top of the bead is "flat". There's a fine line when cutting the bead between too deep and not deep enough. If the bead isn't deep enough you get that flat top. If the bead is too deep it will start to tear the grain at the top of the bead. So watch it closely as you turn it and you'll see that "flat" disappear. Stop right there. It takes a little practice but you get plenty by the time you've turned all the beads on a basket.DSCN9888.JPG

Here's a link to the two tools....
https://www.carvertools.com/ This is the number 21A pen.
 
Last edited:
Joined
Jul 27, 2005
Messages
279
Likes
1,842
Location
North Ogden, Utah
This is the bottom of the basket with most of the beads done. The rest will be done after the inside of the basket is finished and the tenon is removed.DSCN9891.JPG
At this point I do a step that some basket makers do, some don't, and there are probably several different ways to do it. But here's my way. I like darkening the groove between the beads. It's kind of burned but not really. It serves a couple purposes. It creates a shadow line between the beads that gives that look of being used and maybe a little dirt in there. It also creates a dark area that doesn't need to be colored. When coloring the pattern it can be difficult to get the color to the bottom of the bead without getting a little on the adjacent bead. This darkened groove handles that pretty well. I use a piece of formica (laminate countertop). You can get a handful of free samples at anyplace that sells it. I sand the surface that is a plastic material off using my belt sander and that also gives it a fairly sharp edge. I just hold the sharp edge in the groove at 1000-1500 rpms. It kind of burns and kind of melts the formica but creates that dark line very well. Re-sharpen the edge ever few beads so the burn mark doesn't get too wide

.DSCN9893.JPGDSCN9894.JPG DSCN9896.JPG
 
Joined
Jan 10, 2024
Messages
256
Likes
139
Location
Bournemouth, UK
Thanks for posting. I’ve been meaning to have a go at this at some point. I was gifted a small piece of Formica from a guy at my club for burning in lines, I’ve not tried it yet.

I look forward to seeing more of your work.

The D Way beading tools look really nice but far too expensive to get them shipped over here. As a result I made a couple of my own.The first was was made from a 4mm thick HSS blank. I cut a short length (30mm) of flute into the edge with a carbide ball nose cutter in my milling machine - it was very slow going! For my second attempt I milled some Silver Steel (O2) rod and then hardened and tempered it. It works well. It obviously won’t last as long as a HSS tool but then I probably won’t end up using it very often. This one is only about 2mm wide so not for basket work. It was more a proof of concept for me.

IMG_6532.jpeg
 
Joined
Jul 27, 2005
Messages
279
Likes
1,842
Location
North Ogden, Utah
When finished with this stage your basket should look something like this....DSCN9899.JPG

At this point I turn the bowl around and mount it in the chuck using the tenon. I use the live center as long as I can to keep everything as stable as I possible. This is where it becomes a little different process than turning a normal bowl. Because getting the best beads you can turn is a key to making a nice basket you have to take into account all the things that might cause problems. And the main problem is wood movement. Even with kiln dried or twice turned wood you get a little movement from released tension. So to deal with that I turn the bowl to final thickness in stages working from the edge towards the center. The thicker bulk in the center allows for less vibration and wood movement.

After truing up the top of the blank I remove enough wood to work on finishing the rim bead and getting the bowl thickness to what I want. I don't make my baskets incredibly thin and in fact don't even measure them. My good friend and fellow basket maker Steve Mawson makes his soooo thin that when you hold one it feels light like a real basket. I'm too chicken for that so I just get them "thin enough" for me. You be the judge of how thin you want yours to be.DSCN9902.JPG
From here I use that 3/8" beading tool and just lightly work it around the edge. Try to avoid using the entire cutting surface of the tool at once to avoid tearout. Just work it around carefully and create a groove for the first of the beads and then make a bead or two with the 1/8" beading tool. DSCN9907.JPG

Now turn about 1/4 to 1/3 of the bowl to thickness. Again, don't worry about sanding as this surface will all be removed when the beads are cut. Then cut the beads.DSCN9912.JPG
It's also a good idea to burn between the rings in stages for all the same reasons. When turning the inside beads, the dust and shavings will get into the grooves between the beads and make it hard to burn the line between them. So take a minute and clean the grooves with a brush or air.
 
Last edited:
Joined
Jul 27, 2005
Messages
279
Likes
1,842
Location
North Ogden, Utah
Now for getting the design onto the wood. It may seem like I'm jumping the gun because I haven't shown you the design yet but that's because I don't have it yet. Over the 5 or 6 years I've been making these I've decided it's easier for me to make the basket first. Then when I know how many beads it has I can design the basket to that number of beads. For a basket this size (9") I usually go for a design that uses around 63 lines radiating from the center. And this basket ended up with 35 concentric beads. So this is how I do it.
First, I print out a couple pieces of Polar Graph Paper from this website.. https://incompetech.com/graphpaper/polar/ Go to this site, change the options to fit the bowl basket you've made and print out 2 copies, one to draw the design and one to make an indexing wheel. (You can change them to anything you want but these options are for this basket specifically)DSCN0018.JPG And you should end up with this polar (1).jpg
Now, we want to get that same polar graph onto our basket.

First we'll make the indexing wheel and the jig for indexing the basket (a one time project that you can use for many indexing projects). To make the indexing wheel you'll need a small (8" x 8") piece of 1/8" plywood or masonite. Mark the center, use a compass to draw an 8" circle. Drill a hole in the center that is the same as your lathe spindle, usually 1", 1 1/4", or M33. Cut out the circle, cut out the polar graph paper and center it over the circular piece of plywood and glue it to the wood. Now you have an indexing wheel with 63 divisions that should look like this. DSCN0020.JPG

There are some good indexing wheels available but I find this to be more versatile being able to pick virtually any number of divisions and also match the graph you've drawn the design on. I know this is pretty old school and anyone living in the 21st century is probably using some sort of software for this. But I guess I'm just old school.
 
Last edited:
Joined
Jul 27, 2005
Messages
279
Likes
1,842
Location
North Ogden, Utah
The jig for drawing the lines is also simple to make. You'll need a piece of plywood or MDF proportionate to your lathe and a few scraps of 1" thick wood, a pencil, pencil sharpener, a clamp, and one of those T-nuts with the corresponding bolt. I'm posting a picture because you know what they say about a picture being worth a thousand words and my explaing isn't all that great. DSCN0010.JPG Basically the plywood is for a flat surface that is parallel to the lathe bed. The wood scraps, T-nut and bolt are to make a pencil holder and for a perpendicular piece to clamp the index wheel to.DSCN0011.JPG The piece that clamps to the indexing wheel needs to be the same height as the center of your lathe spindle. The pencil holder needs to slide on the plywood platform and have a way to hold the pencil parallel to the lathe bed and the pencil also needs to be at the same height as the center of the lathe spindle. The pieces that sit on the lathe bed have a piece of wood attached to the bottom that fits between the lathe and keeps them from sliding off the ways. When you put the chuck on the spindle, snug it up tight and it will keep the index wheel from slipping on the spindle. Then remount the basket in the chuck. Like I said, I'm not much of an explainer but hopefully the pictures will make more sense.

More to come.....
 
Last edited:
Joined
Jul 27, 2005
Messages
279
Likes
1,842
Location
North Ogden, Utah
Ok, so now we basically replicate the Polar Graph on the basket using the index wheel and jig. I don't know the proper term for the piece that clamps to the indexing wheel so I'll just refer to it as "the post". Pick any line to start with and clamp the post so it lines up with that line. Then with the pencil in its holder just slide the holder, keeping it flat on the plywood bed without letting it lift or rock, and draw a line from near the center to the edge of both the front and the rear of the basket. The pencil holder keeps the pencil horizontal and makes a much straighter line than you could holding the pencil by hand. Then release the clamp, turn the bowl one line, reclamp it and draw the next line.
DSCN0011.JPG
You can see that these first 3 lines aren't evenly spaced. That's because the post wasn't lined up exactly with the line on the indexing wheel. We're not going to fly this thing to the moon, we're just making a replica of a 100 year old basket. But still try to keep the lines as consistent as you can and the pattern will look better. DSCN0013.JPG

This picture shows the lines on the back of the basket. Also, this particular basket has 63 lines, an odd number. I like odd numbers but some designs require an even number. An odd number keeps you from drawing the line all the way across the inside of the basket. But with an even number it's still easier to just draw across one side because it gets so awkward trying to get the pencil over on the back of the far side.DSCN0014.JPG
 
Last edited:
Joined
Jul 27, 2005
Messages
279
Likes
1,842
Location
North Ogden, Utah
When you get finished, it should look something like this. Also, like most everything in woodturning it pays to keep sharp tools, including the pencil. A good quality #2 pencil works best. (These home depot pencils are kind of crappy.) DSCN0016.JPG
This is also a good time to release the clamp from the post, just hold the pencil at the center of the rim and give the basket a turn by hand to draw a line around the rim that will be used when drawing the braiding on the rim.DSCN0017.JPG

That's as far as I've made it so far. More to come.
 

Michael Anderson

Super Moderator
Staff member
TOTW Team
Joined
Aug 22, 2022
Messages
1,360
Likes
3,921
Location
Chattanooga, TN
This is awesome Curt! I know only the basics about basket illusion, and I’ve never done a piece. Great idea turning your heads in sections. And the indexing wheel with a clamp is a sweet! Allows for many more options than a wheel with pins (I think). I also dig your salvaged spindle gouge for the beading tool. Super cool!
 
Joined
Apr 30, 2022
Messages
455
Likes
2,274
Location
Beavercreek, OH
Website
www.ovwg.org
Very nice Curt! My brother enjoys basket illusion but uses the setup where it gets burned on the lathe therefore bypassing the pencil. It is way faster and very accurate! Have you ever tried this method?

 
Joined
Jan 10, 2024
Messages
256
Likes
139
Location
Bournemouth, UK
Very nice Curt! My brother enjoys basket illusion but uses the setup where it gets burned on the lathe therefore bypassing the pencil. It is way faster and very accurate! Have you ever tried this method?

Yes, I’ve seen this method used, seems to cut out one step. Mind you, if you make a mistake you can’t rub it out and start again.
 
Joined
Jun 5, 2023
Messages
121
Likes
693
Location
Portage, MI
I have watched Harvey Meyer perform his magic on a plain piece of stock, transforming it into a beautiful art form. Thanks for describing your method Curt. This is really interesting.
 
Joined
Jul 27, 2005
Messages
279
Likes
1,842
Location
North Ogden, Utah
Very nice Curt! My brother enjoys basket illusion but uses the setup where it gets burned on the lathe therefore bypassing the pencil. It is way faster and very accurate! Have you ever tried this method?

That link has several interesting tools. But I'm pretty much stuck in my technique. As you get older you'll have a better understanding of the word "stubborn" 😉
 
Joined
Jul 27, 2005
Messages
279
Likes
1,842
Location
North Ogden, Utah
This is awesome Curt! I know only the basics about basket illusion, and I’ve never done a piece. Great idea turning your heads in sections. And the indexing wheel with a clamp is a sweet! Allows for many more options than a wheel with pins (I think). I also dig your salvaged spindle gouge for the beading tool. Super cool!
Michael, I have 8 of these homemade indexing wheels with different spacing that I use for laying out all my feather patterns and anything that I want a fairly even spacing on.
 

Tom Gall

TOTW Team
Joined
Feb 20, 2013
Messages
965
Likes
1,776
Location
Hillsborough, NJ
Very interesting follow-along, Curt. Although I probably won't be making any basket illusion pieces (don't have the patience) I do occasionally find the need for indexing. Using my lathe's indexing wheel is a pain, but usually less than setting up my Alisam(sp) wheel. I've bookmarked the Polar Graph Paper link, thanks.
Question - why do you prefer to choose an odd number (63) for this type of basket work?
 
Joined
Jul 27, 2005
Messages
279
Likes
1,842
Location
North Ogden, Utah
Very interesting follow-along, Curt. Although I probably won't be making any basket illusion pieces (don't have the patience) I do occasionally find the need for indexing. Using my lathe's indexing wheel is a pain, but usually less than setting up my Alisam(sp) wheel. I've bookmarked the Polar Graph Paper link, thanks.
Question - why do you prefer to choose an odd number (63) for this type of basket work?
No particular reason really except that the design will have not straight lines across the basket. I think that's sometimes called a tangent. And I chose 63 because of the size of the bowl. It gives enough of a circular grid to have options on the pattern without crowding the lines too close. On larger baskets I like to use 81. 100, an even number, works out well too for patterns that repeat with 5 repeats.
 
Joined
Jul 27, 2005
Messages
279
Likes
1,842
Location
North Ogden, Utah
Ok, here we go again.
After a couple of hours of drawing, erasing, re-drawing, re-erasing and re-re-drawing I've come up with a design for this basket. I've always liked the Pima style Squash Blossom baskets and I think the first basket I made that I felt was close to a success was a 5 petal squash blossom design. I've made several more since that one along with a 7 and a 9 petal design. Because this basket is a little on the small side I didn't want to crowd a 5 petal design so this it the first 3 petal design I've done. I mentioned before that I prefer odd numbers.

The polar graph paper I'm using for this has 63 division lines along with 35 concentric beads, the same as the basket blank. When choosing the options for printing out the polar graph paper, I choose to leave the center clear. If you choose normal the lines in the center will be so crowded you can't use them anyway so just freehand that small area. So for 3 petals I've divided this into 3 sections of 21 lines each. Each section is a repeat of the others so once you draw one section of the design, you just count around 21 lines and repeat it. Pretty simple really once you get an idea for what you want.
3 Petal Squash Blossom small.jpg
Also, if anyone reading this wants to give this a try you're welcome to use this design or modify it in any way you'd like.

Copying the pattern onto the wood is just a matter of sitting down in a comfortable chair with the basket in you lap and drawing the same design on the wood, shading the design areas that will be colored.
DSCN0054.JPG
 

Attachments

  • 3 Petal Squash Blossom small.jpg
    3 Petal Squash Blossom small.jpg
    279.3 KB · Views: 34
  • DSCN0053.jpg
    DSCN0053.jpg
    572 KB · Views: 34
Last edited:
Joined
Jul 27, 2005
Messages
279
Likes
1,842
Location
North Ogden, Utah
One more step that I almost forgot. I need to remove the tenon and finish the bottom of the basket. I don't have a vacuum chuck so I don't know how well that would work with a beaded surface. I do have a set of Cole jaws but I found that just jam chucking the basket seems to be the most accurate way to get basket reversed and turn the remaining beads without having any alignment issues. So that's my preferred way of doing it. I just sand off the nub that's left.
DSCN0055.JPG

I needed to shave a little off a few of the last beads to get a better curve on the bottom of the basket plus turning the rest of the beads where I removed the tenon. So that leaves a few beads that I need to draw the lines on. I've found it's easiest to just use the indexing jig but without the indexing wheel. Just line the pencil tip with the existing line and finish drawing it to the bottom of the bowl.
DSCN0058.JPG

While I was out in the shop I started burning the lines that outline the part of the pattern I had drawn on the inside of the basket.
DSCN0065.JPG

This is the point where the two styles of basket illusion are different. If I were doing this in the style that is most popular recently I would burn all of the lines that I drew on the basket with the indexing jig. Then the design is colored in all the little squares that have been created. I'm over simplifying it because some of the basket makers design incredibly intricate designs that require far more lines than 63. Some in the hundreds. Some are very colorful with a large palette of colors. They are amazing. And in this style it would be very beneficial to have a jig like the one Gabriel Hoff linked in a previous comment. But as I mentioned earlier, I wanted to make a basket that looked like an "old" Native American basket so I took "the road less traveled" so to speak. Once I had seen Jim Adkins work, I was hooked. https://jimadkinsbasketmaker.com/portfolio_category/baskets/
 
Last edited:
Joined
Jul 27, 2005
Messages
279
Likes
1,842
Location
North Ogden, Utah
Nice job and very informative. I have been doing basket illusion pieces for about 11 years now and like Curt said, I have developed my own process. If you're interested you can find my tutorial on You tube.
Just do a search for "GibbsArtWood"
I'm so glad that Gibbs Hansen commented here. Karl, your baskets are exactly what I was talking about when I mentioned the intricate designs and color palettes. I just couldn't remember your name in my forgetful mind. Thanks for commenting.
Also David Bartell's clean, crisp designs are beautiful especially on his signature mesquite forms.
 
Joined
Jan 30, 2024
Messages
14
Likes
24
Location
North Bend, OR
Thanks, Gibbs, for the video on creating patterns. I just watched it. I struggled with graph paper and gave up. I'm going to give it a shot with the app you use!
 
Joined
Jul 27, 2005
Messages
279
Likes
1,842
Location
North Ogden, Utah
I didn't get much time to work on this today but I did finish drawing the rest of the pattern onto the wood and burning the lines that outline the pattern. Tonight I did just a little coloring of the pattern, just to have a picture for explaining the process.
DSCN0070.JPG
I've gone through several different types of pens with varying results in the first baskets I made. Jim Adkins used and recommended Copic markers. They're an alcohol based ink in a pen that can can be refilled and the tips can be replaced. I tried one but had problems with the ink bleeding. I was new at it and it was probably me doing something wrong. I decided to try some Prismacolor markers. Alcohol ink, same problem. About that time I found the Harvey Meyer YouTube videos on basket illusion. He was using Faber-Castell Pitt Artist pens. I'm pretty sure they are india ink pens. And they work great. The ink is permanent, doesn't bleed, and they're available in a lot of colors. Then I had to experiment with the type of tip. They come in several small hard tips, nibs and a couple small brush tips. For me I've settled on the Brush Nib. I use three colors for 90 per cent of my baskets, Black, Brown, and Sanguine. Black and brown are self explanatory, sanguine is a red that looks very authentic on Native American baskets. I buy them online from Dick Blick Art Supplies and they cost about $3 apiece. For a small basket like this two pens is enough. One would probably be enough but I use two and I'll explain why in the next post. It's past my bedtime.
More to come
 
Last edited:
Joined
Jul 27, 2005
Messages
279
Likes
1,842
Location
North Ogden, Utah
About the Faber Castell Pitt Artist pens. As I mentioned in the previous post, I use the Brush tip pens exclusively now. These pens have a felt tip that is about 1/8" diameter and comes to a point. They're great for getting the edges of the beads colored with a minimal amount of ink getting on the adjacent bead. But that sharp tip doesn't last. Depending on the type of wood and the amount of torn grain in the beads they wear out and become frayed. The good news is that you can use a pair of sharp scissors and carefully re-sharpen the tip. And the even better news is that when you can no longer get a sharp tip by trimming you can carefully pull the felt tip out of the pen and it has a new, sharp tip on the other end. So you just turn it around and re-insert it and it's like a brand new pen. So I use two pens, one with a sharp tip for the detail and one that has lost its sharp tip to fill in the rest.

Also, as I said in the previous paragraph, "They're great for getting the edges of the beads colored with a minimal amount of ink getting on the adjacent bead" Slips, goofs, mistakes are all bound to happen and these pens are permanent. But they don't penetrate very deep into the wood grain. So if you do make a mistake, you can use a sharp X-acto knife and lightly scrape the ink off the wood. It works in varying degrees depending on the type of wood. Hard Maple cleans up pretty nice, more porous soft woods like Poplar, Willow, Cottonwood etc. not so well. But they do make beautiful baskets that are very light weight.

I've also done quite a few baskets with floral designs using watercolor paints and Craft Supplies artisan dyes. And I think David Bartell uses acrylic paints with great outcomes on his mesquite pieces.

Watercolor on Maple
autumn leaf basket maple 1.JPG

Artisan Dyes on Silver Maple
silver maple floral basket wow.jpg


Speaking of coloring, today I finished coloring the design on the inside of this basket. It's a pretty simple monochrome design compared to some more elaborate baskets but I think it will be OK. At this point I can start drawing the pattern on the outside of the basket. I don't draw the inside and outside at the same time because the pencil will rub off the outside when handling the basket so much while coloring the inside. In fact it can make the indexing lines hard to see too. But before drawing the outside design on this one I'm going to start burning all of the gazillion little lines that make it look like a basket. Trying not to let this drag out too long.......maybe too late for that already. All of this off the lathe embellishment is what keeps a lot of turners from wanting to try this.

Here's the colored design on the inside of the basket.
DSCN0072.JPG

More to come....
 
Last edited:

Tom Gall

TOTW Team
Joined
Feb 20, 2013
Messages
965
Likes
1,776
Location
Hillsborough, NJ
@Curt Fuller Love the two colored pieces above, especially the Autumn Leaf one ... gorgeous! Thanks for the info on the brush tip pens. I don't do basket illusion pieces - but, I've used several other brands (mostly on spin tops) and the tips wear out very quickly making for a sloppy line. Probably doesn't help that I use them while the lathe is spinning. I'll be ordering some of the F-C pens very soon. Thanks again.
 
Joined
Jul 27, 2005
Messages
279
Likes
1,842
Location
North Ogden, Utah
I had a little time today so I started burning the lines on the basket. I didn't explain why I like to color the design before burning the lines. In this style of basket illusion the entire basket gets lines burned usually at about 1/16" apart. So if I burn the lines first then coloring over the burn lines would make the design even more abrasive to the pen tips. So it's just easier on the pens. When burning the lines I like the lines to be spaced at half the width of the beads or less. I don't measure them but you'll find that there's a happy medium between too close and to far apart. Sometimes when burning just a short section of the bead 3 lines might seem too far apart but 4 lines are too close. I usually go with too close just from personal preference. Also, you'll find that when burning the areas of the beads that are colored you'll need more heat. It's another one of those happy medium things where you do what you personally think looks best, But the ink on the wood seems to make it require more heat. So I usually burn all the color areas and then turn down the heat and burn the bare wood areas. The colored areas also require cleaning the burning tip more often. You get carbon and a residue from the ink on the pen and you'll notice it getting hard to get the burn line you want. I clean my pens with a small brass brush.

Here's today's burning progress...
DSCN0075.JPG

More to come....
 
Joined
Jul 27, 2005
Messages
279
Likes
1,842
Location
North Ogden, Utah
Today I spent some time burning lines. As I mentioned earlier there's kind of a fine line between the lines being too close together and too far apart. For me an easy rule of thumb is that if the bead is a 1/8" bead the lines should be 1/16" apart. I think slightly closer lines are better than slightly farther apart. Again this is a part of basket making that you get a great benefit from a practice piece that you can experiment on. Also you can experiment with different heat settings on your woodburner. You want a line that is dark enough to see but not so dark that it burns the wood around it. Also, I think any of the several woodburners that are available should work as long as the heat is adjustable and you can plug the pen into it. You can even get an adapter from PJL if your cord has the wrong ends. The PJL pens have a male end.

This is probably the most tedious, well maybe the second most tedious part of the basket illusion process. But you can make it a little better by giving yourself something to listen to while burning. I'm a huge fan of audiobooks and almost always have a book playing while I'm working. If not that I have some music playing. I'm not good enough at multitasking to watch TV and pay attention to what I'm doing.

Here's an 'in progress' picture of the line burning so far.
DSCN0078.JPG

More to come....
 
Joined
Jan 10, 2024
Messages
256
Likes
139
Location
Bournemouth, UK
All good stuff, what type of Pyrography tips do you use?

I knew about the Faber Castell pens and some of the popular colours folks use but after reading this excellent series of posts I decided to buy a few ready for when I need them. It will only be something small, maybe a box or a pencil pot. I’m far too busy on another project at the moment though. I kicked myself after ordering them as I think I should have got a Deep Scarlet as well. I also need to make another beading tool. I’ll probably go with 3mm, but do I have a ball nosed milling cutter in that size?! 😄

IMG_9575.jpeg
 
Joined
Jul 27, 2005
Messages
279
Likes
1,842
Location
North Ogden, Utah
Bill, the burning pens I have are both from PJL. https://www.carvertools.com/ One is a 1/8", 21A, the other is 3/16", 21B. And these pens are made specifically to work with D-way beading tools. I can't tell you much about any others except that I have an Ashley Isles 3mm beading tool and neither of my burning pens work for that size bead. You seem to be handy enough that you could probably make your own burning tips to work with you beading tools you make. Both the D-way beading tools and the PJL pens seem to last forever. My beading tools never touch the grinder. I only use a diamond card to refresh the burr so I'm pretty sure they'll outlive me. I have one 3/16" burning pen but don't use it very often. I had to buy a second 1/8" burning pen but only because I dropped my first one and broke the tip off of one side. So I guess what I'm trying to say is that these are one time purchases and might be worth the shipping cost if you can't find something (or make something) that works.

As for making something smaller, keep in mind that the smaller you get the more limited the area for the design. But on the other hand, I like doing lidded vessels because you don't have to do the inside. And I sell most of them pretty quickly whereas larger baskets are not big sellers for me.
 
Joined
Jan 10, 2024
Messages
256
Likes
139
Location
Bournemouth, UK
Thanks for the information Curt, very helpful. I have made some simple pyrography tips but I don’t think I’d be able to make anything like those basket tips. I’ll have to see what’s available this side of the pond when the time comes.
 
Joined
Jul 27, 2005
Messages
279
Likes
1,842
Location
North Ogden, Utah
I finished burning all the little lines on the inside of this today. So now onto the B side. Basically the same process. Make sure the pattern lines up with the inside. You'll usually find that coloring and burning the lines will be a bit easier. A convex curve almost always beads better. How you handle the foot is a matter of personal taste. I've done a few with no foot at all much like a round bottomed bowl. The pattern goes all the way to center. But it doesn't leave anywhere to sign it and will have a fairly rough surface that may scratch someone's fine furniture. This one has a smallish foot that will cut the pattern off in the center. I do it the same way, draw the pattern, burn the outline of the pattern, color it, and burn all the other little lines.

Here's the finished burning on the inside...
DSCN0079.JPG

More to come....
 
Last edited:
Joined
Nov 18, 2012
Messages
660
Likes
1,867
Location
Torrance, CA
Great follow along project Curt! Thanks for taking the time to share your techniques, very informative for sure!

It’s a great gift to us all to get years of knowledge passed on from our resident Maestros. Expertise is a tool that is best shared with all. This is what makes woodturners so special.

I love how your follow along is triggering ideas for other turners. I think that speaks volumes for what added benefits a follow along project does.

Nice job stepping up Curt……signed, a big fan!!
 
Back
Top