• Beware of Counterfeit Woodturning Tools (click here for details)
  • Johnathan Silwones is starting a new AAW chapter, Southern Alleghenies Woodturners, in Johnstown, PA. (click here for details)
  • Congratulations to Jim Hills for "Journey II" being selected as Turning of the Week for May 6th, 2024 (click here for details)
  • Welcome new registering member. Your username must be your real First and Last name (for example: John Doe). "Screen names" and "handles" are not allowed and your registration will be deleted if you don't use your real name. Also, do not use all caps nor all lower case.

Alisam indexing system

Joined
Oct 1, 2005
Messages
212
Likes
0
Website
www.mikecunninghamwoodturner.com
In a recent thread I asked about Ironfire indexing plates and mentioned my difficulty ordering one in M33 (They did email me later with ordering info for the M33 but I had already purchased the Alisam). One of the responses was from Rob Wallace (thanks Rob) who suggested I take a look at the Alisam indexing system http://alisam.com/page/14g9e/Woodworking_turning.html

On Saturday I ordered the system, it arrived today (Tues.- pretty quick) and I played around with it a bit.

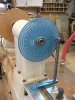
It's a very well made system with an accurate, nicely machined 10" aluminum indexing wheel, offering three separate rows of indexing holes at 2.5, 3 and 4 degrees. The wheel is attached to the lathe spindle via a nut supplied by the manufacturer.

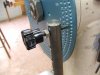
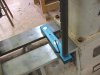
Included is a bracket with indexing pin. The bracket is very sturdy and held to the ways via two large rare earth magnets contained within it's base. This affords the ability to move the bracket to another lathe, etc. There are several holes on the bracket giving various positions to use the index pin.

The index pin is threaded through the bracket and is moved in and out of the index holes on the plate by turning a small wheel on the rear of the pin.

I turned a small 13" mahogany platter with a series of beads on the bottom. Then, using the index wheel was able to easily and accurately mark 120 crosshatching lines for later burning. I'll turn this around and do the same to the top.

In the past I would have marked these crosshatches using a homemade "target" which I drew up on a piece of lauan (idea from Al Stirt). I have several of these, each with a different number of segments. Worked pretty well but no where near the accuracy or ease as this indexing plate.

The only improvement IMHO, would be a spring loaded indexing pin. With the pin as it is, the user must turn the wheel CW and CCW moving the pin in and out of the plate holes. Spring loaded would speed the movement.

If you're looking for a well made, accurate indexing plate which also includes the pin assembly, I'd certainly recommend the Alisam. At least after very limited use on my part, though I can't imagine anything on this would wear out or fail.

I've attached a few photos. That's a small Allen wrench laying on the bracket base in photo 3, used for the screw holding the upright to the base.

Mike
 

Attachments

  • Index plate 001 (Small).jpg
    Index plate 001 (Small).jpg
    96.8 KB · Views: 189
  • Index plate 002 (Small).jpg
    Index plate 002 (Small).jpg
    65.7 KB · Views: 176
  • Index plate 003 (Small).jpg
    Index plate 003 (Small).jpg
    77.5 KB · Views: 162
  • Index plate 004 (Small).jpg
    Index plate 004 (Small).jpg
    79.1 KB · Views: 178
Last edited:
Joined
Jul 18, 2006
Messages
643
Likes
2
Location
Central Florida
Thanks for the review Mike. Too bad they don't use a spring loaded pin. Avoiding screwing and unscrewing the index pin on my lathe is what prompted me to get an index wheel in the first place.

A couple of questions...

1) Do you have to reposition the bracket to use the pin in the different rows of holes?

2) How sturdy is the bracket magnet attachement? If you accidentally bumped it with the banjo would the bracket move?

3) Do you have to be like Hercules to get the magnetic base off the lathe?

4) Looks like yours is mounted on the back of the headstock instead of a handwheel. I assume that it could be used behind a chuck on the front of the headstock without a locking nut. See any problem with that?

Thanks,

Ed
 
Joined
Jun 10, 2004
Messages
792
Likes
9
Location
Ames, Iowa (about 25 miles north of Des Moines)
Website
rwallace.public.iastate.edu
Wow! That arrived quickly! Congrats!

Mike:

Glad you like the Alisam index plate! (Thought you would!). I think I'll have to devise some spring-loaded modification of the indexing pin system - this is a good idea!

Ed: I normally use my indexing plate behind a chuck (Vicmarc VM100) that replaces the "nut on the spindle" arrangement. Works fine. I do take the time to mark the place on the chuck that intersects with a reference line I scribed on the plate surface at zero degrees - makes re-orienting the chuck and plate easy.

Cheers!

Rob Wallace
 
Joined
Oct 1, 2005
Messages
212
Likes
0
Website
www.mikecunninghamwoodturner.com
Ed,
I must admit when I used the plate today that I did not consider whether the pin bracket needs to be moved to use the other two rows of holes. I suspect that it does need to be repositioned however, I'm thinking if you do not changed the vertical positioning of the pin and do not move the index plate relative to it's position on the spindle then moving it will not negatively impact. I'll take a closer look when I go to the shop tomorrow a.m.

The rare earth magnets hold the bracket rather firmly but I would say if you bump it hard enough with the banjo or something else solid, it would move. The literature accompanying the product would lead one to believe that a great deal of strength is required to move it and that is not the case. However you can position it parallel or across the ways and probably in such a way as to avoid the banjo. To remove it, sliding rather than lifting seems to be the way to proceed. Lightly bumping or lightly pushing on it will not move it.

As Rob stated, the plate can be mounted on either side of the headstock. Mine is on the back because I had just finished turning the piece with the beads when the USPS arrived. I'll experiment with both sides.

Rob, I too am going to fool around with some sort of spring loaded device....well, I'm going to make a run at it anyway. Thanks again for leading me to it.

Mike
 
Last edited:

john lucas

AAW Forum Expert
Joined
Apr 26, 2004
Messages
8,353
Likes
3,607
Location
Cookeville, TN
Rob I also put my chuck directly on to hold the various index plates I have. I also got a 1 1/4"x 8 nut to hold the index plate on when I do fluted spindles. That way I can mount the spindle between centers.
I have though about drilling and tapping a hole in the back of my chuck that I could install a short set screw. The I could drill a matching hole in the index plate so the two would always align in the exact same place. When I don't use the index plate I would just screw the set screw in flush with the back.
I have used magnets to hold this style block. It works well as long as the block sits against the headstock. It will slide fairly easily if you bump it. It does hold very strong but by tilting the top it comes off quite easily.
 
Joined
Jun 10, 2004
Messages
792
Likes
9
Location
Ames, Iowa (about 25 miles north of Des Moines)
Website
rwallace.public.iastate.edu
Source for 1-1/4" x 8tpi nuts?

Rob I also put my chuck directly on to hold the various index plates I have. I also got a 1 1/4"x 8 nut to hold the index plate on when I do fluted spindles. That way I can mount the spindle between centers.

Hi John:

When I do spindles with the Alisam indexing plate, I use a threaded insert from a chuck (i.e. unscrewed from the chuck) and can get Morse taper accessories into the spindle without any problems. It does require removing the inserts from the chucks, which is somewhat of a pain.....but it works.

I was wondering if you have a good source for 1-1/4" x 8tpi nuts..... I'd like to get a few of these for use as you explain, as well as for some home-made faceplates. Can you suggest a supplier of these nuts?

BTW - Winter's still here in Iowa (11^F), but they're supposed to ship it east later today..... haven't gotten the tracking number yet!

Thanks,

Rob Wallace
 
Joined
Oct 1, 2005
Messages
212
Likes
0
Website
www.mikecunninghamwoodturner.com
McMaster-Carr

Rob,
I use McMaster-Carr for nuts as well as many other items. Decent pricing and very fast shipping.
http://www.mcmaster.com/#

Ed,
Unless I'm missing something you do need to move the bracket to position for other holes. Also, the bracket base can be semi-permanently mounted on the ways in a matter similar to the locking plate on a banjo. There's a centered hole in the base.

John is correct about an easy way to move the bracket, grab the vertical bar and tip it over, levers the magnets away from the bed. Thanks John.....

Mike
 
Joined
Oct 2, 2006
Messages
1,049
Likes
35
Location
Tallahassee FL
I suggest that anyone devising a spring-loaded pin would benefit by housing it in a block of metal or plastic alongside the column. The block could be clamped to the column by any means, and movable vertically to engage holes in the index plate, as the current design provides. Using one of the holes already there would require either using a weird diameter pin, or destroying the internal threads. Destroying the threads would be worst, because there's no "Undo" function. The lock nut of the present design seems to provide rigidity to the pin.

A possible improvement to the magnets could be (a) switchable magnet(s) like those used on dial indicator bases, such as Grizzly H3328.

I've been very satisfied with Fastenal for bulk and onesy-twosies fasteners, when time is critical. Our local Lowes and Home Depot refer customers to them when they're (L & HD) out of stock.

Joe
 
Joined
Jan 20, 2011
Messages
412
Likes
495
Location
Traverse City, MI
Wow, those get kinda pricey. Pretty slick looking, though.

I took the cheapo route and used a pair of 180 tooth gears for 360 accurate divisions for under $40.
 

john lucas

AAW Forum Expert
Joined
Apr 26, 2004
Messages
8,353
Likes
3,607
Location
Cookeville, TN
I'm going to look harder at making a spring loaded index pin. I was using it today to turn a clock that had a rebate for the chuck. When you back out the index pin if the clock had been a 1/4" larger it would have hit the clock and you couldn't back it out far enough. This is on my Powermatic with a Vicmarc 100 chuck. Platters are usually larger than my clocks so it could be a real problem.
The other problem is I did piece with 24 indexes the other day. man is that a pain screwing and unscrewing that index pin. I may have time later next week to see if I can build something to work better.
My only other complaint is the index bar kind of hides the markings so it's a challenge to count the number of holes if you to for the spacing you want. For example I had 10 holes between indexes the other day. The way I got around it was to set some straight pointed calipers so that one end fit in the hole you need and the other end fits in the next hole you need. Now you just unscrew the index pin. Place one leg of the calipers in that hole. The other leg will go in the next hole you need so you rotate the wheel until it aligns with the pin and lock it down. Reduces the number of mistakes dramatically.
 
Joined
Jan 11, 2014
Messages
58
Likes
32
Location
Indiana
phpubFHtGPM[1].jpgphp3HyzNLPM[1].jpgphp0a0tZvPM[1].jpgphpTpTYUmPM[1].jpg

I have the Alisam indexing setup also, and have been wanting to come up with a spring loaded pin to make it easier to use. Since this thread has been resurrected, it inspired me to do something about it.

The pin needs to be tapered, so that it will center in the holes without any play. I took a length of 1/4" dia music wire (spring steel, available at hobby stores) and chucked it in the lathe and used a file to point the end, then heated the rod about an inch back with a propane torch, and bent it at 90 deg in a bench vise. The rod was then cut to place the point at 10 1/4", the center height of my PM3520b.

The Alisam base is OK, but I wanted something that won't come loose if you bump it, so I took a 9" length of 1"x1" CRS (cold rolled steel), drilled a 1/4" hole, to mount the pin. I drilled a cross hole with a #7 bit, and tapped 1/4-20 for a set screw to secure the pin. I then milled a slot 1/2" x 2" to secure the bar to the lathe bed with a 1/2" bolt.

The 1" square bar may be a bit overkill, but I had some left over from another project.

I originally figured I would have to make some kind of a clamp to secure the dividing plate after locating it with the pin, but it holds it as solid as a clamp would. When you line up the pin with the disc, push the base about 1/8" further towards the headstock to apply pressure. When you want to change holes, pull the pin out of the hole, rotate to the next position, and the tension on the pin will hold it firmly against the disc. With the base firmly clamped down, there is no danger of it coming loose.

John, I like your idea of using the dividers to keep track of which hole is next.
 
Last edited:
Joined
Jan 11, 2014
Messages
58
Likes
32
Location
Indiana
I made a counting index based on the sector arms of a machinist's dividing head to avoid counting each time you move the wheel.

The ring that the arms rotate on was made of 1/2" BB plywood, 3" inside dia, 4" OD. the step is 3 1/2" by 1/4" deep.

The arms are made of 1/8" Masonite, 3 1/2" inside dia to fit in the step on the ring. OD is 5". One edge of the arm comes out radially from the center, the other edge can be straight or tapered, about 1/2" wide.

The ring was fastened to the indexing wheel with four 6-32 screws. A washer of thin plastic was used to provide some friction so the arms won't rotate unless you want them to.

A clamp was made of a scrap of brass and a 1/4-20 screw to hold the arms together once they are set.

To use, you set the index pin in the 0 hole, and bring the arm up to the pin. Adjust the other arm as many holes away as you need to obtain the division you need. Don't count the hole the pin is in. Once the second arm is set to where you want it, tighten the clamp to keep both arms locked together.

To set to the next position, retract the pin, and rotate the index wheel till the second arm comes in contact with the pin, and place the pin in that hole. Then rotate the arms so that the first arm is in contact with pin again.

Repeat the above as many times as necessary to do a full rotation of the indexing wheel.


phpkNNqriAM[1].jpgphpFcSv01AM[1].jpgphpyimm9bAM[1].jpgphpSJijinAM[1].jpg

The first 3 pics are in reverse order, resizing them scrambled them, and they all look the same in the thumbnails.
 
Last edited:
Back
Top