• November Turning Challenge: Puahala Calabash! (click here for details)
  • Congratulations to James Seyfried for "Cherry and Redheart Ornament" being selected as Turning of the Week for November 18, 2024 (click here for details)
  • Welcome new registering member. Your username must be your real First and Last name (for example: John Doe). "Screen names" and "handles" are not allowed and your registration will be deleted if you don't use your real name. Also, do not use all caps nor all lower case.

4 Prong Spur Drive

Joined
Jun 18, 2023
Messages
49
Likes
24
Location
Cincinnati, OH
While teaching a recent spindle turning class, the students were using a wooden mallet to "seat" their 4 prong spur drives into the end of 8" long 2x2 SPF (spruce-pine-fir) spindle blanks, soft wood. Of course they positioned their blanks on the worktable directly over a 4x4 leg resting on concrete. I first demonstrated, and no matter how hard I whacked the end of the 4 prong spur drive the spurs only entered the end of the blank about 1/32". Having encountered this repeatedly over the years I've looked at a number of spurs. The bevel angle, although not acessible for a measurement, always looks to be about 45 degrees or greater. Anyone else feel the bevel angle on four prong spur drives is too large?

Anyone try to grind a more acute angle on the spurs? If so, what was your experience please.
 
Joined
Feb 28, 2021
Messages
1,395
Likes
1,230
Location
Roulette, PA
Website
www.reallyruralwoodworks.com
IMHO, 1/32" should be plenty enough of grab - if you're experiencing stops/spin-outs on spindles on that then tools need sharpened or technique needs adjusted. Doing a spindle, should have no troubles even using a standard cup drive which has no prongs at all for someone who has mastered sharpness and technique (presentation of the tool to the wood, etc.) Only real reason to drive your spur center into the wood is to avoid stressing your bearings on the headstock, IMHO.
 
Joined
Oct 23, 2015
Messages
225
Likes
368
Location
Springdale, Arkansas
For spindle work, I normally use a cup drive center. Just tighten up the tail stock and start turning, no pounding necessary. If I were to use a prong drive it would be a two prong. Far better than 4 prong and again no pounding necessary. Just tighten the tailstock and turn. Normally have to re-tighten the tailstock after the first couple of passes but than I'm good.
 

hockenbery

Forum MVP
Beta Tester
TOTW Team
Joined
Apr 27, 2004
Messages
9,004
Likes
5,501
Location
Lakeland, Florida
Website
www.hockenberywoodturning.com
Ditto to @Larry Copas
Pieces remount perfectly, i can flip the piece en for end,
if I’m doing a layout with the index wheel I can loosen the tailstock an line the face I want up with zero.
Great for multi-center work.

I usually put a pencil mark for center and put the cup center pin on the mark.
If I want a precise center I mark it with an awl put the center pin in the awl hole.

Also if you get a brain cramp and slide the tool rest into the spinning work, the wood will stop, the cup drive will just spin, and damage to spindle will be minimal.

Teaching students to use a cup drive takes about 12 seconds.


If I’m doing spindles and have to use a spur I will cut a center cross 1/8” deep with a bandsaw on the end of the blank.

I use spurs almost all the time with bowl and hollowform blanks.
 
Joined
Feb 2, 2016
Messages
470
Likes
408
Location
Clinton, TN
I know people who make two bandsaw cuts on the drive end of the blank to grip the spur. (Oops, I just glanced up and saw where Forum MVP hockenbery just mentioned that.)

I've never modified a spur drive center.

Actually, I quit using the spur drive centers long ago. I use 1/2" or 1" Steb centers with spring-loaded points. I rough out blanks with a skew, I'll teach but almost never use a spindle roughing gouge in my own turnings. If someone is turning a spindle and needs a spur center to keep it spinning they might consider working towards trading force for finesse..
 
Joined
Jul 30, 2021
Messages
242
Likes
77
Location
Aurora, CO
I switched to steb centers as well. That spring-loaded point and the plethora of teeth are quite handy. I don't think I've pounded a spur drive into anything in a couple of years. I do use a roughing gouge, but like John said: finesse. My gouge is ultra sharp, and I don't try to do what many turners do...where they just shove it in and rip the blank down in seconds. I take a little more time than that, and it works out just fine.
 
Joined
Nov 24, 2010
Messages
451
Likes
350
Location
Lexington, KY
I use only cup (safety) and steb centers for both ends of a spindle. If there should be a catch or other problem, the spindle merely slips rather than doing something more dramatic. As noted above, if the spindle slips, you've done something wrong, and the slip protects you. The one minor exception is when I turn very long and thin (e.g. 1.5" diameter and 30" length), I mount one end in a chuck for a bit more stability.
 

Roger Wiegand

Beta Tester
Joined
Nov 27, 2018
Messages
839
Likes
997
Location
Wayland, MA
Website
www.carouselorgan.com
Sharpening the prongs will just make them better able to split the blank. I too went over to cup drives a number of years ago and have never looked back. With the big one that Robust sells I've turned 100 lb bowl blanks between centers without any problems. I no longer own a spur drive, and don't miss it.

I also tried Steb drives a while ago and found, perhaps counterintuitively, that their holding capacity was much lower than a continuous rim. In my hands they ended up acting like hole saws more often than not, especially in green wood.
 
Joined
Jun 18, 2023
Messages
49
Likes
24
Location
Cincinnati, OH
I can finesse truing rough spindle blanks, but often don't have time to do so and keep up with work needs. So roughing out often has to be without finesse so detail and final cuts can be finessed.

I'll order a 1 1/4" morse taper stebcenter to complement my two smaller onces, and I'll try reducing the bevel angle on a spur drive.
 
Joined
Feb 2, 2016
Messages
470
Likes
408
Location
Clinton, TN
I can finesse truing rough spindle blanks, but often don't have time to do so and keep up with work needs. So roughing out often has to be without finesse so detail and final cuts can be finessed.

I discovered I could rough turn spindle blanks a faster with a skew than a spindle roughing gouge. I prefer to use a 1" or 1.25" skew. The "trick" was starting a little bit from one end (for example the right end) and make what might be considered a shallow cove or taper into the corners then follow through down the grain to the right end. Move over a bit to the left and make similar cove-like cut then repeat. Before running too far to the left end, turn the skew around and repeat the process headed towards the end this time. Repeat, then cut off the hump in the middle. By then the blank is completely round or nearly round and needs only a bit of touch up.

As long as there is no catch, with a sharp skew there is very little force on the blank.

Something like this is far easier to show than describe but I don't even have a video. I did see a video here recently of a gentleman using a very similar method with the skew.
Oh, I remember, it was John Kananis in this thread, watch how fast he roughs square blank with a rounded skew:

The thread:

Or on YouTube:
View: https://www.youtube.com/watch?v=EQJPCjQDwy0


Since I started roughing like this I rarely use the spindle roughing gouge for roughing except to demonstrate to students who may still need a bit of skew practice to be comfortable. I have a couple of Thompson spindle roughing gouges, a 5/8 and a larger one (1"?), but use them less for roughing and more to shape curves on spindles. These are "U" shaped with the sides straight and parallel for a bit. This lets me start a cut with the rounded part to shape a curve then twist over to the flat for a smooth cut where I want a taper or cylinder. I use the 5/8" Thompson without a handle since the shaft is 5/8" and makes a comfortable short handle.

JKJ
 
Joined
Dec 5, 2015
Messages
884
Likes
429
Location
Seattle, WA
Steb center? Hadn't heard of it until now.

Never had problems with spur centers. For offset center turning wouldn't the spur be needed? Mark one spur on the center as an index point and also mark that spur's location on the wood so if re-chucking was needed the wood could be put back in and indexed correctly.
 
Joined
Feb 2, 2016
Messages
470
Likes
408
Location
Clinton, TN
Steb center? Hadn't heard of it until now.

Never had problems with spur centers. For offset center turning wouldn't the spur be needed? Mark one spur on the center as an index point and also mark that spur's location on the wood so if re-chucking was needed the wood could be put back in and indexed correctly.

I use Steb centers on nearly all spindles and often for tailstock support on other things.
One thing I really like about them is the spring-loaded points. I turn a lot of thin spindles and would hate to work without the 1/2" centers.

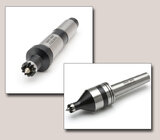
These are 1/2" Steb centers, drive and live. I also have the 1", would like to get the bigger versions some day.

Steb_Sorby.jpg

These are my 1" and 1/2" drive centers.

drivecenters.jpg

JKJ
 

hockenbery

Forum MVP
Beta Tester
TOTW Team
Joined
Apr 27, 2004
Messages
9,004
Likes
5,501
Location
Lakeland, Florida
Website
www.hockenberywoodturning.com
Steb center? Hadn't heard of it until now.

Never had problems with spur centers. For offset center turning wouldn't the spur be needed? Mark one spur on the center as an index point and also mark that spur's location on the wood so if re-chucking was needed the wood could be put back in and indexed correctly.
I prefer cup centers. On napkin rings i can easily use the cups to put a particular grain pattern on a face of a multi center turnin.
Spur drives don’t recenter well even if you match the spur locations
They aren’t well suited to placing centers near the edge of the work

Turning 3 faces is common multi-center turning. I mark the three centers on each end at the same time.

I do 3 sided napkin rings in a demo
Mark centers, Mount spindle, turn the faces with each of the 3 center pairs,

IMG_2410.jpegIMG_2407.jpegIMG_2409.jpegIMG_2411.jpeg
 
Joined
Dec 5, 2015
Messages
884
Likes
429
Location
Seattle, WA
This is a little different type drive center.

The large piece to the left is to put a 90 degree point on your workpiece. Then with a little practice you get so you push the pointed piece into the spinning chuck at the right. The chuck has sharp 90 degree tapered threads which the work screws into. It screws in surprisingly tight, enough that you can turn shorter work with no tailstock support.

When the turning is done give it a whack with a soft mallet to dislodge it. This can all happen without turning off the spindle. Sometimes you see production turners in the 3rd world who don't turn their lathes off.

Both these pieces mount to a 1-8 threaded spindle, the chuck is a little over 2" diameter. Of course, this setup can work with a tailstock for long spindles.

lathe drive centere.JPG
 
Joined
Jun 18, 2023
Messages
49
Likes
24
Location
Cincinnati, OH
For thin spindles (think magic wands) John Jordan kindly shared in a post making a #2 Morse taper on one end, and use the headstock spindle to turn the spindle blank. Minimal contact by the tailstock center pin is all that's needed to keep that end from wobbling.
Same friction drive concept, without the two pieces of hardware. But thanks for sharing.
 
Joined
May 28, 2015
Messages
1,572
Likes
189
Location
Bainbridge Island, WA
Spur drives can get beat up with groups of students, variable skill levels, using them. At our last club meeting, I became very interested in the Axminster Friction Drive set The Program Director was doing multi-axis demo, large maple stock (~4" x 22" or so) using a French bedan. Whether he was aggrasively taking down stock or doing very fine shaping cuts, those little friction drives+center did great, even with the wonkiness of the multi-axis situation. He's been using them for years, apparently.
 

hockenbery

Forum MVP
Beta Tester
TOTW Team
Joined
Apr 27, 2004
Messages
9,004
Likes
5,501
Location
Lakeland, Florida
Website
www.hockenberywoodturning.com
Spur drives can get beat up with groups of students, variable skill levels, using them. At our last club meeting, I became very interested in the Axminster Friction Drive set The Program Director was doing multi-axis demo, large maple stock (~4" x 22" or so) using a French bedan. Whether he was aggrasively taking down stock or doing very fine shaping cuts, those little friction drives+center did great, even with the wonkiness of the multi-axis situation. He's been using them for years, apparently.
Those are a very nice pair of cup centers. :-( They are out of stock

They don’t seem to have a #3 taper on the live center as an option.
Be great on the midi lathe.
 
Joined
Feb 2, 2016
Messages
470
Likes
408
Location
Clinton, TN
They don’t seem to have a #3 taper on the live center as an option.
Be great on the midi lathe.

Am I missing something? Thinking the Powermatic 20" Lathes, large Jets are MT2.

The only 3MT in my shop is on my metal-cutting lathe. All my woodturning lathes, large and small, have 2MT on both headstock and tailstock.

JKJ
 
Joined
Dec 5, 2015
Messages
884
Likes
429
Location
Seattle, WA
My ONEWAY lathe has a #3 taper on the tailstock
Great for using larger drill bits.
Reading a description of one of the high end lathes there's a warning not to use large bits because of the chance of damaging the anti-rotation slot in the tailstock quill. Based on the price of those lathes that seemed odd to me.

There is a way to prevent the damage, use the same method used in better metal lathes. But that method requires a more complicated setup in machining the tailstock.

I recall several posts about the damaged slot needing filing to allow the tailstock quill to crank in and out easily.
 
Last edited:
Joined
Feb 2, 2016
Messages
470
Likes
408
Location
Clinton, TN
Reading a description of one of the high lathes there's a warning not to use large bits because of the chance of damaging the anti-rotation slot in the tailstock quill. Based on the price of those lathes that seemed odd to me.

ABOUT DRILLING, my experience

The way I drill larger diameter holes in almost anything, wood, steel, cast iron, bronze, plastics (except when using Forstner bits or a hole saw in wood) is to
1) Start almost every hole hole with a center bit or spotting bit (ESPECIALLY in end grain on the lathe where a deep hole or precision is desired.)​
2) Drill a relatively small hole​
3) Drill successively larger diameter holes​
4) Depending on the situation, I may drill the depth in steps as well. This makes drilling some deep, large diameter holes easier.​
The drill diameter step-up sizes I use were acquired with experience. When in doubt, remove less at a time.

This is in addition to what should be obvious: using an appropriate tool, rotational speed, bit advancing speed and pressure, lubricant.
In any material, clear chips often. There are charts for recommended rotational speeds for various materials.

If drilling deep holes with Forstner bits, a "trick" I use is to direct a constant stream of compressed air behind the bit - this not only clears chips but helps keep the bit cool..

Provide whatever support is needed to align the drill bit and keep it straight. Sometimes this takes a trick or two and some creativity, especially with small diameter bits in metals. (I recently needed to drill a number of 2.5 mm diameter holes in cast iron in nearly unassailable locations, one into a sloped surface.This provided hours of entertainment.).

Center and spsotting bits are very inexpensive.
If possible, I always use taper shank bits on the lathes.
I don't much enjoy drilling holes of any diameter in glass and ceramics.
I've drilled a lot of concrete with SDS hammer drills with carbide tips. Nothing to do with turning, of course, at least not my kind of turning.
Putting holes in thick steels (especially stainless) can be easier with a plasma torch and a die grinder.
With some materials, lung protection is advised. For all drilling, eye protection is advised.

ABOUT TAPPING, a possibly related topic.

And a similar list when tapping materials, with one of the most important things being keeping the tap straight along with keeping it perfectly straignt. For this, where appropriate, I use a manual tapping tool which aligns the tap which is turned by hand.. Where not possible, I tap freehand, carefully. When on the lathe, I tap by hand using a spring-loaded tapping guide - an amazing and inexpensive aid. Taps have either a concentric dimple or a cone on the back end and the guide has a reversible pin that keeps the tap aligned. And still turn by hand. These things are so indispensable in some situations I bought several just in case.

I usually buy from Little Machine Shop but this tapping guide looks similar

The manual tapping tool I use is similar to this, but I didn't buy mine from Amazon:

I know there are taps made for machine tapping but just break off one in the hole and your day may be ruined.

For anyone inexperienced with drilling and tapping various materials, find some friendly person who is. Like my piano teacher always said, everything's easy once you know how.

But I HAVE, on a couple of occasions, repaired a damaged tailstock quill for others. Besides using appropriate force, don't forget to lubricate appropriately.

JKJ
 
Joined
Feb 26, 2019
Messages
1,909
Likes
1,500
Location
Lebanon, Missouri
While teaching a recent spindle turning class, the students were using a wooden mallet to "seat" their 4 prong spur drives into the end of 8" long 2x2 SPF (spruce-pine-fir) spindle blanks, soft wood. Of course they positioned their blanks on the worktable directly over a 4x4 leg resting on concrete. I first demonstrated, and no matter how hard I whacked the end of the 4 prong spur drive the spurs only entered the end of the blank about 1/32". Having encountered this repeatedly over the years I've looked at a number of spurs. The bevel angle, although not acessible for a measurement, always looks to be about 45 degrees or greater. Anyone else feel the bevel angle on four prong spur drives is too large?

Anyone try to grind a more acute angle on the spurs? If so, what was your experience please.
As others have said, the steb drive centers are better for smaller spindle blanks, particularly softer woods. 4 prong spurs like to split smaller spindle blanks.

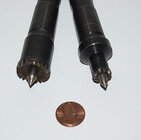
I do use 4 prong centers for larger dia blanks (spindle or bowl) say 4-5” and up. The pice shows 3 - the one that came with my nova lathe with a fixed center, one with a spring loaded center, and a large nova jumbo drive. I tried the nova center a few times, and consider it pretty worthless vs the spring loaded one - it doesnt wallow out the center hole, and the prongs are longer, they go deeper into the wood and are easier to sharpen. The jumbo spurs are removable for sharpening. Yes, the spur drives similar to the nova are too blunt IMO. Sharpen them to a bit of an edge will help. For students, the full circle safe drives are probably the best choice, as they are probably more durable in terms of surviving the drops and banging from students, and will simply spin with a catch or overly aggressive cuts. I dont use them because the steb centers give more drive torque with less friction force. Thin spindles start to buckle due to the pressure.

I never hammer any of these into a blank. A tip from Lyle Jamieson years ago - mount the blank between centers with TS pressure, lock the spindle, rock the blank forward a few times, keep adding TS pressure as the prongs work into the wood. I do the same with steb centers.


1732225063990.jpeg
 
Joined
Dec 5, 2015
Messages
884
Likes
429
Location
Seattle, WA
Regarding drilling out waste in a largish bowl..... Most turners seem to use a hollowing tool rather than a large multi-spur bit, like a 3" diameter.. Never understood that. Any lathe with at least 2 hp motor shouldn't have any problem.

Likewise you should be able to drill at least a 1" diameter hole in mild steel in a wood lathe if your wood working chuck can hold the material. A rule of thumb for metal drilling is 1,000 rpm for 3/8" diameter. Maybe drop it down to 800 rpm to be on the safe side. That would be 400 rpm for 3/4" drill.

What I mentioned earlier is the problem with the anti-rotation method on the tailstock quills. If the they cheap out and used a small diameter rod flatted both sides to fit the quill's slot you have to be careful. Quills are usually soft and their slots are easily deformed.

A neat trick if you have to drill holes in a piece that's too large to spin in your lathe put the drill in the headstock. Hold the piece against the end of the lathe's quill and feed the work onto the drill.
 

hockenbery

Forum MVP
Beta Tester
TOTW Team
Joined
Apr 27, 2004
Messages
9,004
Likes
5,501
Location
Lakeland, Florida
Website
www.hockenberywoodturning.com
Regarding drilling out waste in a largish bowl..... Most turners seem to use a hollowing tool rather than a large multi-spur bit, like a 3" diameter.. Never understood that.
I start almost every hollow form drilling a center hole to depth. This doesn’t remove much wood. It does make it easier to use the hollowing tools and makes it harder to hollow deeper than planned.

I drilled depth holes in a few bowls a long time ago. It provided a good stopping point for depth hollowing. But I soon transitioned to using calipers which provide a great measure of bottom thickness.

Most bowl turners are coring today. Much better than hollowing out a pile of shavings.

Drilling out waste would work but a good turner can hollow open bowls much faster than they can set up the drill, measure depth, and drill.
 
Joined
Jan 11, 2022
Messages
142
Likes
141
Location
Roanoke, VA
Got this tip from a Oneway newsletter nearly 20 years ago. I still use it when needed. Lay the center on a piece of wood, tack the side pieces in place against the taper and go.

sharp - 1.jpg
 

Roger Wiegand

Beta Tester
Joined
Nov 27, 2018
Messages
839
Likes
997
Location
Wayland, MA
Website
www.carouselorgan.com
I probably should drill a depth hole more often than I do ;-). I have a long 3/8" drill bit mounted in a handle so that I can drill such holes without having to set up a chuck inthe tailstock. I'm also acquiring a set of #2 MT drill bits as I find them at the used tool store, much nicer to use in the lathe than a Jacobs chuck.

Agree with Hockenbery that roughing out a bowl with a gouge is far faster than drilling it with a Forstner.
 
Joined
Feb 2, 2016
Messages
470
Likes
408
Location
Clinton, TN
I probably should drill a depth hole more often than I do ;-). I have a long 3/8" drill bit mounted in a handle so that I can drill such holes without having to set up a chuck inthe tailstock. I'm also acquiring a set of #2 MT drill bits as I find them at the used tool store, much nicer to use in the lathe than a Jacobs chuck.

I do the same - I have several drill bits in short handles and just hold them against the spinning wood. I bought a set of depth collars that fasten to the bit with a set screw so I can simply drill to the stop if I'm too lazy to drill to a mark or piece of tape on the bit.

I learned about taper shank bits back long time ago from Rudy Lopez at a demo. He had cut a long 1" dia bit short and sharpened it, used it to remove much of the insides of goblets quickly.

For anyone not familiar with taper shank drill bits, they are the way to go! The smaller bits use a #1MT but #1 to #2 adapters are cheap. I wonce I found some company unloading new bits at $1 each and bought all they had.

Here are a few with an adapter. I keep the most often used small bits in their own adapters.

taper_1_IMG_20160919_094408.jpg

I recently broke down and bought a new set in 1/32" increments from small to over 3/8", some in 64th" sizes for when I want a hole "just a bit" oversize. They were not real cheap as drill bits go (about $7 to $12 each), but I think worth it.

One reason I like the taper shank bits is the shorter space required.
Another is eliminating the chuck, minimizing potential vibration/flexing and perhaps some reducing tiny tolerance errors.
This compares two bits of the same diameter (1/8" I think), one in a Jacob's chuck and the other a taper shank in a 2MT adapter.
A real help for shorter lathes, too!

taper_2_IMG_20160919_094945.jpg

And on the subject of "taper shank bits", I found a 3/8" #2MT end mill holder is perfect for even large Forstner bits (those with 3/8" shafts, of course!)
Set screws hold the bit securely. The size Forstner is good for quickly drilling a recess for 50mm chuck jaws.

end_mill_holder.jpg

To keep MTs from spinning in the tailstock for any larger bits, I steady with medium or small channel locks.
Doesn't take much unless you've hired a gorilla to crank on the tailstock.😄

Hey, I wish I knew of a used tool store - never saw one!

JKJ
 
Joined
Dec 5, 2015
Messages
884
Likes
429
Location
Seattle, WA
I have a long 3/8" drill bit mounted in a handle so that I can drill such holes without having to set up a chuck inthe tailstock. I'm also acquiring a set of #2 MT drill bits as I find them at the used tool store, much nicer to use in the lathe than a Jacobs chuck.

Agree with Hockenbery that roughing out a bowl with a gouge is far faster than drilling it with a Forstner.

Hmmmm acquiring #2 MT bits? Are the bits for drilling metal? I don't recall ever seeing any MT shank bits for wood drilling. Metal drilling bits don't make a clean entry into wood and the drill's web is much thicker than a wood drilling bit so they aren't a particularly good choice for evacuating chips in deep wood drilling.. It is possible to grind a wood type point on a metal drilling bit.

When possible I drill bowl blanks out with the largest possible bit on the drill press. Which is probably faster than anyone can rough material out wiht a gouge on the lathe.
 
Joined
Dec 5, 2015
Messages
884
Likes
429
Location
Seattle, WA
To keep MTs from spinning in the tailstock for any larger bits, I steady with medium or small channel locks.
Doesn't take much unless you've hired a gorilla to crank on the tailstock.😄

This is what you use to prevent a taper spinning in the tailstock. Stick a piece of wood across the lathe bed to support the extension. This one was made in Poland and stamped HT, No.2-2S.

Morse taper.JPG

BTW John, the bit in the end mill holder is not a Forstner. A Forstner has a raised ring around the perimeter allowing it to drill half holes on the edge of a piece of wood.

For anyone not familiar with taper shank drill bits, they are the way to go!

You might find a lot of disagreement on that.
 
Back
Top