• Beware of Counterfeit Woodturning Tools (click here for details)
  • Johnathan Silwones is starting a new AAW chapter, Southern Alleghenies Woodturners, in Johnstown, PA. (click here for details)
  • Congratulations to Jim Hills for "Journey II" being selected as Turning of the Week for May 6th, 2024 (click here for details)
  • Welcome new registering member. Your username must be your real First and Last name (for example: John Doe). "Screen names" and "handles" are not allowed and your registration will be deleted if you don't use your real name. Also, do not use all caps nor all lower case.

What does epoxy pour depth mean for turning?

Joined
Apr 1, 2020
Messages
41
Likes
24
Location
Hudson, NH
I’ve been reading a lot about the use of epoxy for turning and one question (of many) that I have is how does pour depth apply to a turning blank placed in a container. I hope this question makes sense. Say you have placed a number of scraps in an 8” tall container (hopefully more illustrative than just saying “an odd shaped piece”), and you are using an epoxy that has a 2” pour depth spec.
Even though the container is 8” deep, the actual thickness of the epoxy at any one point would most likely be less than 2” because the wood is taking up most of the space.
Imagine pouring epoxy into an 8” x 8” x 1-1/2” mold. If the mold is sitting flat the the epoxy depth is 1-1/2”. If the mold is on its side then the epoxy depth is 8” but it’s still going to cure…..isn’t it? I’m thinking of the epoxy pour into the 8” container filled with blanks to be the same as turning the flat mold on its side, so you haven’t gone beyond the 2” pour limit. Does that make sense? How does “pour depth” apply to turning blanks?

I should mention that I tend to over think things.
 
Joined
Jun 13, 2020
Messages
233
Likes
312
Location
Jackson, NJ
Website
www.blacklabelwoodworks.com
To me its more of a volume thing there concerned with then the depth. Most of the people that use epoxy or resin are not using it to fill voids in wood they are pouring molds. The greater the volume the more heat it generates. If to much heat builds up while it cures you will get a casting that will either not cure correctly or will crack from the heat. If the wood takes up most of the space in the container you should be fine.
 
Joined
Dec 28, 2019
Messages
460
Likes
492
Location
Tallahassee, FL
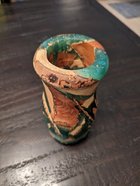
As Chris said I think you'll be fine if your mold is mostly full of wood. . My son turned this vase from my cast-off pieces using Alumilite resin and we didn't have a problem with it. Looking at it tonight it's pretty void and bubble free, which surprises me, he turned it a few years ago so I don't quite remember how we prepped it. :)

PXL_20231109_002140244.jpg
 
Joined
Dec 28, 2019
Messages
460
Likes
492
Location
Tallahassee, FL
If you have a piece of scrap wood close to the size of your mold round it and put it in the middle of your mold. I've seen turners do this as a way to cut down on the amount of resin needed and save some money since that wood gets turned away in creating the vessel. That should also help with your depth issue.
 
Joined
Jun 2, 2021
Messages
180
Likes
308
Location
Kingsville, ON
Great point Charles, Haven't used any epoxy due to costs, but I have been following Jim Sprague on YouTube. Has a ton of experience with epoxy turnings and I watch his videos he puts out every Friday. Great guy and always willing to answer any questions you may have. Give him a try, great contact.
 
Joined
Aug 1, 2015
Messages
144
Likes
580
Location
Iota, LA
The pour dept on epoxy refers to pouring table tops, and that product ability to release the air bubbles before the epoxy sets up. When pouring a bowl or vase you would place in a pressure pot to force the epoxy into the voids and push the air bubbles out.
 
Joined
Jul 19, 2017
Messages
432
Likes
345
Location
Roscoe, Illinois
I'm not an expert on epoxy but I picked up a couple of pieces of information recently when using epoxy on a couple of natural edge end tables. More bubbles will form on deep pours with the standard general purpose epoxy. However, I believe it's possible that deeper pours may generate quite a bit more heat when curing. I used System Three epoxy and System Three has several different epoxies intended for different purposes. At least one of their products is made for deeper pours. However, following their directions with their general purpose version you could just do a couple of pours creating layers. Also, System Three was very responsive to my questions when I did the tables. So, I used their responses to determine which type of epoxy to use and how to do the work.
 
Joined
Sep 19, 2023
Messages
432
Likes
701
Location
Columbia, TN
I have a burl with lots of voids that I'm planning on filling with epoxy. I haven't done any big pours before and I don't have a pressure pot. I'm not concerned about ruining the piece as it's sort of iffy. I expect I'll get bubbles but I'll go ahead with it anyway. If the pour depth is greater than 2", should I do multiple pours? Does one layer bond to the next without any prep?
 
Joined
Jul 19, 2017
Messages
432
Likes
345
Location
Roscoe, Illinois
Epoxies I have used have detailed instructions somewhere; either with the product or online. The last epoxy I used indicated layers should be poured with a specific timeframe; like within 72 hours. I assume that this has something to do with boding. I don’t use epoxy much but have had no problems with bonding. Many bubbles can be removed with a heat gun. Multiple pours will keep bubbles to a lower amount.
 
Joined
Apr 17, 2022
Messages
71
Likes
59
Location
Bristow, IN
With your burl I would recommend a deep pour epoxy with a long demold time, even though a mold is not a big concern. A deep pour epoxy tends to much thinner, with a mixed viscosity closer to the same as water. While you may not use a mold per-se, you will want to consider wrapping your best side somehow as you may have leaks. Aluminum foil, tape or a combination will work.

You will end up doing more than one pour. Pouring the epoxy into the most porous side, go a head and fill all voids as much as they will hold with a bit of puddling on top if possible. By filling, you give more of the air a path out through the resin. As the voids open up, keep adding epoxy. Once the bubbles coming out slow way down, use a hair dryer or hot air gun to gently heat the resin. More air will come out. Add more epoxy and repeat until you get no more air or get tired of messing with it. (This could be a long process depending on the size of your burl). Let it set for a while, hour or two, checking in on it periodically. You find dimples forming in some voids as more air escapes, the resin soaks in and eventually shrinks a little. Feel free to add more resin to the dimples if you want. Again, repeat the process until bedtime. The next morning, you will have more dimples and possibly holes. Add resin as you see fit.

once you begin turning, you will find where bubbles got trapped and voids where resin did not make it. Here you will need to decide how to proceed. They may turn out, you may be able to touch up small areas with superglue or you may want to stop, build a little dam around the void with tape, putty or clay, and add more epoxy.

It can be done without pressure or vacuum but is much more tedious. Deep pour helps by being thinner for longer helping let more bubble out. Some have demold times of 72 hours or more. The initial fill may take up to a couple of hours and you will tinker with it for a day. Be patient and have fun.
 
Joined
Oct 14, 2019
Messages
160
Likes
147
Location
Savannah, Georgia
The rated "depth" of pour is also related to heat. The thicker the epoxy layer the more heat. Deep pour epoxy is formulated to cure slower so there isn't as much heat allowing a greater pour depth.
 
Joined
Sep 19, 2023
Messages
432
Likes
701
Location
Columbia, TN
With your burl I would recommend a deep pour epoxy with a long demold time, even though a mold is not a big concern. A deep pour epoxy tends to much thinner, with a mixed viscosity closer to the same as water. While you may not use a mold per-se, you will want to consider wrapping your best side somehow as you may have leaks. Aluminum foil, tape or a combination will work.

You will end up doing more than one pour. Pouring the epoxy into the most porous side, go a head and fill all voids as much as they will hold with a bit of puddling on top if possible. By filling, you give more of the air a path out through the resin. As the voids open up, keep adding epoxy. Once the bubbles coming out slow way down, use a hair dryer or hot air gun to gently heat the resin. More air will come out. Add more epoxy and repeat until you get no more air or get tired of messing with it. (This could be a long process depending on the size of your burl). Let it set for a while, hour or two, checking in on it periodically. You find dimples forming in some voids as more air escapes, the resin soaks in and eventually shrinks a little. Feel free to add more resin to the dimples if you want. Again, repeat the process until bedtime. The next morning, you will have more dimples and possibly holes. Add resin as you see fit.

once you begin turning, you will find where bubbles got trapped and voids where resin did not make it. Here you will need to decide how to proceed. They may turn out, you may be able to touch up small areas with superglue or you may want to stop, build a little dam around the void with tape, putty or clay, and add more epoxy.

It can be done without pressure or vacuum but is much more tedious. Deep pour helps by being thinner for longer helping let more bubble out. Some have demold times of 72 hours or more. The initial fill may take up to a couple of hours and you will tinker with it for a day. Be patient and have fun.

Mike, that is great advice and exactly what I needed. Thanks a bunch.
 
Back
Top