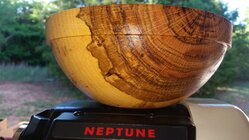
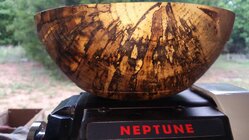
I vote keep it. Gives it some visual attributes. Maybe just fill the big one.Walnut burl.....
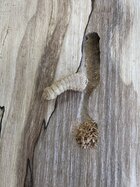
Question for the day: Is it worms.....or is it ants that caused this?????
I'm not sure what to do with it, but open to suggestions.
I can try to fill it with epoxy.
I can turn it away, but that might mean a lot of material removed.
.....or, I can finish the bowl as is, but the activity is pretty intense.....might not be very stable.
What would you do?
-o-
View attachment 63040

-
Beware of Counterfeit Woodturning Tools (click here for details) -
Johnathan Silwones is starting a new AAW chapter, Southern Alleghenies Woodturners, in Johnstown, PA. (click here for details) -
Congratulations to Jim Hills for "Journey II" being selected as Turning of the Week for May 6th, 2024 (click here for details) -
Welcome new registering member. Your username must be your real First and Last name (for example: John Doe). "Screen names" and "handles" are not allowed and your registration will be deleted if you don't use your real name. Also, do not use all caps nor all lower case.
You are using an out of date browser. It may not display this or other websites correctly.
You should upgrade or use an alternative browser.
You should upgrade or use an alternative browser.
What’s on your lathe?
- Thread starter Rusty Nesmith
- Start date
Started another flamed box elder hollow form. The end at the tail stock will be tenoned for a chuck. Not sure if the opening will be 2 inches or a larger 4 inches. Will sleep on it and decide tomorrow. I cut this blank last summer, coated the end grain with glue and stored it in the garage. Even when I drilled out it out before hollowing, it seemed rather dry. Will let it sit for a month after hollowing and then a month in my small kiln.
Worked on a new glue up yesterday

Walnut urn. This will have threaded brass inserts for the lid. About 9 inches high, 5.5 inches diameter. I made an error when I switched to a larger size sawtooth bit when drilling it out. The larger drill did not seat all the way in the extension and as a result, I drilled through the bottom. Had to make a walnut plug to fix it. Will post final pics in the gallery when finished. 
More oak. 8.5x3.5. Wet with DO.
As I hollow the inside it has me thinking about getting a coring system. I have a few more pieces of this wood and it's a shame to see all of that great grain turned into shavings. I might be able to get a 5 or 6 inch blank from the middle of a 9 inch blank? Having never done it I have no idea if it would be worth it.
As I hollow the inside it has me thinking about getting a coring system. I have a few more pieces of this wood and it's a shame to see all of that great grain turned into shavings. I might be able to get a 5 or 6 inch blank from the middle of a 9 inch blank? Having never done it I have no idea if it would be worth it.
Attachments
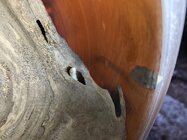
Looks like powder post beetles to me. In my shop that would go to the fire, no matter how nice the wood is. You could try putting it in a kiln though.Walnut burl.....
Question for the day: Is it worms.....or is it ants that caused this?????
I'm not sure what to do with it, but open to suggestions.
I can try to fill it with epoxy.
I can turn it away, but that might mean a lot of material removed.
.....or, I can finish the bowl as is, but the activity is pretty intense.....might not be very stable.
What would you do?
-o-
View attachment 63040

Harvey Fein’s FIS (Fein Incising System).Interesting jig. Your design?
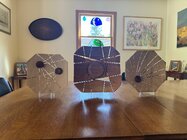
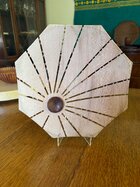
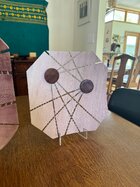
Back from a trip to Rhode Island to officiate a wedding. Now to get back to finishing the three pieces in this series I am calling “Discordant Horizons”.
It’s time for sanding and finishing the second and third pieces.
It’s time for sanding and finishing the second and third pieces.
Attachments
odie
TOTW Team
- Joined
- Dec 22, 2006
- Messages
- 7,140
- Likes
- 9,994
Looks like powder post beetles to me. In my shop that would go to the fire, no matter how nice the wood is. You could try putting it in a kiln though.
Thanks for your post, Isaac. From the research I've been doing this morning, it looks like Powder Post Beetles is a strong possibility. The range of this beetle includes Oregon, which is where this walnut came from. This is a very hazardous beetle to introduce to a home with wooden furniture.
From what I'm observing, it appears that if these holes were created by PP beetles, it likely isn't an active infestation. If these beetles are present, how could that be determined?
From what I'm observing, it appears that if these holes were created by PP beetles, it likely isn't an active infestation. If these beetles are present, how could that be determined?
I don’t know of any good home tests for live beetles other than long term observation. Powder post beetles can be dormant for years, and can continue to re-infest by laying eggs even in fully dried wood. You’ll know they’re still active when they start exiting the wood, leaving a clean exit hole with a small pile of dust below. If you’re willing to chance it, clean the blank really well, put the it in a plastic ziploc bag and leave it for at least a few months. If you come back and find dust in the bag, then there are still active beetles. If there’s no dust, then it may or may not be clean. The longer you let it sit without observing any new exit holes, the more confident you can be.
You can try to cut them out by first locating all the visible holes and then cutting back until they’re completely gone, and then a bit more for good measure. All sapwood anywhere on the piece should also be removed. This sometimes works for lumber, but isn’t really a practical option for a bowl blank.
To be safer, you can kill them by fumigating with chemicals, which is a nasty process, or by kiln drying. Fumigation is the preferred method for dealing with an infestation in finished work like antique furniture. It will sometimes change the color of the wood but not in most cases wil not otherwise damage the piece. Kiln drying will kill all beetles and larva provided that you get the core temperature of the wood to 140 degrees and hold for an hour.
- Joined
- Mar 1, 2006
- Messages
- 137
- Likes
- 74
Guess you got more with your purchase than I didHarvey Fein’s FIS (Fein Incising System).
- Joined
- Feb 28, 2021
- Messages
- 1,242
- Likes
- 1,099
- Location
- Roulette, PA
- Website
- www.reallyruralwoodworks.com
Oven at 130 degrees for an hour, or deep freeze at 10 degrees or less (A home freezer won't do it I don't think) for 4 days followed by warming it back up for 48 hours then re-freeze another few days could take care of powder post larva or eggs, (and oven heating would likely also pretty much guarantee a dry bowl, of course it likely would have to then re-acclimate before finish turning?) Being in Oregon, I'd think likely if you take advantage of winter (Do you get sub-zero temperatures for several days out of a week?) you could box em and park em outdoors for a good freeze, perhaps...Thanks for your post, Isaac. From the research I've been doing this morning, it looks like Powder Post Beetles is a strong possibility. The range of this beetle includes Oregon, which is where this walnut came from. This is a very hazardous beetle to introduce to a home with wooden furniture.
From what I'm observing, it appears that if these holes were created by PP beetles, it likely isn't an active infestation. If these beetles are present, how could that be determined?
Tried to turn a project with a chunk of ash. It ended up with to many cracks for what I wanted to do. Made a witch's cauldron out of it. Still needs finish after everything dries.


Going to try turning a piece of elm ( I think) for my idea.

Going to try turning a piece of elm ( I think) for my idea.

A bunch of very small bowls for a group show opening this weekend. Outsides finished, hollowing and finishing the insides tomorrow. Various wood scraps ranging from 1-1/2” to 4-1/4” diameters.
Also working on a grouping of suction-fit boxes in tan oak. The plan is to make them all with details similar to the one on the right, with varying proportions. The inserts are claro walnut and some mystery spalted wood (best guess wax-leaf myrtle). These will most likely be saved for a two-person show in October.

Finishing a 12-1/2”x 4-1/2” cherry bowl. I decided to pyro the rim since I have 14 about the same size to do the second turning on. Will probably pyro 3 more with different designs.


Small sanding scratches are tough on walnut and cherry. I found that if I still have fine scratches after power sanding I use a soft pad on my random orbital and back up a few grits, 220, 320, and sometimes 400. The soft pad, 3/4-1” thick molds to the shape and take all fine scratches out.Working on getting some of this wood off my shop floor. Today it is an old walnut log . Boy it is hard to get the sanding scratches out of this one.
Where do you get the brass inserts, Kevin? Been wanting to try an urn, but my thread chasing isn’t quite there yet.Walnut urn. This will have threaded brass inserts for the lid. About 9 inches high, 5.5 inches diameter. I made an error when I switched to a larger size sawtooth bit when drilling it out. The larger drill did not seat all the way in the extension and as a result, I drilled through the bottom. Had to make a walnut plug to fix it. Will post final pics in the gallery when finished. View attachment 63059
David, the thing with the soft pads, for me, I don't use them for any grit under 400. While they do push into curves, they still have uneven pressure. I use firm disc to 180 or 220, medium disc to 400. It is important to angle the pads so pressure is equal around the abrasive disc. Think of taking a 3 inch soft pad and pushing it on to a 2 inch half section of pipe. The edges will cut, but the middle is not in contact. If you angle the pad to 45 degrees, then you get more even sanding and removal of scratches.
robo hippy
robo hippy
I use 2” and 3” firm and medium pads for my power sanding and angle the pads so the pressure is even. Different pads used as the wood dictates. I also have soft pads in 2” and 3” that I use occasionally for a light touch. The soft pad I use for the random orbital is a 1” thick x 5” pad that I will use occasionally on larger bowls and angle the same as the pads I use on the drill for power sanding.David, the thing with the soft pads, for me, I don't use them for any grit under 400. While they do push into curves, they still have uneven pressure. I use firm disc to 180 or 220, medium disc to 400. It is important to angle the pads so pressure is equal around the abrasive disc. Think of taking a 3 inch soft pad and pushing it on to a 2 inch half section of pipe. The edges will cut, but the middle is not in contact. If you angle the pad to 45 degrees, then you get more even sanding and removal of scratches.
robo hippy
I seem to get even pressure over the entire pads that is in contact with the bowl using the random orbital and do this sanding with the lathe off and rotating the bowl by hand. It has worked great for me when I have small scratch marks and removes them with little effort. I play close attention to how the pad contacts the bowl and use it rarely but when I need it it works for me but may not work for others.
Last edited:
I sourced them from Woodchuckers here in Canada. But I think they are also available in the US from the same company that makes the bottle stoppers. They’re not cheap. The 2 inch diameter one is about $45.Where do you get the brass inserts, Kevin? Been wanting to try an urn, but my thread chasing isn’t quite there yet.
Where do you get the brass inserts, Kevin? Been wanting to try an urn, but my thread chasing isn’t quite there yet.

Threaded Inserts Archives - Niles Bottle Stoppers
 nilesbottlestoppers.com
I believe they also have an ad in the back of the AAW magazine.
Finishing up a 8-1/2” x 6-1/2” maple vase. This one was green turned and allowed to warp.


15 1/2” x 6” bowl from a board, from a walnut 1 1/2” thick butcher block countertop cut off a local craftsman gave me. Initial coat of 50:50 tung and citrus oil applied to the exterior.
odie
TOTW Team
- Joined
- Dec 22, 2006
- Messages
- 7,140
- Likes
- 9,994
I don’t know of any good home tests for live beetles other than long term observation. Powder post beetles can be dormant for years, and can continue to re-infest by laying eggs even in fully dried wood. You’ll know they’re still active when they start exiting the wood, leaving a clean exit hole with a small pile of dust below. If you’re willing to chance it, clean the blank really well, put the it in a plastic ziploc bag and leave it for at least a few months. If you come back and find dust in the bag, then there are still active beetles. If there’s no dust, then it may or may not be clean. The longer you let it sit without observing any new exit holes, the more confident you can be.
You can try to cut them out by first locating all the visible holes and then cutting back until they’re completely gone, and then a bit more for good measure. All sapwood anywhere on the piece should also be removed. This sometimes works for lumber, but isn’t really a practical option for a bowl blank.
To be safer, you can kill them by fumigating with chemicals, which is a nasty process, or by kiln drying. Fumigation is the preferred method for dealing with an infestation in finished work like antique furniture. It will sometimes change the color of the wood but not in most cases wil not otherwise damage the piece. Kiln drying will kill all beetles and larva provided that you get the core temperature of the wood to 140 degrees and hold for an hour.
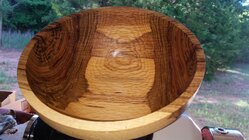
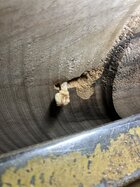
Howdy again Isaac.....
I went ahead and finished the bowl last night, and kept much of the infestation. At this point, I'm still not sure what caused it. I attempted to contact the source of this wood, and this person no longer exists on eBay. The information I have from the sale, is he "cooked" the wood to dry it out. That doesn't say exactly what the process was, but I'm pretty sure it was placed in an oven to season it. Anyway, after removing much of the affected area, I'm seeing no indication that whatever critters caused it, they no longer inhabit this wood.
Hopefully, the DO will penetrate and harden the area enough to firm it up a bit, so that I'll feel safe to sell it with reasonable expectation that it will not be super fragile.
In these two photos taken around midnight last night, the DO is still wet. (Sorry about the one blurry photo.....I was holding my phone by hand, and must have moved.)
It's such a beautiful chunk of Walnut burl, that I'm hoping it will turn out to be a success......
")
-o-


Hopefully your wood supplier’s heat treatment worked. The figure and finish have a kind of antique flavor that somehow makes the bug damage fit right in with the piece rather than detracting. Good call persevering, and also not filling the holes!
Finished tonight:15 1/2” x 6” bowl from a board, from a walnut 1 1/2” thick butcher block countertop cut off a local craftsman gave me. Initial coat of 50:50 tung and citrus oil applied to the exterior.View attachment 63105


Believe me…. You’ll know!Thanks for your post, Isaac. From the research I've been doing this morning, it looks like Powder Post Beetles is a strong possibility. The range of this beetle includes Oregon, which is where this walnut came from. This is a very hazardous beetle to introduce to a home with wooden furniture.
From what I'm observing, it appears that if these holes were created by PP beetles, it likely isn't an active infestation. If these beetles are present, how could that be determined?
It’s a wood boring beetle (I don’t know if it is a powder post specifically) of which there are many types. Interestingly, it’s the larvae that do the tunneling, not the beetle.
Attachments
I've been eyeing a box elder on my place. Finally harvested it yesterday. Roughed in a few pieces. Nothing spectacular yet in terms of patterns.


@john lucas recently demonstrated at my club. His demo focused on using a router on the lathe. Good stuff! He also brought along a trailer full of dried spindle blanks he was helping someone get rid of (for free). That’s one way to gain favor with the audience. In all seriousness, super generous. I grabbed some. This little pedestal is from a well-aged piece of Black Cherry:

I finished the bottom first, flipped around and drilled a recess for a future magnet. This also let me keep tailstock support. But the real reason I wanted to post this is to show the surface quality you can get with a spindle roughing gouge. This is the tool finish with a bit of burnishing from a gray a scotchbrite pad. It’s not perfect, but it’s good enough so that you can sand at 400/600 for a very short while and get a perfect surface. SRG is such a versatile tool. I think it would be fun to do a SRG-centric demo to up its use as a fine finishing and detailing tool. 🤔
I finished the bottom first, flipped around and drilled a recess for a future magnet. This also let me keep tailstock support. But the real reason I wanted to post this is to show the surface quality you can get with a spindle roughing gouge. This is the tool finish with a bit of burnishing from a gray a scotchbrite pad. It’s not perfect, but it’s good enough so that you can sand at 400/600 for a very short while and get a perfect surface. SRG is such a versatile tool. I think it would be fun to do a SRG-centric demo to up its use as a fine finishing and detailing tool. 🤔
Last edited:
Our club has a whole class on using the spindle gouge usually twice per year. It is super helpful, although most of my spindle gouge experience goes to Kirk DeHeer who came for a hands on class to demo spindle techniques 3 years ago.@john lucas recently demonstrated at my club. His demo focused on using a router on the lathe. Good stuff! He also brought along a trailer full of dried spindle blanks he was helping someone get rid of (for free). That’s one way to gain favor with the audience. In all seriousness, super generous. I grabbed some. This little pedestal is from a well-aged piece of Black Cherry:
View attachment 63134
I finished the bottom first, flipped around and drilled a recess for a future magnet. This also let me keep tailstock support. But the real reason I wanted to post this is to show the surface quality you can get with a spindle roughing gouge. This is the tool finish with a bit of burnishing from a gray a scotchbrite pad. It’s not perfect, but it’s good enough so that you can sand at 400/600 for a very short while and get a perfect surface. SRG is such a versatile tool. I think it would be fun to do a SRG-centric demo to up its use as a fine finishing and detailing tool. 🤔
That’s great. Kirk taught me to sharpen (well, his old videos did 😊). Above, I meant specifically a spindle roughing gouge. I do love a plain spindle gouge too, though usually shaped aggressively as a detail gouge.Our club has a whole class on using the spindle gouge usually twice per year. It is super helpful, although most of my spindle gouge experience goes to Kirk DeHeer who came for a hands on class to demo spindle techniques 3 years ago.
Sorry I did mean a roughing gouge my teachers Bev and Mark instruct the class
Rough turning a layer bowl. It's about 10 inches across

That is awesome! What a great resource for your club. I’d like to see that in my neck of the woods 😊Sorry I did mean a roughing gouge my teachers Bev and Mark instruct the class
Well, we always say we are the busiest and biggest club in America!! Here is the May calendar alone....That is awesome! What a great resource for your club. I’d like to see that in my neck of the woods 😊
11 Open Shops (you can come and do any project you want---8 people come to most shops)
1 Turn and Learn bowl class
1 Woodburning class
1 Eccentric multi axis turning class
2 Beginners Open Shop classes for new turners
1 Monthly Meeting with pro turner Sammy Long and TWO all day hands on classes about his carving
1 Workshop Cleaning Day
2 day Appalachian Festival down in Coney Island--- vendors demos etc
1 Board Meeting
1 Introduction class to the OVWG and a couple of beginner projects for the BRAND new turners
and that's just May y'all!!
It's nice to see work like that. As mainly a spindle turner, I find that many people underestimate the quality of cut one can get from a spindle roughing gouge.