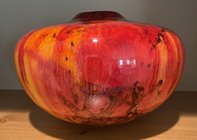
I bought this bowl long ago and unfortunately the gallery closed. I cannot read the signature on the bowl bottom so I cannot contact the artist. Any ideas how to get this type of coloration while preserving grain visibility? I’ve asked a few turners without success.

-
Beware of Counterfeit Woodturning Tools (click here for details) -
Johnathan Silwones is starting a new AAW chapter, Southern Alleghenies Woodturners, in Johnstown, PA. (click here for details) -
Congratulations to Peter Jacobson for "Red Winged Burl Bowl" being selected as Turning of the Week for April 29, 2024 (click here for details) -
Welcome new registering member. Your username must be your real First and Last name (for example: John Doe). "Screen names" and "handles" are not allowed and your registration will be deleted if you don't use your real name. Also, do not use all caps nor all lower case.
You are using an out of date browser. It may not display this or other websites correctly.
You should upgrade or use an alternative browser.
You should upgrade or use an alternative browser.
How was this colored?
- Thread starter Alan Weinberg
- Start date
Dave Landers
Beta Tester
Dye. I like Chestnut Spirit Stain (form Craft Supplies) - it's alcohol based with a bit of shellac. But have also used other water-based dyes.
Here's a small (I think it was about 2") cottonwood hollow form I did a while back

It's just layers of red and yellow dyes. Some people will apply dye then sand it back to expose some of the wood (the dye soaks in some spots more than others). I usually just do layers and blends.
And here's an ash apple - less figure but you can see the grain still thru the dye:

Here's a small (I think it was about 2") cottonwood hollow form I did a while back
It's just layers of red and yellow dyes. Some people will apply dye then sand it back to expose some of the wood (the dye soaks in some spots more than others). I usually just do layers and blends.
And here's an ash apple - less figure but you can see the grain still thru the dye:
Dave, that apple is super cool!
I use Trans Tint dyes and Chris Pytlik has been my wood dyeing guru for almost 20 years. Other than using black I think it is pretty hard to hide the grain using dyes like Trans Tint, Chestnut products, Keystone products and Lockwood products (metal acid dyes in general).
- Joined
- Apr 27, 2004
- Messages
- 8,650
- Likes
- 5,008
- Location
- Lakeland, Florida
- Website
- www.hockenberywoodturning.com
Any ideas how to get this type of coloration while preserving grain visibility?
While I think your piece was probably done with something like cheasnut stains or dyes
Transparent airbrush paints show grain through color nicely too. They can be brushed on or airbrushed
This is a terrible photo but the colors on this chinaberry form are all golden airbrush paint. The background is yellow and orange.

That’s it! Thanks. Any contact info? Update—found him on Instagram.Chris Pytlik, maybe . Inside and outside dyed
Last edited:
Dave—beautiful work and thanks. After the dyes, what finish do you use? It looks amazing!Dye. I like Chestnut Spirit Stain (form Craft Supplies) - it's alcohol based with a bit of shellac. But have also used other water-based dyes.
Here's a small (I think it was about 2") cottonwood hollow form I did a while back
View attachment 53314
It's just layers of red and yellow dyes. Some people will apply dye then sand it back to expose some of the wood (the dye soaks in some spots more than others). I usually just do layers and blends.
And here's an ash apple - less figure but you can see the grain still thru the dye:
View attachment 53315
Dave Landers
Beta Tester
Pieces like these are usually rattle can lacquer. Sometimes they get a few coats of thinned brushing lacquer first (brush or wipe on then wipe off as much as possible). Sometimes I stop there and skip the spray.Dave—beautiful work and thanks. After the dyes, what finish do you use? It looks amazing!
That's an awesome apple, I can't figure out what the stem is made of?Pieces like these are usually rattle can lacquer. Sometimes they get a few coats of thinned brushing lacquer first (brush or wipe on then wipe off as much as possible). Sometimes I stop there and skip the spray.
Dave Landers
Beta Tester
Stem is leatherThat's an awesome apple, I can't figure out what the stem is made of?
- Joined
- Mar 1, 2006
- Messages
- 137
- Likes
- 73
I sent you a couple of emails. Info on dying. Hope they go through.I bought this bowl long ago and unfortunately the gallery closed. I cannot read the signature on the bowl bottom so I cannot contact the artist. Any ideas how to get this type of coloration while preserving grain visibility? I’ve asked a few turners without success.
Thanks so much! It’s appreciated. Got them!I sent you a couple of emails. Info on dying. Hope they go through.
The orange peel from the rattle can on the hollow form doesn't bother you? I told everyone about that in a discussion about the differences of rattle cans and spray guns. With the reply that the finish looks amazing, maybe people just know the difference? But I was surprised to see this piece by Giles Gilson. He was known for his color and lacquer finish. So you are not alone.Pieces like these are usually rattle can lacquer. Sometimes they get a few coats of thinned brushing lacquer first (brush or wipe on then wipe off as much as possible). Sometimes I stop there and skip the spray.
Attachments
Dave Landers
Beta Tester
Yeah, it does. Sometimes. It's on my list of things to work on improving...The orange peel from the rattle can on the hollow form doesn't bother you?
Even a cheap spray gun will do better than a rattle can. With the ability to thin/add retarder a lot of control of the finish is gained, including increasing the environmental conditions when one can spray.The orange peel from the rattle can on the hollow form doesn't bother you? I told everyone about that in a discussion about the differences of rattle cans and spray guns.
It's pretty easy to fix Dave. You just need enough clear on the piece to "finish the finish". Mirka Abralon has a great line of cushioned fine abrasive to flatten the finish out. But lots less work when the finish is really flat out of a good gun.Yeah, it does. Sometimes. It's on my list of things to work on improving...
IMHO most orange peel is either moving too fast or too slow. I think we get impatient when we are holding a can and therefore cans have a bad rap. Also spray rate with can is different from using a sprayer. I personally prefer airbrush.
No, it's about correct atomization. Nozzle size, pressure, and material viscosity, either give you smooth or rough. Too fast or slow gives you runs or a dusty surface. https://pittsburghsprayequip.com/bl...-stop-and-fix-orange-peel-when-spraying-paintIMHO most orange peel is either moving too fast or too slow. I think we get impatient when we are holding a can and therefore cans have a bad rap. Also spray rate with can is different from using a sprayer. I personally prefer airbrush.
If that is the case then you could never get a smooth surface with a can? All same nozzle of a particular brandNo, it's about correct atomization. Nozzle size, pressure, and material viscosity, either give you smooth or rough. Too fast or slow gives you runs or a dusty surface. https://pittsburghsprayequip.com/bl...-stop-and-fix-orange-peel-when-spraying-paint
Yes, that is my opinion. It appears a lot of turners have their own opinion on what smooth means. To me, smooth is defined by both touch and appearance. The aerosol can certainly be used to throw the finish on the work, but the finish is NEVER acceptable right from the can. It needs multiple steps of abrasives and polishing to make it smooth. And to be honest, most gun finishes need a bit of work too. But you can start with much finer abrasive and probably cut the post finish work by 75%If that is the case then you could never get a smooth surface with a can? All same nozzle of a particular brand
thanks, love the appleDye. I like Chestnut Spirit Stain (form Craft Supplies) - it's alcohol based with a bit of shellac. But have also used other water-based dyes.
Here's a small (I think it was about 2") cottonwood hollow form I did a while back
View attachment 53314
It's just layers of red and yellow dyes. Some people will apply dye then sand it back to expose some of the wood (the dye soaks in some spots more than others). I usually just do layers and blends.
And here's an ash apple - less figure but you can see the grain still thru the dye:
View attachment 53315
I like both pieces Dave. Regarding dyes being taken up unevenly, is there a solution to that? I use Chestnut Stains on twig pot forms, often holly. After sanding to 400 (maybe that's too fine?) and cleaning with DNA, I apply the stain full strength and always get a pale line, usually around the largest diameter of the piece. Applying more stain to that area doesn't help. Suggestions? Thanks.Dye. I like Chestnut Spirit Stain (form Craft Supplies) - it's alcohol based with a bit of shellac. But have also used other water-based dyes.
Here's a small (I think it was about 2") cottonwood hollow form I did a while back
View attachment 53314
It's just layers of red and yellow dyes. Some people will apply dye then sand it back to expose some of the wood (the dye soaks in some spots more than others). I usually just do layers and blends.
And here's an ash apple - less figure but you can see the grain still thru the dye:
View attachment 53315
Dave Landers
Beta Tester
I've seen that. I think it's because of the orientation of the grain/pores. Dye seems to soak in rather than sit on the surface, and on the side of a pot there's no pores (they point the other way), so not as much gets drawn into the wood. At least I think that's what's happening.I like both pieces Dave. Regarding dyes being taken up unevenly, is there a solution to that? I use Chestnut Stains on twig pot forms, often holly. After sanding to 400 (maybe that's too fine?) and cleaning with DNA, I apply the stain full strength and always get a pale line, usually around the largest diameter of the piece. Applying more stain to that area doesn't help. Suggestions? Thanks.
I'm usually using dye to highlight figure, layering a couple of colors. So if I get a "shadow" or "highlight" around the outside, that often just adds to that effect.
Thanks for the explanation; that makes sense. I may try applying some dilute sealer to the entire piece first and then dyeing to see if that helps. Thanks again.
Use an air brush or touch up gun to apply the dye for a more even coat.