
Why use a vacuum system
In general, the primary use for vacuum chucking is to finish turn the bottom of an almost finished piece. The vacuum system is used to hold the piece firmly towards the headstock while you turn away the remnants of the foot.
A vacuum system can also be used to turn platters top and bottom.
Safety
Turning is inherently a potentially dangerous activity. You should observe all the normal caution and procedures you normally use during turning. In addition, the piece you will be turning using the vacuum system is not fastened to the lathe. Ensure you are using sufficient vacuum. Additionally be aware that a power outage or an accidental flip of a switch can turn off your vacuum source - and the piece on your lathe will no longer be secured to the lathe.
Getting started
There are various commercial vacuum systems available. A simple suggestion is to browse the catalogs or websites from woodturning vendors. A cheap alternative is to build your own.
Homebuilt system 1 - using a shopvac
The following system was built by Al Hockenbery and it works. If your lathe has an outboard spindle and you have a shop vac, you can make an inexpensive vacuum system that works in a few minutes. Use a block of non-porous hardwood like maple and turn a fitting to connect your shop vac hose to the outboard spindle of the lathe.
This fitting needs:
1. a through hole about the same size as the hole in the spindle
2. a hole the diameter and depth of the spindle on one end
(this is a loose fit since the spindle threads must turn freely inside but not leak too much)
3 the other end is turned to fit inside the shop vac hose with a slight taper.
This adapter fitting should sit against the spindle nut and or the end of the spindle tightly enough when the vacuum is on so it won't leak too much so those surfaces have to be smoothly cut.
To use this system secure the shop Vac hose to the adapter with duct tape. Slide the adapter over the out board spindle and hold it in place by either taping it to the head stock or clamping or taping the hose to something so that the fitting can't fall off.
Put a drum chuck on the inboard side, center you work piece on the drum chuck and turn on the shop vac. Test to see if you can pull the work off. If there s a good fit to the drum chuck it should be quite a struggle to pull the work free and you may not be able to.
This system is only as quiet as your shop vac and has no adjustment, but it works fine for bowls. It is an easy way to use vacuum with out much expense. Don't try this or any vacuum system on any thin walled pieces until you have some experience with vaccuum. It is very easy to crack pieces with walls less than 1/4 inch and certainly possible to crack much thicker ones.
Homebuilt system 2 - using a vacuum pump
Basically you can gather parts from various sources and build a vacuum system. The heart of the system is a vacuum pump. Then you need to connect various pieces listed in the Minimum Setup section below.
Vacuum pump sources (for homebuilt system 2):
The system described above uses a shop vac. Many turners prefer to use vacuum pumps. Vacuum pumps can sometimes be found at:
Surplus Sales of Nebraska
or
American Science and Surplus
Look for rotary vane types of vacuum pumps, which are the least expensive - you'll want to get a unit that pulls at least 20 inches of mercury (vacuum) and is rated for continuous operation. If the vendor doesn't specify any ratings, call them and ask! it is important that you get a pump with enough capacity. Alternatively you can look on eBay or other auction sites for vacuum pumps. Some folks use salvaged refrigerator compressors for vacuum sources for veneering, etc. but I think I'd avoid these for lathe work (I don't think they're "beefy" enough). There are also venturi-type vacuum sources which generate some decent vacuum (quite suitable for veneering) using air flow from a compressor, but I don't know if I'd advise you to use this for lathe work.
Minimum Setup (for homebuilt system 2):
You'll need to do some minor plumbing to setup the vacuum pump. Mark Mandell has a good picture of his setup in this posting
At a minimum you should have some sort of in-line filter on the vacuum line before it enters the pump - you don't want to suck sawdust and other debris into your vacuum pump. I use sintered metal filters ahead of my pump, and actually filter the "release" air that I let in to the system when I'm "un-chucking" the bowl from the vacuum drum. This may be another example of over-engineering, but one that's designed to protect the pump.
Second, you cannot run full vacuum on many pieces since it can potentially crack or break them. See "how much vacuum" below. So you need to put a valve of some type between the vacuum pump and the lathe. I used a hose bib....yes the same kind of hose bib that comes out of your outside wall for the water hose. It works sufficiently fine to introduce a leak in the vacuum system. Mark Mandell uses a 1/4" ball-type bleeder valve. Both of these valves can be obtained from your local hardware store.
Third, a vacuum gauge will be needed to measure the vacuum between the vacuum pump and the lathe. Just get a cheap one. They can be found at auto supply stores, pool stores, or in surplus catalogs.
Fourth, you need a way to attach the vacuum source to the lathe spindle - a vacuum fitting. There are commercial setups for this such as the "EZ Vacuum Unit" discussed in this thread. You can also make your own setup using a sealed bearing. Documenting that fully here would take up too much room.
It can be challenging to determine how to hook everything together, and figure out which components are needed. Jeff Jilg used PVC fittings and a couple of brass fittings to cobble together his system. -e- used all metal fittings (more elegant). The list of fittings and multiple detailed pictures of -e-'s system is listed here. The pictures are nearly self explanatory. If you can use a wrench and have some plumber's tape you can probably hook up a similar system.
How Much Vacuum
Consider that 20" of Hg (mercury) roughly translates to 10 pounds of atmospheric pressure for every square inch on your drum chuck's area, and a 4" chuck has an area of about 12.56 square inches. If you only pull 20" of Hg using a 4" chuck at sea level you're putting more than 125 pounds of pressure on the bottom of your bowl. Go to a 6" chuck and you more than double that to a bit over 280 pounds; at 8" it's over 500 pounds. Mark Mandell has held 18"-20" platters with an 8" drum chuck at less that 10" of Hg. without a mishap.
A note of caution on vacuum chucking is worth noting. Many don't understand or forget that with vacuum fixing, your piece is being held on the chuck by atmospheric pressure, which is ~15 lbs per square inch. When you hold the piece to the seal and start the pump, the amount of physical pressure PUSHING THE BOWL onto the chuck is determined by the surface area inside the seal's contact ring as a function of the amount of vacuum created. So, if you could pull 30" of vacuum and your seal covered 1 sq. in of area on the bowl, the workpiece would be held as if you placed a 15 lb weight on it. Now, say you make your chuck 6" in diameter and your seal is at the rim, that it all fits inside your bowl. You turn on your pump and pull 30" of vacuum (full vacuum) you can calculate the weight holding your bowl as 3.14 (Pi) x 9 (radius squared) x 15 (air pressure) and you'll find you have 424 pounds pushing on your wood. Best consider your bowl, how thin and strong it is and whether it can survive a 400lb weight pushing against it.
Keep in mind that the example is for a "hard" vacuum at sea level. Any vacuum pump in a woodturner's price range will, at most, pull a bit over 28" and usually a bunch less than that due to imperfect seals in the system. The point, however, is with vacuum chucking you walk a line between not enough pressure to hold the bowl and so much that the piece implodes. Usually when you just finished sanding the bottom, you here a "pop", and discover that you have a new funnel or a design opportunity. Pick a chuck with an area under seal which will provide enough area to develop the weight needed to hold the piece. Also have a bleeder valve in your vac line within reach so that you can reduce the vacuum (and so the pressure holding the bowl on) if you start to hear your piece creaking and making sounds.
Trying to get a good seal with the rim of a bowl is difficult, if not impossible. It's rare that a bowl runs so flat at the rim that it will make such a seal as is needed for vacuum holding. Many turners are using drum chucks in a variety of diameters (namely 4, 6, and 8" versions).
You also need to consider wood shear strengths as listed in the US Forest Service Handbook in Chapter 4, available online at US Forest Service Handbook
A more detailed article on how much vacuum to use is discussed in the attached paper by Bill Marx (permission to post given by his son Jim Marx). The article is downloadable from the AAW site here: Allowable vacuum for woodturning
Attaching wood to the lathe
Commercially available chucks can be reviewed on product vendors' websites and in catalogs. Many folks make their own faceplates or chucks using MDF and/or PVC tubes.
Outline to build your own vacuum chuck:
The following AAW forum threads provide various bits of info about woodturning vacuum systems:
How much vacuum is enough
Calling all Vacuum chuckers
Vacuum chuck for Jet 1642 lathe
Venturi Vacuum Question
Vacuum setup
EZ Vacuum Unit Question
Edited by Bill Boehme to fix broken links.
In general, the primary use for vacuum chucking is to finish turn the bottom of an almost finished piece. The vacuum system is used to hold the piece firmly towards the headstock while you turn away the remnants of the foot.
A vacuum system can also be used to turn platters top and bottom.
Safety
Turning is inherently a potentially dangerous activity. You should observe all the normal caution and procedures you normally use during turning. In addition, the piece you will be turning using the vacuum system is not fastened to the lathe. Ensure you are using sufficient vacuum. Additionally be aware that a power outage or an accidental flip of a switch can turn off your vacuum source - and the piece on your lathe will no longer be secured to the lathe.
Getting started
There are various commercial vacuum systems available. A simple suggestion is to browse the catalogs or websites from woodturning vendors. A cheap alternative is to build your own.
Homebuilt system 1 - using a shopvac
The following system was built by Al Hockenbery and it works. If your lathe has an outboard spindle and you have a shop vac, you can make an inexpensive vacuum system that works in a few minutes. Use a block of non-porous hardwood like maple and turn a fitting to connect your shop vac hose to the outboard spindle of the lathe.
This fitting needs:
1. a through hole about the same size as the hole in the spindle
2. a hole the diameter and depth of the spindle on one end
(this is a loose fit since the spindle threads must turn freely inside but not leak too much)
3 the other end is turned to fit inside the shop vac hose with a slight taper.
This adapter fitting should sit against the spindle nut and or the end of the spindle tightly enough when the vacuum is on so it won't leak too much so those surfaces have to be smoothly cut.
To use this system secure the shop Vac hose to the adapter with duct tape. Slide the adapter over the out board spindle and hold it in place by either taping it to the head stock or clamping or taping the hose to something so that the fitting can't fall off.
Put a drum chuck on the inboard side, center you work piece on the drum chuck and turn on the shop vac. Test to see if you can pull the work off. If there s a good fit to the drum chuck it should be quite a struggle to pull the work free and you may not be able to.
This system is only as quiet as your shop vac and has no adjustment, but it works fine for bowls. It is an easy way to use vacuum with out much expense. Don't try this or any vacuum system on any thin walled pieces until you have some experience with vaccuum. It is very easy to crack pieces with walls less than 1/4 inch and certainly possible to crack much thicker ones.
Homebuilt system 2 - using a vacuum pump
Basically you can gather parts from various sources and build a vacuum system. The heart of the system is a vacuum pump. Then you need to connect various pieces listed in the Minimum Setup section below.
Vacuum pump sources (for homebuilt system 2):
The system described above uses a shop vac. Many turners prefer to use vacuum pumps. Vacuum pumps can sometimes be found at:
Surplus Sales of Nebraska
or
American Science and Surplus
Look for rotary vane types of vacuum pumps, which are the least expensive - you'll want to get a unit that pulls at least 20 inches of mercury (vacuum) and is rated for continuous operation. If the vendor doesn't specify any ratings, call them and ask! it is important that you get a pump with enough capacity. Alternatively you can look on eBay or other auction sites for vacuum pumps. Some folks use salvaged refrigerator compressors for vacuum sources for veneering, etc. but I think I'd avoid these for lathe work (I don't think they're "beefy" enough). There are also venturi-type vacuum sources which generate some decent vacuum (quite suitable for veneering) using air flow from a compressor, but I don't know if I'd advise you to use this for lathe work.
Minimum Setup (for homebuilt system 2):
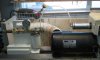
You'll need to do some minor plumbing to setup the vacuum pump. Mark Mandell has a good picture of his setup in this posting
At a minimum you should have some sort of in-line filter on the vacuum line before it enters the pump - you don't want to suck sawdust and other debris into your vacuum pump. I use sintered metal filters ahead of my pump, and actually filter the "release" air that I let in to the system when I'm "un-chucking" the bowl from the vacuum drum. This may be another example of over-engineering, but one that's designed to protect the pump.
Second, you cannot run full vacuum on many pieces since it can potentially crack or break them. See "how much vacuum" below. So you need to put a valve of some type between the vacuum pump and the lathe. I used a hose bib....yes the same kind of hose bib that comes out of your outside wall for the water hose. It works sufficiently fine to introduce a leak in the vacuum system. Mark Mandell uses a 1/4" ball-type bleeder valve. Both of these valves can be obtained from your local hardware store.
Third, a vacuum gauge will be needed to measure the vacuum between the vacuum pump and the lathe. Just get a cheap one. They can be found at auto supply stores, pool stores, or in surplus catalogs.
Fourth, you need a way to attach the vacuum source to the lathe spindle - a vacuum fitting. There are commercial setups for this such as the "EZ Vacuum Unit" discussed in this thread. You can also make your own setup using a sealed bearing. Documenting that fully here would take up too much room.
It can be challenging to determine how to hook everything together, and figure out which components are needed. Jeff Jilg used PVC fittings and a couple of brass fittings to cobble together his system. -e- used all metal fittings (more elegant). The list of fittings and multiple detailed pictures of -e-'s system is listed here. The pictures are nearly self explanatory. If you can use a wrench and have some plumber's tape you can probably hook up a similar system.
How Much Vacuum
Consider that 20" of Hg (mercury) roughly translates to 10 pounds of atmospheric pressure for every square inch on your drum chuck's area, and a 4" chuck has an area of about 12.56 square inches. If you only pull 20" of Hg using a 4" chuck at sea level you're putting more than 125 pounds of pressure on the bottom of your bowl. Go to a 6" chuck and you more than double that to a bit over 280 pounds; at 8" it's over 500 pounds. Mark Mandell has held 18"-20" platters with an 8" drum chuck at less that 10" of Hg. without a mishap.
A note of caution on vacuum chucking is worth noting. Many don't understand or forget that with vacuum fixing, your piece is being held on the chuck by atmospheric pressure, which is ~15 lbs per square inch. When you hold the piece to the seal and start the pump, the amount of physical pressure PUSHING THE BOWL onto the chuck is determined by the surface area inside the seal's contact ring as a function of the amount of vacuum created. So, if you could pull 30" of vacuum and your seal covered 1 sq. in of area on the bowl, the workpiece would be held as if you placed a 15 lb weight on it. Now, say you make your chuck 6" in diameter and your seal is at the rim, that it all fits inside your bowl. You turn on your pump and pull 30" of vacuum (full vacuum) you can calculate the weight holding your bowl as 3.14 (Pi) x 9 (radius squared) x 15 (air pressure) and you'll find you have 424 pounds pushing on your wood. Best consider your bowl, how thin and strong it is and whether it can survive a 400lb weight pushing against it.
Keep in mind that the example is for a "hard" vacuum at sea level. Any vacuum pump in a woodturner's price range will, at most, pull a bit over 28" and usually a bunch less than that due to imperfect seals in the system. The point, however, is with vacuum chucking you walk a line between not enough pressure to hold the bowl and so much that the piece implodes. Usually when you just finished sanding the bottom, you here a "pop", and discover that you have a new funnel or a design opportunity. Pick a chuck with an area under seal which will provide enough area to develop the weight needed to hold the piece. Also have a bleeder valve in your vac line within reach so that you can reduce the vacuum (and so the pressure holding the bowl on) if you start to hear your piece creaking and making sounds.
Trying to get a good seal with the rim of a bowl is difficult, if not impossible. It's rare that a bowl runs so flat at the rim that it will make such a seal as is needed for vacuum holding. Many turners are using drum chucks in a variety of diameters (namely 4, 6, and 8" versions).
You also need to consider wood shear strengths as listed in the US Forest Service Handbook in Chapter 4, available online at US Forest Service Handbook
A more detailed article on how much vacuum to use is discussed in the attached paper by Bill Marx (permission to post given by his son Jim Marx). The article is downloadable from the AAW site here: Allowable vacuum for woodturning
Attaching wood to the lathe
Commercially available chucks can be reviewed on product vendors' websites and in catalogs. Many folks make their own faceplates or chucks using MDF and/or PVC tubes.
Outline to build your own vacuum chuck:
- I made my own vacuum chuck using a cheap 3" dedicated faceplate. If you try to setup a reusable faceplate it may be more trouble than it's worth.
- To the faceplate attach some 3/4" MDF with screws
- Turn a small groove in the MDF and glue a 6" PVC tube into the groove
- Drill or turn a small hole in the middle of the MDF so air can get pulled out by the vacuum thru the headstock (or the base of your spindle depending on your setup).
- When you test the system, you'll find leaks which can be plugged with glue or silicon sealer.
The following AAW forum threads provide various bits of info about woodturning vacuum systems:
How much vacuum is enough
Calling all Vacuum chuckers
Vacuum chuck for Jet 1642 lathe
Venturi Vacuum Question
Vacuum setup
EZ Vacuum Unit Question
Edited by Bill Boehme to fix broken links.
 .
.

