
(addition on 6/5/05 - paragraph added to Sharpening - Adjustments #1)
Last year I took 2 chains to the local Stihl dealer for sharpening. They were sharp when they returned them. But the adenoidal high schooler who probably sharpened them wasn’t paying attention. He cut each tooth to half its original size. Why pay for that???
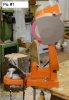
I recently purchased the Harbor Freight (HF) electric chainsaw sharpener to sharpen the chains for the chainsaw (pic #1 at the end of this posting). I am not very good at hand filing - one side always comes out different causing curved cuts. This sharpener produces homogeneously sharpened teeth.
Note - pictures for this post are contained in this posting and the next posting.
Assembly
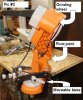
The sharpener is trivial to assemble (see pic #2). You just have to screw on the movable base to the lower half (1 minute max). Then you have to install the pink grinding disk after removing the protective cover. That took about 5 minutes.
Then you bolt or clamp the unit to a bench so it will be stable while you sharpen the chain(s). In picture #2 below I used a bolt on the right side (existing hole in my bench) and a clamp on the left side. You need the chain to have some clearance, so it is easier to install it on the corner of a bench.
Upon plugging in the unit and turning it on, the grinding wheel fluttered quite a bit. The plastic arbor in the unit and/or the grinding wheel on my unit was out of round. I put the grinding wheel on the ways (bed) of my lathe since the lathe bed is dead flat. I determined the grinding wheel was flat.
To partially remedy this situation I kept the grinding wheel off and then lightly pared down the plastic arbor on the chainsaw sharpener with the unit powered on. I used a very sharp spindle gouge and just feathered off some of the material. That squared off the arbor enough to remove most of the flutter.
Most of the unit is plastic, so I didn't expect much.
Sharpening
Safety is important. Either use goggles, or use a facemask to protect your eyes. In addition I use ear muffs (with a radio) to protect my hearing. You should wear gloves also - the chains are sharp.
The sharpener is setup so that you sharpen every other tooth (on one side) of the chain, then you sharpen the other 50% of the teeth on the other side of the chain. The grey movable base must be set at the appropriate angle. There is a set of angle markings on the orange base 0 - 35 degrees in 5 degree increments (pic #5).
Adjustments:
The chain is then set into the holder and you must then make 2 adjustments.
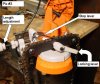
1) Adjust how much of the tooth will be removed with the length adjustment knob. This is done with the knob and locking nut indicated in picture #3. Adjust the length so that a minimum amount of tooth will be removed (i.e. a hair). The setup allows you to move to the next tooth (i.e. slide the chain to the right) and the stop lever will drop down behind the tooth. Then you can lock the chain down so secure it for sharpening via the lock lever.
When adjusting the length find the shortest tooth and grind them all to that length. When setting up that tooth you want the grinding wheel to just kiss the tooth. Don't try to grind a whole lot off at once. If you turn the tooth blue it won't hold an edge. If you grind one half (i.e. right half) of the teeth longer than the other half of the teeth, the saw will cut a curve instead of cutting straight. Make sure that you grind all the teeth to the same length.
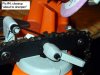
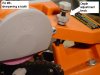
2) The depth adjustment is located on the pivoting arm with the grinding wheel (pic #6). Adjust the depth so that it just barely hits the bottom of the tooth when you bring the arm down to sharpen.
All of the above setup may sound and look complex, but it only takes a few minutes. Prior to actual sharpening, mark the initial tooth so you can remember where you started. I used masking tape on one tooth.
Actual sharpening consists of the following steps.
1) With unit turned on, bring down the grinding wheel and sharpen the tooth.
2) Loosen locking lever
3) Advance the chain by 2 teeth until it passes the stop lever
4) Exert slight pressure against the stop lever while locking the locking lever
Then repeat the sequence.
Results and Comments
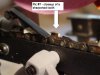
Ensure that you are sharpening across the top bevel of the tooth, and the side as well. The sharpener produced consistent results on all 4 chains that I sharpened. See picture #7 for a closeup of a sharp tooth. The chains look factory fresh (except for a little dirt), and the teeth are quite sharp. Each chain took 12-15 minutes. Maybe it will get faster after I get more experience.
There is a little bit of play in the entire unit. When you bring down the spinning grinding wheel to sharpen a tooth, there is some play. It might take a little more off some teeth if you are not careful. However, this is not rocket science or even computer science; it is chainsaw sharpening. The teeth do not have to be perfect. The teeth just have to be sharp and the unit performs well.
There is no setup to grind down the bumpers/guards. They recommend a file to do that. Why do manual labor when you can use power tools!?!? I used a dremel tool on the chains while they were mounted in the sharpener.
Overall I like the sharpener. I got it on sale from Harbor Freight for $55. (I'm a "Preferred Member"....i.e. they prefer to have my money). The sharpener should be good for at least 100 sharpenings without any problems. That's $0.55 per sharpening. And it can probably last longer than that. If you have multiple chains, you can sharpen them all in one session. For me, this system works great, it’s easy to use, and it can be stowed away after usage.
Last year I took 2 chains to the local Stihl dealer for sharpening. They were sharp when they returned them. But the adenoidal high schooler who probably sharpened them wasn’t paying attention. He cut each tooth to half its original size. Why pay for that???
I recently purchased the Harbor Freight (HF) electric chainsaw sharpener to sharpen the chains for the chainsaw (pic #1 at the end of this posting). I am not very good at hand filing - one side always comes out different causing curved cuts. This sharpener produces homogeneously sharpened teeth.
Note - pictures for this post are contained in this posting and the next posting.
Assembly
The sharpener is trivial to assemble (see pic #2). You just have to screw on the movable base to the lower half (1 minute max). Then you have to install the pink grinding disk after removing the protective cover. That took about 5 minutes.
Then you bolt or clamp the unit to a bench so it will be stable while you sharpen the chain(s). In picture #2 below I used a bolt on the right side (existing hole in my bench) and a clamp on the left side. You need the chain to have some clearance, so it is easier to install it on the corner of a bench.
Upon plugging in the unit and turning it on, the grinding wheel fluttered quite a bit. The plastic arbor in the unit and/or the grinding wheel on my unit was out of round. I put the grinding wheel on the ways (bed) of my lathe since the lathe bed is dead flat. I determined the grinding wheel was flat.
To partially remedy this situation I kept the grinding wheel off and then lightly pared down the plastic arbor on the chainsaw sharpener with the unit powered on. I used a very sharp spindle gouge and just feathered off some of the material. That squared off the arbor enough to remove most of the flutter.
Most of the unit is plastic, so I didn't expect much.
Sharpening
Safety is important. Either use goggles, or use a facemask to protect your eyes. In addition I use ear muffs (with a radio) to protect my hearing. You should wear gloves also - the chains are sharp.
The sharpener is setup so that you sharpen every other tooth (on one side) of the chain, then you sharpen the other 50% of the teeth on the other side of the chain. The grey movable base must be set at the appropriate angle. There is a set of angle markings on the orange base 0 - 35 degrees in 5 degree increments (pic #5).
Adjustments:
The chain is then set into the holder and you must then make 2 adjustments.
1) Adjust how much of the tooth will be removed with the length adjustment knob. This is done with the knob and locking nut indicated in picture #3. Adjust the length so that a minimum amount of tooth will be removed (i.e. a hair). The setup allows you to move to the next tooth (i.e. slide the chain to the right) and the stop lever will drop down behind the tooth. Then you can lock the chain down so secure it for sharpening via the lock lever.
When adjusting the length find the shortest tooth and grind them all to that length. When setting up that tooth you want the grinding wheel to just kiss the tooth. Don't try to grind a whole lot off at once. If you turn the tooth blue it won't hold an edge. If you grind one half (i.e. right half) of the teeth longer than the other half of the teeth, the saw will cut a curve instead of cutting straight. Make sure that you grind all the teeth to the same length.
2) The depth adjustment is located on the pivoting arm with the grinding wheel (pic #6). Adjust the depth so that it just barely hits the bottom of the tooth when you bring the arm down to sharpen.
All of the above setup may sound and look complex, but it only takes a few minutes. Prior to actual sharpening, mark the initial tooth so you can remember where you started. I used masking tape on one tooth.
Actual sharpening consists of the following steps.
1) With unit turned on, bring down the grinding wheel and sharpen the tooth.
2) Loosen locking lever
3) Advance the chain by 2 teeth until it passes the stop lever
4) Exert slight pressure against the stop lever while locking the locking lever
Then repeat the sequence.
Results and Comments
Ensure that you are sharpening across the top bevel of the tooth, and the side as well. The sharpener produced consistent results on all 4 chains that I sharpened. See picture #7 for a closeup of a sharp tooth. The chains look factory fresh (except for a little dirt), and the teeth are quite sharp. Each chain took 12-15 minutes. Maybe it will get faster after I get more experience.
There is a little bit of play in the entire unit. When you bring down the spinning grinding wheel to sharpen a tooth, there is some play. It might take a little more off some teeth if you are not careful. However, this is not rocket science or even computer science; it is chainsaw sharpening. The teeth do not have to be perfect. The teeth just have to be sharp and the unit performs well.
There is no setup to grind down the bumpers/guards. They recommend a file to do that. Why do manual labor when you can use power tools!?!? I used a dremel tool on the chains while they were mounted in the sharpener.
Overall I like the sharpener. I got it on sale from Harbor Freight for $55. (I'm a "Preferred Member"....i.e. they prefer to have my money). The sharpener should be good for at least 100 sharpenings without any problems. That's $0.55 per sharpening. And it can probably last longer than that. If you have multiple chains, you can sharpen them all in one session. For me, this system works great, it’s easy to use, and it can be stowed away after usage.
Attachments

Last edited:
") ) and get one.
) and get one.