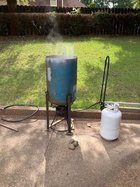
Been a lot of prep to get here but today it all came together for me to boil my first big vase - 27" black willow. Actually the first time I've boiled a piece. I've been told and read that it will drastically change the color but it will come back on the second turning. It certainly did change. Now to drying and wait. It takes a long time to bring 35 gallons of water up to boil.

-
Beware of Counterfeit Woodturning Tools (click here for details) -
Johnathan Silwones is starting a new AAW chapter, Southern Alleghenies Woodturners, in Johnstown, PA. (click here for details) -
Congratulations to Jim Hills for "Journey II" being selected as Turning of the Week for May 6th, 2024 (click here for details) -
Welcome new registering member. Your username must be your real First and Last name (for example: John Doe). "Screen names" and "handles" are not allowed and your registration will be deleted if you don't use your real name. Also, do not use all caps nor all lower case.
You are using an out of date browser. It may not display this or other websites correctly.
You should upgrade or use an alternative browser.
You should upgrade or use an alternative browser.
Boiled my first big vase
- Thread starter Randy Anderson
- Start date

Wow what a beast!! Great work so far. Can’t wait to see it finished, whenever that may be.
Randy, I fully agree with Michael. Looking forward to the pics of your finished piece. Will you also share how you turned and hollowed this "beast"?I've been told and read that it will drastically change the color but it will come back on the second turning. It certainly did change. Now to drying and wait.
Interesting, but I must have missed something somewhere along the line... what is the point? Stabilization?Been a lot of prep to get here but today it all came together for me to boil my first big vase - 27" black willow. Actually the first time I've boiled a piece. I've been told and read that it will drastically change the color but it will come back on the second turning. It certainly did change. Now to drying and wait. It takes a long time to bring 35 gallons of water up to boil.
Thanks guys. It's been and still is an evolution/learning to do big floor vase size pieces and I'm still new to it. I've relied heavily on advice and input from John Tisdale on how to do big pieces. I do a lot of vases in the small to 14" range but once I crossed into trying to do pieces this size the Pandora's box of challenges grew quickly. Stock material that size, getting it in my truck and to the shop, trimming with my chainsaw just enough to mount, how to mount safely, a hoist to lift and position it, etc, etc. The list of challenges just to be able to spin it took some time for me to get through.
For hollowing I use several tools. I have a Simple hollowing articulated setup for the neck and first 5-6 inches. Easy to control and get started with. For drilling the pilot hole I use a Milwaukee switchblade 2 9/16" bit. Drill some, hollow some, drill some, hollow some otherwise you end up with a corkscrew hole in the bottom that is near impossible to deal with. I use a Clark steady rest. For the main hollowing I use the Clark 1 1/4" boring bar setup with either cupped, round carbide or teardop HSS cutters. Depends on the wood. I also use a Roly Munro tool with the shielded cupped cutter for some of the work and cleanup down to as far as I can reach with it. Again, depends on the wood a bit. For the outside turning it's just a big spindle roughing gouge, spindle gouge and scrapers, and several wheelbarrow loads of shavings. Net, I'm still new at this and learning.
For hollowing I use several tools. I have a Simple hollowing articulated setup for the neck and first 5-6 inches. Easy to control and get started with. For drilling the pilot hole I use a Milwaukee switchblade 2 9/16" bit. Drill some, hollow some, drill some, hollow some otherwise you end up with a corkscrew hole in the bottom that is near impossible to deal with. I use a Clark steady rest. For the main hollowing I use the Clark 1 1/4" boring bar setup with either cupped, round carbide or teardop HSS cutters. Depends on the wood. I also use a Roly Munro tool with the shielded cupped cutter for some of the work and cleanup down to as far as I can reach with it. Again, depends on the wood a bit. For the outside turning it's just a big spindle roughing gouge, spindle gouge and scrapers, and several wheelbarrow loads of shavings. Net, I'm still new at this and learning.
Tom, this was my first piece to boil but from what I've been told and read it speeds up the drying process and reduces the potential for cracks and distortion while drying. It's a common step for doing pieces this size and there are a number of articles here and online on how it works. The basics as I understand it are that it facilitates the trapped water being able to escape the cell structure of the wood and relieves some of the potential stresses.
Tom, are you using the Clark fulcrum support tube accesssory or some type of toolrest extending into your vase to accomplish that depth of cut? Congratulations on pulling off the increase in scale.
Kevin, I don’t have the fulcrum support tube but may add it soon. Not sure if I want the fulcrum tube or simply a leverage pin on the side of my tool rest for the Clark bar but know I need something for stabilizing and leverage. For the Munro tool I have a lighted tool rest with a leverage pin that extends into the piece.
- Joined
- Mar 1, 2006
- Messages
- 137
- Likes
- 74
I believe that David Mark uses this technique. I think it was in his blog several years ago. Yes for stabilization.Interesting, but I must have missed something somewhere along the line... what is the point? Stabilization?
I’ve only went ~ 16” deep, but note that for “roughing” the inside the smaller the available cutting edge the better. Having used the 3 cutters you mention, and a 3/16” square hss tool bit, I much prefer the 3/16” bit for hogging the inside. I just mention it for something you might try. The other cutters are definitely better for smoothing things out inside.the Clark 1 1/4" boring bar setup with either cupped, round carbide or teardop HSS cutters. Depends on the wood. I also use a Roly Munro tool with the shielded cupped cutter for some of the work and cleanup down to as far as I can reach with it.
The boiling is an interesting topic and I look forward to your evaluation of the impact of it.
Well, I don't boil, preferring warped pieces, but I have listened to Dale Larson a few times. There are 2 types of water in wood, free and bound. The free water is what sprays on you when you turn green wood. The bound water is at the cellular level. What the boiling does is it ruptures the cell walls which allows the bound water to exit more easily. This greatly reduces the risk of cracking and warping is almost zero. The down side, to me is that it tends to muddle the wood colors together. Stainless steel pots should be used, or galvanized at least to prevent metal stains. The process is supposed to be in the area of 1 hour per inch of thickness, then allow the water and vessel to come back to room temperature in the water, then remove. Some will seal the pieces. Not sure if I would or not. I would still wrap the stretch film around the rim and base, or seal them.
One club member would steam his pieces. Not sure exactly how that worked, but it doesn't burn nearly as much fuel to get the same effect.
robo hippy
One club member would steam his pieces. Not sure exactly how that worked, but it doesn't burn nearly as much fuel to get the same effect.
robo hippy
Robo, I put them into large drying boxes (cardboard) with a piece of PVC tube extended into the vase and a small 12v fan on top of the tube. It pulls the air out of the inside of the vase and circulates it around inside the box. Keeps the air inside the piece mixing with the rest of the air in the box rather than just staying damp and humid inside the vase. Same concept as putting things in a paper bag, which I do for all my other pieces. Again, not my ideas. Getting expert advice from John Tisdale.
I'm still looking for a large stainless or copper kettle to use. All I could get my hands on was an old air compressor tank so rust is going to be an issue. I cleaned, scraped, 60 grit wheel on my grinder, etc then some high temp paint but it's still going to rust here and there over time.
I'm still looking for a large stainless or copper kettle to use. All I could get my hands on was an old air compressor tank so rust is going to be an issue. I cleaned, scraped, 60 grit wheel on my grinder, etc then some high temp paint but it's still going to rust here and there over time.
I have read that boiling breaks up the cell structure and allows drying without cracks. I have tried, with some success, freezing smaller pieces for a couple of days in order to break up the water holding cell structure. A larger piece might benefit from freezing if you have the freezer capacity. Would be interesting to set up an experiment with 3 similar turnings. Freeze one, boil one, and leave one to dry. See what the results look like.
If heating the wood without drying it at the same time is required, it seems that a steam chamber would be as effective, more efficient and would avoid metal stains. I suspect would still tend to muddy the colors, at least in some woods - steaming is how commercial kilns blend the sap and heartwood colors in walnut. Maybe boiling doesn't do that so much?
After boiling, most wood types seem to dry a lot quicker, some will dry too fast with air moving across the blanks, be careful.
Kevin, my understanding is the boiling doesn't impact the color very deep in so the second turning should bring it back to original state. Like I said, first one and it's willow so who knows.
Darryn, never heard of freezing but the concept seems reasonable. I don't have the space so not something I can try. Too much ice cream in there.
Darryn, never heard of freezing but the concept seems reasonable. I don't have the space so not something I can try. Too much ice cream in there.
In my experience, boiling does indeed help mitigate cracks as well as speed up the drying process considerably. That said, it may help prevent warping a little bit, but that's likely dependent. on the piece itself. I imagine an end grain vessel, post boiling would warp very little, but a facegrain bowl (or equivalent) would still warp. I have a big Red Oak bowl drying that I boiled for a few hours--it's a big ole oval now (I even fully coated in anchorseal). The color does change a little bit, but I think it's in the same vein as surface oxidation. The pot is also a big component. Tannin-rich woods would react with some metals, so aluminum or stainless steel is probably best. I have a big stainless steel pot I use (18"d x 15"h), and it works well. I bought it at lowe's (seafood boil pot). You may be able to weld two stainless steel pots together to get the height you need.
I know @JeffSmith has done a lot of boiling, so he could offer some additional good insight.
I know @JeffSmith has done a lot of boiling, so he could offer some additional good insight.
Hi Randy, Your description of the process and the tools needed to accomplish your hf vase is very helpful. As I read, the dollars started to add up at a frightful rate. It demands a big commitment to doing multiple pieces. Hmm. As my boss used to say: "I'll take it under advisement".For hollowing I use several tools. I have a Simple hollowing articulated setup for the neck and first 5-6 inches. Easy to control and get started with. For drilling the pilot hole I use a Milwaukee switchblade 2 9/16" bit. Drill some, hollow some, drill some, hollow some otherwise you end up with a corkscrew hole in the bottom that is near impossible to deal with. I use a Clark steady rest. For the main hollowing I use the Clark 1 1/4" boring bar setup with either cupped, round carbide or teardop HSS cutters. Depends on the wood. I also use a Roly Munro tool with the shielded cupped cutter for some of the work and cleanup down to as far as I can reach with it. Again, depends on the wood a bit. For the outside turning it's just a big spindle roughing gouge, spindle gouge and scrapers, and several wheelbarrow loads of shavings. Net, I'm still new at this and learning.
Larry, doing very large forms is not a trivial undertaking for sure. It does add up quick. The primary cost elements are things like boring bars, steady rests and hoists. I have a Jet 1642 and the pieces are pushing the limits of what my machine is able to deal with. The process and order of operation also become more critical. It's a very different time commit. I can rough out, shape and hollow a small to med hollow form in an afternoon. The work and time to finish go up fast once you start on a vase that's 27" tall and hollow to 25+". I take it in stages over a number of days. In between working on it I submerge it in a large plastic tub of water and then come back to it in a couple of days. All that said, I decided it's a path I wanted to pursue so off I went.
Michael, thanks for the tip. Duh, I didn't even think they would make a crawfish boiler in the size I needed. Been looking this morning and I can find aluminum and stainless (not cheap) but so far I can only find them 25" deep. I need about 30", maybe get by with 28". I'll keep looking.
Do you wrap the outside of the piece in plastic when hollowing to slow down drying while working on it? Some stretch film works wonders.I take it in stages over a number of days. In between working on it I submerge it in a large plastic tub of water and then come back to it in a couple of days.
Yes, I spray it down then wrap it with stretch film. I also spray the opening/neck area and the foot from time to time since they're exposed and get dry while turning.Do you wrap the outside of the piece in plastic when hollowing to slow down drying while working on it? Some stretch film works wonders.
Randy, I have heard of using galvanized water troughs for the boiling. I know the ganvanizing wears out eventually. No clue as to how far the metal staining will penetrate. It goes in deeper in the end grain for sure. Keep us posted!
robo hippy
robo hippy
In David Ellsworth’s book, there is a picture of him using a galvanized trash can after he soldered the seams to keep it water tight. The galvanizing would wear off eventually though. Maybe a stainless steel trash can would work?
Regarding warpage: A post up top states that boiling lessens the warping.
I have NOT found that to be true - a volatile wood like Michaels red oak will still warp like crazy.
For the few that have not read Bruce Hoadley's UNDERSTANDING WOOD, you might do so. Hoadley approaches wood as an engineering material - he goes on to detail the various species and their attributes.
To my thinking, it's critical to have some idea of both the absolute radial and tangential shrinkage and the percentage between the two (aka warpage).
I did my first red oak hollow-form as a commission in early 2020 (red oak is the choice of bold men and idiots - no one in-between) - had to leave the wall thickness a little over 1" thick (20"dia) to allow for the inevitable warpage - final thickness was about 3/8" - had the wood been mesquite, I would have roughed to maybe 3/4"
I started out considering a galvanized livestock feed/water containers but my local tractor supply didn't have any in the dimensions that would work. I'll revisit and see. A big metal trash can would be great as well but, where the handles attach would need some attention for leaks. My neighbor owns a local steel fabrication business so the setup I have now was free and readily available.
I initially bought a metal trashcan for boiling, but it leaked everywhere, moreso than just the handle attachment. Everywhere there was a rolled seam leaked. You'd need to solder everything to keep it water tight (like Kevin mentioned above re. Ellsworth)I started out considering a galvanized livestock feed/water containers but my local tractor supply didn't have any in the dimensions that would work. I'll revisit and see. A big metal trash can would be great as well but, where the handles attach would need some attention for leaks. My neighbor owns a local steel fabrication business so the setup I have now was free and readily available.
welcome to the boiling brother/sisterhood. I’ve been a boiler for about a decade and a half, but never attempted a piece as high/long as yours. It seems you’ve already solved the biggest probkem - a vessel big enough to handle your pieces. I use a very large aluminum stock pot - 180 quarts - that I found in the scratch and dent section of a restaurant supply house. It does take a while to bring it to a boil when reasonably full. My routine looks like this - on roughing day the pot is set up on a propane jet burner; roughing starts and as pieces are cored out of the blanks they are chucked into the pot. this proceeds until the pot is full or I’ve run out of juice to keep going. If there’s more than fit in the pot (often) they get covered by shavings until the pot is emptied.
By now most pieces have been in the pot for at least a couple of hours and I start pulling them out with an old set of blacksmith tongs or just using a stick to bring them up to the surface and grab with gloved hands. Don’t let the pot cool - stack on edge on the shop floor near the doors where air circulation is good and don’t disturb til morning. They steam nicely as they cool. The pot is then refilled for any pieces left to boil. It holds a lot when pieces have been cored they often wind up nestled that way in the pot.
In the morning the cooled bowls are stacked on stickers rim down - again with good air circ - and left to get surface dry. they then go on wire shelves to store until fully dry.
I’ve found that if they’re left to cool in the pot there is nearly always a major problem with mold before they get surface dry. This may be a climate related situation (I’m up in the upper left hand corner, very close to salt water near the Canadian border). A spritz of boric acid/peroxide solution takes care of mold problems if needed.
I follow this process for both all madrone (straight grain and burl) and maple (burl and highly figured) or any fruitwood I suspect may be prone to cracking. Been doing it for a long tine and find warpage is reduced and cracking pretty much eliminated. John is right - it doesn’t eliminate warping, but does seem to lessen it. I typically can chuck up the pieces when re-turning by the warped tenons with no problem. I tend to chuck them up by the warped tenon, turn a recess in the inside and grip by the recess to true up the tenon and complete the outside before gripping by the tenon to hollow. May sound like extra work, but its my routine and it works fine for me.
Jeff, thanks for chiming in. I didn't let it sit in the hot water until it got cool. It would have been there a LONG time. I started a siphon hose and then replaced with cool water as it drained out so net is I brought it down slowly over about an hour. I did let it sit out overnight in the garage and part of the next day, until it quick leaving water puddles under it at least. It's now in my drying box with the tube fan. Time will tell. The one thing that is different re your process is I put the piece in and brought it up to a boil slowly. Figured and have been told not to "shock" the piece by dropping it into boiling water plus it seems a lot safer considering the size and height of my setup.
I've looked and looked for pots and find lots of restaurant pots online that are big enough in terms of volume but always a few inches short. Rust is going to be a constant battle on my steel one. I can find them 25" tall but I need 28-30 inches. Let me know if you know of a source.
I've looked and looked for pots and find lots of restaurant pots online that are big enough in terms of volume but always a few inches short. Rust is going to be a constant battle on my steel one. I can find them 25" tall but I need 28-30 inches. Let me know if you know of a source.
I purchased a stainless steel pot that is 22.5" in diameter and about 40" tall. Found it at a salvage yard nearby. The pot is from the food industry. Thick, well made. I believe I paid less that $300 for it. Heat it with a propane gas burner. I used to get a lot of Madrone wood and boiled that. Have tried boiling other woods, but minor success on the other woods. Valley Oak, Live Oak.
This site has several options that would work. This is one (you would need to cut the top off of this one, but there are other options). I’m sure there are other winemaking/beer brewing suppliers with similar offerings. Maybe one close enough to you to save on shipping too.

 www.usedstainlesssteelbarrels.com
Used 55 Gallon Stainless Steel Barrel | Closed Top (1.5 mm)
New 55 gallon stainless steel closed top barrel. 1.5 mm thick with 2 inch and 3/4" bungs included.
www.usedstainlesssteelbarrels.com
Interesting that a piece can be pulled out of hot water - I've found that the super fast drying resulting when a very hot vessel is pulled can result in some surface checks.
As I do only one at a time, I let the pot cool overnight and pull the very saturated vessel out and put in a box with the little computer fan pulling and circulating the moist air inside the sealed box (as described by Randy Anderson) After about 6 to 8 months it's at 20% MC or less - I can then pull from the box and be more aggressive. The goal is 6% MC
Is the above overkill, perhaps. Problem is, I'm not smart enough to know how much to relax. To my thinking, better to keep a larger number in the queue and adhere to a process that brings results. Add to my thinking the absolute fact that I'm 77yo and going a little slower makes sense
Just a few thoughts from my limited experience. I started "boiling" to "soften" Mountain Mahogany. It is a very hard word that'll quickly dull your steel tools. I considered getting a carbide tipped chainsaw chain to do the initial harvesting. It has beautiful grain.
I ended up using a pressure cooker and a turkey fryer propane burner. The pressure cooker is actually a "pressure canner" that is probably a foot deep and 18" diameter (too small for your project) that I picked up at the local Goodwill. The advantage is that since your are "steaming under pressure", it takes less time and energy to heat it up and it "cooks" at a higher temperature than just plain boiling. I don't know if you could find a large pressure vessel that might work.
The end result for me on my Mountain Mahogany is that is much easier to cut and turn and it reduces cracking as it dries.
Also a thought on "freezing" . . . in our climate, we (used to) regularly see week-long -30 degrees Fahrenheit periods that definitely would "freeze" our trees. I don't know that it has any effect on the properties of our trees (generally coniferous softwood). I believe the theory on "boiling" is that the temperature actually breaks down the lignin in the tree, thus freeing the cellular moisture.
Will the boiling process stop all warping? Well, no. Will it greatly reduce the amount of warping? Absolutely. The 10% rule for twice turned bowls applies to a lot of woods. Some, like madrone, that won't even come close to how much it will warp. By boiling it, you can apply the 10% rule to boiled madrone. No other way to twice turn madrone.
robo hippy
robo hippy
At least for me, the point of boiling is to help mitigate cracking on madrone, figured maple and fruitwoods in particular. Warping is just a fact of life and I don’t even try let alone expect to eliminate it. Besides, letting the wood ‘do its thing’ usually results in a more attractive piece to my eye.Will the boiling process stop all warping? Well, no. Will it greatly reduce the amount of warping? Absolutely.
But, madrone left untreated can and will attempt to twist itself into a pretzel that literally rips itself apart - often seemingly without regard to evident grain patterns. I looked for an example in my shop but only found this old, forgotten chunk of madrone burl that shows a little of the typical cracking pattern that boiling can help control in roughed blanks. It’s far below a ‘normal’ level of cracking but Not untypical in its pattern

boiling is being discussed now on other forums, led me to this discussion:
 groups.google.com
Boiling Wood:How Does It Prevent Cracking?
groups.google.com
I had a friend gift me a madrone burl that had been in his shop for years. There were no visible cracks on the outside of the burl. The inside looked identical to your piece Jeff. Broke my heart. I may have to try some spheres out of it. It does have lovely color in it though.
robo hippy
robo hippy
My question is why boil Willow wood, it is one of those woods that will almost never split, it is a far cry from Arbutus (Madrone)
Leo, my experience is that it will sometimes split. At the bottom of the hollow form if it does. Other reason is that it speeds up the drying process
I did a test using electrically generated steam that seems promising. Two 1500 watt Earlex steam generators piped into a 30 gallon poly bag registered about 206 F on a $8 meat thermometer - not sure of the accuracy but I got the same reading in a pot of boiling water so I think it was hot enough for the purpose. One steamer alone showed 200F on the gauge. The units put out about 6600 btu/hr each as opposed to the 50-100k btu propane burners typically used to boil vessels in large stockpots. The Earlex steamers hold about 5 qts, run for about 2 hours and shut off automatically when the water gets low. I feel a lot more comfortable with them than working with an open flame and a vat of boiling water, the energy cost is less and I am using solar power rather than dead dinosaurs.
I steamed several pieces from the shelf of shame, rejects for various reasons, to see how they would fare. They all discolored superficially to some degree, which I have read is common to boiling as well. They all were once-turned and air-dried and showed a moisture content of 20-30% after two hours in the bag. The spalted piece changed color the least and it was not objectionable, but I think the process is better suited to twice turning for other types of wood as one would have to sand heavily to get through the discolored layer.
Having a "steambox" I can fold up when not in use is a great advantage in a small shop, and as shown in this video can be adapted to pieces of any size steam in a bag. Next time I will use some type of tub under the bag to catch the condensate, and perhaps use some type of insulating blanket over the affair.
I can't say if steaming is equivalent to boiling for conditioning turned pieces but I will experiment more as called for.
Last edited: