• January Turning Challenge: Thin-Stemmed Something! (click here for details)
  • Conversations are now Direct Messages (click here for details)
  • Congratulations to Scott Gordon for "Orb Ligneus" being selected as Turning of the Week for January 20, 2025 (click here for details)
  • Welcome new registering member. Your username must be your real First and Last name (for example: John Doe). "Screen names" and "handles" are not allowed and your registration will be deleted if you don't use your real name. Also, do not use all caps nor all lower case.

Willow burl... what to do with it, how to handle it... dry it... all of it

Joined
Nov 21, 2022
Messages
7
Likes
297
Location
Virginia
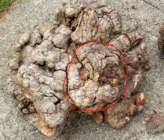
Greetings - I've been turning for about 9 months and have started to collect wood from things like facebook marketplace (free wood), and friends, and the HOA common areas. Today I picked up a bunch of willow, chunked it out and glued up the end grain, but I ended up with a ton of burl from this tree. I imagine with this willow burl - one quite large. You might say.... I might have hit the holy grail with this one in particular quite large. I fear I have a mental block. Do I treat this like any other burl? What do I do with it? How long should it sit - how to treat it to dry / season well?, any ideas on what to make with it? It's about 18 inches around, 10 inches deep - bigger than my 16 inch max on my current lathe (do I buy another lathe... already?! = j/k.... kinda) I'm certain I'm not the only one to have asked this question before. I think I'll go spend a bunch of time searching the forums in solitude rather than trying to strike up a conversation or ask advice from the depth of wisdom available. Maybe Youtube will suffice instead.
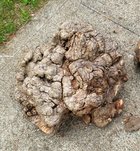
20230521_174751~2.jpg
 
Last edited:
Just like any other burl. Curious that everyone figures they hit the Holy Grail when they find a burl, but then suffer mental lock when they want to work with it. You are far from the only one to ask those questions.
 
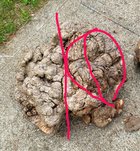
I'd suggest cutting it into sections that are approximately round and are a size you are comfortable turning. 12" diameter might be a reasonable target size. Cut into sections that look naturally round, not quite sure how to describe what I mean here, but one example circled in your picture:
1684754999623.png

Willow burls are fairly common, at least where I live. So don't be intimidated or think that this is a once in a lifetime chance.

The ones I've used did not have as much figure inside as a high quality maple or cherry burl. But still had lots of character, especially from the uneven rim (turned as natural edge). They also developed lots of surface checking as they dried. I filled the checks, probably with coffee grounds and CA, and that added interest too.
 
Tom, you haven't mentioned the size of the burl or the size of the lathe you'll be turning it on.
Huh??? he does in original post.. says the burl is roughly 18 inch by 10 inch, and bigger than his 16 inch lathe swing can handle... ?
But after all the burls I've cut up over the years I've always had it in the back of my mind to just turn one whole. I think that burl is probably going to have a lot of voids, rot, etc. Whatever you do will make some beautiful natural pieces.
Yup, As I understand it , willow can be difficult to turn as it is, and I suspect burl may be even worse. This one looks like it may end up either as firewood or a lot of smaller boxes/lids judging by the deep furrows in it. I'd probably suggest getting as much bark removed as possible for a better idea of what and where to cut it into blanks and then seal the pieces all around (Anchorseal? PVA glue? emulsified wax, melted wax, etc..) Some people might be able to put this on a lathe and turn a lovely void-y vase or hollow form or bowl or something as a piece of art... I do not have the artistic eye to achieve something like that, unfortunately... and turning with lots of voids I would suggest is something only an experienced turner should be doing...
 
Greetings - I've been turning for about 9 months
Your skill level will limit what you can do with this piece.
The turners I have worked with at 9 months varied in skill level from beginner to well beyond intermediate advanced level.
Most master turners took about 10,000 hours to become a master. In 9 months you can have had 2000 hours at the lathe or less than 40.

If you have turned a dozen natural edge bowls this piece will yield several.
I would think hollow form but if you have done a bunch of HFs you wouldn’t be asking.
Willow is soft and is a challenge to turn - sharp tool light cuts.

Be worth practicing with some other willow.

Like @Dave Bunge look for blanks focusing on the contour.
I might make this first cut then try for this bowl.
The NE blank I would look for would have an outer rim with bumps at similar height.

A shallow NE bowl will have a great scalloped rim, will look good with some thickness. Will look good regardless of grain features.
IMG_0150.jpeg
 
Last edited:
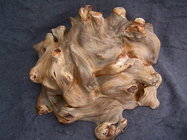
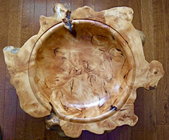
I turned a large Black Willow burl, about 24 ", though it was without all the deep fissures, and I kept the outside and turned the inside away, you will have to look it over and decide what or how to go about it, every burl is different, but be aware that these fissures could be deep enough to have it come apart while turning, be safe.

I had to remove all the very thick bark and clean the outside of the burl, turned it and let it sit, as the wood dried it got several small splits with I filled when it was dried.

Willow burl.jpg
Willow burl now.jpg
 
Last edited:
Leo, I’m curious how you mounted this piece to turn the inside and leave the outside natural. I can imagine affixing it to a large wood faceplate with screws into some of the protrusions and then filling or cutting them off. It’s quite striking!
 
Yes Lou that is basically what I did, at the beginning I set the burl on a piece of plywood to find a position where I would have a couple bumps that would sit on the plywood surface.

When I got those I marked the height around the outside of the burl to the lowest point on it, then chainsawed a good wedge off of the burl to get it all level around.

Eyeballed the burl to find the center of the burl and then a set it on a plywood disk, mark where the bumps/now feet were contacting the plywood,, then drill holes for screws, and screwed the burl onto the plywood disk and the disk to a faceplate.

Turned the top flat and turned the inside, after that the screws were removed and the holes filled up, then waited for more than a year to have the burl dry and then filled and finished the inside, done.
 
You can stare at a log like this until the cows come home or you can get busy:
- first step is to turn a flat for your largest faceplate into the flat from the chainsaw
- trim so it will clear the bed and get started
- go very slow with very sharp gouges
Something will emerge
 
Back
Top