• Beware of Counterfeit Woodturning Tools (click here for details)
  • Johnathan Silwones is starting a new AAW chapter, Southern Alleghenies Woodturners, in Johnstown, PA. (click here for details)
  • Congratulations to William Rogers for "Ambrosia Maple Platter" being selected as Turning of the Week for September 16, 2024 (click here for details)
  • Welcome new registering member. Your username must be your real First and Last name (for example: John Doe). "Screen names" and "handles" are not allowed and your registration will be deleted if you don't use your real name. Also, do not use all caps nor all lower case.

Walnut Oil Dulling Out

Joined
Jun 15, 2024
Messages
27
Likes
24
Location
Lawrenceburg, TN
Hi everyone,
New member here with my first post other than my introduction post. I just recently started using Mahoney's Walnut oil. I've been wet sanding with it up to 1,000 grit and I get a very nice satin sheen. I've noticed though that after 2-3 days drying time the sheen has dulled out to a at best a matt sheen. Do you guys find the same thing using walnut oil? I don't particularly like using wax or having to buff my pieces but that does bring the sheen back, though I'm sure it would wash right off.
 
Joined
Feb 26, 2019
Messages
1,897
Likes
1,488
Location
Lebanon, Missouri
I use Mahoney’s. It takes a long time, as in 6-8 weeks, for walnut oil to cure (normal room temp/hum). As such, it keeps seeping into the wood for a while. You are seeing the glisten of the wet oil, which goes away as the oil soaks in.

I typically apply ~ 4 coats over 2-3 days, not wiping it off. I check the surface several times a day and just move the surface oil around as needed, and add more as needed. After it appears the wood is saturated, I wipe the surface down. I let it sit another day or 2, then put it in heat - outside in summer, into my cardboard box finish kiln in cooler weather. I check the surface 2-3 times a day for bleed out, and just buff the surface with a blue shop towel.

After about 3-4 days, it has pretty well set up in the heated environment. This is to get a a surface with a bit of gloss. For utility items intended to be used, I don’t go through this much trouble. I’ll wipe several coats on over 3-4 days, wipe it off, and call it good. It will be pretty much a matte finish, might be a little gloss depending on final sanding grit.
 
Joined
Oct 25, 2020
Messages
340
Likes
294
Location
Minneapolis, MN
Like Doug said...

Oil is my go-to finish. (Tried & True products, which use very thin coats with thorough wipe off, no standing oil left on the surface.) Those later coats of oil will eventually stay up nearer the surface as the deeper ones cure, but won't really stay *on* the surface. You may see a cosmetic appearance that meets your wishes after 3-4 coats have cured, but in the end if you are looking for some surface sheen/shine (even if it's not a plastic layer build-up), your last coat may need to be something akin to varnish. That can be as simple as your penetrating oil with a bit of Minwax Wiping Poly mixed into it (as strong as 1:1 oil to Mixwax, or as little as 5:1 oil to Minwax), or even a wipe on-wipe off coat of the Mixwax thinned 1:1 with mineral spirits. The result is a wee bit of varnish settled down in the surface grain that may provide a subtle sheen without it looking like the piece is encased in a surface build-up of varnish. And, all woods will show different final results, so having a small can of a wiping varnish on hand ain't a bad thing at all for when your oil needs just a bit extra zip to it.

There are a ton of varnish products out there that are nothing more than blends of oil, varnish, and solvent to make it water consistent and wipable. Watco, Mixwax Wiping, and Waterlox are but 3 of them. A home brew of 1:1:1 oil (walnut, pure linseed, pure tung) and wiping varnish and mineral spirits would make a great last wipe on/wipe off coat (let it sit 5 minutes or so before wipe off). Have fun with it!
 
Joined
Jun 15, 2024
Messages
27
Likes
24
Location
Lawrenceburg, TN
I use Mahoney’s. It takes a long time, as in 6-8 weeks, for walnut oil to cure (normal room temp/hum). As such, it keeps seeping into the wood for a while. You are seeing the glisten of the wet oil, which goes away as the oil soaks in.

I typically apply ~ 4 coats over 2-3 days, not wiping it off. I check the surface several times a day and just move the surface oil around as needed, and add more as needed. After it appears the wood is saturated, I wipe the surface down. I let it sit another day or 2, then put it in heat - outside in summer, into my cardboard box finish kiln in cooler weather. I check the surface 2-3 times a day for bleed out, and just buff the surface with a blue shop towel.

After about 3-4 days, it has pretty well set up in the heated environment. This is to get a a surface with a bit of gloss. For utility items intended to be used, I don’t go through this much trouble. I’ll wipe several coats on over 3-4 days, wipe it off, and call it good. It will be pretty much a matte finish, might be a little gloss depending on final sanding grit.

Like Doug said...

Oil is my go-to finish. (Tried & True products, which use very thin coats with thorough wipe off, no standing oil left on the surface.) Those later coats of oil will eventually stay up nearer the surface as the deeper ones cure, but won't really stay *on* the surface. You may see a cosmetic appearance that meets your wishes after 3-4 coats have cured, but in the end if you are looking for some surface sheen/shine (even if it's not a plastic layer build-up), your last coat may need to be something akin to varnish. That can be as simple as your penetrating oil with a bit of Minwax Wiping Poly mixed into it (as strong as 1:1 oil to Mixwax, or as little as 5:1 oil to Minwax), or even a wipe on-wipe off coat of the Mixwax thinned 1:1 with mineral spirits. The result is a wee bit of varnish settled down in the surface grain that may provide a subtle sheen without it looking like the piece is encased in a surface build-up of varnish. And, all woods will show different final results, so having a small can of a wiping varnish on hand ain't a bad thing at all for when your oil needs just a bit extra zip to it.

There are a ton of varnish products out there that are nothing more than blends of oil, varnish, and solvent to make it water consistent and wipable. Watco, Mixwax Wiping, and Waterlox are but 3 of them. A home brew of 1:1:1 oil (walnut, pure linseed, pure tung) and wiping varnish and mineral spirits would make a great last wipe on/wipe off coat (let it sit 5 minutes or so before wipe off). Have fun with it!

Thank you for the helpful responses guys!
 
Joined
Jun 15, 2024
Messages
27
Likes
24
Location
Lawrenceburg, TN
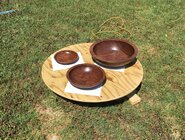
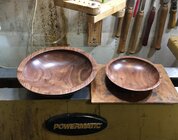
This may sound crazy LOL but on the last couple of bowls I used Waterlox as a sealer coat and then 48 hours later used the walnut oil to wet sand the bowls. I don't want anything left on the surface and want the finish to be easily repaired by the customer. That seemed to help a little. I'm not looking for a gloss finish but I do like them to have a low satin sheen. This photo was taken right after the wet sanding with walnut oil. That's about the sheen I like if it will stay that way at least until the customer receives them.

Tree To Finished Bowl (128).JPG
 

Dennis J Gooding

Beta Tester
Beta Tester
Joined
Apr 10, 2010
Messages
833
Likes
800
Location
Grants Pass, Oregon
Hi everyone,
New member here with my first post other than my introduction post. I just recently started using Mahoney's Walnut oil. I've been wet sanding with it up to 1,000 grit and I get a very nice satin sheen. I've noticed though that after 2-3 days drying time the sheen has dulled out to a at best a matt sheen. Do you guys find the same thing using walnut oil? I don't particularly like using wax or having to buff my pieces but that does bring the sheen back, though I'm sure it would wash right off.
Tim, I see that you have seen one of my earlier posts regarding drying of walnut oil. I ran experiments that showed (1) that exposure to light is essential to the drying process, (2) that 3 days or so exposure to direct sunlight will harden the oil. and (3) that Mahoney's oil and three different supermarket brands of walnut oil performed about the same. However, I did not explore what drying times would be required for various forms and intensities of artificial light.

By the way, it is somewhat hard to tell whether the oil on a work piece has completely dried. One solution to this problem is to apply the oil to a piece of paper towel at the same time as the work piece and to leave it in the same environment as the work piece. The oiled towel will become crisp when the oil has set.
 
Last edited:
Joined
Oct 25, 2020
Messages
340
Likes
294
Location
Minneapolis, MN
Tim, using the Waterlox first did just as you stated, mostly sealed the wood. Your oil wet sanding was just that, more a final sanding of any surface of the cured Waterlox mellowing whatever sheen was there and maybe some of the wood itself, but very little of that oil will get into the wood past the Waterlox varnish resin. If it were mine I'd still do a coat or two of oil first, and if you're happy with the Waterlox/oil wet sand process you described, do that again, and see how it turns out. It's almost impossible to screw up what you're doing, just be sure to give those steps their full curing first. Have fun with it and maybe keep notes of what you did.
 
Last edited:
Joined
Jun 15, 2024
Messages
27
Likes
24
Location
Lawrenceburg, TN
Tim, I see that you have seen one of my earlier posts regarding drying of walnut oil. I ran experiments that showed (1) that exposure to light is essential to the drying process, (2) that 3 days or so exposure to direct sunlight will harden the oil. and (3) that Mahoney's oil and three different supermarket brands of walnut oil performed about the same. However, I did not explore what drying times would be required for various forms and intensities of artificial light.

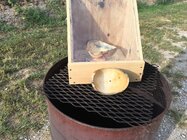
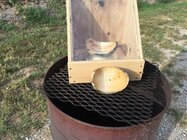
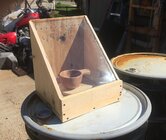
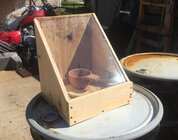
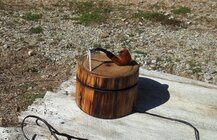
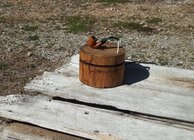
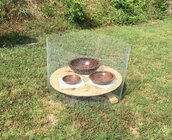
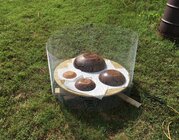
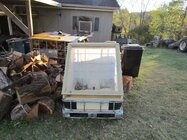
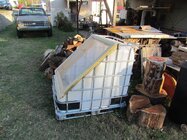
Thank you for the response Dennis! Yes sir I did see that. It's very interesting, I've found the same results when I was using pure tung oil. UV light helped speed the curing time more than any other method I tried, which included heating the items in an oven, keeping them in front of a fan and putting them in sunlight. I actually built a small hot box if you will that looks like a miniature solar wood kiln for cuing items in. It has a glass roof though and a motorized turntable inside it. If I continue to be pleased with the walnut oil I plan to build a larger one of similar style. The bigger one will have hardware mesh for the top/face though and not glass. With Tung oil the UV light sped up the drying time significantly, much like your test with the walnut oil did. I've been reading numerous threads here on walnut oil and seeing what others results have been with it. In the first two photos it just happen to be sitting on the burn barrel, no fire was used in the barrel while the box was in use. 😎
 

Attachments

  • IMG_7074.JPG
    IMG_7074.JPG
    791.1 KB · Views: 13
  • IMG_7075.JPG
    IMG_7075.JPG
    784.3 KB · Views: 13
  • IMG_7763.JPG
    IMG_7763.JPG
    445.2 KB · Views: 12
  • IMG_7764.JPG
    IMG_7764.JPG
    417.8 KB · Views: 12
Joined
Jun 15, 2024
Messages
27
Likes
24
Location
Lawrenceburg, TN
I've heard that critters such as squirrels are quite fond of the oil scent and even heard that some have lost small items such as spoons to squirrels carrying them off, so the box was more for protection against critters than to keep heat in.
I used microwave turntable motors for this one and another motorized turntable I made. I just purchased a replacement rotisserie motor that I'll use in the new one if I build it though. It's slower and has much more power for heavier items such as big bowls which this first one isn't big enough to hold.

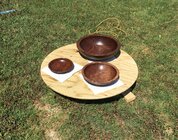
This one made to look like a stump was mainly just for taking photos on.
100_4415.JPG100_4416.JPG
 
Last edited:
Joined
Jun 15, 2024
Messages
27
Likes
24
Location
Lawrenceburg, TN
Tim, using the Waterlox first did just as you stated, mostly sealed the wood. Your oil wet sanding was just that, more a final sanding of any surface of the cured Waterlox mellowing whatever sheen was there and maybe some of the wood itself, but very little of that oil will get into the wood past the Waterlox varnish resin. If it were mine I'd still do a coat or two of oil first, and if you're happy with the Waterlox/oil wet sand process you described, do that again, and see how it turns out. It's almost impossible to screw up what you're doing, just be sure to give those steps their full curing first. Have fun with it and maybe keep notes of what you did.

Thank you Steve! As most here probably are, I'm a wood finish nerd LOL and love learning about them and experimenting with them. After more than 45 years working with wood I've used many different kinds with the exception of the water based finishes which I have no desire to try. I'm always looking for the bestest ;) finish I can possibly use on my work.
 
Joined
Aug 14, 2007
Messages
5,641
Likes
2,992
Location
Eugene, OR
I use the Doctor's Woodshop walnut oil, and I don't know how different it is from Mahoney's. I never get a gloss finish. I apply with one of the grey synthetic steel wool pads and that is it, other than wiping off with an old T shirt. They may stay more glossy till the first time you wash them off, then that shine is gone. I actually prefer it that way. I generally don't refinish my old plates that I use.

robo hippy
 
Joined
Jun 15, 2024
Messages
27
Likes
24
Location
Lawrenceburg, TN
I use the Doctor's Woodshop walnut oil, and I don't know how different it is from Mahoney's. I never get a gloss finish. I apply with one of the grey synthetic steel wool pads and that is it, other than wiping off with an old T shirt. They may stay more glossy till the first time you wash them off, then that shine is gone. I actually prefer it that way. I generally don't refinish my old plates that I use.

robo hippy

Thank you for the response Reed! I've watched your videos countless times and got all kinds of good tips from them. I was hoping you might chime in here. :)
Is there a way I can search the gallery here for your photos? I looked but didn't see a way to do so.
 
Joined
Aug 14, 2007
Messages
5,641
Likes
2,992
Location
Eugene, OR
I don't have any photos up. Never figured out how to do them, both taking and posting. I did some professional photos once when I was doing shows, but only do one show per year now. I used to have some up on my web site, but even took the web site down since I wasn't selling my bowl rests and grinder platforms any more...

robo hippy
 
Joined
Sep 19, 2023
Messages
703
Likes
1,331
Location
Columbia, TN
For a little extra sheen, you could try this:

1. Sand to 320, no higher.
2. Apply shellac. I use a 1# cut. When dry, sand or steel wool the shellac using #0000 steel wool or 1000 grit paper.
3. Apply Yorkshire Grit, Ack's, et al.
4. Apply your walnut oil.

I do this sometimes with Tried and True Original finish.
 
Joined
Oct 25, 2020
Messages
340
Likes
294
Location
Minneapolis, MN
High school wood shop, I remember knocking the sheen down on Deft lacquer with a rottenstone/dishsoap mix and a felt blackboard eraser. Ah, the days when the laws of woodworking required artifical coloring and a thick layer of plastic. I'm glad I know better now.
 
Joined
Jun 15, 2024
Messages
27
Likes
24
Location
Lawrenceburg, TN
For a little extra sheen, you could try this:

1. Sand to 320, no higher.
2. Apply shellac. I use a 1# cut. When dry, sand or steel wool the shellac using #0000 steel wool or 1000 grit paper.
3. Apply Yorkshire Grit, Ack's, et al.
4. Apply your walnut oil.

I do this sometimes with Tried and True Original finish.

I've never tried any of the polishing grits like those, I need to give one a try sometime.
 
Joined
Jun 15, 2024
Messages
27
Likes
24
Location
Lawrenceburg, TN
I don't have any big windows in the house to be able to leave bowls in front of. I'm working on my big motorized turntable to see how the walnut oil responds to direct sunlight. I've about got the turntable itself built but not the box to put it in.
 
Joined
Jun 15, 2024
Messages
27
Likes
24
Location
Lawrenceburg, TN
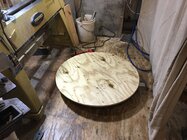
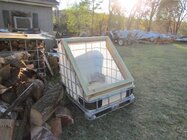
Here's the beginnings of my new hot box with motorized turntable. The table is 36" dia. I don't plan to turn any bowls that big but I wanted it big enough to be able to put two or three decent sized bowls on at a time. The turntable is finished, I just have to figure out exactly how I want to do the lid for the box and finish it.

IMG_3590.JPGIMG_3592.JPGIMG_3593.JPG
 
Back
Top