
- Joined
- May 15, 2004
- Messages
- 10
- Likes
- 0
Vacuum Adaptor for Jet 1642
Vacuum adaptor for Jet JWL-1642EVS-2
Hello,
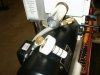
This will be my first post and I am going to start off by attempting to include a picture of my vacuum adapter.
I made this by stacking six pieces of Corian. They were all cut 2 ½ inches by 2 ½ inches. I then glued them up with the gap filling CA glue and let this set up over night before I chucked it up. Next, I drilled a 5/16 inch hole all the way through and turned it down into the shape you see in the picture.
I turned it to just fit the hole in the back of the aluminum hand wheel. Then, with a thin parting tool, I made three small grooves evenly spaced along the outer circumference to accommodate some o-rings. This was a bit time consuming because I wanted to make the depth so there would be a tight fit along the inside wall yet be able to make a good seal.
The other end stepped out to a diameter somewhat larger than the hand wheel (about 2 ¼ inches and 1 inch thick). That’s a dual seal bearing with a brass reducer bushing 3/8 inch male by ¼ inch female. You make this by using a ¼ inch by 3 inch brass nipple. Thread the nipple onto the bushing, chuck it up, turn off the threads with a parting tool and taper to force fit into the ID of the bearing. I used my drill press and pressed (forced) the brass bushing snug to the hex of the bushing. To make a good seal, I used a light application of thin CA glue between the bearing and the Corian.
I used foam material to make a seal between the adaptor and the hand wheel and between the hand wheel and the back of the headstock.
This has worked very well for me. You can get into the vacuum mode very quickly with this arrangement. This adaptor has consistently held in excess of 24 to 26 inches of vacuum.
I hope this will be of some benefit. I have been wanting to share this information for quite sometime.
Vacuum adaptor for Jet JWL-1642EVS-2
Hello,
This will be my first post and I am going to start off by attempting to include a picture of my vacuum adapter.
I made this by stacking six pieces of Corian. They were all cut 2 ½ inches by 2 ½ inches. I then glued them up with the gap filling CA glue and let this set up over night before I chucked it up. Next, I drilled a 5/16 inch hole all the way through and turned it down into the shape you see in the picture.
I turned it to just fit the hole in the back of the aluminum hand wheel. Then, with a thin parting tool, I made three small grooves evenly spaced along the outer circumference to accommodate some o-rings. This was a bit time consuming because I wanted to make the depth so there would be a tight fit along the inside wall yet be able to make a good seal.
The other end stepped out to a diameter somewhat larger than the hand wheel (about 2 ¼ inches and 1 inch thick). That’s a dual seal bearing with a brass reducer bushing 3/8 inch male by ¼ inch female. You make this by using a ¼ inch by 3 inch brass nipple. Thread the nipple onto the bushing, chuck it up, turn off the threads with a parting tool and taper to force fit into the ID of the bearing. I used my drill press and pressed (forced) the brass bushing snug to the hex of the bushing. To make a good seal, I used a light application of thin CA glue between the bearing and the Corian.
I used foam material to make a seal between the adaptor and the hand wheel and between the hand wheel and the back of the headstock.
This has worked very well for me. You can get into the vacuum mode very quickly with this arrangement. This adaptor has consistently held in excess of 24 to 26 inches of vacuum.
I hope this will be of some benefit. I have been wanting to share this information for quite sometime.
Attachments
Last edited: