• Beware of Counterfeit Woodturning Tools (click here for details)
  • Johnathan Silwones is starting a new AAW chapter, Southern Alleghenies Woodturners, in Johnstown, PA. (click here for details)
  • Congratulations to Jim Hills for "Journey II" being selected as Turning of the Week for May 6th, 2024 (click here for details)
  • Welcome new registering member. Your username must be your real First and Last name (for example: John Doe). "Screen names" and "handles" are not allowed and your registration will be deleted if you don't use your real name. Also, do not use all caps nor all lower case.

Today's Crummy Wood

Joined
May 16, 2005
Messages
3,540
Likes
15
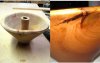
It's all well and good to have principles, but this is, after all an election year where pandering makes them passe. Thus, after finishing up on SWMBOs flatwork requests this morning, I grabbed a chunk of entirely questionable cherry that I found wedged between the bass and the pine lumber. Think it's from last fall. You'll notice the gigantic wind shakes in the non-flash green photo, but I figured I'd spend some CA and risk turning it with cracks rather than make a shortie or pitch it.

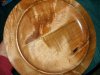
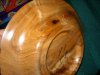
Nothing special, certainly, and with all the cutting of wedges, matching grain directions, and curing of glue, must have spent an extra hour on it. Entirely ordinary, except I saved a piece of firewood.

Cherry. About 9.5 x 4.5.
 

Attachments

  • Crummy-One.jpg
    Crummy-One.jpg
    51.1 KB · Views: 390
  • Crummy-Two.jpg
    Crummy-Two.jpg
    58.5 KB · Views: 390
Joined
Apr 29, 2004
Messages
576
Likes
2
Location
Hanover, VA
Website
www.abhats.com
This shot doesn't show the 1"+ diameter dead branch vertically through from just inside the rim to underneath it. I must have used 6 oz of CA stabilizing the rotted wood and the wind split on the other side that's visible. John wouldn't have liked it, but I thought it was worth saving.
 

Attachments

  • 131 smallist.JPG
    131 smallist.JPG
    62.1 KB · Views: 337
Joined
May 16, 2005
Messages
3,540
Likes
15
This shot doesn't show the 1"+ diameter dead branch vertically through from just inside the rim to underneath it. I must have used 6 oz of CA stabilizing the rotted wood and the wind split on the other side that's visible. John wouldn't have liked it, but I thought it was worth saving.

Those damn radial checks show no matter what, don't they? I say radial check, because it doesn't look like it follows the annuals the way a traditional wind shake does. Mostly I just turn them away or throw them away, of course, but this is a thread about "saving" things, so does anybody have a clue how to keep that black line from showing through any fill? I've had some success with leaving it open and filling it with shellac/pumice, as well as using dead white dust packed and CA'ed into darker woods. Anybody bleaching their way through?

I don't keep 2-part bleach on the shelf, but perhaps a bleach to neutralize the oxidation in the crack followed by an immediate fill? This prior to final passes like other CA fills so you can turn away the off-color areas.

Next time I feel like fiddling I may try one of the peroxide types from the laundry side.
 
Joined
Apr 29, 2004
Messages
576
Likes
2
Location
Hanover, VA
Website
www.abhats.com
There aren't any radial cracks in it. It was a seriously twisted and distressed tree. The crack in the photo on the back follows a growth ring and is twice the width on the bottom. The piece is much heavier than I'd like, but I didn't want anything falling apart. I had to pick it up from a gallery a couple of months back to refinish it (minor wear and tear). I'll take some more photos today and post them.
 
Joined
Apr 29, 2004
Messages
576
Likes
2
Location
Hanover, VA
Website
www.abhats.com
I had to hold the thing in order to reduce glare, and only the top view ended up in decent focus. The really twisted figure is very visible, as is the dead branch running through. I really prefer working with this sort of wood although I've got to think ahead more and be prepared to change what I thought I would do vs. what the wood will let me do.
 

Attachments

  • SS850105.JPG
    SS850105.JPG
    96 KB · Views: 222
  • SS850106.JPG
    SS850106.JPG
    90 KB · Views: 222
  • SS850107.JPG
    SS850107.JPG
    87.4 KB · Views: 222
Joined
May 16, 2005
Messages
3,540
Likes
15
From topside I can see it moves with the annual rings. With those, you might consider a bit of trompe l'oeil. One of the reasons I like wedges for filling is that you can cut them to match the grain direction reasonably well. When done with the same species, they can slide in between those annual rings and almost look as if they were just some earlywood. Take out the dark with a V-shaped carving tool and tap in a male shaving from the same tool. Then the dark on either side looks a part of the pattern. Doesn't work as well if it crosses more than a couple of annuals, though.

Doesn't have that "walleye" look of a sawdust fill.
 
Back
Top