• Congratulations to Alex Bradley winner of the December 2024 Turning Challenge (click here for details)
  • Congratulations to Kris DeVault for "Tri-Corner Trifecta Bowl" being selected as Turning of the Week for December 30, 2024 (click here for details)
  • Conversations are now Direct Messages (click here for details)
  • Welcome new registering member. Your username must be your real First and Last name (for example: John Doe). "Screen names" and "handles" are not allowed and your registration will be deleted if you don't use your real name. Also, do not use all caps nor all lower case.

Templates for One Way Easy-Core

Joined
Jan 20, 2023
Messages
20
Likes
13
Location
Abingdon, VA
I am planning to buy a One Way Easy-Core in the near future and have been watching videos on how to use the system. While searching videos I ran across the following video about templates available that can be used while setting up the coring system. It looks like the templates could be helpful and save setup time; however, I do not have any experience with the Easy-Core and do not know whether they would be of any value.

Do any of you have experience with these templates or other similar templates? Could the templates be beneficial and shorten the learning curve? Based on the number of views of the video, I assume that the templates are not widely used.

 
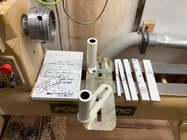
My late friend made up set-up blocks that would lay on the bed so that the base of the Easy-Core could be set at the correct distance from the headstock to produce a standard bowl base thickness. Since there are 3 knives, you basically need 3 block sets, but in order to make it more flexible, he cut a variety of thinner blocks of 1/2-1.5" that could be added together to make the desired thickness. The cost is only your time, as you're using scrap wood for the blocks, no giant notebook needed. He made his from particle board shelf remnants, which allows them to be labeled with a sharpie.

You create the set-up with no blank mounted, by positioning the Easy-Core base so that the knife cuts to the desired depth (distance from the face of the jaws) at or near centerline, and measure that distance from the base of the Easy-Core to the headstock, for each of the 3 knives. Make a block that is the smallest of the distances, the "starter block", and use the "shims" to create the distance needed for each knife. You can also vary the distance by small amounts by swapping "shim" blocks to make the bowl bottom thickness more or less than standard. If you change chucks or change jaws, you'll have to adjust the set up, because changing those will change the distance from headstock to jaw face. (In my system, which now that I look at it is very messy and confusing, I've written those distances for different chuck/jaw combos on the "starter block".)

In use, it's 1) mount the blank into the chuck 2) on the lathe bed, put the appropriate blocks for the knife you want to use 3) slide the Easy-Core base up to the block, and voila', your depth is set. With the base against the positioning block, you then adjust the base position so that the knife starts the cut at the desired wall thickness, lock it down and go to work.

This is much easier to understand visually, than in words:
IMG_1906.jpg
In use, one or several of the thin blocks would be placed between starter block and OneWay base. (Note that the 3520A lathe has a slightly curved edge to the headstock base, so the starter block is made to allow for it)
 
Last edited:
Mine are around the shop some where.... You can make your own simply enough, I am too cheap to buy them. I think they used to send them with the coring system, but I don't remember. You can set it up for each blade, and measure where the base sits and making sure you have 1/2 inch+ clearance when you get to the chuck. I made mine rectangular so I could use one edge for one bar, and the other edge for the next size up or down.

robo hippy
 
You can download a trial template and I think this is a pretty good thing that would help new users but a whole lot of turners. Covers up from 8" to 20" bowl diameters and thicknesses. I'm impressed.
 
I just cut some plywood scraps to the proper length. The length the cutter will enter the bowl blank at it's deepest point. They butt up to the base of the cutter mount. Want to make sure.....I hold a carpenter square on the headstock edge of the plywood and hold it at 90 degrees from the lathe bed. I do not make funnels. Sometimes the blank is a little thick maybe, but that is just trimmed away. Cost was a little time and scrap plywood. $80 seems a bit much for a simple solution.
 
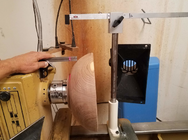
Here's another way...use a laser pointer to help set the base. This is the laser from my hollowing rig. I added a steel post to adapt it to the Easy Core.

The horizontal bar on top holds the laser and is calibrated for the different sized knives. It's set for the 13" knife in the picture below. The laser points to the same spot that the outside edge of the cutter would be if the knife was in the base instead. So you can see on the bowl exactly where the knife is going to hit.

I have a hard time judging thickness from the laser hitting the curved surface of the bowl. So I measured the distance from the headstock to the edge of the chuck jaws and wrote it on each of my chucks (4 3/8" for the chuck in the picture) So if I want a 1" thickness on the bowl bottom, I set the rig so the laser hits 5 3/8" from the headstock.

I think it's more flexible than using set up blocks. Easy to compensate for different chucks (e.g. Nova Powergrip jaws are taller than than their more standard jaws). Easy to adjust for different knife sizes. Easy to dial in an exact/custom thickness for a bowl bottom (once turn vs twice turn bowls). I had a stretch when I did a lot of once turned cores, both NE and cut rim. Using the laser I was able to consistently get within 1/8" of my desired bottom thickness.

Here's a photo:
1735777269729.png
 
You can download a trial template and I think this is a pretty good thing that would help new users but a whole lot of turners. Covers up from 8" to 20" bowl diameters and thicknesses. I'm impressed.
Thank you for the input. I will probably test the trial template when I get my new lathe and the coring system set up.
 
I didn't realize the One-Way system is a bit trickier to visualize and set up. I bought the Woodcut Max 4, but it didn't include the free laser attachement. I made my own and it is quite helpful to see exactly how deep your blades will be cutting.
 
I bought that set of templates, had them printed them on cardboard stock, cut out the templates, put them folders in a binder so they would be accessible, and have never used them. Not once.

The product is fine, it just isn't needed. It is not hard to do it without templates. I made a simple laser guide (like Dave Bunge's above) and it helps when I have some doubts about the depth or the path of the cutter.
 
I hold the cutter over the bowl blank as it would be at full depth, align the post to the holder by eye, then look down at the cutter from above. It works surprisingly well.
 
Back
Top