• April 2025 Turning Challenge: Turn an Egg! (click here for details)
  • Congratulations to Kelly Shaw winner of the March 2025 Turning Challenge (click here for details)
  • Congratulations to Ellen Starr for "Lotus Temple" being selected as Turning of the Week for 21 April, 2025 (click here for details)
  • Welcome new registering member. Your username must be your real First and Last name (for example: John Doe). "Screen names" and "handles" are not allowed and your registration will be deleted if you don't use your real name. Also, do not use all caps nor all lower case.

Tear Out? Something new...

Joined
May 6, 2024
Messages
26
Likes
942
Location
Bloomington, IN
Website
www.ninog.com
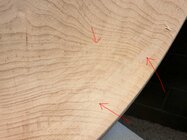
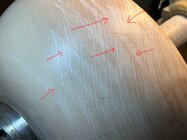
I have a question for you vastly more experienced turners. I'm seeing a lot of what I'm calling micro tear out. Maybe it is just tear out but it seems pretty fine yet stubbornly hard to get rid of.

First off, I'm using a 55º swept back bowl gouge and yes I kiss it before the final cuts with a 180 grit CBN wheel. I'm "ridding the bevel" as much as I can and keeping the last several cuts very light. Sometimes I sheer scrape too using the bowl gouge or a slightly rounded skew chisel.

This tear out I'm seeing really bad in second turnings of very dry Cherry, Maple and Walnut. But it seems easier to sand out of the Walnut. I watched several good videos on YouTube referencing this but despite my efforts its still there in many of my bowls.

Is it the species of wood I'm using?
Am I just being too picky?
Is sanding the crap out of these hardwoods normal?

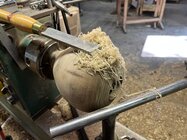
Thanks for thoughts and comments in advance. Have a great Memorial Day!IMG_2909.jpgIMG_2909.jpg
IMG_2930.jpg
 
It is the nature of cutting end grain, but in a couple of spots in the last photo I'd be led to believe your gouge isn't quite as sharp as you think it is. But the majority of it appears to be just runout of the bowl due to wood movement (Rotate lathe by hand while holding a pencil to your tool rest and contacting the bowl. if you lock pencil to tool rest you'll discover that pencil hits the bowl in some spots but tends to skip over those end grain spots ) and that combined with the tool marks (which those "record groove" marks are, really) makes me wonder if your tool rest is actually glass smooth? run a fingernail along the tool rest where tool rides on it and if you can feel your nail "chatter" then so is your tool.) Just IMHO. based on my own past experience with my harbor fright lathe and the runout in the spindle (plus aforementioned wood movement/warp) Some of it might be helped by a bowl steady rest (how thin is your bowl wall?)
 
Your wall looks pretty thin, so vibration is probably the number one problem. Second I have had some woods do this, it is mostly due to the wood fibers being crushed instead of cut. Try to steady the bowl with your hand or a rest and make sure the tool is sharp and the bevel angle is correct, I use a 50° angle on all my gouges. And no you are not being too picky, seeing potential problems and asking about them is a great step to becoming better!
 
Are you sanding at high speeds? I sand at 100 because that's the lowest my lathe will go, and with the light warpage on some bowls that's too fast for the pad to stay in contact all the way around.
 
It is the nature of cutting end grain, but in a couple of spots in the last photo I'd be led to believe your gouge isn't quite as sharp as you think it is. But the majority of it appears to be just runout of the bowl due to wood movement (Rotate lathe by hand while holding a pencil to your tool rest and contacting the bowl. if you lock pencil to tool rest you'll discover that pencil hits the bowl in some spots but tends to skip over those end grain spots ) and that combined with the tool marks (which those "record groove" marks are, really) makes me wonder if your tool rest is actually glass smooth? run a fingernail along the tool rest where tool rides on it and if you can feel your nail "chatter" then so is your tool.) Just IMHO. based on my own past experience with my harbor fright lathe and the runout in the spindle (plus aforementioned wood movement/warp) Some of it might be helped by a bowl steady rest (how thin is your bowl wall?)
Thanks Brian! I like to get the wall to 3/8" but often end up thinner buy way of 80 grit in these situations... Movement, and tool sharpness are where I was wondering. I also have a 320 grit wheel. Should I go to that one? I heard someone on YT say they stick with their 180 grit so that's why I'm at that point.

I haven't got a good procedure yet for second turning and the bowls I'm turning for the second time were some of my first - just say'n. I have felt vibration from time to time. I'm liking once turned more and more but I want to be good at this regardless.

The tool rest is stock Powermatic. Is there a better option? I do have a Oneway curved tool rest for the interior. I also oil the tool rest, and the bed, with Camellia oil. That helps keep it pretty smooth.
 
Are you sanding at high speeds? I sand at 100 because that's the lowest my lathe will go, and with the light warpage on some bowls that's too fast for the pad to stay in contact all the way around.
Didn't know that. I mostly use a drill with a 3" soft pad although at the slowest speed. I use the lathe too but, yes, way fast. Thanks Russell
 
Your wall looks pretty thin, so vibration is probably the number one problem. Second I have had some woods do this, it is mostly due to the wood fibers being crushed instead of cut. Try to steady the bowl with your hand or a rest and make sure the tool is sharp and the bevel angle is correct, I use a 50° angle on all my gouges. And no you are not being too picky, seeing potential problems and asking about them is a great step to becoming better!
Gabriel, Thanks for the input and encouragement. Yes, I like to get to 3/8" for a simple bowl.
 
Appears that a lot of the tear out will be removed by the time all the tool marks are out. I would shear scrape all of the marks/tear out away. That will preserve wall t vs more gouge cuts at your current capability. Continued practice will get better gouge finish cuts.
 
vibration is not your #1 issue and you are not being picky. Why not attempt perfection? I've turned bowls with less than 1/8" thick walls. If it was vibration, the wood will chatter and you get an undulating surface. You can get a better shearing cut of you use a freshly sharpened gouge and a super light shearing cut. Using your gouge as a shear scraper will also improve the surface. Drop the handle way below the lathe bed and draw the gouge with the bottom cutting edge just skimming along the surface. Nothing thicker than whiskers should be coming off the gouge. I find those 3 species you mentioned are more prone to that. If I'm having a bad day, I take a slightly damp cloth and wipe down the end grain. It swells the fibers and they cut a little cleaner.
 
I also have a 320 grit wheel. Should I go to that one?
Not necessary really. I have a 180 grit myself. There's a thread elsewhere in the forum discussing benefits of higher grit wheels, but those benefits seem to apply more to the higher grade steels - if you're using plain old M2 to M42 HSS tooling, I don't think you'd see much difference in a higher grit wheel. HOWEVER.. what I mean by not as sharp as you think it is - Like I have found myself on many edged tools, including plane irons, (I doo hand tool wood work too) a keener edge may be very difficult to tell from just looking at it by someone who has not actually seen the difference in person.. and "shaving arm hairs" really isn't all that good of an indicator of sharp - just shows it is sharp enough to shave your arms and doesn't mean it's sharp enough to slice through hardwood end grain. Magnifying glass examination (or one of those cheap USB microscope loupes from amazon) can help you refine your sharpening technique to get that truly sharp edge.
The tool rest is stock Powermatic. Is there a better option?
Not especially- It isn't the brand of tool rest, it's the fact the rest "edge" where your tool touches it needs to be perfectly flat and glass-smooth - tiny dents and imperfections (which invariably show up even with the best of turners) are going to affect movement of the tool along the rest and cause little "hesitations" in the tool movement which will translate into the cut surface. Those imperfections you won't feel by running a finger over them (it may feel smooth and flat to touch) but can still catch a fingernail (You ever try scraping a bit of gunk off your kitchen countertop with a fingernail? you can feel when you catch the gunk even if you wouldn't feel it with fingertips) - as I said those imperfections translate to your tool movement which then will show up in your cut.

For newbies, it is not uncommon that they'll need to very frequently file and sand and polish their tool rest until they learn better tool control and avoid catches and dings.

However, D-Way tools does make a very nice tool rest accessory bar (recently discussed elsewhere in these forums) from hardened steel - same stuff they use to make their tools - so far harder than the stock lathe tool rests you'd normally find (except on premium rests such as Robust) I recently did up my One-Way rests with the hardened rod treatment, and it made an immediate impact. (My OneWay rests I got used , and even after dressing they still had some deeper dings, possibly from being dropped or something dropped on them) so I couldn't use their full width on a finish cut (the cuts would end up looking somewhat like y our photos)

As for thickness - getting down to 3/8 wall thickness depending on size of bowl , you likely also will be seeing some flexing as you cut - you may need to re-sharpen very frequently (sometimes as often as before each cut - that's where honing comes in handy) but as others said you likely also need technique practice, and as mentioned, the rest may be down to just the wood movement as it changes moisture content and/or reacts to changes in stress as wood is cut away. (If you ever have had a board bind tight on your table saw riving knife so you had to shut off saw and drive a wedge in kerf to get the board off, then you'd know what I'm talking about.)
 
Helping a friend of mine learn to turn and same thing is on a maple bowl he started yesterday. The wood is really dry. I've seen it before as well and attribute it to compression marks from the bevel of bowl gouge. Not sure if that's the cause but my approach is to use a NR scraper, a water mist to raise fibers and work at it with light passes to avoid creating more. If I do go back with a gouge I make sure I've ground the bevel back quite a bit or use high angle sheer cuts only.
 
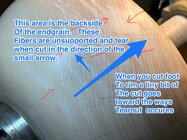
what you are showing is the backside of the endgrain. The problem area for bowls.
IMG_1642.jpeg

I finish turn the outside of the bowl then the rim then the inside.
@Richard Coers has great advice. What you have is sandable. You can and will do better.

Cut foot to rim, light cuts, light grip on the tool, float the bevel.drop the handle.
Tiny shavings -> smooth surface.
It’s a lot harder to make a 1/128” shaving than it is to make an 1/8” shaving.
Practice practice practice.

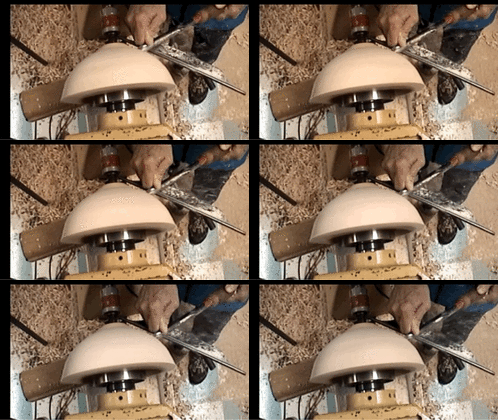
A finish push cut below with an Ellsworth grind on an 80 grit wheel.
my thumb and forefinger grip the tool. Handle against my thigh, move the body to follow the curve. The shavings are tiny.
trim.EF596DF9-5778-41FF-97A4-C8D15062F790.gif

Until you master the light push cut, pull cut can often produce a better finish cut. Higher shear angle and the wing is sharper.

Your last photo appears to show a really bad tearout. Probably from the rough out turning.
A smooth rough out surface is easier to return
 
Last edited:
Boy very long thread. First. Finer grit wheels are not needed. See my discussion on sharpening with different grits. I got the exact same cuts with a 36 grit wheel as I did with a 350 grit wheel. There are a lot of reasons we get tearout. Pushing the tool too fast is #1. You have to push the tool only as fast as the wood wants to be cut. That is slower than you think.
Then you have to use the tool so the wood crosses the edge at a shear angle. As much as possible you should cut downhill with the grain. Of course on bowls this is impossible.
Knowing and using all of this I still get minor tearout. I can usually make a final pass with a freshly sharpened tool taking a very light pass abd pushing the tool very slowly.
OK so you've tried all of that and still get tearout. Even extremely small tearout is surprisingly deep. You have to sand at slow speed with course grit to get it out. Sanding at speed is like driving over a pothole. Your paper skips over the deeper tearout. Sometimes it's best to stop the lathe and hand sand that area. I dust off or blow out the wood between each grit looking for tearout. If it shows up when you get to 220 it's very hard to go back to course grits but it's essential.
 
You've gotten really good suggestions above. What I see in your pictures is modest tear out and tool marks. Both perfectly normal in folks learning to turn. Sanding will fix those problems, but it will be more sanding than you would like. The good news is that it will be less sanding in the future! It takes LOTS of practice to make the smooth, light cuts that leave no tool marks and little tear out. When an accomplished turner makes those cuts, from a distance it doesn't look any different than what you or anybody else is doing. But they do it with proper foot position, soft hands, no tension, no bevel pressure, excellent control, the edge at the ideal angle to the wood, and the lightest possible cut. With practice, and a sharp tool, you can do it, too.

The suggestions mentioned above will help you get a better result now, but the ultimate solution is simple Nino--make 500 bowls and pay attention while you're doing it. Even 50 more bowls will make a huge difference. And getting there is a lot of fun. (except the sanding part)
Thanks Dean! I’m on my way to that 500 mark. Maybe at 50 now. Too addicted to stop!

Both of my boys studied music. Whenever they complained about practicing I’d say, “If it was easy everyone would do it.”
 
If it was easy everyone would do it.
The hard part is letting the tools do the work!

I learned on my own then had two great classes that undid most of my self taught holding the tools to tightly.

Liam O’Neil had me spend an afternoon turning the outside of bowls one handed.
Put a 10-12” blank on a small faceplate got a bowl shape with both hand then 1 handed turn it down to a 3” bowl.
Did this 3 times….

A year later in a Ellsworth class David said I was holding the tools too tightly when hollowing. I made the mistake of telling him Liam’s exercise. David had me hollow a bowl one handed. Start in the middle cutting bigger and bigger hollows.
Think I only hollowed 2 to graduate this exercise.

That was 30 years ago….
 
Last edited:
The hard part is letting the tools do the work!

I learned on my own then had two great classes that undid most of my self taught holding the tools to tightly.

Liam O’Neil had me spend an afternoon turning the outside of bowls one handed.
Put a 10-12” blank on a small faceplate got a bowl shape with both hand then 1 handed turn it down to a 3” bowl.
Did this 3 times….

A year later in a Ellsworth class David said I was holding the tools too tightly when hollowing. I made the mistake of telling him Liam’s exercise. David had me hollow a bowl one handed. Start in the middle cutting bigger and bigger hollows.
Think I only hollowed 2 to graduate this exercise.

That was 30 years ago….
Sounds like boot camp😂 but I’m sure it’s a shinny badge of honor you wear. 30 years…wow! I have a lifetime of experience in things that I don’t really care about any more. Turning, and woodworking in general, are all I want to do. Well, gardening and grandkids.
 
DSC01207.JPGIMG_0287.jpg
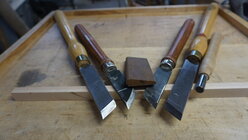
The right hand photo shows the tools for the original method that I learned from Dell Stubs in about 1989. The 2 Sears skews that only have one bevel is the type that Dell taught and the india slip stone is what he used to form a burr. The 2 HS skews are an identical concept and the polished carbide burnishing tool is used to form the burr after honing with a 600 grit diamond hone. The right hand photo shows the resulting shavings, which I have measured with a micrometer at 1/2 thousands inch (500 micro inch). The shear scarper shown in the right hand photo would be used at about a 45 degree angle to the tool rest from the largest diameter to the top of the urn shown and the other one similarly toward the head stock. The tools could be used flat on the tool rest for mostly end grain where skew angle is irrelevant. These tools would easily remove the tear out shown in your pictures and you should be able to start sanding at about 220 grit.
 
When I have similar results I spend as long as needed shear scraping. Shear scraping with a newly sharpened gouge usually works. I didn't see anything about using this method in your post. Even if the bowl is a little out of round a long session of shear scraping or some very light cuts can usually round it out.

Finally, when you put it on the lathe for the second time, did you re-round the tenon? After your first turning and, no matter how long the bowl sits till the second turning (a day or more likely longer), the tenon will be oval just like the bowl will be. Making sure the tenon is round again will go a long way to making sure that your cuts on the bowl itself are resulting in a bowl that is as close to round as possible. That's something I didn't realize until several years after I began turning.
Randy,

Thanks! Yes, I did freshen up the tenon. So far my method is jam chuck to re-round the tenon and the outside as far as I can with that level of hold. Then flip the tenon into the chuck and finish the outside and go inside.

I have been shear scraping today with a fresh bowl gouge on the outside and a negative rake on the inside. I'm not getting the glass finish I desire but I am getting closer!
 
Another thought to add to this discussion - these bowls are some of my first, first turnings. Back when I had an old Delta lathe and a small chuck. My tenons are around 2 1/2" for bowls 9 - 12". I think that is too small and may be causing some of the problem... Thoughts? Is there a ratio to consider?

I now have a PM 3520C that I got at an estate auction (for $2k!) that came with a larger chuck and bunches of other goodies.
 
View: https://youtu.be/LUKPO_MNn-w?si=kXvZ-pt72XGNieIv


This YouTube video by Glenn Lucas demonstrates an accessory for re-rounding a tenon when remounting a bowl for the second turning. I confess I haven’t made it but, given it comes from Glenn Lucas and seeing the video I’m sure it works as designed. I don’t do much turning of wet wood so I haven’t yet taken the time to make this.
I've seen that one and, like you, haven't made it either. I'm okay with the interior jam chuck so far. Thanks!
 
For me it is hard to learn without help. I joined a local club. Became good friends with a master turner there. Every 4th Saturday we have an open shop mentoring program aimed at the new turners. You bring your tools and wood and they will help with anything you need. My friend showed me a few cuts that were a game changer with the finish off the tool. Being able to see and feel it made it very easy to repeat it at home on my own. If you don’t belong to a club I would recommend joining one.
 
Another thought to add to this discussion - these bowls are some of my first, first turnings. Back when I had an old Delta lathe and a small chuck. My tenons are around 2 1/2" for bowls 9 - 12". I think that is too small and may be causing some of the problem... Thoughts? Is there a ratio to consider?

I now have a PM 3520C that I got at an estate auction (for $2k!) that came with a larger chuck and bunches of other goodies.
The size of the tenon is not as important as that it be well made. If you have straight jaws, the sides of the tenon have to be straight and with dovetail jaws, the tenon has to match the angle of the jaws. (Nova jaws with 'beaks' get straightish tenons). The flat on the bottom of the bowl adjacent to the jaws must be truly flat and as perpendicular to the lathe axis as possible. This surface firmly flush against the face of the jaws provides a large part of the strength and security of the mounting.

That said, I would personally want a 3" tenon on a 10-12" bowl blank. Others will chime in on the size of the tenon needing to match the foot on the finished bowl, and other reasons for particular sizes. Now that you've got a Mustard Monster, you'll be wanting to see just how big a bowl you can make on it, DAMHIK. For me, on bigger than 12" bowl blanks, I like a 4+" tenon.
 
re: shear scraping, even though I learned to use a gouge as a scraper in David Ellsworth's class, I still prefer using a traditional scraper. I find it easier to move and control, and I can touch up the edge on a scraper (either with burnisher or grinder) faster than I can sharpen a gouge. I have 3 scrapers I use for shear scraping: one for left-to-right, one for right-to-left, and a Raffan spearpoint scraper I use for getting into tight corners. But on problem wood, I will usually try both shear scraping and negative-rake scraping. Sometimes one technique just seems to work better.
 
Asher, thanks for the input. I do experiment with shear scraping with the above mentioned tools. Sometimes one is better than another depending on a million variables l. Trial and error and practice are in my future for sure!
 
Back
Top