• January Turning Challenge: Thin-Stemmed Something! (click here for details)
  • Conversations are now Direct Messages (click here for details)
  • Congratulations to Scott Gordon for "Orb Ligneus" being selected as Turning of the Week for January 20, 2025 (click here for details)
  • Welcome new registering member. Your username must be your real First and Last name (for example: John Doe). "Screen names" and "handles" are not allowed and your registration will be deleted if you don't use your real name. Also, do not use all caps nor all lower case.

Square Bowl #2 What did I do wrong?

Joined
Sep 6, 2014
Messages
33
Likes
5
Location
Costa Mesa, CA United States
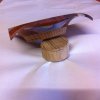
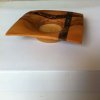
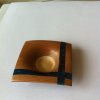
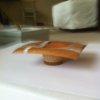
I hope it's OK to start a new thread. I have a bit of a different problem this time. So I decided to try the square bowl again, I really wanted a different profile than what I had achieved with the first completed bowl (see post titled Square Turning Part 2 on this thread http://www.aawforum.org/vbforum/showthread.php?11357-What-did-I-do-wrong-Chip-out-on-square-turning) . I wanted a downturn on the wings, more like a bird wing or leaf shape. I succeeded in getting that but the interior of the bowl had a pronounced "hump" where the transition was (see the first pic). The profile (pic 2) looks right to me but the interior of the bowl does not. I corrected the hump with an hour of sanding but that's not what I want to do in the future. The hump appears right where the bowl stops being solid (where turning in air begins) I think I may have just been too gun shy to keep the tool cutting consistently, but I'm not really sure. Again, any suggestions are appreciated.
Mark
Square bowl #2 2 .jpgSquare bowl #2 1.jpg
 
Mark,
If you are wanting more droop in your wings. You need to turn the bottom(outside) first to get the contour you want to curve. Once you have done that. Flip the bowl in chuck and turn the wings inside to match contour of outside. Next turn the bowl shape inside. From there you can shape the bowl however you want.
You are on the right track.

Be safe and Enjoy
 
Mostly it's just being careful and using a light touch on the bevel. When your turning "air" the tool cuts very rapidly. It takes much less force to go through the wood so you simply have to lighten up. Most of the control comes from moving the handle to guide the cutting edge. That is as long as your using a bevel rubbing cut. What I do when cutting wings like that is very lightly touch the wood with the bevel rubbing but not cutting. Listen to the sound. The less noisy the lighter your touch. Then move the handle until the tip starts to cut and then just watch cut as it goes and move the handle gently to guide the cut. Don't push the gouge any faster than necessary.
 
You have a nice piece for having done only two.
Similar to Bills comment about working the outside.

What I see is the center of the side rim is lost visually in a wide flat.
If you turned the outside of the bowl a bit more the width of the rim would be more even and more pleasing to the eye. Also the rim would be defined along the whole side edge.
Then when you hollow you can follow that outside curve in past the square edge hollowing the bowl as you follow that outside curve.
Being able to follow the outside curve in past the square edge will keep a smooth flow to the inside curve.

Below are photos of your recent piece and your earlier one.
Compare the rims in the center of the square face. The earlier one is almost even just a bit thick.
The recent one is much wider which means a wide straight edge on the top instead of the flowing curve.

Al
 

Attachments

  • image-3624273620.jpg
    image-3624273620.jpg
    354.3 KB · Views: 92
  • image-3123834428.jpg
    image-3123834428.jpg
    330.7 KB · Views: 96
Last edited:
If I understand what you are asking then I think the solution is to first turn the top shape so that the outside edge has a curve as shown in the attached image.

Square-bowl-#2-1a.jpg

Then turn the bottom so that the curve along the edge has a constant thickness. Finally turn the interior of the bowl.
 
You guys are great! Thanks so much for all the advice. Al you are absolutely right and I hadn't even noticed that until you pointed it out. Bill your suggestion is spot on, that's exactly how I will approach it the next time. John, your advice is spot on as well, I actually tried turning a knob that would mirror the shape of the bowl and I used your advice and it went much better.
Mark
 
Mark,
the problem of a hump that you have highlighted is something I experienced many times when making the square winged bowls.
I finish the underside of the bowl with as much curvature on the wings as I want and sanded to 600 grit, then flick it round to turn the topside.
I work from the centre outwards using a bowl gouge until I have the shape I want, endeavouring to get an even wall thickness all the way to the corners.
Once the shape is correct, but too thick, I then switch to a 1 1/2" wide curved flat scraper working up the wall of the bowl to the outside and at at medium to high speed.
In order to correct any hump or refine the taper in thickness at the corners I stop the lathe, position the centre of the scraper at the highest point of the hump, restart the lathe and gradually work the scraper too and fro sideways to reduce the hump at that position. I have found that the width of the shallow curve of the scraper helps in avoid the humps and gives a very gentle way of achieving the desired shape. Finally, when creating the final shape of the wings I turn at high speed and with the gentleness of cuts watch the shadow of the wings on the far side of the lathe, and as stated previously listen for the changes in sound at the point of the cut.
Hope this helps, I really enjoy turned these bowls.IMG_3003.jpgIMG_3006.jpgIMG_3632.jpgIMG_3643.jpgMike
 

Attachments

  • IMG_3636.jpg
    IMG_3636.jpg
    385.4 KB · Views: 46
Welcome, Michael. Your winged bowl design is beautiful. I've never seen one with acrylic incorporated into the design.

Thank you Bill. I have turned many of these bowls, started by glueing softwood sides to the blanks to turn as a circular disk but I now turn as a square blank within extra sides as I find I can get thinner wings more turned down. The acrylic is pen blanks cut in half lengthways. Glueing is the main problem, in about 20% of the blanks the small corner of wood breaks away as I get towards the end of the turn. However, with a quick application of medium superglue and accelerator, (oh, and a search on the hands and knees amongst the shavings for the piece) and a final few turns and buffing all is retrieved, I haven't lost a bowl yet!
MB
 
... oh, and a search on the hands and knees amongst the shavings for the piece....

I've done that, sometimes even emptying dust collector bags looking for a small piece. I have found pieces in the most unexpected places that defy the laws of physics.
 
Back
Top