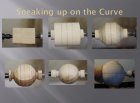
First, a disclaimer. There are many ways to turn a sphere on the lathe. Some work better than others, and my way isn't necessarily the best way. It's just the way I do it!

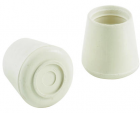
Though a "perfect" sphere can be challenging to achieve, you can turn near-perfect spheres without specialized jigs, cups, or chucks. The method detailed here uses a blank about 4-1/2" in length and 3" in diameter, spindle gouge, negative rake scraper, your lathe and chuck, and a 3/4" rubber furniture tip from your nearby home center.
Note: A package of 4 rubber furniture tips retails for under $2 at most home centers or hardware stores.
Here's the step-by-set process I use:
1. Turn a cylinder between centers an inch or more longer than the diameter of the blank.
2. Turn a tenon appropriate for your chuck jaws on one end.
3. On the other end, turn a short (1/8") tenon ... it does not have to fit your chuck. It only needs to be long enough to accommodate the point on your live center.
4. Mount the blank in your chuck.
5. Measure the cylinder diameter ... a digital caliper that uses decimal or metric scales is preferable as they are easier than fractional numbers
6. Let's assume your blank is 3.00 inches in diameter. Measuring from the shoulder of the short tenon, mark 3.0 inches on the left side of the cylinder.
7. Mark the center line of the cylinder.
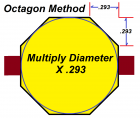
8. Multiply the diameter (e.g. 3.00 inches) by .293. Result in this example will be .879 (round to .88)
9. Set your caliper to .88 and make a mark .88 inches from the shoulder of the short tenon. Make a corresponding .88 inches mark from the mark you made on the left side of the cylinder.
10. Part down .88 inches on each side of the cylinder. Widen the part on the left side of the blank for easier access.
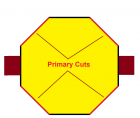
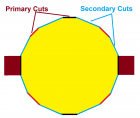
11. Using a spindle gouge, cut the corners off both ends of the blank, connecting the marks at .88 inches with the tenons. We'll refer to these as the 'primary cuts'. These cuts will result in an octagon-shaped blank.
12. Measure about a third of the distance from each point of the octagon and cut the points off with a spindle gouge. We'll refer to these as secondary cuts and should result in a 16-sided blank.
13. Trim remaining accessible tips off.
14. Pull the tailstock away, and trim off most of the tenon, leaving about 1/32" of it in place.
15. Part the blank off, leaving a tenon about 1/32" in length.
16. Knock the center point out of your live center and slip a 3/4" rubber furniture tip onto the threads.
17. Use a spindle gouge or scraper to excavate a recess in the cut-off portion of the cylinder in your chuck. This recess should be about 2/3 the diameter of your sphere blank and a half inch or more deep. It is critical that the sphere blank seat firmly on the rim of the recess and not bottom out.
18. Mount the blank between the recess and you live center with the center line you drew pointing at you. This will ensure that the tenon stubs will be in the cutting path of your tool as you shape the sphere.
19. Take very light cuts to cut or scrape the sphere. It is best to watch the ghost image on the back side of the piece as it rotates.
20. Draw a light center line and rotate the sphere so that the new center line runs parallel to bed of the lathe.
21. Rise and repeat, rotating the blank approximately 45 degrees. It will take several rotations to achieve an acceptable spherical shape.
22. Sand, repeating steps 19 thru 21 using sandpaper instead of a cutting tool for each grit.
Give your sphere the "roll test" ... it should roll straight on a smooth surface. If it doesn't, you can always re-mount it on the lathe and further refine it!
Here's a demo I did for my club that shows my process:

