• November Turning Challenge: Puahala Calabash! (click here for details)
  • Congratulations to James Seyfried for "Cherry and Redheart Ornament" being selected as Turning of the Week for November 18, 2024 (click here for details)
  • Welcome new registering member. Your username must be your real First and Last name (for example: John Doe). "Screen names" and "handles" are not allowed and your registration will be deleted if you don't use your real name. Also, do not use all caps nor all lower case.

Some ideas to try for crack repair?

Joined
Dec 29, 2022
Messages
950
Likes
1,042
Location
West Central, IL
Suggestions on what to use for fixing so that I don't ruin the blue dye job too bad by sanding etc.

Super glue in the cracks then super glue the whole as a finish?

This is another example of a rookie mistake on the learning journey of woodturning experiments.

Tried the RIT dye the way that is recommended for fabric. Did get a better color just too much water involved and it cracked when dried.
 

Attachments

  • PXL_20231204_173007845.jpg
    PXL_20231204_173007845.jpg
    873.9 KB · Views: 69
  • PXL_20231204_173019804.jpg
    PXL_20231204_173019804.jpg
    707.1 KB · Views: 69
  • PXL_20231204_173313741.jpg
    PXL_20231204_173313741.jpg
    367.3 KB · Views: 69
Joined
Jul 9, 2010
Messages
15
Likes
12
Location
Webster, NY
You have problem here that may not be easily solved. I have had similar cracks and my "solution" works at times, but not always.

First of all I rarely have used CA as a finish on a bowl. I normally use a version of Danish oil so read my comments in that context. If you use thin, clear CA to fill the crack it will fill in the wood around the crack. Then when you sand it back you will have a lighter CA filled area around the now filled crack. This light area will never go away. My guess is that with your dyed bowl it will be different blue if you finished with oil. I get around this problem by sealing the area around the crack with shellac. It seals the wood and the oil finish blends in the shellac.

In my opinion, I don't like the look of clear CA filling in a crack. That is especially true if you can see through the crack. I think it looks like a cheesy repair of a mistake. I like to use black or brown CA to fill cracks like yours. I guess I would call it a classy repair of a mistake. Yes, it's still a mistake but I think it looks better. I use the shellac method and then sand and finish with oil.

Since you describe yourself as a rookie, here is some advice. If you look at each of your turnings as an experiment you will be rewarded by learning something with each one. And if they are experiments then some of them should be failures. Let's be honest here, you will learn more from your mistakes than from your perfect results. I am sure that you have and will make some nice things on your lathe but the quality in design and your technique will certainly improve with time. There is disappointment in these drying cracks but hopefully your next bowl won't have them.

Cheers and keep on turning,
David
 

Michael Anderson

Super Moderator
Staff member
TOTW Team
Joined
Aug 22, 2022
Messages
1,681
Likes
5,198
Location
Chattanooga, TN
This is another example of a rookie mistake on the learning journey of woodturning experiments.

Maybe this is a good opportunity to practice culling the failures. In my opinion, any sort of success you have or will achieve with the dye will be diminished by the appearance of these cracks. You know how much opinions are worth though…

Long-term fixes could include bowties or other types of reinforcement repairs. You could get also try epoxy as a fill, but I would suspect these will open and close seasonally (or environmentally).
 
Joined
Aug 16, 2022
Messages
358
Likes
835
Location
Butler, PA
When I have stuff like that happen first learn from the mistake, second I use this stuff for practice of embellishments and repairs. Would be good practice for pewa as suggested. When I'm done playing with them they go to my friend that takes all my cutoffs and scraps for his woodburner.
 

hockenbery

Forum MVP
Beta Tester
TOTW Team
Joined
Apr 27, 2004
Messages
9,001
Likes
5,498
Location
Lakeland, Florida
Website
www.hockenberywoodturning.com
I wouldn’t try to fix the cracks. What you might do is use it for practice.

Just an idea.
Get a vee palm carver. Clamp your bowl on the lathe.
Use the palm carver to cut along every crack you see. Then carve lines between all the carved lines you made be sure to carve every surface.

Great for practice for producing a nice surface.
Carving will hide the cracks some and may make them seem like they fit.

Airbrush the carved surface black?
 
Last edited:
Joined
Dec 29, 2022
Messages
950
Likes
1,042
Location
West Central, IL
I have been thinking about a palm router. If I hadn't bought the couple of faceplates on sale today that I really didn't need. Oh well. One more tool away from having enough......,

@alanweinberg , I saw the pewas you did, is the jig available to make those or do you have to buy them? I saw the jig to route out the "hole" maybe I missed the other one.

@hockenberry, I probably have one of those already. A buddy gave me a box of old carving chisels from his father-in-law. He thought they were lathe tools and they aren't. I'd have to get sharpening stones/hones, learn how to sharpen.. etc.. I need to get proficient with my regular chisels first. (still not happy with sharpening them but I am getting better)
 

Dave Landers

Beta Tester
Joined
Dec 1, 2014
Messages
937
Likes
3,244
Location
Estes Park, CO
Website
dlwoodturning.com
I would suggest dedicating a shelf in your shop to failures. Like @David Gilbert 's advice - learning is a process involving necessary failures. But if we forget those lessons, they are worthless. So I have a shelf in the shop where "lessons" are "displayed" to remind me of whatever it is that I was supposed to learn. After a while, those do get tossed, but they sit there for a while till I think I've learned whatever it was...
 

Dave Landers

Beta Tester
Joined
Dec 1, 2014
Messages
937
Likes
3,244
Location
Estes Park, CO
Website
dlwoodturning.com
Also, as others have mentioned, fails are good for experimenting with other techniques (pewas, carving, etc). After that, they might go on "the shelf" for either lesson reminder or for embellishment/process idea reminder...
 
Joined
Feb 7, 2020
Messages
239
Likes
178
Location
Sykesville, Maryland
Yeah. Just mark it as a learning experience. Use it to practice other techniques but not worth trying to really salvage it. It's been said: "life it too short to turn crappy wood". It's taken me a minute, with a many failures, but I'm finally subscribing to that thought. If it's too punky, or cracks badly, throw it away and move on to better wood. Learning how to dry wood so cracks don't form is also something to figure out. Some twice-turn. Others turn to finish while green. Still others seal and wait and hope no crack form. Some force dry. Dozens of ventures all aimed at no cracking.
 
Joined
Nov 14, 2023
Messages
154
Likes
206
Location
Los Angeles, CA
As a turner who pretty much only turns wood with cracks and defects, that bowl is definitely savable if it means something to you. The way I'd recommend fixing it depends on two things:
1. Did you happen to leave a recess in the bottom where you can re-mount it on the lathe?
2. Are you willing to turn it a bit thinner and reapply the color?
 
Joined
Aug 14, 2009
Messages
2,334
Likes
1,418
Location
Peoria, Illinois
Is the wood that valuable? Whatever you do, it will always look like you repaired a cracked bowl. Personally I have plenty of wood without cracks.
 
Joined
Oct 13, 2016
Messages
1,138
Likes
1,735
Location
Rainy River District Ontario Canada
I agree with getting rid of that bowl, there are just too many splits in there already, dried too fast IMO

Normally I don't get splits, but sometimes there is a good chance that a weak point could develop a split or open up, and have put time and effort into them to prevent that to happen or even stop a small split in a difficult wood.

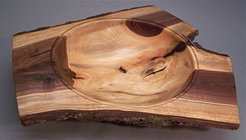
Like this Walnut crotch that I used a home made staple on to prevent the crotch to open up, it never did open up and I was OK with the look.

Walnut crotch with bark inclusion.jpg

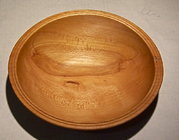
This is an American Beech bowl ( a difficult wood) that had a small check in the rim, small staple again and it never moved, someone must have liked it as it found a new home.

Beech bowl with staple.jpg

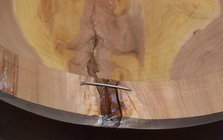
Here is another one (before and after) cut a Black Cherry crotch and found there was deep bark inclusion in both halves, I treated both like this one (close-up 0f the staple)

Black Cherry with staple.jpg

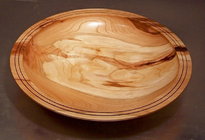
After it was dry I returned it and the staple was then put under the rim, as the outside was returned first, and then the top/inside after.

The staples I made from a stiff stainless steel wire, predrilled undersize holes and then hammered the staples in.

BlackCherry finished.jpg
 
Last edited:
Joined
Dec 29, 2022
Messages
950
Likes
1,042
Location
West Central, IL
bought. www.bigislandengraving.com. Good videos on the subject there also.
I watched the video, he makes it look simple but like everything else takes practice I'll bet.

What I was wondering about was if there was a template to make your own patches. I see there isn't and someone asked in the faq and you can send him the wood. I thought it might have been a situation where you just bought two different size templates and cut your own patch.
 
Joined
Feb 28, 2021
Messages
1,390
Likes
1,227
Location
Roulette, PA
Website
www.reallyruralwoodworks.com
What I was wondering about was if there was a template to make your own patches.
Check out rockler for Butterfly inlay templates , I got a large set , I think from amazon, also all you really need then is a router that can take template bushings (I got a set of those from taytools) and then you can cut your own butterflies from any wood you have around. Rockler also has sign lettering templates also for router, using the same process. - as well, with a bushing kit and a scroll saw (or bandsaw or jigsaw) and a little skill you can cut any size templates out of scrap wood and use those to make custom or odd-shape templates to work with the router as well....

So , bushing kit for router would be well worthwhile investment, IMHO. (Assuming, that is, that you have a router! I have a makita cordless palm router, and a Bosch full-size plunge router, which usually sits in my home built router cabinet/table) either of them has bases that can accept the router template bushing kit. (Not all routers have the capability, though some, you might be able to modify or fabricate a base that will, so before buying a router, check on that possibility)
 

Michael Anderson

Super Moderator
Staff member
TOTW Team
Joined
Aug 22, 2022
Messages
1,681
Likes
5,198
Location
Chattanooga, TN
I watched the video, he makes it look simple but like everything else takes practice I'll bet.

What I was wondering about was if there was a template to make your own patches. I see there isn't and someone asked in the faq and you can send him the wood. I thought it might have been a situation where you just bought two different size templates and cut your own patch.

You can definitely cut your own pewa if you want to. I’ve done it before with a scroll saw, but you could also do it with any other tool. And like Brian said, you can also make your own templates if you want. Via reverse engineering, using an existing template, or even just by trial and error. You can also do it all by hand without a template or router, though that is more challenging. I’ve done it, but won’t again (unless some very specific reason).

Big Island prices are hard to beat though, and the quality is top notch.
 
Joined
Jan 20, 2011
Messages
523
Likes
639
Location
Traverse City, MI
If you built up multiple coats of fast-dry poly on it, you might be able to fill with CA or epoxy and sand back to the poly and not damage the stained wood.
 
Joined
Dec 29, 2022
Messages
950
Likes
1,042
Location
West Central, IL
If you built up multiple coats of fast-dry poly on it, you might be able to fill with CA or epoxy and sand back to the poly and not damage the stained wood.
Well, so far I gave up on keeping it pristine.

It's all trial and error and like my dad used to say, "You're not going to learn any younger" So I filled the cracks with CA to stabilize. Sanded that back and gave the whole thing a "distressed" look. Applied another two colors of dye and actually replicated a color/look that I had done on a large salad bowl a couple of months ago that I liked. That was purely by accident but at least I do know how to do that color again.

Now I'm going to try @hockenbery's suggestion and do some carving on it and see what I end up with. The cracks didn't go all the way to the inside so who knows maybe if I go deep enough they'll disappear.
 
Joined
Aug 14, 2007
Messages
5,728
Likes
3,066
Location
Eugene, OR
Well, my question would be how did it crack. The one picture with the end grain view makes me think that you put a heat gun to it while it was still fairly wet. That type of end grain checking will happen. I have seen it with bowls where they torched it too. One method I have never tried, was to mix some PVA glue like Titebond or Elmers, mix 50/50 with water and let the bowl soak at least over night. The water and glue will get all the way through the cracks, the wood expands, and the cracks are gone. I heard about it, but never tried it. For me, I usually have a box that I take to shows and put 'factory rejects' on them, and nothing more than $5. They vanish. Good for dog food scoops, gardening, or what ever. Other than that, they are not worth the effort of repairing.

robo hippy
 
Joined
Aug 6, 2009
Messages
763
Likes
570
Location
Lummi Island, WA
You can cut your own patches, or buy a template with a variety of sizes. You can also make your own template from acrylic. It adds time to the process and introduces another way to screw up your piece. That’s what the small bearing that comes with the inlay kit is for - much simpler to use patches that are pre made to the correct size though. Cutting the patches is time consuming. You need to move and glue the template for each one then take a cut with the bandsaw to remove the patches from the block. The benefit is that you can make custom patches to any size or shape you like. If you buy the big template, it’s easiest to cut out the templates you’re planning to use. The downside is that you’ve added days to a process that should take about 20 minutes.
If it sounds like I’ve been down that rabbit hole, there’s a reason…
 
Joined
Dec 29, 2022
Messages
950
Likes
1,042
Location
West Central, IL
Well, my question would be how did it crack. The one picture with the end grain view makes me think that you put a heat gun to it while it was still fairly wet. That type of end grain checking will happen. I have seen it with bowls where they torched it too. One method I have never tried, was to mix some PVA glue like Titebond or Elmers, mix 50/50 with water and let the bowl soak at least over night. The water and glue will get all the way through the cracks, the wood expands, and the cracks are gone. I heard about it, but never tried it. For me, I usually have a box that I take to shows and put 'factory rejects' on them, and nothing more than $5. They vanish. Good for dog food scoops, gardening, or what ever. Other than that, they are not worth the effort of repairing.

robo hippy
Experimenting with fabric dye. I tried using it the way they recommend for fabric because it was aquamarine and I wanted a good saturation of color. This involves three gallons of water at least 145 degrees some salt and a touch of dish soap. When that's done you rinse in cold water then wash with soapy water.

You pretend like you're a witch and stir it for 35 minutes keeping the bowl mostly submerged. You get a really even color that way..... But the drying part kind of defeated the whole process. I left it sit on a wire rack in the sink for a day but it was the part where I sat it on a towel over my gravity feed house furnace when the cracks developed. Could have been dried too quick but probably would have cracked no matter what. I had just started reading a book the night before about finishing and it was talking about how a board checks on the ends. Similar science probably.

I'll keep playing with it and I'll bet I'll find someone who will take it. My sister gets rejects. She even mentioned the other day that she seems to get all the ones with mistakes.
 
Joined
Nov 3, 2008
Messages
12
Likes
21
Suggestions on what to use for fixing so that I don't ruin the blue dye job too bad by sanding etc.

Super glue in the cracks then super glue the whole as a finish?
I like rustic, out of round bowls. Consider letting it crack all it wants and then fill the cracks only w the same color dye so that they look intentional.
 
Joined
Dec 29, 2022
Messages
950
Likes
1,042
Location
West Central, IL
duh duh duh duuuuuuhhhhhh. (imagine slow dirge)

working with what I had for practice. chisel I found not sure if it's one you hit with a mallet or not but I got better "nicks" when I did. would have preferred silver but you know the saying. Wish in one hand and....... see what fills up firs

I'll spray some nice and shiny on it and my sister will be happy!
 

Attachments

  • PXL_20231205_221808185.jpg
    PXL_20231205_221808185.jpg
    379.5 KB · Views: 33
  • PXL_20231205_221758750.jpg
    PXL_20231205_221758750.jpg
    448.9 KB · Views: 34
Last edited:
Joined
Feb 2, 2020
Messages
76
Likes
59
Location
Germantown, NC
I watched the video, he makes it look simple but like everything else takes practice I'll bet.

What I was wondering about was if there was a template to make your own patches. I see there isn't and someone asked in the faq and you can send him the wood. I thought it might have been a situation where you just bought two different size templates and cut your own patch.
No you need one template and a guide bushing like this for your router

 
Joined
Dec 29, 2022
Messages
950
Likes
1,042
Location
West Central, IL
Getting there on my crack repair experiments. It's turning into a "how many different things can I do to this candy dish?" project.

Todays/tonight project on it was finishing off two different brands of rattle can poly on it and filling in the mortise with some epoxy (and glitter) to reinforce the foot.

You can also see the other experiment underneath it on the workbench. Too thin of a mortise and the tailstock live center had made a hole that appeared when sanding. In my defense I didn't personally make the mortise in the rough turned bowl. I just had to deal with it when I finish turned it.
 

Attachments

  • PXL_20231210_202350494.jpg
    PXL_20231210_202350494.jpg
    308.2 KB · Views: 38
  • PXL_20231210_202353161.jpg
    PXL_20231210_202353161.jpg
    253.1 KB · Views: 38
Joined
Jul 27, 2020
Messages
317
Likes
1,261
Location
Durham, NC
Getting there on my crack repair experiments. It's turning into a "how many different things can I do to this candy dish?" project.

Todays/tonight project on it was finishing off two different brands of rattle can poly on it and filling in the mortise with some epoxy (and glitter) to reinforce the foot.

You can also see the other experiment underneath it on the workbench. Too thin of a mortise and the tailstock live center had made a hole that appeared when sanding. In my defense I didn't personally make the mortise in the rough turned bowl. I just had to deal with it when I finish turned it.
I love how your dyes have really made that elm grain pop. I hadn’t noticed that it was elm till these photos.
Its quite a look!
 
Back
Top