• It's time to cast your vote in the January 2025 Turning Challenge. (click here for details)
  • Conversations are now Direct Messages (click here for details)
  • Congratulations to Alan Weinberg for "Elm Burl Bowl" being selected as Turning of the Week for January 27, 2025 (click here for details)
  • Welcome new registering member. Your username must be your real First and Last name (for example: John Doe). "Screen names" and "handles" are not allowed and your registration will be deleted if you don't use your real name. Also, do not use all caps nor all lower case.

Smoothing & Sanding Hollow Form Interiors

Joined
Sep 5, 2019
Messages
40
Likes
77
Location
Boone, NC
I've been learning to turn hollow forms in the past six months or so and am getting better with each one. I'm still not able to smooth and finish the interiors to my satisfaction. How much effort and priority do you put on the interiors of hollow forms and what tools and techniques do you use to smooth and sand them?

Many thanks for your help.
 
It depends on how much you like to sand. :D

If the size of the opening is close to the largest diameter of the piece then the inside should be done as well as the outside. If you can barely put a finger in the opening then don't waste any unnecessary time making the inside look pretty. In between, it's your call.
 
Most of the HF I do have large openings. i don’t sand inside below the opening.
I do use a teardrop scraper to remove the tool marks.
I sometimes paint or bleach the inside.

if people look inside they will see a relatively smooth surface.
If they feel it will be sort of fuzzy.
 
I only sand the inside of hollow forms small enough that people can feel all the way inside. I will sometimes sand if I have a large opening. I've been trying lately with smaller forms to simply use better tool techniques to clean up the inside. One of my friends used to turn hollow forms that were started off center. When he hollowed the inside he would cut through one side and leave a hole people could see through. The insides looked perfect. I asked how he did it and he said you have use the tool extremely lightly. He said if you take your fingernail and drag it across the back of your hand so you can just feel it, that's how light the passes should be. He used 3/16" HSS cutters. I've been doing some Christmas ornaments lately with holes in the sides and you can see in. I've been playing with this technique and have done 2 that look like they have been sanded inside. I have a tear drop scraper and sometimes that works but it's really easy to get chatter. With the 3/16 HSS cutters or shear scraping with a Hunter carbide I'm able to get a better finish but it does take patience and practice.
For larger hollow forms like sugar bowls with large openings I use my Hunter carbide tools. Mike has several that are designed to cut as bevel rubbing tools up the sides and across the bottom and even under the lip. With those and good hand I can get a finish that looks like it's been sanded to 400 grit. It does take practice.
 
I haven't done many hollow forms, but did find getting the inside smooth a problem, which I know would get better with more practice. I did find the tear drop scrapers to be rather grabby. I would think a tear drop NRS with 60/30 bevels and a burnished burr would be able to leave an almost glass smooth finish on the inside... Any one make M42 or V10 tear drop scraper tips???

robo hippy
 
I only sand the inside of hollow forms small enough that people can feel all the way inside. I will sometimes sand if I have a large opening. I've been trying lately with smaller forms to simply use better tool techniques to clean up the inside. One of my friends used to turn hollow forms that were started off center. When he hollowed the inside he would cut through one side and leave a hole people could see through. The insides looked perfect. I asked how he did it and he said you have use the tool extremely lightly. He said if you take your fingernail and drag it across the back of your hand so you can just feel it, that's how light the passes should be. He used 3/16" HSS cutters. I've been doing some Christmas ornaments lately with holes in the sides and you can see in. I've been playing with this technique and have done 2 that look like they have been sanded inside. I have a tear drop scraper and sometimes that works but it's really easy to get chatter. With the 3/16 HSS cutters or shear scraping with a Hunter carbide I'm able to get a better finish but it does take patience and practice.
For larger hollow forms like sugar bowls with large openings I use my Hunter carbide tools. Mike has several that are designed to cut as bevel rubbing tools up the sides and across the bottom and even under the lip. With those and good hand I can get a finish that looks like it's been sanded to 400 grit. It does take practice.

John, that is a really helpful reply. Thank you for your time to respond.
 
One thing that is critical is that the final tool finishing, smoothing with the scraper or any tool needs to be done in steps. I do 2-3” of wall at a time. Hollow to thickness then switch to the scraper. Before switching to the scraper I cut away wood projecting into the hollow that I might hit accidentally with the scraper as I’m coming off the wood.
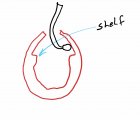
Often there is a 1/2” thick shelf at the end of the wall. I cut that corner off at an angle.

This way the area I’m working will be round.
 
I use a teardrop shaped scraper for final smoothing. I use a Jamieson rig and usually can get pretty smooth. I also use wooden sticks with velcro added to the end, for sandpaper, this can help on difficult woods. I shape the sticks into a gooseneck shape. I also saw a demonstration by Charles Farrar, he ground his teardrop into a negative rake scraper.
 
A picture is needed.

I remove the corner of the shelf before I use the scraper.
If you hit it with the scraper bad things may transpire.
I want the scraper to have a gentle slope at the end

View attachment 30649

I'm having a heart catheterization next week and that looks just like the picture that the cardiologist drew. :D
 
I'm having a heart catheterization next week and that looks just like the picture that the cardiologist drew. :D
I would usually really worry to hear something like that, but after over 2 months in the hospital watching my wife with heart issues, I know that that procedure is not too complicated, you probably be home the same day. Simply amazing what they can do nowadays. Regardless. is a bit nerve-wracking, the bad part are the Doctors telling you the worst-case scenario! Best of luck!
 
I had a triple bypass in 1999 and was in the hospital nearly two weeks and picked up a really bad staph infection in my chest. I would have died there if I wasn't released when I was. Back then they basically field dressed you. I've heard that things have changed immensely in the twenty years since then. I think that they mainly do stents now..
 
Bill,
I just had 3 catheterizations and a stent 2 months ago. It was a piece of cake. They went through my arm and I was done in about an hour. Sat around the hospital for the rest of the day to let the anesthesia wear off. Bored to tears.
Jon
 
I try to get the inside where someone can feel smooth, so the depth depends on the opening. I usually make the inside a dark color so the prying eyes with flashlights cant see much. One thing I’ve found, the better the form and finish on the outside the less concerned people are with the inside. There’s always a smart a** “turner” who will check wall thickness and or inside finish, But those few arent my audience.
 
I usually make the inside a dark color so the prying eyes with flashlights cant see much.

Which gets us to the second half of the original question. How do you apply surface coatings to the inside of a hollow form?

If you make the opening too narrow to get sandpaper inside it's also too narrow for a brush or rag. If the opening is wide enough for sanding it may also be wide enough to sort of get a brush or rag inside, but not in a posture that lets you do a fine surface application.
 
Which gets us to the second half of the original question. How do you apply surface coatings to the inside of a hollow form?

I do several different things depending on the surface finish and the look I want.

Usually I finish the outside with Waterlox and put one coat of Watco on the inside using a foam brush.
I use one if the engine inspection led lights to look inside to be sure I get everything wet.
The let dry for a few days.
If the foam brush is too wide scissors can make it narrow. If the handle is too short I tape it too a old 1/8” long aircraft drill bit.

if the form has voids and I have access to the inside I often bleach the inside so that it reflects more light.
The bleach raises the grain giving a more uniform look. Then typically I don’t do anything on top of the bleach.
The forms already have a warped ovalness from drying. Any seasonal change will not be noticed.

if I want the inside black. I usually airbrush black paint inside. Take car not to get any area wet looking or at least no runs. I use the inspection light to see that I get the whole surface.
If it won’t bleed through in a bad way I use black leather dye applied with a foam brush or airbrush.
This gives the best black but it will usually darken the outside surface even dulling the look of paint.
 
I am working on a sizable hollow segmented form adding 1-1/2 thick segment rings and rough turning the inner and outer surfaces until I get all of the rings added to the piece. I am using a standard parting tool to trim the inner part of each ring from the tail stock end while it is supported with a fitted wood brace on each segment ring to support the hollow form while turning. During this repetitive process I have thought about a ring master type cutter mounted on the end of my tool rest that you could turn a small hand wheel to advance a small cutter into the segment ring and quickly trim the inner surface of the hollow form at the same angle the tool rest is positioned on the outside of the hollow form. Have any of you turners run across a tool or accessory that would address this process? I would use a standard thin parting tool but the radius of the segmented rings can bind on the blade depending on the diameter of the rings.
 
I always thought that the dinky little openings were an excuse to not smooth the inside.
The idea that I had with some success is to machine a 45 degree end on a 3/4" bar so that I can mount a rounded scraper with a burnished burr that can be presented to the inside at a negative rake when the bar is parallel to the axis. The bar can be held in the arm brace handle to give a controlled light touch.
 
Always sharpen the cutter for finish cuts, and wipe the toolrest and tool with a block of paraffin to make it as friction free as possible. Light tool marks are appropriate so long as the walls are pretty even.

I often tell people that I've never seen someone stick a finger in a piece and then write me a check. :cool:

Check the articles on my website for some more smoothing tips.
John
 
I usually do not finish inside a HF but sand in far enough so the finger does not touch rough (if possible using forceps) . As to blackening the inside Black Gesso works well and can be thinned to ease the application making the inside look like a Black Hole.
 
making the inside look like a Black Hole.

A philosophical question: given that a Black Hole can't be seen and I have also used black gesso on the interior of a hollow form so I'm able to confirm that the inside can't be seen. So the question is if we have two things that can't be seen, how do we know if they look alike? :D
 
Always sharpen the cutter for finish cuts, and wipe the toolrest and tool with a block of paraffin to make it as friction free as possible. Light tool marks are appropriate so long as the walls are pretty even.

I often tell people that I've never seen someone stick a finger in a piece and then write me a check. :cool:

Check the articles on my website for some more smoothing tips.
John

Thank you John. I've started reading your articles on your website.......good stuff.
 
I use one if the engine inspection led lights to look inside to be sure I get everything wet.
Speaking of inspection lights, I bought a "micro" LED light from Cindy Drozda at the Raleigh Symposium. It is great as an inspection light and has a magnet on it, it can be attached to your boring bar. No batteries, which is big for me because i always forget to turn off my battery powered light.
 
Due to the fact I often have open spirals on my pieces. I not only have to sand but polish as well. So over time I have developed sanders and polishers etc to get the job done. But I have limited my sanding to openings of around 30mm or 1.25" or greater anything smaller I dont bother. Ok I do use a scraper on these smaller to even thing up and so on.
 
Back
Top