
The technique described here can be applied to almost any type of turning where the inside width of the turning is larger than the neck opening. This includes hollow forms, boxes, vases and bottles. One limitation is that it requires a headstock spindle that is bored all the way through. It allows complete access to the bottom of the turning for finishing and decorating.


The concept is illustrated in Figure 1. The basic components are a piece of all-thread rod of suitable length and a stop nut, a winged nut and washers to fit the rod. In addition one needs a toggle to fit the object being mounted. The toggle is made by first cutting a disk of thin plywood to a diameter larger than the inside diameter of the neck of the turning but less than the maximum inside diameter of the turning. Then, two opposing edges of the disk are trimmed to allow the trimmed disk to fit easily through the neck of the turning. Finally, a hole is bored in the center of toggle. This hole should be large enough that when the rod is inserted, the assembly can be tilted to insert and remove it freely through the neck of the turning. The system is used as follows: The toggle is inserted into the turning and the other end of the rod is passed though the headstock. The assembly is held in place by a wing nut and washer on the outboard end of the spindle. Figure 2 shows an assortment of toggles that I have used and re-used over the years. Some have been reused several times by trimming them on a bandsaw when necessary. It is worth noting that the minimum length of the rod depends on the length of the turning and other factors. I have rod assemblies of a few different lengths so that the distance that the outboard wing nut has to be advanced to tighten the system is not excessive. (By the way, if you have an air nozzle handy, with a bit of practice you can use it to spin the wing nut on and off like a propeller.)
In addition to the hold-down, one needs a base for the rim to press against and, depending on the shape of the turning, to prevent lateral movement of the base and, in the case of tall forms, to prevent tilting. Some examples are a disk with a hole in the middle mounted on the headstock, a long-jawed chuck used in an expanding mode, or a piece of scrap wood mounted on a chuck and turned to accommodate the neck and shoulder of the turning and bored to allow the rod to pass through. The first example method is described in more detail in the companion posting “Poor Man’s Reverse Chucking System”.
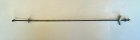
Figure 3 shows a variant of the system for bottles or vases with very small openings. Instead of a wood toggle, it uses an articulated toggle from a standard toggle bolt. I use two sizes, depending on the application. The smaller will work with neck openings as small as 0.6-inch and the larger 0.75-inch. These happen to fit the standard all-thread rods that I use with wood toggles. Note that the toggles must be mounted as shown. If reversed on the rod they will become a permanent feature of the turning. They are used as follows: The toggle is backed off from the stop nut until it will fold flat for insertion into turning. Then the rod is backed off, forcing the toggle toward the stop nut and spreading the wings of the toggle. After completion of the turning, the toggle and rod are removed by pulling slightly outward on the rod while turning it to the right to screw it into the toggle, allowing the wings to collapse
The concept is illustrated in Figure 1. The basic components are a piece of all-thread rod of suitable length and a stop nut, a winged nut and washers to fit the rod. In addition one needs a toggle to fit the object being mounted. The toggle is made by first cutting a disk of thin plywood to a diameter larger than the inside diameter of the neck of the turning but less than the maximum inside diameter of the turning. Then, two opposing edges of the disk are trimmed to allow the trimmed disk to fit easily through the neck of the turning. Finally, a hole is bored in the center of toggle. This hole should be large enough that when the rod is inserted, the assembly can be tilted to insert and remove it freely through the neck of the turning. The system is used as follows: The toggle is inserted into the turning and the other end of the rod is passed though the headstock. The assembly is held in place by a wing nut and washer on the outboard end of the spindle. Figure 2 shows an assortment of toggles that I have used and re-used over the years. Some have been reused several times by trimming them on a bandsaw when necessary. It is worth noting that the minimum length of the rod depends on the length of the turning and other factors. I have rod assemblies of a few different lengths so that the distance that the outboard wing nut has to be advanced to tighten the system is not excessive. (By the way, if you have an air nozzle handy, with a bit of practice you can use it to spin the wing nut on and off like a propeller.)
In addition to the hold-down, one needs a base for the rim to press against and, depending on the shape of the turning, to prevent lateral movement of the base and, in the case of tall forms, to prevent tilting. Some examples are a disk with a hole in the middle mounted on the headstock, a long-jawed chuck used in an expanding mode, or a piece of scrap wood mounted on a chuck and turned to accommodate the neck and shoulder of the turning and bored to allow the rod to pass through. The first example method is described in more detail in the companion posting “Poor Man’s Reverse Chucking System”.
Figure 3 shows a variant of the system for bottles or vases with very small openings. Instead of a wood toggle, it uses an articulated toggle from a standard toggle bolt. I use two sizes, depending on the application. The smaller will work with neck openings as small as 0.6-inch and the larger 0.75-inch. These happen to fit the standard all-thread rods that I use with wood toggles. Note that the toggles must be mounted as shown. If reversed on the rod they will become a permanent feature of the turning. They are used as follows: The toggle is backed off from the stop nut until it will fold flat for insertion into turning. Then the rod is backed off, forcing the toggle toward the stop nut and spreading the wings of the toggle. After completion of the turning, the toggle and rod are removed by pulling slightly outward on the rod while turning it to the right to screw it into the toggle, allowing the wings to collapse