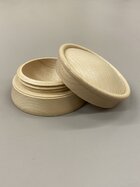
I’ve never thought of doing this. Anyone made a side grain box before?
-
December Turning Challenge: Tree! (click here for details) -
Congratulations to José Esteban Cruz"Rocking Horse" being selected as Turning of the Week for December 16, 2024 (click here for details) -
Welcome new registering member. Your username must be your real First and Last name (for example: John Doe). "Screen names" and "handles" are not allowed and your registration will be deleted if you don't use your real name. Also, do not use all caps nor all lower case.
You are using an out of date browser. It may not display this or other websites correctly.
You should upgrade or use an alternative browser.
You should upgrade or use an alternative browser.
Side Grain Box
- Thread starter Bill Alston
- Start date
Ronald does a great job on his videos. Very well demonstrated and his wife in the background making comments is hilarious.
I've made a few side grain boxes, though none of them threaded. I find that you can get quite a tight fit with the lid by rotating it slightly (tight fit because of the minor differences in warping/movement). That said, I wildly prefer to make and use endgrain boxes.
And I agree with Don above--Ronald's videos are always entertaining and informative.
And I agree with Don above--Ronald's videos are always entertaining and informative.
Nice video..... he does have his direction of thread cuts mixed up. A climb cut should always be used.
I don't try to match grain so much any more. Rather use different woods since seasonal distortion has a tendency to make the lid too tight or loose with grain alignment.
I don't try to match grain so much any more. Rather use different woods since seasonal distortion has a tendency to make the lid too tight or loose with grain alignment.
Last edited:
I and others use side grain a lot for Beads of Courage boxes, often glued up from several boards. (None are threaded.)
The problem I have seen is with seasonal change - I once looked at 10 BOC boxes at a symposium and half of them had stuck lids. Since most people make lids with parallel tenons/mortices for the box/lid fit, a stuck lid is inevitable on a side grain box unless the junction is made rather loosely.
I started teaching making them with a tapered lid fit instead, either inside or outside tapers. No more stuck lids, and people, especially those with coordination or mobility issues, can easily remove or replace the lid. For this reason, I make many boxes now with tapered lids, even end-grain boxes. Ordinary people simply like to lift the lid with one hand and don't care one bit about the "woodturner's pop" suction show of skill often taught and that many have used included me.
A diagram of a layered BOC box showing a tapered lid:
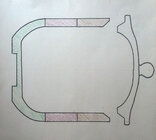
A couple of my glued up side-grain boxes with tapered lids, one external, one internal.

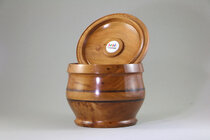
This is an end-grain box but I like the look with a tapered lid that
fits into a taper a little deeper in the body of the box.

I did think the video was pleasant and informative.
I have different opinions on some of the techniques but in woodturning there is room for lots of technique opinions!
JKJ
The problem I have seen is with seasonal change - I once looked at 10 BOC boxes at a symposium and half of them had stuck lids. Since most people make lids with parallel tenons/mortices for the box/lid fit, a stuck lid is inevitable on a side grain box unless the junction is made rather loosely.
I started teaching making them with a tapered lid fit instead, either inside or outside tapers. No more stuck lids, and people, especially those with coordination or mobility issues, can easily remove or replace the lid. For this reason, I make many boxes now with tapered lids, even end-grain boxes. Ordinary people simply like to lift the lid with one hand and don't care one bit about the "woodturner's pop" suction show of skill often taught and that many have used included me.
A diagram of a layered BOC box showing a tapered lid:

A couple of my glued up side-grain boxes with tapered lids, one external, one internal.


This is an end-grain box but I like the look with a tapered lid that
fits into a taper a little deeper in the body of the box.

I did think the video was pleasant and informative.
I have different opinions on some of the techniques but in woodturning there is room for lots of technique opinions!
JKJ
How about a side-grain threaded bowl? Work-in-progress, but really more to see if I have my threading process solid.
Last edited:
I did see one box by Kip Christensen that was side grain and lidded, and it had not moved in the years that the turner had it. I do have 2 that I have done that are about 5 inch diameter. They do work, but care must be taken. I would rough turn and let them sit. then re turn them at least once to true them up. If you use the same piece of wood for bottom and lid, it can at least in theory work. If the pieces move, then they "should" move in the same amount and direction. You may or may not be able to spin the lid, but it should still be able to come off. One of my boxes has stayed true. The other has a very slight tight/loose fit as I spin the lid.
robo hippy
robo hippy
The problem of the piece going oval due to seasonal changes is not only in side grain but will also be a problem with end grain if as is typical using a blank away from the pith. The way to eliminate the oval is to center the threaded vessel on the pith, but you can still have uniform movement that can work against you. The only way to eliminate the problem is to use a coarse thread with lots of clearance. If you are wondering if I know what I am talking about I still have a walnut urn made in about 1995 with a 1/8" pitch (8 TPI or 3.175 mm) and I first started doing wood threading in 1988.
I believe you. I sometimes use single turn bottle threads with a 1/4" pitch which can tolerate more looseness than vee type threads.If you are wondering if I know what I am talking about I still have a walnut urn made in about 1995 with a 1/8" pitch (8 TPI or 3.175 mm) and I first started doing wood threading in 1988.
We live in a world of screw lid containers. I started the day with a screw top on the toothpaste tube. Last night I cooked dinner for the family, at least 8 screw lids involved. When you're done you screw the lid on just enough so it feels secure.
But those are different from the typical ones on a grain aligned box. Dealing with alignment you have make an effort to get it in just the right position. What's the point and who cares?
In the video it was interesting how he got the threads aligned. He screwed the lid on, determined angular rotation needed for alignment, divided that by 360 and multiplied the result by the thread pitch to get an exact amount to remove from the base for alignment. Most of us remove an amount by trial and error.
The fact that he knows the exact amount to remove does not help if he has no way to accurately remove that amount, therefore your back to trial and error.In the video it was interesting how he got the threads aligned. He screwed the lid on, determined angular rotation needed for alignment, divided that by 360 and multiplied the result by the thread pitch to get an exact amount to remove from the base for alignment. Most of us remove an amount by trial and error.
In Ronald’s video he does, in his words “run the cutter in the opposite direction to the rotation of the wood. This is conventional wisdom in wood working (router for example). In some of Simon Hopes videos he uses both Conventional and Climb cuts in his demonstrations. It’s easy and logical to use a conventional cut on the female thread. It’s perhaps slightly easier though to use a climb cut on the male?Nice video..... he does have his direction of thread cuts mixed up. A climb cut should always be used.
Since getting my Simon Hope Threading Jig I’ve tried both directions on the male thread and not noticed any difference in quality. It may be more noticeable on some timbers though. I’ve only used Beech and Holly to date.
I’m not sure why this is though. Not long after I got my first milling machine I quickly noticed that when cutting steel or aluminium, sometimes you get a better finish with conventional milling and sometimes it’s better with a climb cut. At least for the final few passes.
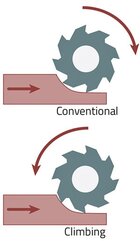
Using the climb cut you are always cutting down from the surface therefore there is less chance of crumbling the sharp edges of the threads and that holds true for both male and female threads but it doesn't mean that all conventional cut threads will crumble. When using the hand feed Cline style jigs you should always be carful that it doesn't get away from you because the climb cut can self feed.In Ronald’s video he does, in his words “run the cutter in the opposite direction to the rotation of the wood. This is conventional wisdom in wood working (router for example). In some of Simon Hopes videos he uses both Conventional and Climb cuts in his demonstrations. It’s easy and logical to use a conventional cut on the female thread. It’s perhaps slightly easier though to use a climb cut on the male?
Since getting my Simon Hope Threading Jig I’ve tried both directions on the male thread and not noticed any difference in quality. It may be more noticeable on some timbers though. I’ve only used Beech and Holly to date.
I’m not sure why this is though. Not long after I got my first milling machine I quickly noticed that when cutting steel or aluminium, sometimes you get a better finish with conventional milling and sometimes it’s better with a climb cut. At least for the final few passes.
View attachment 69638
The Simon Hope cutters are only 16mm or 8mm diameter, and given the amount of friction in the jigs spindle I think it’s unlikely to self feed. Unless that is the operator adjusts the friction very low. The spindles come pre adjusted and mine was quite tight.
Climb cutting in metals on manual machines can cause a self feeding which is not good (broken cutters, work coming out of the vise, etc).. CNC's are okay on climb cutting because of the ball screw's lack of backlash and control by the axis drive motors.Not long after I got my first milling machine I quickly noticed that when cutting steel or aluminium, sometimes you get a better finish with conventional milling and sometimes it’s better with a climb cut. At least for the final few passes.
Conventional cutting on manual machines cause excessive wear on cutters. The cutter has to rub along the work piece before it bites in. They tend not to bite in until any play in the spindle and table is taken up. But you really have no choice. Climb milling can be carefully done on manual machines as long as the depth of cut is small.
The people doing demos at the few symposiums I've attended didn't seem to understand when questioned about climb or conventional cutting. You would think that's something they should know.
Chip out on vee threads can be lessened by having flats on the crests rather than a sharp point. Even when cutting threads in metal the specs call for a flat or a radius on the crests.
I’ve not had a self feeding situation (or broken any cutters) on either of the mills I’ve owned, but I understand it can be a problem on manual machines if the lead screw nuts are badly worn. Having said that I don’t generally take large cuts.
I don't know about the Hope cutters. The cutters supplied with some threading jigs are neutral rake. They'd be much better with a positive rake. Neutral rake cutters are hold overs from old metal working cutters.The Simon Hope cutters are only 16mm or 8mm diameter, and given the amount of friction in the jigs spindle I think it’s unlikely to self feed. Unless that is the operator adjusts the friction very low. The spindles come pre adjusted and mine was quite tight.
Positive rake cutters are used in metal working thread milling, but a bit expensive from what I've seen.
Micro100
Not long after I got my first milling machine I quickly noticed that when cutting steel or aluminium, sometimes you get a better finish with conventional milling and sometimes it’s better with a climb cut.
On occasion climb cutting is useful on the mill. It's recommend for a better finish (removing only a very small amount of metal - don't use for heavy cuts.)
I've only used it on small parts.
JKJ
I’ve done it quite a bit. First as an experiment for a magazine article. I found if you thread too big you get a double start thread, but it does still work. The bigger you go, the more you risk movement. Threading cross-grain holds a thread surprisingly well, especially on a coarser thread like 10tpi.
I down-scaled it a bit for a demo I currently do. I’ll be doing it at the AAW next year. My threads are hand-chased though, rather than jig-cut.
I made one in a demo recently and got the lid a touch thick, dap cut it open to see how thin I’d gone. Video here
Richard
I down-scaled it a bit for a demo I currently do. I’ll be doing it at the AAW next year. My threads are hand-chased though, rather than jig-cut.
I made one in a demo recently and got the lid a touch thick, dap cut it open to see how thin I’d gone. Video here
Richard
Attachments
cut it open to see how thin I’d gone.
Nice!
Raffan recommends occasionally cutting a piece in half to see just what made it feel right (or wrong) in the hand. It's a hard thing to do...
Hey, there is a place for a thin box bottom - to make a "sounding board" for a music box! I've made several. A good wood for those is sassafras which seems to have a natural resonance when a thin piece is flicked with a fingernail. The music boxes from sassafras did have a good sound. The wood might be good for dulcimers or other instruments.
This was sassafras and walnut, both from trees from our farm, a birthday gift for a friend in Italy.
The little feet are to provide clearance for the winding key.
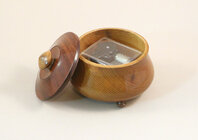
(The wood is too glossy! I can see the reflections of a white side of my photo cube and the dark opening in the front!)
JKJ

