Thanks! I did not put any gas in the foil--rather, I wrapped the pieces of wood tightly, trying to squeeze out the air (though some remained, of course). That would be interesting re. different gases. Likely beyond my scope, BUT I do have some fun ideas for this experiment.Interesting results. It appears that oxygen or some other gas present in air makes a significant impact on the color. Did you put a inert gas inside your foil envelopes? Possibly investigate different gases for different effects? Did you cut the pieces to see if the process actually goes all the way through the wood? Good work here keep it up.

-
Beware of Counterfeit Woodturning Tools (click here for details) -
Johnathan Silwones is starting a new AAW chapter, Southern Alleghenies Woodturners, in Johnstown, PA. (click here for details) -
Congratulations to Peter Jacobson for "Red Winged Burl Bowl" being selected as Turning of the Week for April 29, 2024 (click here for details) -
Welcome new registering member. Your username must be your real First and Last name (for example: John Doe). "Screen names" and "handles" are not allowed and your registration will be deleted if you don't use your real name. Also, do not use all caps nor all lower case.
You are using an out of date browser. It may not display this or other websites correctly.
You should upgrade or use an alternative browser.
You should upgrade or use an alternative browser.
Roasting wood?
- Thread starter Michael Anderson
- Start date
Michael, I know it's not woodturning but some of the spoon carvers are "baking" their spoons with (what I think) are some nice results. I've tried cooking chunks of wood with less than satisfactory results. I like that you are willing to experiment. How many filaments did Edison try??? Anyway, here is a spoon baking link...
View: https://www.youtube.com/watch?v=c8R_4lT_KIs
Thanks Clifton! That’s a great video. I had a short interest in spoon carving before I got addicted to turning. And, actually did do a bit of roasting with a few scoops. All pecan wood, and all after I oiled them with linseed oil. The color definitely turned deeper, but I never pushed it to super high temps.
You can fins a lot of information in Thermowood handbook https://thermalwoodcanada.com/images/PDF/Thermowood_handbook.pdf
Thanks Lennart. That's a great resource!
I had a crazy thought.
You could put the wood into a turkey roasting bag, blow in some co2 or other inert gas, leaving plenty of room for expansion. Seal up the bag and roast away. Would keep the smell in and oxygen out.
I have never tried this, so take proper precautions.
You could put the wood into a turkey roasting bag, blow in some co2 or other inert gas, leaving plenty of room for expansion. Seal up the bag and roast away. Would keep the smell in and oxygen out.
I have never tried this, so take proper precautions.
I thought I might just post a simple idea. If we're trying to get consistent reaction to burning... Why not use a laser thermometer and find out for each wood and moisture levels. Film it on your phone and then you can catch the timing at which it gets too hot.
That's a pretty good idea. I thought it might be difficult to seal gas into a tinfoil bag. The turkey roasting bag seems like an easy solution though!I had a crazy thought.
You could put the wood into a turkey roasting bag, blow in some co2 or other inert gas, leaving plenty of room for expansion. Seal up the bag and roast away. Would keep the smell in and oxygen out.
I have never tried this, so take proper precautions.
This is a good idea as well!I thought I might just post a simple idea. If we're trying to get consistent reaction to burning... Why not use a laser thermometer and find out for each wood and moisture levels. Film it on your phone and then you can catch the timing at which it gets too hot.
I tried out a bit of roasting on a Black Oak bowl I turned last night. Here is a before/after photograph. Note: both of these have been oiled/waxed. I figured that this might help prevent some cracks during the roasting process. Also, my final product is going to be finished with oil/wax, so that's the comparison that is important. I also added a cup of water to the roaster to keep humidity levels high-ish. I roasted for 30 minutes at 210 F, 30 minutes at 280 F, and 30 more minutes at 350 F. Next time I will likely do 30 more minutes (or maybe an hour) at 400 F. I like the color change; though, a bit darker would be ideal (and more obvious). It was super lat though, and I wasn't really keen on falling asleep with wood in the oven at high temps! 
As it is, and with these metrics, I got a pretty rich brown color. Maybe even more significant is some unsightly yellow streaks from the bit of sapwood present darkened and aren't really visible anymore. Here are the pre-roast and the post-roast photos of the bowl:


No cracks developed during the roasting process. I think the cup of water and the pre-oil helped. The bottom of the bowl developed a nice texture because of the medullary rays--they feel like little ridges now. Given the exterior form, the wall thickness obviously varies, but it probably a stays between 1/8" and 1/4", aside from the rim and the foot.
As it is, and with these metrics, I got a pretty rich brown color. Maybe even more significant is some unsightly yellow streaks from the bit of sapwood present darkened and aren't really visible anymore. Here are the pre-roast and the post-roast photos of the bowl:
No cracks developed during the roasting process. I think the cup of water and the pre-oil helped. The bottom of the bowl developed a nice texture because of the medullary rays--they feel like little ridges now. Given the exterior form, the wall thickness obviously varies, but it probably a stays between 1/8" and 1/4", aside from the rim and the foot.
Last edited:
Some of what you're seeing could be color change in the wax & oil layer.
Absolutely true. I have another bowl I'm finishing this afternoon that I'm going to roast without waxing/oiling first, and see how it changes. I wanted the security of the oil for the previous pieces, haha.Some of what you're seeing could be color change in the wax & oil layer.
Well, not just because she is pretty, but she explains some things about torrefied woods and why. Maybe some day I will make a guitar....
View: https://www.youtube.com/watch?v=HuR1AYivDzQ
robo hippy
robo hippy
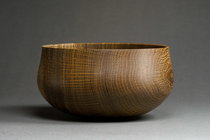
Turned a calabash out of green White Oak the other day. The bottom was a little bit flatter than I wanted, so I decided to roast it and see what would happen.
The wall is around 1/8” thick for most of the bowl, but gets a bit thicker on the bottom for stability’s sake. I should have let it dry for a little while prior to roasting, but that’s alright. The bowl itself is 8” diameter and about 3” tall.
I roasted with a pan of water to keep humidity levels high in the oven. I used the following protocol: 30m at 230F, 30 at 280, 30 at 350, and 45 at 400. The color is about where I wanted it to be, aside from the bottom. Oiled, it’s a very rich brown.
The only cracks that developed were on the bottom, where it was a bit thicker and still wet. Even so, they weren’t full thickness. This area also didn’t get as dark, of course. A moisture ring formed on the surface, which is easily sanded away (though you lose some of the interesting texture. Here are some pics. 1) Before, 2) after, 3) moisture ring and cracks, and 4) a little sample oiled portion.
Last edited:
Michael, looks "torrefic"! Thanks for sharing the experiments.
Thanks for sharing the experiments.You can see commercially roasted (torrified) wood for sale here. https://www.curlymaplewood.com/Roasted-Torrefied-Woods_c_89.html
I have purchased several pieces and really like it.
I have purchased several pieces and really like it.
Thanks, Mark! It's fun messing around and trying to find a good protocol. There have been some failures, for sure, but the successes are encouraging. (I posted the last images form my phone--didn't realize they would be so large. sorry everyone!)
Thanks for the recommendation, Dave. There are a lot of beautiful pieces for sale!
Thanks for the recommendation, Dave. There are a lot of beautiful pieces for sale!
That was/is a nice bowl in it's own right Michael, before the changing of the color, and the picture size is just right IMO, as it shows all of the woods grain and figure of the wood, rather than the often too small pictures that have one guess what there is to see  .
.
As for the splitting of the wood in the bottom, it is typical for Oak to split on those medullary rays, it is just weaker there, of course the wood not being oven dry doesn't help doing the cooking/roasting, anyway it is an interesting outcome that I have seen used by another turner in Canada and then made bowls in the manner of "a bowl from a board" with varying glue-ups.
As for the splitting of the wood in the bottom, it is typical for Oak to split on those medullary rays, it is just weaker there, of course the wood not being oven dry doesn't help doing the cooking/roasting, anyway it is an interesting outcome that I have seen used by another turner in Canada and then made bowls in the manner of "a bowl from a board" with varying glue-ups.
Thanks for the kind words, Leo! I’m glad the photos weren’t too overwhelming. It’s always a bit of guesswork on mobile.
I wasn’t expecting the cracks to be exactly along the rays—makes sense though. I think I’ll probably do the ole sawdust and wood glue trick to fill them. Given the dark grey color of the other rays, I think the fox will be minimally noticeable; though I will lose the wrinkles texture in the bottom. Fair compromise.
I wasn’t expecting the cracks to be exactly along the rays—makes sense though. I think I’ll probably do the ole sawdust and wood glue trick to fill them. Given the dark grey color of the other rays, I think the fox will be minimally noticeable; though I will lose the wrinkles texture in the bottom. Fair compromise.
What do you mean by ultra thin CA glue? I have thin but I have not seen ultra thin, do you add something to it?Here’s my first attempt at making torrified Silver Maple. Baked a white board in toaster oven at 220, 280, 350 and 380 degrees for 30 minutes at each temp. Mostly wanting to see if roasting the maple would help show off the chatoyance more than the leaving it plain. Also, torrification is better than staining since the brown color is throughout the entire board. I can see why guitar makers like this process.
Top board is sealed with ultra thin CA glue then buffed in out. Bottom left plain for comparison.
View attachment 47692
Search YouTube for woodturner Mark Sillay using Parfix 3408. Btw, Mark has the best price for this low odor low bloom CA glue. Just bought another pint of 3408 and activator spray.What do you mean by ultra thin CA glue? I have thin but I have not seen ultra thin, do you add something to it?
Here is extra thin CA according this info.What do you mean by ultra thin CA glue? I have thin but I have not seen ultra thin, do you add something to it?

Here is extra thin CA according this info.
View attachment 49912
I stay away from thin ca glue having a very short 2 or 3 second cure time if using as a sub surface finish that’s absorbed into the wood. For reference, Parfix has a 40 second open time and no smell. Gives plenty time to wipe on, get absorbed and excess wiped off. I didn’t know this kind of ca glue existed until I saw a demo by Mark at a club meeting.
There was an article in the AWT some years ago where the author moved an electric stove outdoors and heated wood under controlled conditions in the oven. Tried searching the index but unable to locate.
I’d love to read that article, Mike. Might have to do some digging myself. Small chance of success, but would be interesting to check out!
Dan Holderdman was asking about ultra thin CA as he had not seen it, so I got a link for it, it was in your earlier post,I stay away from thin ca glue having a very short 2 or 3 second cure time if using as a sub surface finish that’s absorbed into the wood. For reference, Parfix has a 40 second open time and no smell. Gives plenty time to wipe on, get absorbed and excess wiped off. I didn’t know this kind of ca glue existed until I saw a demo by Mark at a club meeting.
"Top board is sealed with ultra thin CA glue then buffed in out. Bottom left plain for comparison."
For me the use of thin or thicker CA do depend on the application it is needed for.
Sorry if I sounded overly critical. I personally didn’t know thin CA could be so different until I saw Markks demo. Just wanted to make it clear in case somebody was trying to duplicate my results with torrefied maple.Dan Holderdman was asking about ultra thin CA as he had not seen it, so I got a link for it, it was in your earlier post,
"Top board is sealed with ultra thin CA glue then buffed in out. Bottom left plain for comparison."
For me the use of thin or thicker CA do depend on the application it is needed for.
I have used the vinegar with steel mixture a few times, nothing special to it, the same with the ammonia treatment.
I never washed the steel wool, as the oil will float on the surface and is easily skimmed off.
The biggest problem is the tannin that is or is not in the wood and how much and how even in the different pieces, even from the same tree/log, not easy to find out without trial of small offcuts.
Wood without tannin or very little can be treated with tannin, strong thee does increase the tannin, and you can get tannin on-line, it is used by leather production and hides treatment, I have never used any of that.
My use was with some Red Oak turnings and also Apple and Honey Locust, I do have some pictures of the Oak and one of the Apple piece, none of the Honey Locust or the Fuming, that was all before we had digital picture taking.
The fuming was done with fresh household Ammonia, a flat plastic dish for the Ammonia and a tent made out of some plastic sheet over the turning and the Ammonia, left for two days I think I did, the color is much more brown than the vinegar and steel wool, as that has a blueish sheen to it, the Apple wood was colored more evenly as the year rigs and early/late wood are not like in the Oak or the Honey locust
Last edited:
The only thing I’ve fumed is brass, to give it an aged patina. I’ve used vinegar/steel wool several times. Have a jar sitting in my shop. One of my buddies calls it “swamp juice”. Very fitting, haha. You’re right though, the effects are somewhat inconsistent, even with the same piece of wood. If I’m ebonizing I usually go the India ink route. Here’s a walnut bowl from a while ago that I used steel wool and vinegar on. It does have a somewhat purple sheen to it, not quite black (though it’s darker in person than in this photo. The black cherry bowl after it is what set me off on this roasting journey. Some very cool, very rich burgundy colors that (I suspect) came about via the caramelization of sugars in the green wood.


Last edited:
The rescued from the fire Cherry is a cool looking bowl Michael,The only thing I’ve fumed is brass, to give it an aged patina. I’ve used vinegar/steel wool several times. Have a jar sitting in my shop. One of my buddies calls it “swamp juice”. Very fitting, haha. You’re right though, the effects are somewhat inconsistent, even with the same piece of wood. If I’m ebonizing I usually go the India ink route. Here’s a walnut bowl from a while ago that I used steel wool and vinegar on. It does have a somewhat purple sheen to it, not quite black (though it’s darker in person than in this photo. The black cherry bowl after it is what set me off on this roasting journey. Some very cool, very rich burgundy colors that (I suspect) came about via the caramelization of sugars in the green wood.
View attachment 49933View attachment 49934
"I had a crazy thought.
You could put the wood into a turkey roasting bag, blow in some co2 or other inert gas, leaving plenty of room for expansion. Seal up the bag and roast away. Would keep the smell in and oxygen out.
I have never tried this, so take proper precautions."
I think you are giving the turkey roasting bag too much credit. I always smell the turkey cooking in a bag every year. If I can smell it, the bag is not air tight.
Oh no! Brain Flash! Wonder if it would work if you could put a piece in one of those vacuum sealers and then boil it?
robo hippy
robo hippy
That's a good thought, but I don't think the temperature would be high enough to see a significant effect. That said, I have thought about pre-boiling the wood prior to roasting, at least if cracking is a major concern.Oh no! Brain Flash! Wonder if it would work if you could put a piece in one of those vacuum sealers and then boil it?
robo hippy
Might as well use this thread as my roasted piece gallery. Here is another black oak bowl, roasted to 400F. Interestingly, the sapwood turned darker than the heartwood. Before roasting, after roasting and oiled, and a shot of the interior showing the dark sapwood:


Also, if you know the work of Jim Rinde, he has done a lot of experimenting with turning and roasting. I just found out yesterday. A bunch of really cool stuff!
Also, if you know the work of Jim Rinde, he has done a lot of experimenting with turning and roasting. I just found out yesterday. A bunch of really cool stuff!
I haven’t updated this thread in a while. Once I have a roasting setup outside of the house I will continue the experimentation. The fumes are too strong to continue indoors. Anyway…
In lieu of roasting, I’ve switched over to ammonia fuming. My primary purpose is to impart an aged patina, but I also have some other reasons for doing. In part, simply because it’s fun!
I’ve posted a couple of fumed pieces in the gallery, the last including some bowls. Here are some individual shots of a Black Cherry calabash and a White Oak calabash.


This has been interesting finding out which woods are affected by the ammonia, and how sensitive they are. I’m using a 10% ammonia solution I bought from the hardware store. One of the more interesting findings is Eastern Red cedar. Initially I thought it wasn’t affected at all. However, I noticed that a little prop-up ERC block I was using darkened slowly over time. So, I turned a little bowl from some scrap, and very lightly sanded at 120g to get a cleanish surface. I let it fine for around a week and took it out and treated with hemp oil. I was kind of blown away. The Dean we areas of wood (including knots) are nearly black, whereas the normal heartwood is a deep burgundy (but a variety of shades). The sapwood seemed to be unaffected, and remained the characteristic light yellow. Here is a photo after wiping off the oil. It’s a bit more subdued than when wet, but I think with a semi-gloss finish it will be incredible. Once the oil cures I’ll put on some lacquer.

In lieu of roasting, I’ve switched over to ammonia fuming. My primary purpose is to impart an aged patina, but I also have some other reasons for doing. In part, simply because it’s fun!
I’ve posted a couple of fumed pieces in the gallery, the last including some bowls. Here are some individual shots of a Black Cherry calabash and a White Oak calabash.
This has been interesting finding out which woods are affected by the ammonia, and how sensitive they are. I’m using a 10% ammonia solution I bought from the hardware store. One of the more interesting findings is Eastern Red cedar. Initially I thought it wasn’t affected at all. However, I noticed that a little prop-up ERC block I was using darkened slowly over time. So, I turned a little bowl from some scrap, and very lightly sanded at 120g to get a cleanish surface. I let it fine for around a week and took it out and treated with hemp oil. I was kind of blown away. The Dean we areas of wood (including knots) are nearly black, whereas the normal heartwood is a deep burgundy (but a variety of shades). The sapwood seemed to be unaffected, and remained the characteristic light yellow. Here is a photo after wiping off the oil. It’s a bit more subdued than when wet, but I think with a semi-gloss finish it will be incredible. Once the oil cures I’ll put on some lacquer.
Attachments
Last edited: