• January Turning Challenge: Thin-Stemmed Something! (click here for details)
  • Conversations are now Direct Messages (click here for details)
  • Congratulations to Scott Gordon for "Orb Ligneus" being selected as Turning of the Week for January 20, 2025 (click here for details)
  • Welcome new registering member. Your username must be your real First and Last name (for example: John Doe). "Screen names" and "handles" are not allowed and your registration will be deleted if you don't use your real name. Also, do not use all caps nor all lower case.

putting a morse taper on wood

Joined
Oct 25, 2020
Messages
598
Likes
558
Location
Minneapolis, MN
I think it was @John K Jordan who, in a recent thread, described putting a taper on a small piece of wood to insert it right into the headstock spindle taper to skip using a chuck for small spindle work. I've forgotten about this method, been a long time... A machinest website found me this table of morse taper dimensions-
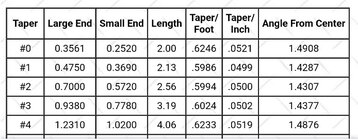
1000009002.jpg
1000009001.jpg

So I'm going to regrind a forgotten Sears skew chisel to a new angle (1.43 degree, or whatever is humanly possible freehand). When I want to insert a small piece of wood right into the spindle taper, I'll eyeball the toolrest parallel to the bed ways, eyeball the tool square to the toolrest, and scrape a half inch or so of taper onto the wood spindle. This should take most of the guesswork out of cutting a taper get a reasonably good taper fit of the wood into the spindle, and a little tailstock pressure (not mallet pounding like I've seen demonstrated, poor bearings!) will set the wood into the drive spindle taper.

Thanks for reminding me of this method, John (if that was you).
 
Turning a morse taper is just one of several valuable tips John as kindly shared with us.

When I make these, I try to match the small diameter and 2" away the large diameter. Instead of a continuous taper, John suggested relieving the taper slightly midway between the two to try to insure the contact points in the spindle are further apart. Following his method, I was able to finish turning the ends of 10-12" long "magic wands" with the tailstock backed off.

Lacking John's precise eye, after shaping the tenon on a number of spindles I remove the drive center, insert each in turn into the spindle and rotate several times to see where contact occurs, touch them up and repeat as necessary.
 
Yes, a great method for longer tapers. I've only ever done this for small parts, so I've only made a short taper on the wood.

Properly done, it is a very stable method to hold a piece of wood. ("Man, my piece is too small for a chuck. Wait! Taper it!")
 
John has a wonderful presentation of doing this for thin spindles. He makes his taper on a one inch section, taking the diameter measurements from a drive center. He has two vernier calipers locked at the large and small diameters. In this presentation he admits his humanity in that he doesn't always hit the mark in the first try.

I want to thank John for all his help and guidance as I enter this great hobby. I saw this method and was immediately sold. Only needing an inch to firmly secure a work piece as long and thin as a wand is amazing. Any time that I'm turning a spindle project I'll look to see if this makes sense. Being able to register the work piece in a repeatable manner definetly makes sense (in some situations). I can also envision preparing several blanks for this mounting so that a practice session can be focused on turning the pieces one after another.

Gregory
 
Many wood lathes don’t have a full length Morse taper (the through-bore negates much of the length) - especially those with #2MT and a 1”-8 threaded spindle. So it’s worth checking to see just how much taper length you need, and whether it is practical to relieve any of the length or not.
 
I think it was @John K Jordan who, in a recent thread, described putting a taper on a small piece of wood to insert it right into the headstock spindle taper to skip using a chuck for small spindle work.

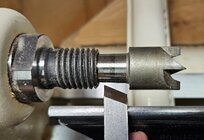
Yes, and thanks for the shout out. I make the short tapers by sizing with calipers so the fit is secure with a little twist. One beauty of this is the piece can be removed from the lathe and remounted later with perfect registration - something not easy (or impossible) when holding with a chuck. If carefully made, twisting it into the lathe spindle will make two burnished marks with 1/2" spacing, enough to hold securely and precisely.

For anyone interested, the document is attached to this message. (I wrote it for a recent demo on turning thin spindles.)
The reasoning for these tapers is early in the document on pg 5 - the instructions are in Appendix 1 starting on page 20.

As I mentioned elsewhere, some people make long tapers, perhaps the length of a typical drive center, but from my experience that length is not needed.

JKJ
 
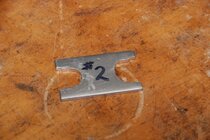
Here is my morse taper jig. I made it like a go no go gauge. I draw lines the length of this piece. The I cut down until the small end drops over. then cut on the other line until the big end drops over. Then it's simply a matter of connecting the two. If I'm using the full length of the morse taper I will cut away part of the middle. slide the piece into the taper and twist it. pull it out and see where the high spots are cut those down. Sometimes I'll use chalk to make it easier to see where the chalk rubs off which is a high spot.
 

Attachments

  • Morse taper jig.JPG
    Morse taper jig.JPG
    326.4 KB · Views: 10
Here is my morse taper jig. I made it like a go no go gauge. I draw lines the length of this piece. The I cut down until the small end drops over. then cut on the other line until the big end drops over. Then it's simply a matter of connecting the two. If I'm using the full length of the morse taper I will cut away part of the middle. slide the piece into the taper and twist it. pull it out and see where the high spots are cut those down. Sometimes I'll use chalk to make it easier to see where the chalk rubs off which is a high spot.
John how long is your go/no-go gauge?
 
John how long is your go/no-go gauge?
Not much point knowing that without also knowing the diameter of the gauge points Just pick any 2 spots on your #2 MT, usually starting with the largest spot and then cuts something to length then the diameter of the smaller end where the length intersects would be the way to make your own gauge, I'd say.
 
Not much point knowing that without also knowing the diameter of the gauge points Just pick any 2 spots on your #2 MT, usually starting with the largest spot and then cuts something to length then the diameter of the smaller end where the length intersects would be the way to make your own gauge, I'd say.
The gauge defines the diameters, one at each end. The length of his gauge defines the distance between them. My question is what distance did he chose. I know this response is going to come across snarky, trust me when I say I don't mean it that way. I make it because I'm interested in the actual answer.
 
The gauge defines the diameters, one at each end. The length of his gauge defines the distance between them. My question is what distance did he chose. I know this response is going to come across snarky, trust me when I say I don't mean it that way. I make it because I'm interested in the actual answer.
Ah!. not snarky at all (indeed, I half expected my post might have been seen as snarky itself) Helps to understand your original question as to the length - In my case, I turned a MT2 taper when I did not yet have pin jaws, and needed a way to drive my project for hollowing once I had finished the outside and set my recess (for the other part that was to fit in there) and realized I had no way to reverse it and hollow, so I cut a spindle to the same length as my drive center, and then turned the one end to have a nice friction fit to the work piece, and turned the other end to match my Drive center's taper - Later on I made shorter tapers and still just took the measurements off my drive center's MT2 taper based on length.... I'd never considered making a gauge, but I just might make one myself sometime down the road, but as my drill bit sizes or go-no-go cutouts could vary somewhat from some plan or the other, I figured I'd do the cutouts first and then use them on an existing drive center MT2 taper to determine my length needed....
 
I'd never considered making a gauge, but I just might make one myself sometime down the road, but as my drill bit sizes or go-no-go cutouts could vary somewhat from some plan or the other, I figured I'd do the cutouts first and then use them on an existing drive center MT2 taper to determine my length needed....
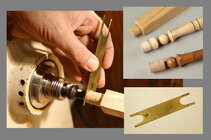
It might be better to do it the other way - first decide on the desired taper length, then make two straight cuts in the brass or aluminum on a bandsaw or something. Then cut off the waste and round the end (if desired, not necessary) with a dremel bit or something. The rounding is not really necessary but does make a thin brass gauge a little stiffer. (That's the way I made mine.) Or just use thicker stock and leave the slot rectangular!

I've made two of these from brass, one for me and one for a friend. I made distance between the diameter measurements on a drive center was 1/2" (the little marks on one end, thus the little marks on one end). I made these similar to go/no-go gauge with a short slightly wider section at the very end to warn me that the needed diameter was close when using a parting tool, then stop when the part with the curve slips over the wood. (BTW, if anyone cares (!), a true go/no-go used in precision inspection is made to work the other way - it slips over the first dimension (pass, go) and stops at the narrower dimension (fail, no-go), but it's made to check precision tolerances rather than size something being made. I guess my gauge would be better called an "amost there/stop now" gauge!)

B02_morse_taper_comp.jpg

HOWEVER:
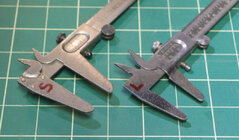
Although I used the gauge years, but was a pain to make so I no longer recommend one. I now recommend a much simpler method as I describe in my thin spindle document: just set a cheap vernier caliper to each diameter of the taper. (I never use the vernier scale to measure, just use the calipers to transfer dimensions to the wood.)

I make the short MTs so often I keep two calipers preset and locked but one would work fine - just set it twice. I've paid 4-5 dollars for this type from Amazon when I can find them cheap enough, also have seen them on the wall at HD in the cheap tool section. (I keep a small drawer full of these - I never use digital or higher quality dial calipers for sizing, just for measuring - these work better with a parting tool since the steel is thinner.)

Be sure to round off and smooth the inside "points" so they don't catch on the spinning wood when sizing!!

calipers_2MT.jpg

It only takes a few minutes to make a useful MT. If you want a longer MT (I make mine about an inch or so), just take the two measurements from the drive center further apart.

BTW, these are currrently $ 5.95 each:

JKJ
 
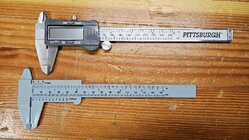
Oh, I can't stand that type of metal caliper. (And they are available at just about any hardware store.) That window blocks too much of the view of the scales. For woodturning, where I'm not worried about thou's of an inch, the cheap plastic works fine. If I need greater tolerance, the Harbor Freight digital ($15-20?) works well... enough. It chews through batteries every few months, though.
1000009189.jpg
 
Oh, I can't stand that type of metal caliper. (And they are available at just about any hardware store.) That window blocks too much of the view of the scales.

If you are referring to those I pictured, remember I said I never use them or measuring (never use the scale), only for sizing. In fact, I've never once tried to read the vernier scale on those in years of use. If I need a specific size I might set a digital (or better, a dial caliper), lock it down, then set the close the cheap caliper jaws on the internal points.

At the mill and metal lathe where precision is needed I use a Starrett (my favorite) or Mitutoyo. However, they are not cheap. I'd never round off the points or let them touch spinning wood.

I had a plastic one like that but I couldn't see how to lock it down without glue or tape. 🙂 The one I had was too easy to accidentally move when used to sizing spinning wood on the lathe, reducing the diameter with a parting tool. I couldn't stand it so it accidentally fell into the trash can.

I use the cheap metal verniers for one thing only, sizing spindles while spinning, and they do it well. And the battery lasts forever.
 
Back
Top