No worries, Dale. Have a great trip!
-
Beware of Counterfeit Woodturning Tools (click here for details) -
Johnathan Silwones is starting a new AAW chapter, Southern Alleghenies Woodturners, in Johnstown, PA. (click here for details) -
Congratulations to Peter Jacobson for "Red Winged Burl Bowl" being selected as Turning of the Week for April 29, 2024 (click here for details) -
Welcome new registering member. Your username must be your real First and Last name (for example: John Doe). "Screen names" and "handles" are not allowed and your registration will be deleted if you don't use your real name. Also, do not use all caps nor all lower case.
You are using an out of date browser. It may not display this or other websites correctly.
You should upgrade or use an alternative browser.
You should upgrade or use an alternative browser.
Production efficiency for twice turned bowls
- Thread starter Michael Anderson
- Start date
The most important efficiency task for me was having several of the same size bowl gouges. At least 3 of each and up to 5. I sharpened them all in the morning, and when one gouge was not cutting as well as it should, I dropped that and grabbed a fresh one. After lunch I re-sharpened all those gouges. Not everyone has the cash for 20 plus gouges, I know, but having 2 of each is possible, and saves time.
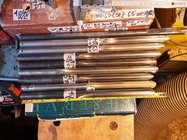
Like Donna, I also found that multiple gouges sharpened in batch mode increased my efficiency. Here's my 5/8" BGs waiting to have their edges refreshed...
If your selling your work you can afford to progressively add to your most used gouge sizes. They quickly pay for themselves.
The other efficiency for me when final turning pieces is to not have to remount a piece to turn off the tenon. I finish the foot (with a recess) when turning the outside to completion. Then mount the piece using the recess to complete the inside of the piece and when done, the piece is done.
I'm curious Neil, when you finish turn the foot with a recess, then chuck mount to finish turn the inside, do you ever crack the foot/recess due to pressure from the chuck jaws? i.e Usually I leave a significant amount wood to support force from expanding chuck jaws. On a platter I accomplish this by creating a recess that's deeper than the foot or platter bottom. My guess is it's more difficult to do on the bottom of a curved bowl. It sounds like I'm wrong but again I'm curious if you ever run into problems.
Last edited:
Part of the learning curve when using a recess, is learning how wide your shoulders need to be, and how much expansion pressure to put on the jaws. You want it snug, but not 'armstrong' tight.... I broke a few before I learned how snug to make them. I do go around both of the 'keys' on my Vicmark chucks a couple of times, and just snug, not really tight. With a shoulder that is 1 inch wide, it is almost impossible for even me to put enough pressure in the key to get the wood to crack. I am on the Brute Squad.......
robo hippy
robo hippy
That’s okay as long as your shop isn’t The Pit of Despair!I am on the Brute Squad.......
Anes Grigg makes a spike plate. Depending upon the size of the bowl blanks you are twice turning... this might help you with production. It makes larger pieces easier to mount on the middle peg, rather than having to screw a face plate on or trying to maneuver screwing a blank onto a worm screw. You do have to use the tailstock. But it is a lot easier mounting large blanks!
Good call, Donna. I've seen some Glenn Lucas videos where he uses a spike plate as well. It does seem like it speeds up the roughing process considerably!
A big time saver for me, and I would expect this would work for roughing the outsides of bowls, is to drill a 2 5/8 diameter recess for my Vikmark chuck to expand into. The chuck never comes off the lathe, and it is a very secure mount, no taper for the dove tail jaws necessary. If blanks are well cut and almost parallel top and bottom, I only drill down about 1/4 inch. If blank is a little lop sided, then I drill down 1/2 inch or so so the face of the blank sits on the face the jaws protrude out of. Never had blanks spin. Only problem is if I remove the blank and have to remount it, It seldom spins perfectly true, Never more than plus/minus 1/16 or so. Since I use a recess for my mounts, I have eliminated the need for face plate and screws. This method does not work for natural edge bowls, but I don't do many of those.
robo hippy
robo hippy
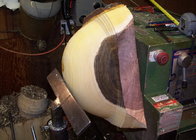
I find that screwing a faceplate on takes very little time, and makes for a solid and safe mounting of large blanks.
So a faceplate on the chainsawed face and the blank is turned on the outside, and a recess is turned on it before flipping it over and then turn the inside, DONE.
For me there is no leaning over the bed, or exactly band sawing the blank, no tailstock in the way, and a comfortable standing and holding of the tools the way I like.
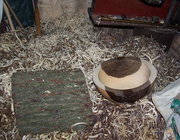
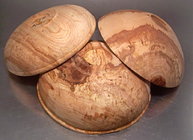
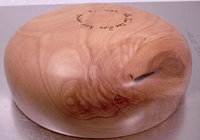
The recess size and depth depends on the size of the blank and wood's soundness/strengths, like the spalted Apple wood here where in softer wood the recess is deeper.


Last edited:
odie
TOTW Team
- Joined
- Dec 22, 2006
- Messages
- 7,123
- Likes
- 9,888
Don't make those batches too big.....or else they become chores.
Keep everything in the realm of maintaining interest, and pleasure.
-----odie-----
Keep everything in the realm of maintaining interest, and pleasure.
-----odie-----
Glad you said that Odie. This was all starting to sound a bit tedious to me, and in fact when I go and get too many logs at once that I feel I need to work through quickly, I wind up asking myself, is this how I want to be spending my time?Don't make those batches too big.....or else they become chores.
Keep everything in the realm of maintaining interest, and pleasure.
Reed, that’s a great idea. I still tend to gravitate toward tenons for most things, but I’m going to put that method in the bank. Do you clean up the Forstner bit point or just leave as is?
Leo, faceplates are great. Often I’ll just use a woodworm screw, but for unruly pieces faceplates give me a lot of security. Especially on the bigger stuff. Also, your signature ring is really nice. That is certainly something I need to improve upon myself.
Odie, sage words. Well said.
Leo, faceplates are great. Often I’ll just use a woodworm screw, but for unruly pieces faceplates give me a lot of security. Especially on the bigger stuff. Also, your signature ring is really nice. That is certainly something I need to improve upon myself.
Odie, sage words. Well said.
Last edited:
Since the forstner bit point is tiny, and I don't take that last 1 1/2 inch deep core, it is not a problem. It does give more depth to work with than one of the screw chucks. I do use a forstner bit if I need a level spot to put a face plate on if I am turning a natural edge piece.
robo hippy
robo hippy
Going back to your original post, steps 1-5 follow what I do, except for #2. Typically I cut up a section end sealed log and keep the blanks in a plastic bag till turned - I try to turn them within a couple of weeks, and dont want the time and mess of sealing. Significant time improvement for you here.
- Chainsaw half-log (or whatever other orientation)
- Seal the half log with Anchorseal (or equivalent--has anyone used Bailey's before? 5 gallons for $80 sounds nice)
- Once ready to turn, cut corners off with chainsaw (I don't have a bandsaw at this point)
- Mount blank (sometimes between centers, sometimes with a screw)
- True the blank, form shoulder and tenon, and shape the outside (i've used a glue block as part of this process as well, though only with dried wood)
- Mount in chuck, and rough the inside (and if necessary, refined the outside)
- Seal endgrain of bowl, record weight, store blank, and check weight occasionally
- Finish turn (and everything involved) once blank has equalized with environment
5-6 can be a significant improvement if using a drive center (I do 99% between centers so I can adjust the blank). Never used a chuck mount drive center - potential for clearance issues with the work hitting the chuck jaws, as I tend to use oneway tower jaws a lot. If the drive center must be removed and chuck installed when turning the work around, the more pieces you rough before switching to the chuck the more time saved. Also, not all pieces cut may use the same jaws, so once to the ID step, multiple chucks with jaws speed the process. I core large bowls, and of course smaller bowls will get smaller tenons. The large bowl may have a 6” tenon to core it, then it may be cut down in dia later in the process.
#7 Bagging will go faster vs sealing. Bag it, write wt, date, s/n, etc on the painters tape used to hold the bag closed, store. Re-use bags multiple times, no changing bags if stored in a ventilated space on wire shelves (mine go in the house).
For 2nd turn, do multiple pieces at each step that use the same holding method, ie friction chuck, chuck jaws, etc.
The most significant improvement is moving to a 1 turn process, but you have to accept rims that are not flat and oval bowls.
Doug, thanks very much for the thoughtful and thorough response. A lot of good information in there. It seems like bagging is the way to go. I have a procrastination problem, so anchorseal gives me that extra security haha. That said, I’ve still lost several sealed blanks (half logs minus pith) because they sat around for too long. Not a big loss though—they just become firewood.
I would consider bagging good if I only turned a few bowls. For production work, I would consider it time consuming. A method used by Christian Burshard for his madrone sculptures is to use a paper bag inside a plastic bag and change out the paper bag daily. Fine if I am only doing a few bowls, but when turning a couple hundred madrone bowls, that would just take too much time. Also, to me, the bagging method would work fine with woods that are generally fairly stable. For woods that are more 'difficult' you do need to seal, or boil them. Again, that takes time.
robo hippy
robo hippy
I find that screwing a faceplate on takes very little time, and makes for a solid and safe mounting of large blanks.
So a faceplate on the chainsawed face and the blank is turned on the outside, and a recess is turned on it before flipping it over and then turn the inside, DONE.
For me there is no leaning over the bed, or exactly band sawing the blank, no tailstock in the way, and a comfortable standing and holding of the tools the way I like.
The recess size and depth depends on the size of the blank and wood's soundness/strengths...
Ditto!
I also use faceplate rings for larger blanks, but find a screw chuck much quicker for mounting smaller blanks.
The size of my foot recesses are also determined by foot design considerations. The downside of retaining the recess in the foot as part of the finished design is that I require a dozen or so jaws and chucks. Fortunately I sell almost everything I make, so those paid for themselves a long time ago.
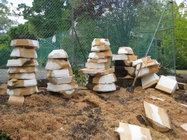
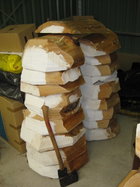
The only time I take the extra time and trouble to seal blanks is when I'm preparing blanks onsite and can't move immediately, otherwise I just bag half billets as I harvest or throw a tarp over the pile if too many to bag. Here is an example where I couldn't move the blanks offsite until the next morning (axe included for scale)...
- Joined
- Nov 1, 2013
- Messages
- 325
- Likes
- 733
- Location
- Gulfport, MS
- Website
- www.woodtreasuresbybreck.com
Michael I am a type of production turner having 100 to 150 bowls always drying, same finished ready to sell, and about the same green waiting to be rough turned. I will say this if you ask a hundred turners how to do something you may get 98 very good methods of accomplishing the same goal. I have learned over the years to try different methods and find what you are the best at or the most comfortable at. Over time you will find what works and what doesn't work best for you personally. I turn because I love to turn I will green turn (rough turn) until I am just tired of all the mess, then I change to finish turning already dried bowls this way it's more fun not work. each aspect has it's wonderfully fun or enjoyable parts. When nothing seems fun I work on art pieces. Or a production line of making salad bowl tong sets. I use a face plate because it's my preferred method. I use the large tenon like many of the others do it is simply the best for holding heavy blanks or for coring, I can always cut them down from my 5" jaws to use my #2 jaws on my vic marc chuck for finish turning when they are dried when truing up the tenon I can always make it smaller but not bigger. Enjoy my friend and find your own path you are very creative and I always ask for other turners advice then pick and choose what works for me time wise or money wise as we all do I imagine etc...
I turn about 200 bowls a year plus spindle stuff vases etc. for bowls I believe you have gotten some great info here. I would like to add, do not leave sharp edges on your blanks you want to dry. round the rims slightly this will help with cracking while drying make your bases larger than your finish size. 40% is good, you'll reduce to 30ish when dry. you will also need the extra strength when stacked for dying sticker between. Add 8-10 % to finish bowl size meaning for a 15 inch bowl cut blank 16-1/4. these will oval when drying. The exception to the rule is mesquite, it deforms very little. When sealing just focus on the end grain, this will help with drying.
Attachments
@robo hippy noted about bagging. Btw, have you seen some of Christian's madrone accordions/slinkies he's been making lately? Not trying to get off track, but I saw some photos recently--wild stuff.
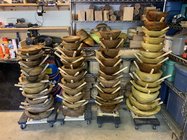
@Neil S those are nice stacks of beautiful wood. That's convenient to not have to seal--what a time saver. Sometimes my problem is that I will let my logs pile up, and then I will chainsaw a huge amount at once. And then seal all of them--but, I'm learning that even well-sealed blanks can crack if they sit around for a while. Some unfortunately become firewood, but it's all part of the learning curve.
@Breck Whitworth you are completely correct. I think a lot of things factor into everyone's personal process--shop space, wood availability, tool preference, time availability, etc... It's all good and enlightening information. I also turn primarily because it's fun/engaging, and I suspect that I'd get burnt out if I had to make the same thing all the time (and not everyone is like that, of course). This forum/community is such a good source of information, and I have no problem asking for help
@Dean good advice! do you leave your stickers in place for the entire drying process, or just until a certain point?
I haven't seen any of Christian's work in a while. He was branching out into sculpture, more than turning. He is very creative.
If a log sits for a while, and you cut out a bunch of blanks, it seems to me that some times, just cutting the blanks opens up new stresses, or maybe it just provides a stress relief point, and that is why you get the cracking. I never seal my rounded blanks. I do use the plastic stretch film, and make sure it covers the edges an inch or two. I have kept a few blanks for 6 months or so and they don't crack. Less mess than the sealers.
robo hippy
Press button automatic chuck jaws
Michael A
I hesitated to post the following video clip in this thread earlier on because of the response I got in some other forums where I posted, which was verbatim... whatever rings your bell!
I expect this wasn't something that they had seen elsewhere and therefore couldn't see its relevance to them and their woodturning, which it probably the case if they are only mounting one or two pieces on and off their lathe during any workshop session. But. if I'm in production mode and re-turning a batch of pre-turned bowls I find it does save a bit of time and contributes to my efficiency.
Apologies for the video production quality. As you can see I have no intention of becoming a self promoting YouTuber :~} ... it's just a quick snap to show how long it takes to open and close the jaws on a 5" chuck with a T bar (40 secs) compared to doing it with a battery drill (6secs).
View: https://www.youtube.com/watch?v=-bzTOafyZcw
When I'm re-turning a pre-turned bowl I first mount it on the outside tenon and true up the internal recess or tenon. Then reverse and mount piece on the trued up internal recess/tenon and complete the turning of the outside including the recess in the foot, which will remain on the finished piece. After which I remount the piece using the foot recess to complete the inside of the piece. All up this involves three cycles of opening and closing the chuck jaws. Using the battery drill saves approx 3 x 3/4min, which is only just over a 2 min saving a piece, but it all adds up. Regardless of the time savings, I use this press button automatic jaw action all the time because I have found that there are two other benefits from using the drill:
I use the screw tension dial on the drill to pre-set the tension that the jaws will automatically apply to the tenon or recess. With experience you get to know which tension setting to use. When you get that right it eliminates the small nibbing up adjustments that are done by hand.
The other benefit from not using the T bar is it saves my wrists from all that twisting action, which can cause as much repetitive strain injury as the tuning itself.
Anyway, most of us have a battery drill or two already, so there is little expensive in giving it a go and if it doesn't do anything for you then not much has been lost.
Michael A
I hesitated to post the following video clip in this thread earlier on because of the response I got in some other forums where I posted, which was verbatim... whatever rings your bell!
I expect this wasn't something that they had seen elsewhere and therefore couldn't see its relevance to them and their woodturning, which it probably the case if they are only mounting one or two pieces on and off their lathe during any workshop session. But. if I'm in production mode and re-turning a batch of pre-turned bowls I find it does save a bit of time and contributes to my efficiency.
Apologies for the video production quality. As you can see I have no intention of becoming a self promoting YouTuber :~} ... it's just a quick snap to show how long it takes to open and close the jaws on a 5" chuck with a T bar (40 secs) compared to doing it with a battery drill (6secs).
When I'm re-turning a pre-turned bowl I first mount it on the outside tenon and true up the internal recess or tenon. Then reverse and mount piece on the trued up internal recess/tenon and complete the turning of the outside including the recess in the foot, which will remain on the finished piece. After which I remount the piece using the foot recess to complete the inside of the piece. All up this involves three cycles of opening and closing the chuck jaws. Using the battery drill saves approx 3 x 3/4min, which is only just over a 2 min saving a piece, but it all adds up. Regardless of the time savings, I use this press button automatic jaw action all the time because I have found that there are two other benefits from using the drill:
I use the screw tension dial on the drill to pre-set the tension that the jaws will automatically apply to the tenon or recess. With experience you get to know which tension setting to use. When you get that right it eliminates the small nibbing up adjustments that are done by hand.
The other benefit from not using the T bar is it saves my wrists from all that twisting action, which can cause as much repetitive strain injury as the tuning itself.
Anyway, most of us have a battery drill or two already, so there is little expensive in giving it a go and if it doesn't do anything for you then not much has been lost.
Interesting concept Neil. I have severe carpal tunnel in both wrist (already operated on)and degenerating rheumatoid arthritis in both thumbs. This might help me out. Right now I try to use scroll chuck levers as much as possible.
I’ve been using the drill to remove and reset the buttons on the Cole jaws for a while. I can’t claim the idea as mine, as someone on this forum suggested it. Sorry, but I don’t recall who. In that case it saves much more time when you’re moving eight buttons. I also use the adjustable clutch, in my case set down at about 5 or 6 on my Bosch drill and it saves my wrist from the jerk that usually results if the clutch is not engaged.
I think I’ll pass on using it to snug up or release the chuck jaws though. I don’t mind the few seconds that takes, and I find different woods require a different degree of tightening. Just my $.02.
I think I’ll pass on using it to snug up or release the chuck jaws though. I don’t mind the few seconds that takes, and I find different woods require a different degree of tightening. Just my $.02.
Last edited:
Neil, I haven't done that with my chucks, but have done it with the screws for my chuck jaws. I think it is important to make sure you adjust the clutch down to a lower setting. Some of the modern drills have too much torque and can strip threads if you have it set to full torque.
robo hippy
robo hippy
Tom Gall
TOTW Team
Me too! Although it is a rare occasion since I have a lot of chucks with different jaws.Neil, I haven't done that with my chucks, but have done it with the screws for my chuck jaws. I think it is important to make sure you adjust the clutch down to a lower setting. Some of the modern drills have too much torque and can strip threads if you have it set to full torque.
robo hippy
It is important to set the clutch to the lowest setting (might even have to back them off a little). You just want to save time driving the screws. Most likely you will want to close the jaws to check for alignment and seating, etc. I then use the hand tool to tighten (preferred) - or - increase the torque on the clutch setting.

