• January Turning Challenge: Thin-Stemmed Something! (click here for details)
  • Conversations are now Direct Messages (click here for details)
  • Congratulations to Scott Gordon for "Orb Ligneus" being selected as Turning of the Week for January 20, 2025 (click here for details)
  • Welcome new registering member. Your username must be your real First and Last name (for example: John Doe). "Screen names" and "handles" are not allowed and your registration will be deleted if you don't use your real name. Also, do not use all caps nor all lower case.

Problem with finish. Advice please and thank you?

Mark Hepburn

Artist & Chef
Joined
Mar 26, 2014
Messages
1,622
Likes
580
Location
Houma, Louisiana
Hi Everyone.

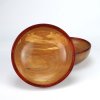
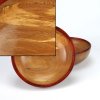
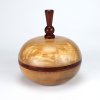
So I did this bowl in elm with a segmented band around the middle. Aside from my dissatisfaction with the clunkiness of the form and the finial, there's this finish issue that I couldn't resolve so I just forged ahead.

NONE of this showed up during turning. I went through the grits from my old faithful 100 to 600. Wiped with tack cloth and mineral spirits and let dry. Top coated with spray poly. The first coat this appeared and so I waited, then re-sanded and finished again. Same result.

I decided to try again so i did and this time I hit it with mineral spirits again and no tack cloth and let it sit a few days before recoating. Then did a "seal coat" with dewaxed shellac (fresh Zinsser universal seal coat) before putting on poly. The final result is what you see.

I've done a lot of flat work over the years and so my first thought was that my prep was insufficient but then, I've never worked with some of the woods I've turned when doing cabinets, etc.

Any help anyone can offer would be very welcome.

Thanks!
01.jpg

02.jpg 02a.jpg
 
Last edited:
Mark, I'm not seeing any finishing problems, such as a blemish on or in the finish, or sanding marks. I am seeing some colorations, some might say discolorations, in the wood itself, but that goes all the way thru so thats nothing you did or failed to do. Is that what you are dissatisfied with? I know cherry and a few other woods have a propensity to blotch when finishing but that's not what I see here. I like it, the coloration looks like wings to me. I suppose it's like looking at clouds, everybody sees something different. What size is it?
 
What is the red wood?

P
Mark, I'm not seeing any finishing problems, such as a blemish on or in the finish, or sanding marks. I am seeing some colorations, some might say discolorations, in the wood itself, but that goes all the way thru so thats nothing you did or failed to do. Is that what you are dissatisfied with? I know cherry and a few other woods have a propensity to blotch when finishing but that's not what I see here. I like it, the coloration looks like wings to me. I suppose it's like looking at clouds, everybody sees something different. What size is it?

Clifton,

Yes, that's it. I really dislike the discoloration. I do know that cherry can be tough to finish some times and I've really never worked with it other than in turning.

The box is about 6" diameter.
 
The area on the lower right in the first pictures bears resemblance to what can happen to maple in our humid climate -- mildew, more or less. Usually, though, it's apparent when you're turning. I'm a little confused about the use of a tack cloth and mineral spirits. (Not thinking it is the cause, though) A tack cloth is basically a mesh cloth with shellac on it to make it gummy. Never thought of using it in conjunction with mineral spirits.
 
image.jpeg Mark, You have a little bit of tearout that needs more attention.
A scraper while it is still on the lathe and of course sanding. the issue is seeing it while it is on the lathe. A light at different angles. As my eyes get older I need to use the optivisors to check the surface. The mineral spirits usually show tearout when you wipe it on Or when the damaged grain dries more slowly.

Overall you are getting a really clean surface.

1. The left arrow points to a ring in the square photo that I see when the tip of the gouge cuts without bevel support. As the gouge comes off the bevel only the tip is in contact and it wants to cut following the bevel which makes the cut too deep. The brain without us realizing it corrects the cut an if you get back on the bevel all is good. If not you get a sort of washboard effect. To make that smooth cut along the curve I grind the heel off the Ellsworth bevel to shorten it so it can make the turn or use a Michelson grind which has a micro bevel all around, or pull out the Hunter and practice with it.

2. The right arrow could be the gouge coming off the bevel but it looks like a section of punky wood with tearout. The punky wood could probably be stiffened with water as you are turning it. The water swells the fibers so they give a supported cut.
Punky wood is a challenge because the wood fibers have spaces between them and don't support a cut so fiber lift up and tear instead of being pressed against the next fiber and cut cleanly.
Sharp tools, light cuts, stiffen the fibers water, wash coat of shellac or lacquer. CA will let you cut the wood but it doesn't finish well.

Al
 
The area on the lower right in the first pictures bears resemblance to what can happen to maple in our humid climate -- mildew, more or less. Usually, though, it's apparent when you're turning. I'm a little confused about the use of a tack cloth and mineral spirits. (Not thinking it is the cause, though) A tack cloth is basically a mesh cloth with shellac on it to make it gummy. Never thought of using it in conjunction with mineral spirits.

Hi Jamie,

I usually use the tack cloth for everything just to remove surface stuff, but sometimes if I'm not sure about a wood that may have some oils like some of the exotics, then I use the mineral spirits to make sure the Orioles going to fit the final finish . But you're thinking that there's mildew is a possibility? Here in Louisiana we are super humid.
 
View attachment 20255 Mark, You have a little bit of tearout that needs more attention.
A scraper while it is still on the lathe and of course sanding. the issue is seeing it while it is on the lathe. A light at different angles. As my eyes get older I need to use the optivisors to check the surface. The mineral spirits usually show tearout when you wipe it on Or when the damaged grain dries more slowly.

Overall you are getting a really clean surface.

1. The left arrow points to a ring in the square photo that I see when the tip of the gouge cuts without bevel support. As the gouge comes off the bevel only the tip is in contact and it wants to cut following the bevel which makes the cut too deep. The brain without us realizing it corrects the cut an if you get back on the bevel all is good. If not you get a sort of washboard effect. To make that smooth cut along the curve I grind the heel off the Ellsworth bevel to shorten it so it can make the turn or use a Michelson grind which has a micro bevel all around, or pull out the Hunter and practice with it.

2. The right arrow could be the gouge coming off the bevel but it looks like a section of punky wood with tearout. The punky wood could probably be stiffened with water as you are turning it. The water swells the fibers so they give a supported cut.
Punky wood is a challenge because the wood fibers have spaces between them and don't support a cut so fiber lift up and tear instead of being pressed against the next fiber and cut cleanly.
Sharp tools, light cuts, stiffen the fibers water, wash coat of shellac or lacquer. CA will let you cut the wood but it doesn't finish well.

Al

Al, I can't believe you can tell so much from the picture but your dead on. I'm actually going to get another Ellsworths so I will grind the heel off of the bevel. And I will take my own advice that you also just now gave me, and use a light at a raking angle so I can see it better. Since I'm wearing trifocals any help I can get is a big help ..

As to the right arrow, I think it's probably the gouge rather than punkY wood because the wood was pretty stable. And I have definitely noticed a washboard affect him turning in particular he and what is apparently a problem area for me that you just noted from the photo.

I think I would go with awash coat of shellac rather than CA. As you said I I also find that it doesn't finish well. And you just can't sand the stuff out of the work piece.

I use that Ellsworth grind mostly, but I just looked at the Michelson grind tools at his website. Do you think that, given that I already have a number of Ellsworth gouges, I might be better off just getting a Michelson? From what I can tell the nose looks quite different from the Ellsworth; seems a little more pointed and less of a wing
 
Last edited:
I use that Ellsworth grind mostly, but I just looked at the Michelson grind tools at his website. Do you think that, given that I already have a number of Ellsworth gouges, I might be better off just getting a Michelson? From what I can tell the nose looks quite different from the Ellsworth; seems a little more pointed and less of a wing

My suggestion is to stick with the Ellsworth and grind off the heel.

Our club had a week long class with Johannes. We were all pretty good turners at the time.
Eight students and we all used the micheslon grind in the class to turn hats...
When we started the class 6 of us were using the Ellworth, 1 using a stocksdale grind, and 1 using the standard English grind.
A month after the class 1 was using the Michelson, 5 using the Ellsworth, 1 using the English grind, and 1 using the stocksdale.

I should add that I suspect every one of the class members keeps a gouge with the micheslon grind.
The micheslon grind has a small learning curve and it is worth trying at some point especially if you ever have an opportunity to have a workshop with Johannes.

Of course we can't have too many tools.

Al

Nope. Can't have too many. so you know I have to buy a gouge and grind the heel.
 
To make that smooth cut along the curve I grind the heel off the Ellsworth bevel to shorten it....
Al, for those of us who can only buy a gouge when we need one, can you confirm that it's OK to grind the heel off any bowl or spindle gouge -- e.g., would there be a reason to avoid this heel treatment (I've done it to all of my bowl gouges, and half of my spindle gouges). LMK if this is off-base.
 
P
Yes, that's it. I really dislike the discoloration.

Mark, that lighter area of discoloration is often seen in elm, hazelnut, and big leaf maple in this neck of the woods. It’s not a cutting, sanding, or finishing issue - it’s inherent in the wood itself.

Just my 2¢, and now I’m wondering when woods ever had necks...
 
Al, for those of us who can only buy a gouge when we need one, can you confirm that it's OK to grind the heel off any bowl or spindle gouge -- e.g., would there be a reason to avoid this heel treatment (I've done it to all of my bowl gouges, and half of my spindle gouges). L

I think it is ok to have a micro bevel on all your tools and/or to grind the heel off all the bowls gouges
Sort of a personal preference thing. I think the short bevel edge lasts as long as a long bevel edge.

What I do personally is keep one bowl gouge with the heel ground off. When I only had one tool I would only grind the heel when I needed a gouge without the heel. I also just grind the heel on the nose of the bowl gouge not on the wing

Spindle gouges I use with a full bevel.
My one Michelson ground gouge has a convex bevel and in effect has a micro bevel all around.

Two issues with the short bevels that mostly apply to beginners.
1. There is not much steel so it is easy to over grind the tool and mess up the profile if you are heavy handed on the grinder
2. A short bevel can be a little more difficult to control on convex shapes.

Once you get to intermediate skill level the short bevel is of little consequence.

My 2c
 
While it's usually funny, the mistakes our computers and devices commit can make it oh-so-hard to figure out (a) someone's question or (b) someone's solution. As a former writer/editor, it drives me nuts. Proof-reading is the only solution.

Sadly, I did proofread 😕
 
Mark, that lighter area of discoloration is often seen in elm, hazelnut, and big leaf maple in this neck of the woods. It’s not a cutting, sanding, or finishing issue - it’s inherent in the wood itself.

Just my 2¢, and now I’m wondering when woods ever had necks...

Owen, so I just make sure that I cut the neck off before I turn the wood right?

Seriously though that's good to know because I've got some Big leaf maple blanks that I got from Northwest figured woods.
 
I think it is ok to have a micro bevel on all your tools and/or to grind the heel off all the bowls gouges
Sort of a personal preference thing. I think the short bevel edge lasts as long as a long bevel edge.

What I do personally is keep one bowl gouge with the heel ground off. When I only had one tool I would only grind the heel when I needed a gouge without the heel. I also just grind the heel on the nose of the bowl gouge not on the wing

Spindle gouges I use with a full bevel.
My one Michelson ground gouge has a convex bevel and in effect has a micro bevel all around.

Two issues with the short bevels that mostly apply to beginners.
1. There is not much steel so it is easy to over grind the tool and mess up the profile if you are heavy handed on the grinder
2. A short bevel can be a little more difficult to control on convex shapes.

Once you get to intermediate skill level the short bevel is of little consequence.

My 2c
Thanks for the tips, Al. I've learned to have a light hand at the grinder, which was very helpful when the CBN wheel arrived. My gouges don't have a true "micro" bevel, but the heels are ground back some, using the technique of putting a small square of wood in the Wolverine pocket to move the tool forward and soften the heel. If the tool needs to go a little more forward to get just what I want, I stand up a quarter in front of the wood spacer. I have 2 spindle gouges that have very long, shallow bevels on them, there's a learning curve for sure! but they come in handy.
 
Jamie, I'm going to steal that idea of the spacers in the jig pocket. Great way to get a repeatable bevel. Thanks.
 
Pretty much all of my tools except the skew have what I call a mirco bevel. The main bevel is about 2 or 3mm long. What I do is grind the main bevel, then I move the Wolverine jig forward in the V notch to the front of the V and grind a second bevel, then I pull the tool out of the jig and just grind away the bottom corner of that second bevel to soften it so it doesn't get that compression ring when your turning inside a bowl. My grind looks very similar to the Michelson grind except the main bevel isn't convex like he did when he sharpened without a jig. Using his Vector jig on my thompson V gouge gives a very slight roll in of the main bevel but I can't really tell much if any difference in actual use. The short main bevel lets me "feel" the cut better so I can tell when I'm forcing the cut. Forcing the cut is when I am pushing the tool faster than it wants to cut an leads to tearout. I also find this short main bevel is much easier to push through coves or bowls with a tight transition area.
I do use a wooden block in my Wolverine jig but that is simply so I can use the same V arm setting for my bowl gouge and spindle gouge. I leave the V arm set to the bowl gouge setting and then put the wooden block in to sharpen the spindle gouge. I want my spindle gouges sharpened to about 35 degrees where my bowl gouge is about 50 degrees. I still sharpen both by moving them forward in the V arm to create that secondary bevel. I show that in my video on sharpening techniques.
 
Seriously though that's good to know because I've got some Big leaf maple blanks that I got from Northwest figured woods.

I believe the light spots are the beginnings of spalting or some other decay process - I don’t know for sure, just what I’ve guessed at while working with woods that have it. NW Figured Woods sells high quality blanks and this would likely be considered a quality defect so I doubt your purchased pieces have this characteristic.
 
Pretty much all of my tools except the skew have what I call a mirco bevel. The main bevel is about 2 or 3mm long. What I do is grind the main bevel, then I move the Wolverine jig forward in the V notch to the front of the V and grind a second bevel, then I pull the tool out of the jig and just grind away the bottom corner of that second bevel to soften it so it doesn't get that compression ring when your turning inside a bowl. My grind looks very similar to the Michelson grind except the main bevel isn't convex like he did when he sharpened without a jig. Using his Vector jig on my thompson V gouge gives a very slight roll in of the main bevel but I can't really tell much if any difference in actual use. The short main bevel lets me "feel" the cut better so I can tell when I'm forcing the cut. Forcing the cut is when I am pushing the tool faster than it wants to cut an leads to tearout. I also find this short main bevel is much easier to push through coves or bowls with a tight transition area.
I do use a wooden block in my Wolverine jig but that is simply so I can use the same V arm setting for my bowl gouge and spindle gouge. I leave the V arm set to the bowl gouge setting and then put the wooden block in to sharpen the spindle gouge. I want my spindle gouges sharpened to about 35 degrees where my bowl gouge is about 50 degrees. I still sharpen both by moving them forward in the V arm to create that secondary bevel. I show that in my video on sharpening techniques.

I think that's what I'm gonna do John. I like Jamies idea of the quarter for the final bevel. And now that I have a spare quarter I can use...
 
I believe the light spots are the beginnings of spalting or some other decay process - I don’t know for sure, just what I’ve guessed at while working with woods that have it. NW Figured Woods sells high quality blanks and this would likely be considered a quality defect so I doubt your purchased pieces have this characteristic.

I do like the blanks from those folks. I bought a lot of wood from them over the past couple of years and been very pleased.
 
Back
Top