• Beware of Counterfeit Woodturning Tools (click here for details)
  • Johnathan Silwones is starting a new AAW chapter, Southern Alleghenies Woodturners, in Johnstown, PA. (click here for details)
  • Congratulations to Peter Jacobson for "Red Winged Burl Bowl" being selected as Turning of the Week for April 29, 2024 (click here for details)
  • Welcome new registering member. Your username must be your real First and Last name (for example: John Doe). "Screen names" and "handles" are not allowed and your registration will be deleted if you don't use your real name. Also, do not use all caps nor all lower case.

PM3520 Owners: What about that "useless" headstock bracket?

Joined
May 7, 2004
Messages
315
Likes
1
Location
Lincoln Hills, CA (At the foot of the Sierra Nevad
Website
jerryhallstudio.com
Joined
Sep 11, 2006
Messages
1,039
Likes
138
Location
Ormond Beach FL
Website
turnedbygeorge.com
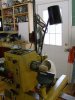
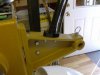
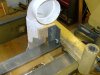
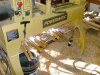
OK, Lets share how we use that cast iron safety shield bracket. I will put the ideas in the Mustard Monster Tips site. I will start things off with two tips, the first I do not recommend:

YIKES and YEAH to the Lathe disaster thing and...
I GOTTA GET ME ONE OF THESE to the tool shelf thing!
I have two other projects first, but... I'm doing one, just a little different, I think.
 

Steve Worcester

Admin Emeritus
Joined
Apr 9, 2004
Messages
2,694
Likes
97
Location
Plano, Texas
Website
www.turningwood.com
Do they ship it on the pallet with the headstock on the lathe bed?
Seems since it is a moveable headstock, it would be better to ship it attached directly to the ballot as most large lathes are shipped.
 
Joined
Apr 24, 2004
Messages
745
Likes
0
Location
Cowlesville,Western New York
Do they ship it on the pallet with the headstock on the lathe bed?
Seems since it is a moveable headstock, it would be better to ship it attached directly to the ballot as most large lathes are shipped.

Steve, I don't know about the "B" model but my "A" came with the headstock mounted a mid-ship on the ways. and it was top heavy.

By lifting(using a lever), centered, at each end I blocked up the machine and removed the pallet. Using 1X or less material for blocking allows you to raise and lower the machine in increments reducing the danger of tipping.
 
Joined
May 4, 2005
Messages
203
Likes
1
Location
Derby, Kansas, USA
B Model Packing

My B model came packed as described for the A model.

Headstock, banjo and tailstock mounted on the bed.

I took them off, turned the bed over, mounted the legs to the bed with the bed upside down. Then turned the assembly on its side and slide the pallet and assembly to the end of the PU bed. Two man job.

John :)
 
Joined
Apr 11, 2007
Messages
628
Likes
2
Location
Northwest Arkansas
PM3520b Assembly

I would like to concur with some of the other posts. I picked up my new 3520 in October at the truck terminal. When I got home, I started to unpack. At the sides of the carton/pallet are two boxes with the legs. Carry them in and install the levelling feet. This leaves the bed with the headstock, tailstock and banjo attached. I removed these and took them in the shop. The headstock is managed much safer with two people (about 150#). When my neighbor and I brought in the bed, 150-175#, we put it on two steel sawhorses. This was great, because I was able to stand up each leg on the floor, slide it under the bed, and bolt it up! You may have to adjust the levellers so that the leg is tall enough that the bolts will go through and engage the threads. Then, lift one end and remove the sawhorse and repeat for the other end. At this point, the legs and bed assembly can be positioned where you want, and the headstock, tailstock and banjo can be installed on the bed! Good Luck!
 
Joined
Sep 11, 2006
Messages
1,039
Likes
138
Location
Ormond Beach FL
Website
turnedbygeorge.com
I would like to concur with some of the other posts. I picked up my new 3520 in October at the truck terminal. When I got home, I started to unpack. At the sides of the carton/pallet are two boxes with the legs. Carry them in and install the levelling feet. This leaves the bed with the headstock, tailstock and banjo attached. I removed these and took them in the shop. The headstock is managed much safer with two people (about 150#). When my neighbor and I brought in the bed, 150-175#, we put it on two steel sawhorses. This was great, because I was able to stand up each leg on the floor, slide it under the bed, and bolt it up! You may have to adjust the levellers so that the leg is tall enough that the bolts will go through and engage the threads. Then, lift one end and remove the sawhorse and repeat for the other end. At this point, the legs and bed assembly can be positioned where you want, and the headstock, tailstock and banjo can be installed on the bed! Good Luck!
I purchased my 3520A through Osolnik machinery... It came assembled and mounted on a pallet with what LOOKED like a factory box covering it (center mounted head and tail stock). I cut the bands and slid the head and tail stocks to one end, then dragged the whole thing from the light end, till I could put those feet on the ground. I then slid the H & T stocks to the end on the ground and lifted the palleted end up and rotated it off of the pallet. With the pallet out of the way, I took the headstock off and set it on a hand truck, so I could carry it to my shop.
After I delivered the headstock, I went back for the bed and legs. Same hand truck. One more trip for the outboard stand and a final trip for the other stuff I bought at the time, extra face plates and stuff...
DO NOT EVER try to take off or put on the headstock BY YOURSELF (I wish someone had told me that before I started)... I moved the whole thing by myself, without realizing how CRAZY that was. If you know how to use a hand truck, and balance things, a person COULD move the bed/legs without too much trouble, but the headstock was HEAVY!
For some reason, it never occurred to me to ask for help, but I'm smarter now.
 
Joined
Jan 27, 2005
Messages
100
Likes
0
Wait! You mean you don't use that safety shield every time you turn. :D:D
It's amazing that we're all still here!

I'd love an idea for using that shield. I'm thiiiis far from trashing it.

Any ideas?
 
Joined
Sep 11, 2006
Messages
1,039
Likes
138
Location
Ormond Beach FL
Website
turnedbygeorge.com
Wait! You mean you don't use that safety shield every time you turn. :D:D
It's amazing that we're all still here!

I'd love an idea for using that shield. I'm thiiiis far from trashing it.

Any ideas?
It SHOULD be great for growing ivy or morning glory on.
 
Joined
Nov 7, 2005
Messages
882
Likes
2
Location
Wimberley, Texas
1642's Too

Note that folks with 1642's also have that outstanding, or outsticking appendage. Just 'cause it isn't yellow doesn't make it any less useless.

Have considered making a bar thingy to fit the bracket, which would hold either clamp lamps or a tool tray. Add to long list of things I haven't gottaroundtu, yet.
 
Joined
Mar 27, 2006
Messages
19
Likes
0
Location
St. Louis, MO area
On the 1642, I put a pipe in the bracket for the safety basket and hung a big plastic exhaust hood on it suspended by shower curtain hooks. Works well.
 
Joined
Jan 27, 2005
Messages
100
Likes
0
Kurt, do I know you? You couldn't be more right, and that applies to a hundred other things in my shop!:eek:
 
Joined
Nov 1, 2005
Messages
5
Likes
0
Location
Huntsville, TX
drilled a couple of holes and attached a light to it. liked that so much i drilled a couple more holes and added a 2 foot piece of angle iron going up and mounted an AC strip and hook for my rotary power tool.
 
Joined
May 7, 2004
Messages
315
Likes
1
Location
Lincoln Hills, CA (At the foot of the Sierra Nevad
Website
jerryhallstudio.com
Bill can you post a picture of your light bar?

Then I can put it in the Mustard Monster site. I have set up a page for miscellaneous tips HERE
 
Joined
Nov 1, 2005
Messages
5
Likes
0
Location
Huntsville, TX
nothing fancy just works and its cheap.

Also including pictures of my dust hood made from angle iron and PVC .

Tool shelf idea from Kendall - it's a metal closet shelf.

All parts are from local home building or hardware store.
 

Attachments

  • Setup.jpg
    Setup.jpg
    48.9 KB · Views: 83
  • connection.jpg
    connection.jpg
    46.6 KB · Views: 82
  • dust hood.jpg
    dust hood.jpg
    70.2 KB · Views: 82
  • tool shelf.jpg
    tool shelf.jpg
    63.7 KB · Views: 82
Joined
May 7, 2004
Messages
315
Likes
1
Location
Lincoln Hills, CA (At the foot of the Sierra Nevad
Website
jerryhallstudio.com
Bill, Nice simple practical ideas..

Thanks! I like the fact that the light is so sturdily affixed and it doesn't look like it will wiggle around. Also nice that it follows your headstock along.

Not so sure about your wire shelf, it seems like all the shavings will fall thru making it entirely to easy to see what tools you have there :cool2: I will get some of those pictures on the Miscellany page.
 
Back
Top