• It's time to cast your vote in the January 2025 Turning Challenge. (click here for details)
  • Conversations are now Direct Messages (click here for details)
  • Congratulations to Alan Weinberg for "Elm Burl Bowl" being selected as Turning of the Week for January 27, 2025 (click here for details)
  • Welcome new registering member. Your username must be your real First and Last name (for example: John Doe). "Screen names" and "handles" are not allowed and your registration will be deleted if you don't use your real name. Also, do not use all caps nor all lower case.

Photogrammetry....

Joined
Dec 5, 2015
Messages
914
Likes
448
Location
Seattle, WA
Photogrammetry involves creating accurate 3D models from a series of computer processed digital photos of an object.

I've done architectural restoration, this method makes it possible to accurately duplicate a detail without having to measure or take it with me. An object up on a building could be done with a telephoto lens. The photogrammetry software uses camera calibration to determine object size.

All sorts of possibilities in the art field. Seems more and more artists are no longer doing their complete pieces, only providing a small clay model to be scanned and built up to size. 3D models can be 3D printed for investment casting. High dollar pieces could advertised with a rotatable picture for viewing from all angles.

There are hand held scanners to do this same thing, pricing a few years ago was "if you have to ask you can't afford it" category. Prices are coming down, still in the $5K to $10K area. This method only needs a digital camera or smartphone.

The first picture shows a 5" tall "turning" as an example. 40 some photos were taken in a light box by rotating the part on a turntable. If an item is too big to move it can be done by walking around it while the photos are taken.
wood turning.JPG


The photo set was uploaded to 3D Zephir software (there's a free version). My medium speed computer cranked away for half an hour, this next picture shows the result ready to export in a variety of CAD and graphic formats depending on the intended use. The computer processing time appears to go up exponentially with the number of photos. 500 photos could most of a day on a slow computer. Having an nVidia graphics processor speeds the processing up substantially.

Getting a usable photo set can be frustrating at first. The first 10 minutes of processing this photo set involved analysis to determine which ones were acceptable, a couple were rejected. You need good quality, non blurry pictures, lighting is critical. The software requires any given spot on the object to be shown in at least 3 pictures which makes overlap in the series important. Really frustrating and time wasted to have only 4 out of 60 be acceptable, BTDT, a couple too many times.

wood 3D Zephir.JPG

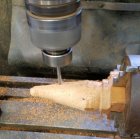
I exported the 3D model in a CAD format. This screen shot from my CAM software shows the part after "turning" on a 4 axis miling machine. The part could have been scaled in this step, bigger/smaller,taller/shorter, skinny/fatter. Or, that can be done on the machine.
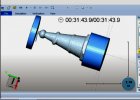
wood bobcam.jpg

If you're at all interested, give it a try. Download the software,3D Zephyr, either free or standard version for 14 day trial. There's a photo set in their first tutorial that can by used. Some of you are good photographers, you might want to make your own set.
 
Interesting.

I am presently attempting to learn Fusion 360 (steep and desperately boring learning curve), so right now it's hard for me to imagine ever wanting to do anything on a computer again :), but that photo software does sound cool.
 
Interesting but how many pieces of a given item would you need to sell to pay for all of that technology.
If you take a caliper and a tape measure to the part you can produce a drawing via CAD or the old fashion drawing board.
With the drawing in hand you start by turning the major diameter then mark off the various linear detail points and rough turn the diameters and eyeball the details in between. The photo below shows a simple method using a small square to transfer the detail points. The baluster shown was duplicated about 100 times and averaged about 30 minutes each.
SpindleTurningInProgress-2.jpg
 
Don, all of what technology? All you need to do photogrammetry is a digital camera and a computer, software is free.

Now, if you're referring to the CNC machine itself, that's no more than the typical woodturner has in his setup. (Besides, the woodturning vendors tell me the typical turner is an affluent retired guy.)

What's appealing about photogrammetry is its lack of expense. But it'll take a little creativity to find a use.
 
Mark,

Yeah, Fusion 360 is a steep curve for individuals with no former CAD experience. Most of us had 2D CAD experience prior to going to 3D. I use Fusion occasionally, only enough to do some odd operation on parts that my other CAD's don't do as well such as some filleting operations..

Fusion is a good companion to photogrammetry since it can open and manipulate files of such a wide variety.
 
I was in Louisville last May for an archery tournament. The LS plant was first on the list of places to visit. The tour is well worth it!!! If you order a custom bat, do it just before the tour and it should be ready when you finish the tour. No photos are allowed in the plant for privacy of the employees. I had my photo taken with Ronald Acuna Juniors bat and Mickey Mantle's bat. BTW, if you are into history, cross the Ohio River (not on I-65 or you will receive a bill for toll; license taken by camera), visit the museum and go down to the river at Falls of The Ohio. One island was occupied by the Lewis and Clark expedition. Loads of fossils in the rock bed.
 
John, that'a a good example where the photogrammetric process could be used. If I still had my prized bat with the crack from when I was ten years old I could take a series of pictures to make a model. Then email the CAD model file to somebody willing to turn a copy for my grandson. The model would even show where my dad burned my name into it.

The turner could load the file into his computer using free software to get all the dimensions. How cool would that be?
 
CAD? Computer? Software? That takes all the fun out of it. It was interesting to watch him. Just think, he turns all day and gets paid for it!
 
Photogrammetry involves creating accurate 3D models from a series of computer processed digital photos of an object.

I've done architectural restoration, this method makes it possible to accurately duplicate a detail without having to measure or take it with me. An object up on a building could be done with a telephoto lens. The photogrammetry software uses camera calibration to determine object size.

All sorts of possibilities in the art field. Seems more and more artists are no longer doing their complete pieces, only providing a small clay model to be scanned and built up to size. 3D models can be 3D printed for investment casting. High dollar pieces could advertised with a rotatable picture for viewing from all angles.

There are hand held scanners to do this same thing, pricing a few years ago was "if you have to ask you can't afford it" category. Prices are coming down, still in the $5K to $10K area. This method only needs a digital camera or smartphone.

The first picture shows a 5" tall "turning" as an example. 40 some photos were taken in a light box by rotating the part on a turntable. If an item is too big to move it can be done by walking around it while the photos are taken.
View attachment 30510


The photo set was uploaded to 3D Zephir software (there's a free version). My medium speed computer cranked away for half an hour, this next picture shows the result ready to export in a variety of CAD and graphic formats depending on the intended use. The computer processing time appears to go up exponentially with the number of photos. 500 photos could most of a day on a slow computer. Having an nVidia graphics processor speeds the processing up substantially.

Getting a usable photo set can be frustrating at first. The first 10 minutes of processing this photo set involved analysis to determine which ones were acceptable, a couple were rejected. You need good quality, non blurry pictures, lighting is critical. The software requires any given spot on the object to be shown in at least 3 pictures which makes overlap in the series important. Really frustrating and time wasted to have only 4 out of 60 be acceptable, BTDT, a couple too many times.

View attachment 30511

I exported the 3D model in a CAD format. This screen shot from my CAM software shows the part after "turning" on a 4 axis miling machine. The part could have been scaled in this step, bigger/smaller,taller/shorter, skinny/fatter. Or, that can be done on the machine.

View attachment 30512

If you're at all interested, give it a try. Download the software,3D Zephyr, either free or standard version for 14 day trial. There's a photo set in their first tutorial that can by used. Some of you are good photographers, you might want to make your own set.


Doug, thanks for posting this topic. I can Envision design uses and aids for my Woodturning. I was influenced by one of David Ellsworth’s early videos which teaches you to develop and turn by eye. Nevertheless, copying from an existing form or modeling such as John did using calipers and parting tools i find necessary at times. I usually draw or print from my computer an exact scale replica and storyboard from it. It’s getting to this stage is often challenging and photogrammetry I feel can assist in obtaining more accurate drawing. I don’t need 3D since I do not plan to model multi Axis forms. My question to you is: after it gets all it photos and produces a 3D model, does this software have the ability to print a scalable photo on 8..5x11 paper? . If the model is greater than 8x11 will it print banner style on multipages so that I may turn from an exact 2d drawing?
 
..................................................................after it gets all it photos and produces a 3D model, does this software have the ability to print a scalable photo on 8..5x11 paper? . If the model is greater than 8x11 will it print banner style on multipages so that I may turn from an exact 2d drawing?

Dennis, one way to print a scalable image would be under the "Export" menu click "mesh export" and specify .stl format. Googling brought up several free apps to go from .stl format to .pdf format which are scalable.

The way I did it was to use Freecad (free download). Import the .stl file and export as .pdf. Then in Adobe Acrobat Reader the .pdf image can be scaled to desired size. I assume Acrobat will print to multiple pages if needed, but I haven"t tried.
 
Doug,

Is your turntable work manual or motorized? Also, can you use a video (sequence of pics) of an object spinning on a motorized turntable?
 
Karl,

Manually rotated so far. This weekend I'm going to try setting up a small motorized machinist's rotary table with an Arduino driving a stepper motor for consistent indexing. Maybe tie in a remote shutter release too. It can be tedious having to hand rotate and a shutter time delay to eliminate camera shake. I've been shooting in a light box so no background shows in the images and it gives good lighting.

You don't want a shiny reflective surface on whatever you're shooting. Easier said than done sometimes. Suggestions have been to spray the object with clear matte finish or dust it with baby powder.

The first time I tried the process was outdoors with pictures of a shoe on a stool. Walking around the item instead of rotating it. Outdoors it has to be done so there isn't bright sunshine causing shadows, an overcast day is best.

Video works, I tried it once to see if the software would accept video. The software broke the video into a series of stills.

The ideal manual camera settings are on a tripod, 1/25 shutter, f16, ISO 200 and auto focus. I have had reasonable results hand holding the camera in fully automatic. mode.

The actual pixel size of the camera/s image is important, bigger is better. Not the amount of pixels, but the pixel size which you can find in online camera databases.
 
Here's a test of new to me photogrammetry software.

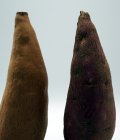
I took a series of 56 photos of a sweet potato from all angles. That's actually the ideal subject,matte finish and lots of surface detail. The photos were processed using a free, open source program called meshroom. The output was a solid model useful viewing from any angle , 3D printing or in my case making a wood model on the CNC.

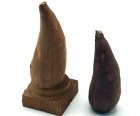
It turned out better than I expected capturing all the surface details of the potato. The photos were taken a few days ago and I forgot to put the potato in the refrigerator so it's deteriorated and shrunken slightly. The wood model shows the potatoes original shape. Here's the original and the copy.

sweet potatoes.JPG

This is the wood model being cut in the CNC with a 1/4" ball nose router bit. I used a piece of cherry that probably wasn't the best choice.

cutting wood.JPG

Next picture shows a close up comparison of the detail. All the detail of the original is possible provided the cutter is small enough. Very small cutters take forever, the 1/4" cutter was a good compromise still giving enough detail in 40 minutes to cut. No sanding was done on the wood, with only a 1 degree step of the rotary axis between cutter passes the finish is very good.

close up.JPG

The more I play with the technique the more possibilities I see. Who hasn't turned a fruit shape, but you got a smooth surface, now the actual surface detail can captured.

Since the AAW should more properly be the AAWWS, American Association ot Woodturners and Wood Sculptors (I say this because the journal seems to be getting more sculpture featured with every issue, which is fine with me). This has all sorts of application in sculpture.

The process used all free, public domain software. You do need a digital camera and a new-ish computer with a fast processor and a nVidia graphic card. The CNC I use is from my business, purchased used it was less than a new Powermatic lathe.

Sorry about the poor quality photos. The key to this process is a set of good photos, I am getting better.
 
Last edited:
Back
Top