When I started turning on my "new" 25 y/o lathe I found there was a bit of chatter, which gradually turned into an ominous juddering sound. I ruled out the motor as a source and decided to pull the spindle and replace the bearings. I thought it would be worth recounting the procedure for anyone else facing this.
I had checked for runout with a dial indicator when I bought the lathe, but I never did do that while putting a lateral load on the spindle as I couldn't feel any give when reefing on it. I was shocked when the old bearings came off to find how worn they were, with the balls as loose as a wizard's sleeve between the races. This wear is something that creeps up on you, so I would suggest that if you are sensing some chatter in your work and have an old lathe to consider replacing the bearings. This particular lathe came with an outsized outboard setup so it may well have been used for some very large work by the original owner, but I just don't know.
I spoke to Shane at Oneway, who said to get the #'s off the existing bearings and source them locally. They have changed over the years- my lathe has two sets of two bearings, but at some point they went to double row bearings at least on the inboard side. He didn't suggest any particular grade but did warn me off NTN brand for some reason, which is what my inboard set were. I took the advice of the salesman at the local Eastern Bearings shop and came away with FAG brand bearings at a cost of about $250, a bit painful but buy once, cry once.
The spindle came out without too much drama. There are threaded jacking holes in the bearing housings at each end of the headstock, and I used two of the 8mm capscrews that hold the front bell on to start pulling the shaft out of the outboard cap. I would have needed 2" long screws to jack it all the way out. Rather than take a trip to the hardware store, I drove the shaft the rest of the way out with a deadblow hammer. If I wanted to replace the drive belt I would do this with long jack screws to avoid damaging the bearings.
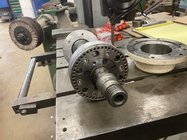
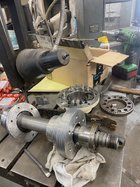
With the shaft out and held in a vise, I removed a bearing retaining ring from the outboard end which was held on by grub screws in a groove in the shaft. I unscrewed another retainer (held against the bearings' outside race) from the inside of the inboard bearing housing, then loosened the nut and castellated tension washer that hold the inside race against a shoulder on the shaft. At that point I could read the #s on both sets of bearings.
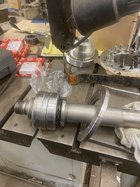
I arranged to take the shaft to a nearby metal fab shop to remove and replace the bearings. I was able to work with an experienced older gent, and they didn't even charge extra for my help. Getting the bearings off with an arbor press was fairly straightforward, but the drive pulley was a bit of a wrinkle. There were three parts plus a spacer. The indexing ring was bolted to the aluminum pulley, revealing a tapered split ring that tightens on the shaft as it is pulled into the mating taper on the stepped pulley. Like the bearing housings, it has tapped holes for 8mm jack screws which served to separate the two parts. Replacing the pulley was a bit tricky as it wanted to back off the shoulder as it tightened up. We backed off the bolts a bit, tapped the assembly home again, and when the bolts were retightened it stayed tight to its shoulder. There actually was a key recess milled in the shaft but none in the pulley, so perhaps Oneway changed to the tapered collar along the way and my machine got a shaft from an earlier run.
Bob Giroux, who has worked on all sorts of heavy machinery, was quite impressed by the overall quality of the Oneway workmanship. The one thing I was a bit skeptical of was the fit of the front bearings to their housing. The housing popped right off the bearings when I had it upside down in my vise, where I would have expected a press fit. There was no evident wear on either housing or bearings, and the new bearings were the same fit- no slop, but no interference. We used a bit of bearing retaining compound when installing them.
We were careful to photograph the parts as we went along and referred back to make sure we didn't miss anything. It took about an hour and twenty minutes in a well equipped shop with an experienced hand.
Back home, I put the shaft in the freezer and used a heat gun on the outboard housing. It still took some force to pull things together, using the screws in the inboard housing along with a cone center in the tailstock.


Last edited:
